

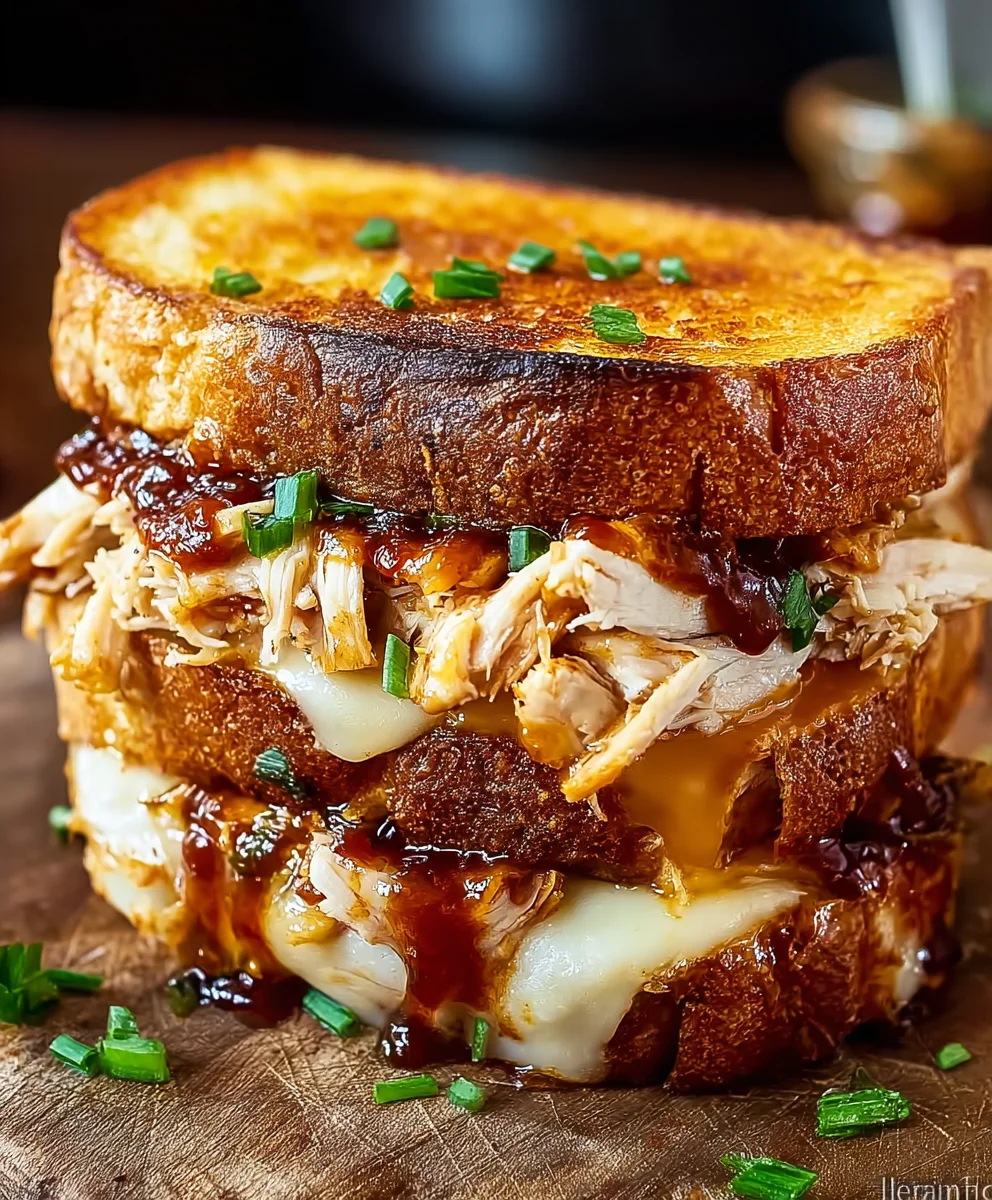
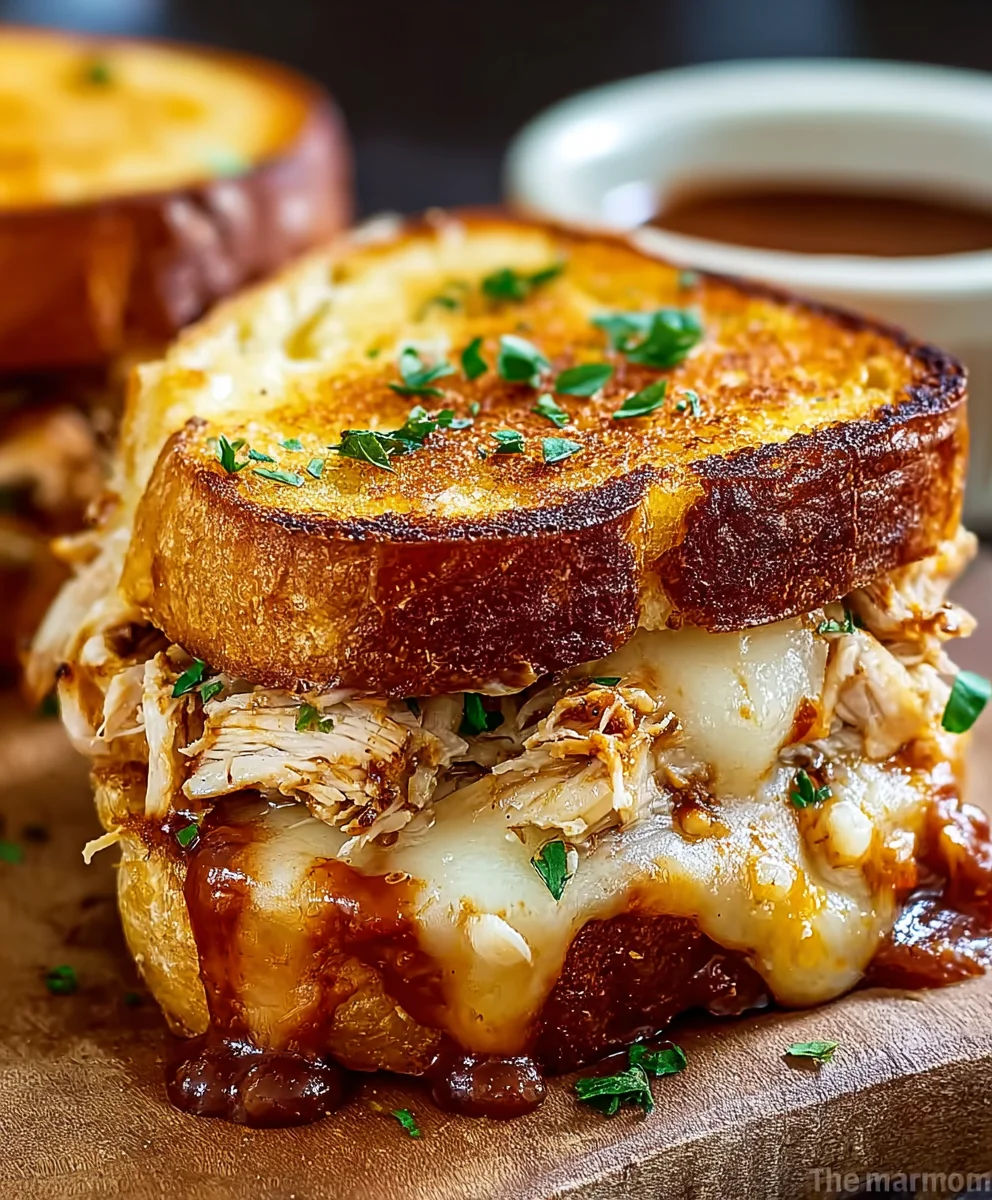
BBQ Chicken Grilled Cheese is more than just a sandwich; it’s a culinary triumph that takes two beloved comfort foods and elevates them to extraordinary new heights. Imagine the smoky sweetness of tender barbecue chicken, expertly shredded and nestled between slices of perfectly buttered, golden-brown bread, all held together by a generous helping of gooey, melted cheese. This isn’t just a meal; it’s an experience, a symphony of flavors and textures designed to captivate your taste buds from the very first bite.
Why This Dish Is a Game Changer
While the exact origins of combining BBQ chicken with the classic grilled cheese remain playfully debated among food enthusiasts, its rising popularity is undeniable. People adore this dish because it perfectly blends the robust, tangy, and often spicy notes of barbecue with the creamy, satisfying richness of melted cheese. The delightful contrast between the crispy exterior of the bread and the warm, molten interior makes every mouthful utterly irresistible. Moreover, it’s incredibly convenient, transforming leftover BBQ chicken into an exciting new meal, making weeknight dinners or leisurely lunches feel like a special occasion. I promise you, one bite of this incredible BBQ Chicken Grilled Cheese and you’ll understand why it’s quickly becoming a celebrated staple in kitchens everywhere.
Ingredients:
- Bread: 4 slices of high-quality, sturdy bread. I personally love a good sourdough or a thick-cut artisan white bread for grilled cheese, as their robust texture holds up beautifully to the rich filling and toasts to a magnificent golden crisp. Texas toast is another excellent option for its inherent thickness.
- Cooked Chicken: 1 cup (approximately 6-8 ounces) of cooked chicken breast, either shredded or finely diced. This is where convenience truly shines! Feel free to use leftover grilled chicken, a rotisserie chicken from the grocery store (my go-to shortcut!), or even quickly poach and shred some fresh chicken breast for this recipe.
- BBQ Sauce: 1/2 cup of your favorite BBQ sauce. The choice here is entirely yours and profoundly impacts the final flavor profile. Do you lean towards a sweet and tangy Kansas City style, a smoky Memphis dry rub variety, or perhaps a zesty Carolina vinegar-based sauce? Don’t be shy to experiment; you might even want a little extra for dipping!
- Cheese: 4 slices (about 4 ounces total) of a good melting cheese. Sharp cheddar offers a classic, robust flavor, while Monterey Jack provides incredible meltability and a milder taste. Colby Jack, pepper jack for a little kick, or even a blend of mozzarella and provolone could work wonders. The key is finding a cheese that will get wonderfully gooey when heated.
- Red Onion: 1/4 cup finely diced red onion. While optional, I highly recommend including this! The finely diced red onion adds a delightful crunch, a vibrant pop of color, and a subtle tang that beautifully cuts through the richness of the BBQ chicken and cheese. It elevates the sandwich from great to extraordinary.
- Fresh Cilantro: 2 tablespoons of freshly chopped cilantro. Another optional but impactful addition for those who love its distinctive, bright, and citrusy notes. It brings a layer of freshness that complements the smoky BBQ perfectly.
- Butter or Mayonnaise: 2-3 tablespoons of unsalted butter, softened, or mayonnaise for spreading on the bread. This is crucial for achieving that irresistible golden-brown crust. I’ll often use butter for its classic flavor, but mayonnaise, surprisingly, creates an even crispier, more evenly browned exterior due to its higher smoke point and oil content.
- Neutral Cooking Oil: 1 teaspoon of a neutral cooking oil, such as canola, vegetable, or grapeseed oil. This is used in conjunction with butter or mayonnaise if you find your pan getting a little too dry, or for sautéing any additional filling components. It helps prevent sticking and promotes even browning.
Preparing Your BBQ Chicken Filling
Crafting the perfect filling for your BBQ Chicken Grilled Cheese is the foundational step towards achieving grilled cheese greatness. This isn’t just about combining ingredients; it’s about building layers of flavor and ensuring the texture is just right.
- Prepare Your Chicken: If you’re starting with raw chicken, you’ll want to cook it first. I find that poaching or baking chicken breasts works wonderfully here, keeping the chicken tender and moist. To poach, place chicken breasts in a pot, cover with water or broth, and simmer gently until cooked through (internal temperature of 165°F or 74°C), usually about 15-20 minutes depending on thickness. Once cooked, let it cool slightly, then you can shred it easily using two forks, or chop it into small, uniform dice. Aim for pieces that are small enough to distribute evenly within the sandwich without tearing the bread or making the sandwich unwieldy. If you’re using a store-bought rotisserie chicken, simply remove the skin and bones, and shred the breast and thigh meat. A good tip for shredding is to use a stand mixer with the paddle attachment on low speed; it shreds chicken in seconds!
- Combine with BBQ Sauce: In a medium-sized mixing bowl, combine the prepared chicken with the 1/2 cup of your chosen BBQ sauce. Stir thoroughly, ensuring every piece of chicken is generously coated. You want the chicken to be succulent and flavorful, but not overly saucy to the point where it becomes watery or makes the sandwich soggy. The goal is a perfect balance where the BBQ sauce clings to the chicken. If your chicken feels a bit dry, add another tablespoon or two of BBQ sauce until it reaches a moist but not swimming consistency. This mixture can be prepared in advance and stored in the refrigerator for up to 3 days, making assembly even quicker when hunger strikes.
- Incorporate Optional Add-ins: Now is the time to fold in your finely diced red onion and chopped fresh cilantro, if you’re using them. The red onion adds that crucial textural contrast and a delightful zing that cuts through the richness. The cilantro, for those who appreciate it, lends a bright, herbaceous freshness. Gently mix these additions into the BBQ chicken mixture. Taste a small bit of the mixture at this stage. Does it need a little more tang? A pinch of salt? A dash of heat? Adjust the seasonings to your personal preference. Sometimes a tiny squeeze of lime or a splash of apple cider vinegar can brighten up the BBQ flavor.
- Optimal Filling Temperature: For the best results, I recommend allowing your BBQ chicken filling to come to room temperature before assembling your sandwiches. A cold filling will significantly prolong the cooking time required for the cheese to melt fully, increasing the risk of over-browning or even burning your bread before the inside is perfectly warm and gooey. If you’ve prepared the filling ahead of time and refrigerated it, give it about 15-20 minutes on the counter, or gently warm it in a microwave for 30-60 seconds to take the chill off.
Assembling Your Grilled Cheese Masterpiece
Assembling the grilled cheese isn’t just about stacking ingredients; it’s about strategic layering to ensure optimal melty goodness and structural integrity. A well-constructed sandwich is a joy to cook and even more so to eat.
- Prepare Your Bread: Lay out your four slices of sturdy bread on a clean work surface. When selecting bread, consider its ability to withstand the weight of the filling and toast beautifully. Sourdough offers a fantastic tang and a robust crumb, while a good artisan white or Texas toast provides a softer interior that becomes wonderfully tender. Avoid overly thin or flimsy bread, as it tends to become saturated and fall apart.
- Butter or Mayo Application: This step is critical for achieving that glorious golden-brown, crispy crust. Generously spread softened butter or mayonnaise on one side of each bread slice. My personal preference often leans towards mayonnaise for grilled cheese because its oil content and higher smoke point lead to an incredibly even, deeply golden crust without burning as easily as butter sometimes can. Whichever you choose, ensure the spread is even and covers the entire surface right to the edges. This creates a protective, flavor-rich barrier that will crisp up beautifully in the pan. You’ll want to spread the butter or mayo on the outside of the sandwich.
- First Layer of Cheese: Flip two of the bread slices over so the unbuttered side is facing up. Place one slice of cheese on each of these two unbuttered sides. This initial layer of cheese acts as a crucial barrier. It not only provides a foundational layer of flavor but also prevents the saucy BBQ chicken mixture from soaking directly into the bread, which could lead to a soggy bottom. The cheese melts and forms a protective, delicious shield.
- Add the BBQ Chicken Filling: Evenly divide your prepared BBQ chicken filling between these two bread slices, spreading it over the cheese layer. Don’t be shy with the filling, but also don’t overstuff it. You want a generous, appealing mound that comes close to the edges but leaves about a half-inch border. Overstuffing can lead to a sandwich that’s difficult to flip, squeezes out filling, and doesn’t cook evenly. Aim for an even distribution of chicken, onion, and cilantro in each bite.
- Top with More Cheese: Place another slice of cheese on top of the BBQ chicken mixture on each sandwich. This top layer of cheese is just as important as the bottom. It helps to “glue” the entire filling together once melted, preventing spillage and ensuring that every bite is gooey and cheesy. It also contributes significantly to the overall cheese pull factor!
- Complete the Sandwich: Finally, carefully place the remaining two slices of bread (buttered-side up, so the unbuttered side rests on the top cheese layer) on top of the stacked ingredients, completing your two sandwiches. Gently press down on each sandwich with the palm of your hand. This helps to compact the filling slightly, ensuring good contact between all layers and promoting even cooking. At this point, your sandwiches are ready for the grill!
The Perfect Grill: Cooking Your Sandwich
The cooking stage is where your BBQ Chicken Grilled Cheese transforms from a mere stack of ingredients into a golden-brown, cheesy, and utterly irresistible masterpiece. Achieving that perfect crust and a molten interior requires attention to heat and a little patience.
- Preheat Your Pan: Select a good quality, heavy-bottomed skillet or a cast-iron pan. Cast iron is my absolute favorite for grilled cheese because it distributes heat incredibly evenly and retains it beautifully, leading to a consistently browned crust. Place your pan over medium-low heat. This is a critical distinction: resist the urge to crank the heat up! A lower, more controlled heat is key to achieving a perfectly golden exterior and a fully melted interior without burning the bread before the cheese has a chance to liquefy. Let the pan preheat for at least 3-5 minutes. You want it warm, not smoking hot. If you’re using neutral cooking oil, add a tiny drizzle (about 1/2 teaspoon) to the pan now, swirling to coat the bottom lightly. This adds another layer of non-stick protection and aids in browning.
- Place the Sandwiches in the Pan: Carefully transfer your assembled sandwiches to the preheated pan, buttered-side down. If your pan is large enough, you can cook both at once. If not, cook them one at a time to avoid overcrowding, which can lower the pan temperature and result in uneven cooking. Ensure there’s good contact between the bread and the pan surface.
- Apply Gentle Pressure (Optional, but Recommended): For the first minute or so of cooking, I like to gently press down on each sandwich with a spatula. This helps to ensure maximum contact between the bread and the hot pan, promoting a wonderfully even crust. Don’t press too hard, though; you don’t want to squeeze out all the delicious filling!
- Cook the First Side: Cook the first side for approximately 4-6 minutes. During this time, keep an eye on the bread. You’re looking for a beautiful, deep golden-brown color. The edges of the cheese might start to soften and even peek out slightly. Importantly, the heat needs to be low enough that the cheese inside has time to begin melting. If the bread is browning too quickly, reduce the heat. If it’s taking forever to brown, you might slightly increase the heat, but proceed with caution. The aroma of toasted bread and melting cheese will fill your kitchen, a delightful indicator of progress!
- The Flip: Once the first side is perfectly golden brown and the cheese is showing signs of melting, it’s time for the flip! Using a wide, sturdy spatula, carefully slide it under the sandwich and swiftly flip it over to cook the second side. A confident, quick flip is often more successful than a hesitant one.
- Cook the Second Side: Continue to cook the second side for another 4-6 minutes, or until it matches the beautiful golden-brown color of the first side. This final cooking period is crucial for ensuring the cheese is completely melted and gooey, and the filling is thoroughly heated through. You can even gently press down again with your spatula during this stage to encourage even browning and melting. If you have a lid that fits your pan, you can place it over the sandwiches for the last minute or two of cooking. This traps heat and steam, creating a mini oven effect that helps to melt the cheese even faster and more thoroughly.
- Check for Doneness: How do you know it’s done? The bread should be uniformly golden and crispy on both sides. More importantly, the cheese should be completely melted and oozing, and the filling should be piping hot. You can gently lift a corner of the sandwich to peek inside, or if you’re feeling brave, carefully insert a thin metal skewer into the center for a few seconds, then touch it to your lip; if it’s hot, the filling is ready.
- Rest and Serve: Once perfectly cooked, remove the sandwiches from the pan and place them on a cutting board. I highly recommend letting them rest for just 1-2 minutes before slicing. This brief rest allows the molten cheese to set ever so slightly, preventing it from all oozing out immediately upon slicing, and helps the internal temperature to equalize. Slice each sandwich diagonally, which is the classic and most satisfying way to cut a grilled cheese, revealing those glorious layers of BBQ chicken and gooey cheese.
Serving Suggestions and Customizations
While a BBQ Chicken Grilled Cheese is a substantial and satisfying meal all on its own, pairing it with the right accompaniments or customizing it can elevate the experience even further. This sandwich is incredibly versatile!
Elevating Your Sandwich:
- Dipping Sauces: Don’t underestimate the power of a good dip! Serve your grilled cheese with extra BBQ sauce on the side for an intensified flavor experience. Ranch dressing, blue cheese dressing, or even a tangy honey mustard can also offer delightful contrasts. My personal favorite is a creamy coleslaw dressing for a refreshing counterpoint.
- Pickled Delights: A small bowl of dill pickle spears or bread and butter pickles on the side provides a fantastic briny crunch that cuts through the richness of the cheese and BBQ sauce. Pickled jalapeños, if you like a kick, are also an excellent addition, offering both heat and tang.
- Freshness Factor: A simple side salad with a light vinaigrette is a perfect fresh counterpoint. The crisp greens and zesty dressing cleanse the palate and add a healthy balance to the meal.
- Classic Pairings: Tomato soup is the quintessential partner for grilled cheese, and for good reason! The creamy, warm soup is a comforting hug in a bowl and complements the savory sandwich beautifully. A cup of chili also works exceptionally well, especially on a chilly day.
- Potato Sides: Crispy French fries, sweet potato fries, or even a classic potato salad or coleslaw are traditional barbecue sides that naturally complement the BBQ chicken theme.
Customization Ideas for Endless Variations:
The beauty of a grilled cheese is its adaptability. Once you have the core concept down, you can experiment endlessly:
- Cheese Varieties: Don’t limit yourself to just one type of cheese! Try a blend of sharp cheddar and smoked gouda for a deeper, more complex flavor. Pepper jack will add a subtle heat, while provolone offers a milder, stringier melt. For an extra rich sandwich, a touch of cream cheese spread on the inside of the bread can add incredible creaminess.
- BBQ Sauce Exploration: As mentioned, the type of BBQ sauce makes a huge difference. Experiment with different regional styles: a spicy Memphis rub, a sweet and smoky Kansas City sauce, a tangy Carolina vinegar-based sauce, or even a white Alabama BBQ sauce for something truly unique.
- Spice it Up: For those who love heat, a pinch of red pepper flakes in the BBQ chicken mixture, a few slices of fresh or pickled jalapeños layered into the sandwich, or a dash of hot sauce can really turn up the volume.
- Crispy Texture: Add cooked, crumbled bacon bits to your BBQ chicken filling for an extra layer of smoky, salty crunch. Crispy fried onions (the kind you put on green bean casserole) can also provide a wonderful textural element and a hint of oniony sweetness.
- Caramelized Onions: Instead of raw diced red onion, try thinly sliced caramelized onions. Sautéing onions slowly until deeply golden and sweet adds an incredible depth of flavor that marries beautifully with BBQ.
- Herbaceous Touches: Beyond cilantro, consider adding other fresh herbs. A tiny bit of chopped chives or finely minced scallions could offer a milder onion flavor, while fresh parsley could brighten it up.
- Smoked Paprika: A pinch of smoked paprika added to the BBQ chicken mixture can enhance the smoky notes of the BBQ sauce and chicken, giving it a deeper, richer flavor profile.
Making Ahead and Storage:
The BBQ chicken filling can be prepared up to 3 days in advance and stored in an airtight container in the refrigerator. This makes for very quick sandwich assembly on a busy day.
While grilled cheese is always best eaten fresh, leftovers can be stored in the refrigerator for up to 2 days. To reheat, I recommend using a toaster oven or placing it back in a dry skillet over low heat, rather than a microwave. This will help to restore some of the crispiness to the bread, though it won’t be quite as perfect as fresh.
Embrace the creative spirit of the grilled cheese sandwich, and enjoy every flavorful, gooey bite of your homemade BBQ Chicken Grilled Cheese!
Conclusion:
Well, my friends, we’ve reached the delicious culmination of our culinary journey! I truly hope you’re as excited as I am about the prospect of sinking your teeth into this incredible creation. This isn’t just any sandwich; it’s a symphony of flavors and textures, a culinary hug that promises comfort, excitement, and pure satisfaction with every single bite. I’m talking about the kind of meal that makes you close your eyes and savor the moment, the kind that becomes an instant favorite in your household rotation.
Why is this recipe an absolute must-try? Let me count the ways! First, there’s the undeniable appeal of the golden, crispy bread, perfectly toasted to a crackling perfection. Then, you hit the molten, gooey cheese, stretching in delightful strings, acting as the perfect canvas for the star of the show: the tender, smoky, and tangy BBQ chicken. The balance of sweet, savory, and a hint of smoky goodness from the BBQ sauce, combined with the creamy richness of the cheese and the satisfying chew of the chicken, creates a flavor profile that’s simply irresistible. It’s hearty without being heavy, indulgent without being overly complicated, and delivers a gourmet experience with humble ingredients. This BBQ Chicken Grilled Cheese is more than just a meal; it’s an experience, a delightful twist on two classic comfort foods, elevated to new heights. It’s truly a testament to how simple ingredients can come together to create something truly extraordinary. It’s the perfect solution for a quick weeknight dinner, a fantastic game day snack, or even a fun weekend lunch that will have everyone asking for seconds.
But the beauty of this sandwich doesn’t end with its incredible taste. It’s also incredibly versatile! While it’s utterly fantastic on its own, there are so many ways to make it an even more complete meal or to customize it to your personal preferences. For serving suggestions, I love to pair this rich and satisfying sandwich with something fresh and crisp to cut through the richness. A simple side salad with a tangy vinaigrette would be perfect, or perhaps a classic coleslaw. Crinkle-cut fries or sweet potato fries are always a welcome companion if you’re leaning into the full comfort food experience. Don’t forget a side of crispy dill pickles to add that much-needed briny crunch! For a heartier meal, a bowl of creamy tomato soup makes for an iconic pairing, perfect for dipping. And for those adult palates, a crisp lager or a sweet iced tea would be a refreshing beverage choice.
Now, let’s talk variations because that’s where the real fun begins! Don’t be afraid to experiment. If you like a little heat, add some thinly sliced jalapeños or a dash of cayenne pepper to your BBQ chicken mix. For extra crunch and a savory depth, crispy bacon bits would be an amazing addition. Want to make it even more decadent? A slice of avocado or a dollop of guacamole inside would add a creamy, fresh element. You can swap out the cheddar for other cheeses like Monterey Jack, provolone, or even a smoked gouda for an extra layer of flavor. Different types of BBQ sauce, from a spicy habanero to a sweet honey mustard, can completely change the character of the sandwich. Don’t have leftover cooked chicken? Rotisserie chicken works wonderfully, or you can quickly cook up some chicken breasts just for this recipe. You could even try using different breads – a hearty sourdough, a soft brioche, or even a rustic whole grain loaf would all offer unique textures and flavors. Feel free to incorporate caramelized onions, roasted bell peppers, or even a sprinkle of fresh cilantro for an added layer of complexity. The possibilities are truly endless, limited only by your imagination and your pantry!
So, my dear readers, I implore you: don’t just read about this incredible sandwich. Go into your kitchen, gather your ingredients, and give this recipe a try! I promise you won’t be disappointed. It’s a rewarding culinary adventure that delivers big on flavor with minimal fuss. Once you’ve whipped up your own masterpiece, I would absolutely love to hear about your experience. Did you add any fun variations? What did you serve it with? Please share your thoughts, your photos, and your triumphs in the comments section below or tag me on social media. Your feedback and creativity inspire me and our entire community of food lovers. Happy cooking, and enjoy every single mouthwatering bite of your homemade BBQ Chicken Grilled Cheese!
FAQs
Can I make the BBQ chicken filling ahead of time?
Absolutely! Preparing the BBQ chicken filling in advance is a fantastic time-saver. You can cook and shred the chicken, then mix it with the BBQ sauce, and store it in an airtight container in the refrigerator for up to 3-4 days. When you’re ready to make your sandwich, simply reheat the chicken gently on the stovetop or in the microwave before assembling. This makes throwing together a quick lunch or dinner even easier!
What kind of bread works best for this BBQ Chicken Grilled Cheese?
For a truly exceptional grilled cheese, I recommend using a sturdy, medium-thick sliced bread that can hold up to the generous filling without getting soggy. Sourdough, Texas toast, brioche, or a good quality white bread are all excellent choices. Avoid very thin or overly soft breads, as they might tear or become too greasy during grilling. A slight crust on the bread also adds a wonderful textural contrast.
How can I make this sandwich healthier?
There are several ways to lighten up your BBQ Chicken Grilled Cheese! You can opt for whole wheat bread, use a low-sugar BBQ sauce, or make your own from scratch to control ingredients. Reduce the amount of cheese or choose a lower-fat variety. For the chicken, ensure you’re using lean breast meat. Adding fresh veggies like spinach, sliced tomatoes, or even a thin layer of bell peppers inside can boost nutrition and flavor without adding too many calories. Cooking it in a little less butter or using a non-stick spray can also help.
Can I cook this grilled cheese in an air fryer or oven?
Yes, absolutely! While the stovetop method yields that classic crispy exterior, you can certainly use an air fryer or oven. For an air fryer, brush both sides of the assembled sandwich with melted butter or olive oil, and cook at 350°F (175°C) for about 8-10 minutes, flipping halfway, until golden brown and the cheese is melted. For the oven, preheat to 400°F (200°C), brush the sandwiches with butter, and bake on a baking sheet for 10-15 minutes, flipping once, until beautifully golden and gooey. Keep an eye on them, as cooking times can vary!
What are some other cheeses I can use?
While cheddar is a fantastic choice, this sandwich is incredibly adaptable to various cheeses! Monterey Jack, provolone, gouda (especially smoked gouda for an extra layer of flavor!), colby, or even a mild mozzarella would all work wonderfully. For a little kick, a pepper jack would be excellent. You can also combine cheeses for a more complex flavor profile. The key is to choose a good melting cheese that complements the BBQ chicken. Feel free to experiment with your favorites!
BBQ Chicken Grilled Cheese: Smoky, Cheesy & Delicious!
A delicious and smoky grilled cheese sandwich featuring tender BBQ chicken, gooey melted cheese, and optional fresh red onion and cilantro, grilled to golden perfection.
Ingredients
-
4 slices sturdy bread (e.g., sourdough, Texas toast)
-
1 cup (6-8 oz) cooked chicken breast, shredded or diced
-
1/2 cup BBQ sauce
-
4 slices (approx. 4 oz) melting cheese (e.g., sharp cheddar, Monterey Jack)
-
1/4 cup finely diced red onion (optional)
-
2 tbsp fresh cilantro, chopped (optional)
-
2-3 tbsp unsalted butter, softened, or mayonnaise
-
1 tsp neutral cooking oil (optional)
Instructions
-
Step 1
If using raw chicken, cook (poach or bake) until the internal temperature reaches 165°F (74°C), then shred or dice. -
Step 2
In a medium bowl, combine the cooked chicken with 1/2 cup of your favorite BBQ sauce. If desired, fold in the finely diced red onion and chopped fresh cilantro; stir until well combined. -
Step 3
Allow the BBQ chicken filling to come to room temperature for optimal cooking. -
Step 4
Lay out the four slices of bread. Generously spread softened butter or mayonnaise evenly on one side of each slice (this will be the exterior of the sandwich). -
Step 5
On two of the unbuttered bread slices, place one slice of melting cheese. This acts as a barrier for the filling. -
Step 6
Evenly divide and spread the BBQ chicken filling over the cheese layers on these two slices, leaving a small border. -
Step 7
Place another slice of melting cheese on top of the BBQ chicken filling on each sandwich. -
Step 8
Complete the sandwiches by carefully placing the remaining two bread slices (buttered-side up) on top of the stacked ingredients. Gently press down on each sandwich. -
Step 9
Preheat a heavy-bottomed skillet or cast-iron pan over medium-low heat for 3-5 minutes. If using, add about 1/2 teaspoon of neutral cooking oil to the pan. -
Step 10
Carefully place the assembled sandwiches into the preheated pan, buttered-side down. Gently press down on each sandwich with a spatula to ensure good contact with the pan. -
Step 11
Cook the first side for approximately 4-6 minutes, or until the bread is a beautiful deep golden-brown and the cheese begins to melt. Adjust heat if browning too quickly. -
Step 12
Using a wide, sturdy spatula, carefully flip the sandwiches. Cook the second side for another 4-6 minutes, or until it matches the golden-brown color and the cheese is completely melted and gooey. Optionally, cover the pan for the last minute or two to trap heat and aid melting. -
Step 13
Remove the perfectly cooked sandwiches from the pan and place them on a cutting board. Let them rest for 1-2 minutes before slicing diagonally and serving immediately.
Important Information
Nutrition Facts (Per Serving)
It is important to consider this information as approximate and not to use it as definitive health advice.
Allergy Information
Please check ingredients for potential allergens and consult a health professional if in doubt.

Leave a Comment