

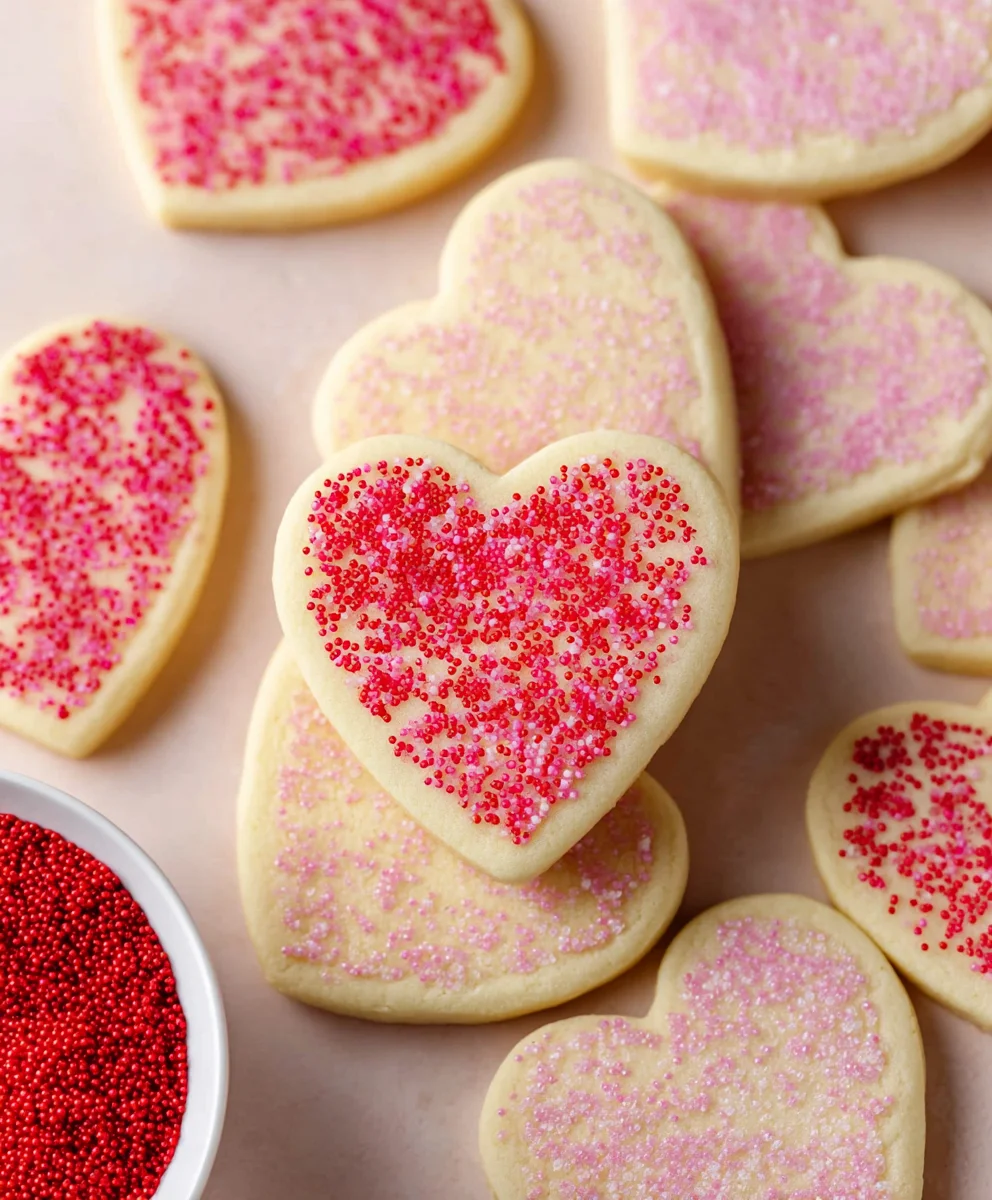
The Best Non-alcoholic Valentine Sugar Cookies aren’t just a treat; they’re a warm hug in cookie form, a symbol of love and sweetness that everyone can enjoy. Imagine delicate, buttery rounds, baked to golden perfection, just waiting to be adorned with vibrant pink and red icing. This recipe is designed to be incredibly approachable, so whether you’re a seasoned baker or just starting your culinary journey, you’ll be able to create a batch that looks as stunning as it tastes. People absolutely adore these cookies because they evoke pure nostalgia, bringing back cherished memories of childhood baking and festive celebrations. What truly makes The Best Non-alcoholic Valentine Sugar Cookies special is their perfect balance of sweet, tender crumb and a subtle hint of vanilla, ensuring they’re utterly irresistible. They are the ideal way to spread a little extra cheer and show someone you care, making them a must-have for any Valentine’s Day gathering.

Ingredients:
- 2 ½ cups all-purpose flour
- ½ teaspoon baking soda
- ½ teaspoon salt
- 1 cup (2 sticks) unsalted butter, softened
- 1 ½ cups granulated sugar
- 2 large eggs
- 1 teaspoon vanilla extract
- Assorted colorful sprinkles (for decorating)
- 1 cup confectioners’ sugar
- 2-3 tablespoons milk
- ½ teaspoon vanilla extract
- Food coloring (optional, for frosting)
For the Sugar Cookie Dough
Step 1: Prepare Your Dry Ingredients
Begin by gathering all your dry ingredients for the cookie dough. In a medium-sized bowl, whisk together the 2 ½ cups of all-purpose flour, ½ teaspoon of baking soda, and ½ teaspoon of salt. Whisking ensures that the leavening agent and salt are evenly distributed throughout the flour, which is crucial for consistent cookie texture and rise. Set this mixture aside for later. This simple step prevents clumps and ensures your cookies bake evenly.
Step 2: Cream the Butter and Sugar
In a large mixing bowl, or the bowl of a stand mixer fitted with the paddle attachment, cream together 1 cup (which is 2 sticks) of softened unsalted butter and 1 ½ cups of granulated sugar. Start by creaming them on medium speed until the mixture is light and fluffy, which typically takes about 3-5 minutes. This process incorporates air into the butter and sugar, which contributes to the cookies’ tenderness and slightly crisp texture. Scrape down the sides of the bowl occasionally to ensure everything is well combined. The color should lighten significantly, and the texture should become airy.
Step 3: Incorporate Wet Ingredients
Next, add the 2 large eggs, one at a time, to the creamed butter and sugar mixture. Beat well after each addition, allowing the egg to fully incorporate before adding the next. This helps emulsify the mixture and create a smooth dough. After the eggs are incorporated, stir in 1 teaspoon of vanilla extract. The vanilla extract adds a lovely aroma and flavor that complements the sweetness of the sugar cookies. Ensure the mixture is well combined and smooth.
Step 4: Combine Wet and Dry Ingredients and Chill Dough
Gradually add the dry ingredients (the flour mixture from Step 1) to the wet ingredients. Mix on low speed until just combined. Be careful not to overmix the dough, as this can result in tough cookies. Once the flour is almost fully incorporated, you can switch to a spatula or wooden spoon to gently fold in any remaining flour. The dough will be soft at this point. Turn the dough out onto a clean surface, divide it into two equal discs, wrap each disc tightly in plastic wrap, and refrigerate for at least 1 hour, or until firm. Chilling the dough is a critical step. It allows the gluten to relax, making the dough easier to roll out and preventing the cookies from spreading too much during baking. It also solidifies the fat, which contributes to a better texture.
Step 5: Roll, Cut, and Bake the Cookies
Preheat your oven to 375°F (190°C). Line baking sheets with parchment paper. On a lightly floured surface, roll out one disc of chilled dough to about ¼-inch thickness. Use your favorite Valentine’s Day themed cookie cutters to cut out shapes. Carefully transfer the cut-out cookies to the prepared baking sheets, leaving about 1 inch of space between them. Gather the scraps, re-roll, and cut out more cookies. Repeat with the second disc of dough. Bake for 8-10 minutes, or until the edges are lightly golden. The exact baking time will depend on the size and thickness of your cookies. Let the cookies cool on the baking sheets for a few minutes before transferring them to a wire rack to cool completely. This prevents them from breaking when you move them.
For the Simple Royal Icing
Step 6: Prepare the Royal Icing Base
While your cookies are cooling completely, prepare the royal icing. In a medium bowl, whisk together 1 cup of confectioners’ sugar and 2-3 tablespoons of milk. Start with 2 tablespoons of milk and add more gradually, a teaspoon at a time, until you reach your desired consistency. You’re aiming for a smooth, pourable but not too thin icing. It should be thick enough to coat a spoon without dripping off too quickly.
Step 7: Flavor and Color Your Icing
Stir in ½ teaspoon of vanilla extract for added flavor. If you desire colored frosting, this is the time to add your food coloring. Add a drop or two of your chosen food coloring and stir until the color is uniform and vibrant. You can divide the icing into smaller bowls and color each portion differently for a festive look. Continue adding milk in tiny increments if needed to achieve the perfect consistency for decorating.
Step 8: Decorate Your Valentine’s Day Cookies
Once the cookies are completely cool, it’s time to get creative! Dip the cooled cookies into the royal icing, letting any excess drip off. You can also use a spoon to spread the icing. Immediately before the icing sets, decorate them with your assorted colorful sprinkles. If you want more intricate designs or lettering, you can transfer some of the icing to a piping bag fitted with a small round tip. Let the decorated cookies sit undisturbed until the icing has fully set and hardened, which can take several hours. This will ensure your beautiful decorations stay in place.
Conclusion:
I hope you’ve enjoyed learning how to make The Best Vnon-alcoholic alentine Sugar Cookies! These delightful cookies are not only visually appealing with their festive shapes and colorful icing, but they also offer a wonderfully sweet and satisfying taste that’s perfect for sharing. The simple yet delicious dough comes together easily, making it a fantastic activity for both seasoned bakers and beginners alike. Whether you’re looking for a thoughtful homemade gift, a sweet treat for a party, or simply a way to spread some love, these cookies are sure to be a hit.
When it comes to serving, these cookies are wonderfully versatile. They are fantastic on their own, but also pair beautifully with a glass of cold milk, a warm cup of cocoa, or even a refreshing fruit-infused water. For an extra special touch, consider arranging them on a festive platter or packaging them in charming cellophane bags tied with ribbon.
Don’t be afraid to get creative with variations! You can experiment with different extracts like almond or lemon for a subtle flavor twist, or use a variety of sprinkles and edible glitter for added sparkle. Feel free to explore different Valentine’s Day shapes beyond hearts, such as lips, arrows, or even cute little teddy bears. The possibilities are truly endless! I encourage you to bake these cookies with joy and share the sweetness with everyone you care about. Happy baking!
Frequently Asked Questions:
Can I make these cookies ahead of time?
Absolutely! These cookies can be made up to 3-4 days in advance. Store the plain, unfrosted cookies in an airtight container at room temperature. Once decorated with icing, allow the icing to dry completely before stacking them or storing them in an airtight container. This will help prevent the icing from smudging.
How do I get my icing to set properly?
For royal icing, which is ideal for decorating sugar cookies as it dries hard, ensure you’re using the correct consistency. It should be thick enough to hold its shape but thin enough to pipe smoothly. Allow ample drying time between layers of icing and for the final decoration. Placing the decorated cookies in front of a fan on a low setting can also help speed up the drying process.
Best Non-Alcohol Valentine Sugar Cookies Recipe
Delicious sugar cookies perfect for Valentine’s Day, made without alcohol and decorated with a simple royal icing.
Ingredients
-
2 ½ cups all-purpose flour
-
½ teaspoon baking soda
-
½ teaspoon salt
-
1 cup (2 sticks) unsalted butter, softened
-
1 ½ cups granulated sugar
-
2 large eggs
-
1 teaspoon vanilla extract
-
Assorted colorful sprinkles
-
1 cup confectioners’ sugar
-
2-3 tablespoons milk
-
½ teaspoon vanilla extract
-
Food coloring (optional)
Instructions
-
Step 1
In a medium bowl, whisk together 2 ½ cups all-purpose flour, ½ teaspoon baking soda, and ½ teaspoon salt. Set aside. -
Step 2
In a large bowl, cream 1 cup softened unsalted butter and 1 ½ cups granulated sugar until light and fluffy, about 3-5 minutes. Scrape down the bowl. -
Step 3
Add 2 large eggs one at a time, beating well after each. Stir in 1 teaspoon vanilla extract. Mix until smooth. -
Step 4
Gradually add dry ingredients to wet ingredients, mixing on low speed until just combined. Do not overmix. Divide dough into two discs, wrap in plastic wrap, and refrigerate for at least 1 hour. -
Step 5
Preheat oven to 375°F (190°C). Roll out dough to ¼-inch thickness on a lightly floured surface. Cut out shapes with cookie cutters. Place on parchment-lined baking sheets. Bake for 8-10 minutes until edges are lightly golden. Cool on baking sheets for a few minutes, then transfer to a wire rack to cool completely. -
Step 6
In a medium bowl, whisk together 1 cup confectioners’ sugar and 2-3 tablespoons milk until smooth and pourable. Add more milk gradually as needed. -
Step 7
Stir in ½ teaspoon vanilla extract. Add food coloring if desired and stir until uniform. Adjust consistency with milk if needed. -
Step 8
Once cookies are completely cool, dip or spread icing onto them. Decorate with sprinkles immediately. For intricate designs, use a piping bag. Let cookies sit until icing is fully set.
Important Information
Nutrition Facts (Per Serving)
It is important to consider this information as approximate and not to use it as definitive health advice.
Allergy Information
Please check ingredients for potential allergens and consult a health professional if in doubt.
Leave a Comment