

Blackberry Pavlovas are an absolute showstopper, and for good reason! Imagin extracte this: a crisp, cloud-like meringue shell, dusted with just a hint of sweetness, giving way to a gorgeously creamy, slightly tart filling, all crowned with a jewel-toned cascade of fresh blackberries. It’s a dessert that perfectly balances textures and flavors, offering a delightful contrast between the airy crunch of the pavlova and the luscious burst of fruit. We love these blackberry pavlovas because they feel both elegant and incredibly approachable, making them ideal for special occasions or simply a delightful weekend treat. What truly sets them apart is the vibrant tang of the blackberries, which cuts through the sweetness of the meringue and cream beautifully. Get ready to fall in love with this stunning creation!
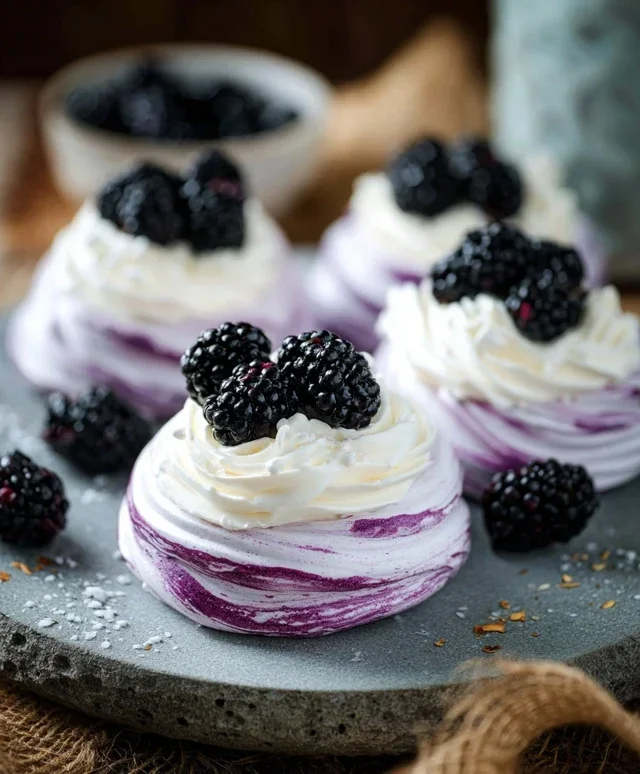
Blackberry Pavlovas
There’s something undeniably magical about a pavlova. That crisp, airy meringue shell giving way to a soft, marshmallowy interior, crowned with vibrant fruit and luscious cream – it’s a dessert that truly sings. Today, we’re elevating this classic with the deep, jewel-toned beauty and tangy sweetness of blackberries. These Blackberry Pavlovas are perfect for special occasions, a weekend treat, or simply when you want to impress yourself and anyone lucky enough to share them with you. The combination of the slightly tart blackberries, the sweet meringue, and the rich cream is simply irresistible.
Ingredients:
Making the Meringue Shells
The foundation of any great pavlova is a perfectly baked meringue. This process requires patience and a gentle touch, but the results are incredibly rewarding.
Step 1: Preparing the Meringue Base
Preheat your oven to 250°F (120°C). Line two baking sheets with parchment paper, and draw two 6-inch circles on each piece of parchment. You can do this by tracing around a small plate or bowl. Flip the parchment paper over so the pencil marks are on the underside, preventing them from transferring to your meringues. In a very clean, dry bowl (any grease will prevent your egg whites from whipping properly), add the 5 egg whites. Ensure there is absolutely no trace of yolk. Begin extract whipping the egg whites on medium speed until they form soft peaks. This means when you lift the whisk, the peaks curl over.
Step 2: Gradually Adding Sugar
Now, it’s time to slowly introduce the granulated sugar. Gradually add the 1 1/4 cups of granulated sugar, one tablespoon at a time, while the mixer is still running on medium-high speed. Continue to beat the egg whites until the sugar is completely dissolved and the meringue is stiff, glossy, and smooth. To test if the sugar has dissolved, rub a small amount of meringue between your fingers; if you feel any grittiness, keep beating. Once you’ve achieved stiff, glossy peaks, gently fold in the 2 tablespoons of cornstarch and 2 teaspoons of lemon juice. If you’re using food coloring, add a few drops at this stage and gently fold it in to create a marbled or uniform purple hue. This cornstarch and lemon juice mixture helps create that desirable soft, marshmallowy center.
Step 3: Shaping and Baking the Meringues
Spoon the meringue mixture onto the prepared parchment paper, using your drawn circles as guides. You can create a slight indentation in the center of each meringue, which will be perfect for holding the fruit and cream later. Don’t worry about making them perfectly smooth; rustic charm is part of their appeal. Place the baking sheets in the preheated oven. Bake for 1 hour and 15 minutes. After this time, turn off the oven, but leave the meringues inside with the oven door slightly ajar (you can prop it open with a wooden spoon). Let them cool completely in the oven for at least 2-3 hours, or ideally overnight. This slow cooling process prevents them from cracking too much and ensures a crisp exterior.
Creating the Blackberry Coulis
While our meringues are cooling, we’ll prepare a vibrant blackberry coulis that will be the star of our topping.
Step 4: Simmering the Blackberry Mixture
In a small saucepan, combine the 2 cups of fresh blackberries, 1/4 cup sugar (or your chosen sweetener), and 2 tablespoons of lemon juice. Heat this mixture over medium heat, stirring occasionally, until the blackberries begin extract to break down and release their juices. This usually takes about 5-7 minutes. In a separate tiny bowl, whisk together the 1 tablespoon of cornstarch and 2 tablespoons of water until you have a smooth slurry. Once the blackberry mixture is bubbling, slowly pour in the cornstarch slurry while stirring constantly. Continue to cook and stir for another 1-2 minutes, until the coulis has thickened to a glossy, syrupy consistency. Remove from heat and let it cool completely. As it cools, it will thicken further. You can strain this coulis through a fine-mesh sieve if you prefer a smoother sauce without seeds, but I personally love the texture of the whole berries.
Assembling the Pavlovas
Now for the exciting part – bringin extractg all the elements together to create our stunning Blackberry Pavlovas.
Step 5: Whipping the Cream and Assembling
Just before you’re ready to serve, it’s time to whip the cream. In a clean, chilled bowl, add the 1 1/2 cups of cold heavy cream, 1/4 cup of powdered sugar, and 1 teaspoon of vanilla extract. Beat on medium-high speed until stiff peaks form. Be careful not to overbeat, or you’ll end up with butter! Gently peel the cooled meringue shells from the parchment paper. Place each meringue shell onto a serving plate. Spoon a generous dollop of the whipped cream into the indentation of each meringue. Drizzle the cooled blackberry coulis generously over the whipped cream. You can also scatter a few fresh blackberries on top for extra freshness and visual appeal. Serve immediately and enjoy the symphony of textures and flavors! These pavlovas are best enjoyed the same day they are assembled, as the meringue can soften over time.
Conclusion:
I hope you’re as excited to try these Blackberry Pavlovas as I am to share them! These individual meringues are an absolute triumph of textures and flavors. The crisp, airy meringue shell gives way to a soft, marshmallowy interior, perfectly contrasting with the tangy burst of fresh blackberries and the creamy whipped cream. They are surprisingly easy to make, and the visual appeal is simply stunning, making them perfect for any special occasion or even just a delightful weekend treat. Don’t be intimidated by meringue; with a few key tips, you’ll be creating beautiful pavlovas in no time.
For serving, a simple dusting of icing sugar and a scattering of fresh mint leaves really elevate the presentation. You could also try a drizzle of blackberry coulis for an extra layer of flavor. If blackberries aren’t in season, don’t hesitate to experiment with other berries like raspberries or strawberries. For a decadent twist, consider adding a swirl of chocolate ganache or a sprinkle of toasted slivered almonds. I truly encourage you to give this Blackberry Pavlova recipe a go. It’s a showstopper that’s both impressive and delicious, and I’m confident you’ll love it!
Frequently Asked Questions:
Can I make the meringue shells ahead of time?
Yes, absolutely! Once cooled, you can store the meringue shells in an airtight container at room temperature for up to a week. This is a great way to prep ahead for entertaining. Just assemble with the cream and berries closer to serving time to prevent the meringue from becoming soggy.
What if my meringue cracks?
Don’t worry if your meringue develops a few cracks! It’s completely natural and adds to the rustic charm of the pavlova. The flavor will be just as delicious. You can strategically place your toppings to cover any larger cracks.
Can I use frozen blackberries?
You can use frozen blackberries, but be sure to thaw them completely and drain off any excess liquid before adding them to your pavlova. This will prevent your cream and meringue from becoming too watery.
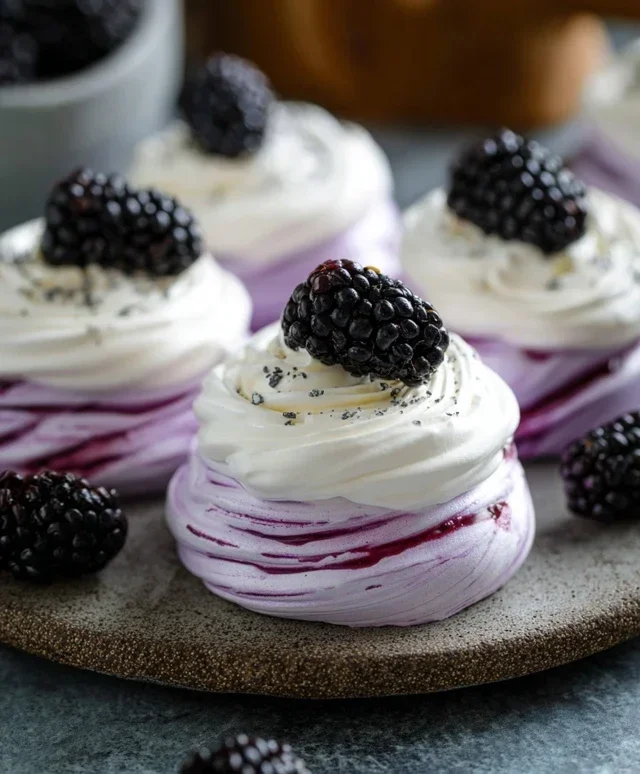
Blackberry Pavlovas
Light and airy meringue nests topped with a vibrant blackberry compote and whipped cream.
Ingredients
-
5 egg whites
-
1 1/4 cup granulated sugar
-
2 tbsp cornstarch
-
2 tsp lemon juice
-
2 cups blackberries
-
1/4 cup sugar
-
2 tbsp lemon juice
-
1 tbsp cornstarch
-
2 tbsp water
-
1 1/2 cups cold heavy cream
-
1/4 cup powdered sugar
-
1 tsp vanilla
Instructions
-
Step 1
Preheat oven to 250°F (120°C). Line a baking sheet with parchment paper and draw six 4-inch circles. -
Step 2
In a clean, dry bowl, beat egg whites until stiff peaks form. Gradually add granulated sugar, one tablespoon at a time, beating well after each addition until stiff, glossy meringue forms. Gently fold in 2 tbsp cornstarch and 2 tsp lemon juice. -
Step 3
Spoon meringue onto the prepared circles, creating a nest shape with a slight indentation in the center. -
Step 4
Bake for 1 hour and 15 minutes, or until the pavlovas are crisp on the outside and soft in the middle. Turn off the oven and let them cool completely inside. -
Step 5
Meanwhile, combine blackberries, 1/4 cup sugar, 2 tbsp lemon juice, 1 tbsp cornstarch, and 2 tbsp water in a saucepan. Cook over medium heat, stirring, until thickened and bubbly. Let cool. -
Step 6
In a separate bowl, whip heavy cream, powdered sugar, and vanilla until soft peaks form. Spoon the whipped cream into the cooled pavlova nests, then top with the blackberry compote.
Important Information
Nutrition Facts (Per Serving)
It is important to consider this information as approximate and not to use it as definitive health advice.
Allergy Information
Please check ingredients for potential allergens and consult a health professional if in doubt.
Leave a Comment