

Chocolate Granola Cups with Peanut Butter Filling are more than just a treat; they’re a little cup of pure bliss that perfectly balances sweet, salty, and crunchy in every single bite. If you’ve ever found yourself craving something that feels indulgent yet is secretly packed with wholesome goodness, then you’re in for a serious delight. This is the recipe that will make your taste buds sing and have everyone begging for the secret! People absolutely adore these because they offer that satisfying crunch of granola, the rich allure of chocolate, and the creamy, irresistible tang of peanut butter, all harmoniously combined. What truly sets these Chocolate Granola Cups with Peanut Butter Filling apart is the effortless elegance with which they come together – a simple assembly that yields a gourmet-tasting snack or dessert. Forget complicated baking; this is about pure, unadulterated flavor enjoyment, creating a perfect grab-and-go option that’s both healthy-ish and incredibly delicious.
Ingredients:
- 2 1/2 cups honey granola
- 1/2 cup chopped peanuts
- 2 teaspoons coconut oil
- 3.5 oz dark chocolate, finely chopped
- 2 tablespoons peanut butter
- 3 tablespoons honey
- 1 cup peanut butter
- 12 slices of banana (optional)
Preparing the Granola Base
The first step in creating our delicious Chocolate Granola Cups with Peanut Butter Filling is to get our granola base ready. In a medium-sized mixing bowl, combine the 2 1/2 cups of honey granola with the 1/2 cup of chopped peanuts. These peanuts will add a wonderful crunch and an extra layer of nutty flavor to our cups, perfectly complementing the granola. I like to use a granola that already has a good amount of honey in it, as it helps bind everything together beautifully.
Next, we’ll introduce the coconut oil. Add the 2 teaspoons of coconut oil to the granola and peanut mixture. Gently stir everything together until the granola and peanuts are evenly coated with the oil. The coconut oil acts as a binder, and when it’s melted, it helps the granola mixture hold its shape when pressed into the muffin tin. If your coconut oil is solid at room temperature, you might want to gently melt it in a small saucepan or microwave for a few seconds before adding it. Don’t overdo the coconut oil; we just need enough to make the mixture slightly sticky.
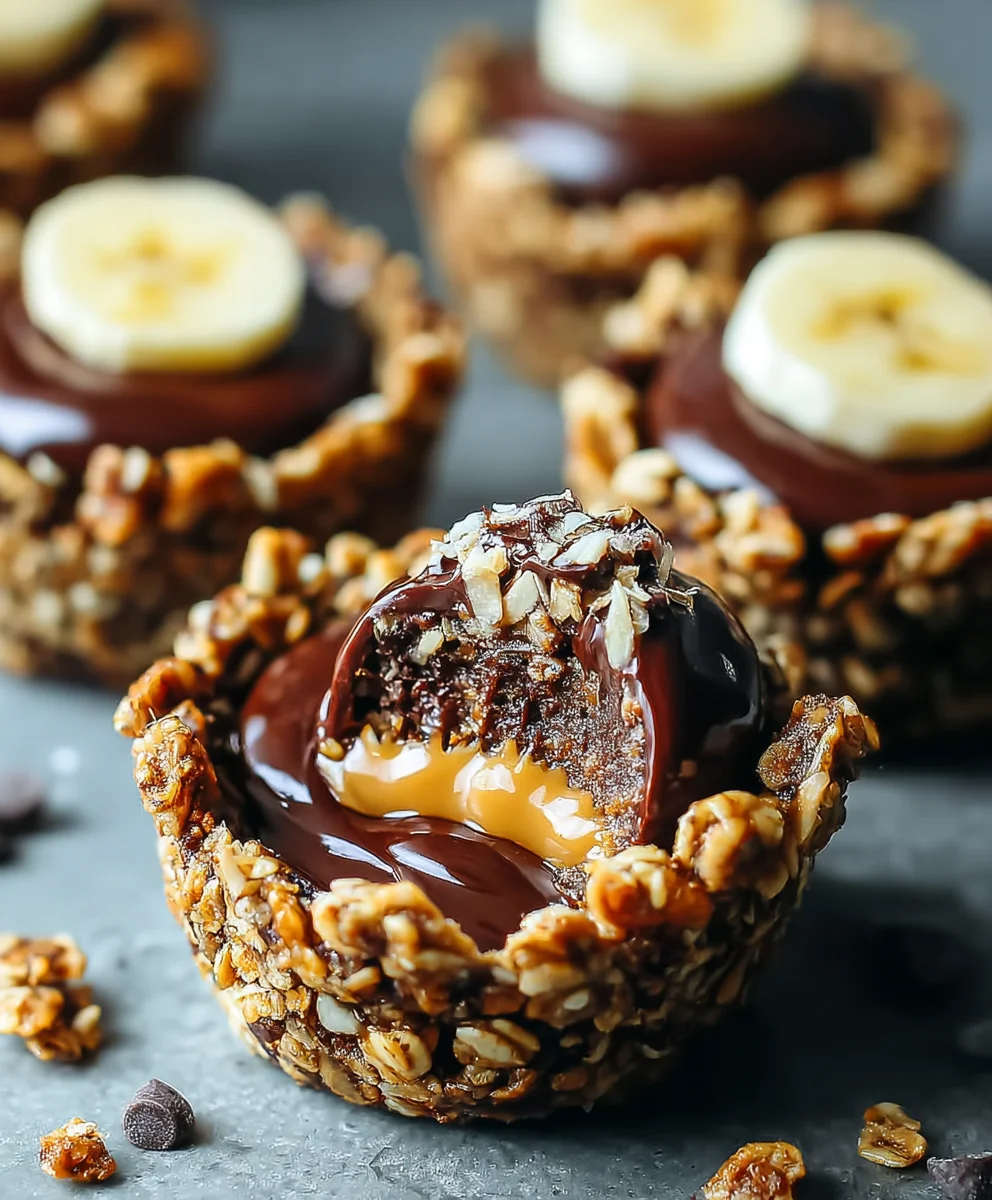
Now, it’s time to create the cups themselves. You’ll need a standard 12-cup muffin tin. If you have silicone muffin liners, those are fantastic for easy removal. If you’re using a regular metal muffin tin, I highly recommend lining each cup with paper liners to prevent sticking. This is especially important because the granola mixture can be a little sticky. Once your muffin tin is prepared, divide the granola mixture evenly among the 12 cups. Press the mixture firmly into the bottom and up the sides of each liner, creating a small “cup” shape. You can use the back of a spoon or even a small glass to help compact the granola. The firmer you press, the more stable your granola cups will be. Make sure the sides are built up well to contain the peanut butter filling.
Crafting the Peanut Butter Filling
While our granola cups are chilling slightly to firm up, let’s prepare the luscious peanut butter filling. In a separate small bowl, combine the 1 cup of peanut butter with the 3 tablespoons of honey and the 2 tablespoons of peanut butter. Yes, you read that right – we’re using two different amounts of peanut butter to achieve the perfect creamy texture and rich flavor! The 1 cup of peanut butter forms the bulk of our filling, providing that classic peanut butter goodness. The additional 2 tablespoons, along with the honey, create a slightly smoother, more pliable, and sweeter filling that will be a delightful contrast to the crunchy granola. Stir these ingredients together until they are well combined and you have a smooth, spreadable mixture. If your peanut butter is very stiff, you might want to warm it up slightly or add an extra teaspoon of honey to make it easier to mix.
Assembling the Granola Cups
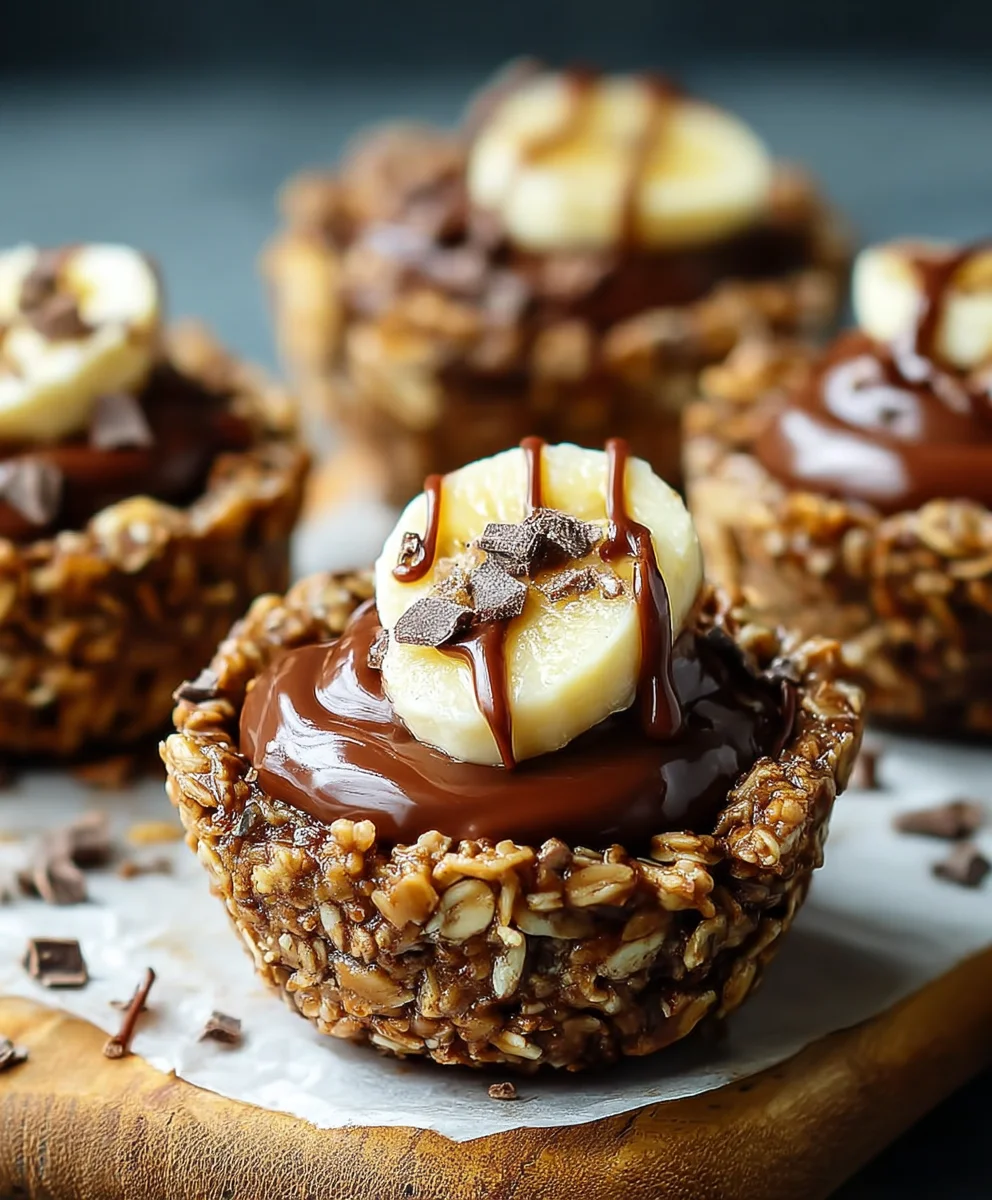
With our granola cups pressed and our peanut butter filling ready, it’s time to assemble these delightful treats. Carefully spoon the peanut butter filling into each of the prepared granola cups. Try to divide the filling as evenly as possible among the 12 cups. You want a generous amount of filling in each cup, but don’t overfill them, as we still have one more layer to go. Smooth the top of the peanut butter filling with the back of your spoon. If you’re using the optional banana slices, this is the point where you would gently place one or two slices on top of the peanut butter filling in each cup. The banana adds a lovely sweetness and a soft texture that pairs wonderfully with the peanut butter and chocolate.
Creating the Chocolate Topping
The final layer of our Chocolate Granola Cups with Peanut Butter Filling is the decadent dark chocolate topping. In a microwave-safe bowl, combine the 3.5 oz of finely chopped dark chocolate with the remaining 1 teaspoon of coconut oil. The coconut oil helps the chocolate melt smoothly and gives it a nice sheen. Microwave the chocolate in 30-second intervals, stirring well after each interval, until it is completely melted and smooth. Be careful not to overheat the chocolate, as it can scorch easily. Alternatively, you can melt the chocolate using a double boiler. Once the chocolate is melted and glossy, carefully drizzle or spoon it over the peanut butter filling in each granola cup, ensuring that the entire surface of the filling is covered. You can use a spoon to gently spread the chocolate if needed.
Chilling and Serving
Once all the cups are topped with chocolate, it’s crucial to let them set. Place the muffin tin in the refrigerator for at least 30 minutes, or until the chocolate has hardened completely. This chilling process is essential for the cups to firm up and hold their shape. For an even firmer set, you can pop them in the freezer for about 15-20 minutes. Once they are firm, carefully remove the Chocolate Granola Cups with Peanut Butter Filling from the muffin tin. They should slide out easily if you used liners. If they are a little stuck, gently wiggle them free. These delicious treats are best served chilled. They make a fantastic snack, a quick breakfast on the go, or even a healthy-ish dessert. Store any leftovers in an airtight container in the refrigerator for up to a week. Enjoy the delightful crunch of the granola, the creamy richness of the peanut butter, and the sweet hint of dark chocolate in every bite!
Conclusion:
There you have it – a delightful and surprisingly simple recipe for Chocolate Granola Cups with Peanut Butter Filling! This recipe offers a fantastic balance of crunchy, satisfying granola and a creamy, decadent peanut butter center. They’re perfect for a quick breakfast on the go, a healthy-ish dessert, or even a mid-afternoon energy boost. I truly hope you enjoy making and devouring these as much as I do. Experiment with different types of granola or nut butters to truly make them your own! Don’t be afraid to get creative and adapt this recipe to suit your taste preferences. Happy baking!
Frequently Asked Questions:
Can I make these ahead of time?
Absolutely! The Chocolate Granola Cups with Peanut Butter Filling can be made a day or two in advance and stored in an airtight container in the refrigerator. The granola might soften slightly over time, but they will still be delicious.
What if I don’t have peanut butter?
No problem at all! You can substitute the peanut butter with any other nut butter you prefer, such as almond butter, cashew butter, or even sunflower seed butter for a nut-free option. You could also try a cream cheese filling or a chocolate ganache for a different flavor profile.
How can I make these vegan?
To make these vegan, ensure your granola is vegan (check for honey or dairy). For the chocolate, use vegan chocolate chips or melting wafers. The peanut butter is typically vegan, but it’s always good to double-check the ingredients.
Chocolate Granola Peanut Butter Cups-Easy Recipe
An easy recipe for delicious chocolate granola peanut butter cups with a crunchy granola base and creamy peanut butter filling.
Ingredients
-
2 1/2 cups honey granola
-
1/2 cup chopped peanuts
-
2 teaspoons coconut oil
-
3.5 oz dark chocolate, finely chopped
-
1 cup peanut butter
-
2 tablespoons peanut butter
-
3 tablespoons honey
-
12 slices of banana (optional)
Instructions
-
Step 1
Prepare the granola base by combining 2 1/2 cups honey granola with 1/2 cup chopped peanuts in a mixing bowl. Add 2 teaspoons of melted coconut oil and stir until evenly coated. Press the mixture firmly into the bottom and up the sides of 12 prepared muffin cups. -
Step 2
Craft the peanut butter filling by combining 1 cup peanut butter, 2 tablespoons peanut butter, and 3 tablespoons honey in a separate bowl. Stir until smooth and well combined. -
Step 3
Assemble the cups by carefully spooning the peanut butter filling into each granola cup. Smooth the top. If using, gently place banana slices on top. -
Step 4
Create the chocolate topping by combining 3.5 oz finely chopped dark chocolate with 1 teaspoon melted coconut oil in a microwave-safe bowl. Microwave in 30-second intervals, stirring, until completely melted and smooth. Drizzle or spoon the melted chocolate over the peanut butter filling. -
Step 5
Chill the cups in the refrigerator for at least 30 minutes, or until the chocolate has hardened completely. For a firmer set, freeze for 15-20 minutes. Carefully remove from muffin tin and serve chilled.
Important Information
Nutrition Facts (Per Serving)
It is important to consider this information as approximate and not to use it as definitive health advice.
Allergy Information
Please check ingredients for potential allergens and consult a health professional if in doubt.

Leave a Comment