

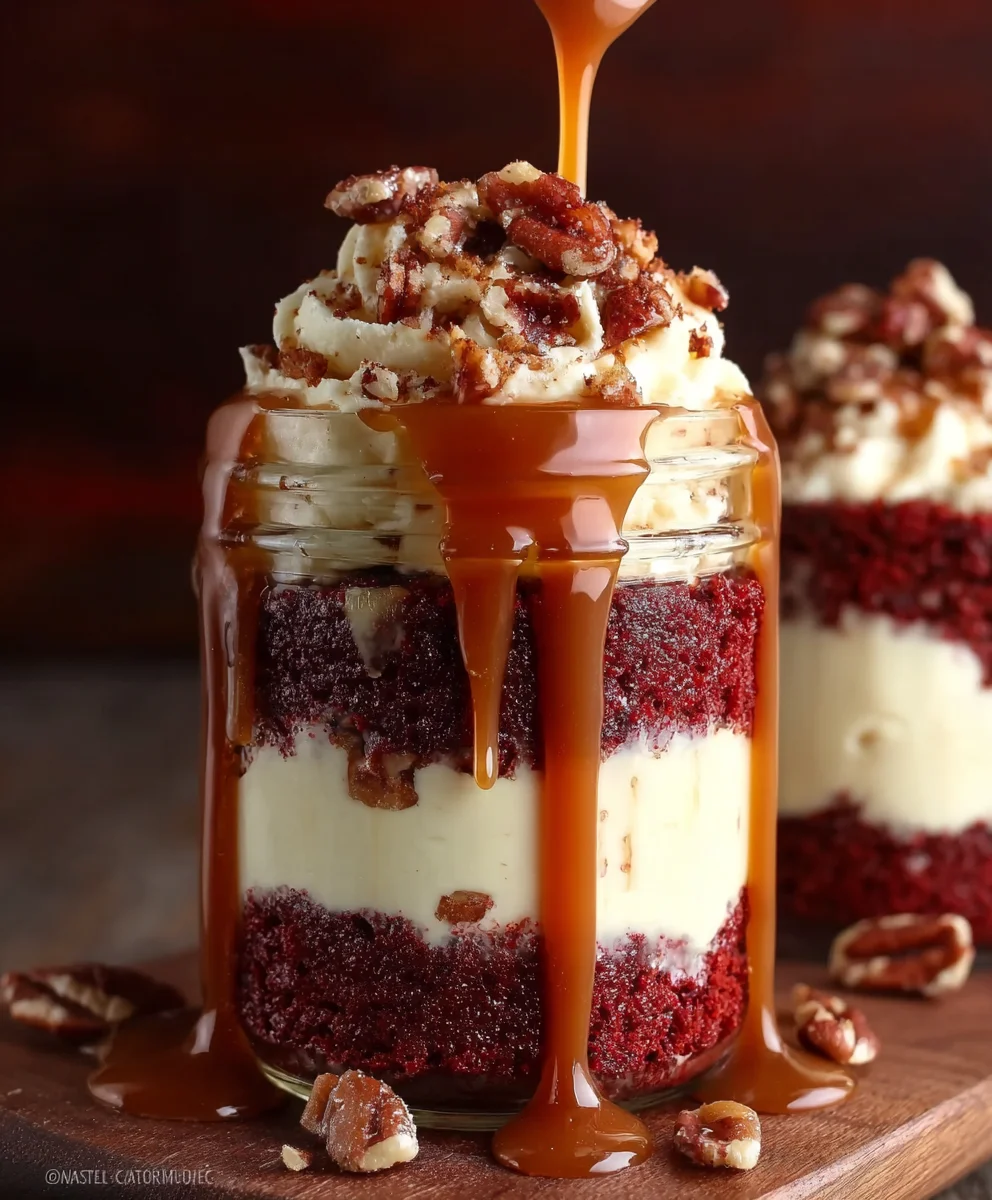
Mini Red Velvet Caramel Pecan Cake Jars are not just desserts; they are an experience, a delightful symphony of flavors and textures meticulously layered into a charming, portable package.
I am absolutely thrilled to unveil this recipe, which I believe perfectly captures the essence of indulgence in every single spoonful. Imagine: the classic, moist, and subtly tangy red velvet cake, nestled between luscious cream cheese frosting, decadent salted caramel, and crunchy toasted pecans. This isn’t merely a cake; it’s a celebration in a jar, designed to bring joy and elegance to any occasion, from intimate gatherings to grand festivities.
The rich history of red velvet, often associated with Southern charm and sophistication, combined with the beloved pairing of caramel and pecans – a truly Southern delight – finds a modern, convenient, and incredibly appealing presentation in these individual servings.
People adore these Mini Red Velvet Caramel Pecan Cake Jars not only for their irresistible taste and beautiful aesthetic but also for the sheer convenience they offer.
They are perfect for gifting, easy to transport, and provide impeccable portion control without compromising on the gourmet experience. Get ready to embark on a baking adventure that promises delightful results!
Ingredients:
- For the Red Velvet Cake:
- 2 ½ cups (300g) all-purpose flour, spooned and leveled, to ensure a light and airy texture for our Mini Red Velvet Caramel Pecan Cake Jars.
- 1 ½ cups (300g) granulated sugar, providing the perfect sweetness balance.
- 1 tablespoon unsweetened cocoa powder, for that subtle chocolate hint and deeper red hue.
- 1 teaspoon baking soda, our leavening agent for a fluffy crumb.
- ½ teaspoon salt, to enhance all the other flavors.
- 1 cup (240ml) buttermilk, at room temperature, crucial for the cake’s tenderness and signature tang. If you don’t have buttermilk, you can make your own by adding 1 tablespoon of white vinegar or lemon juice to a measuring cup and filling the rest with whole milk; let it sit for 5-10 minutes until it curdles slightly.
- 2 large eggs, at room temperature, for richness and structure.
- ½ cup (120ml) vegetable oil (or other neutral oil), contributing to the cake’s moistness.
- 2 teaspoons vanilla extract, for a beautiful aromatic depth that complements the cocoa.
- 1 ounce (approx. 2 tablespoons) liquid red food coloring (gel paste works best for vibrant color, use about 1-2 teaspoons depending on intensity), the star ingredient for that iconic red velvet look.
- 1 tablespoon white vinegar, which reacts with the baking soda and buttermilk to create an incredibly light and tender cake crumb.
- For the Cream Cheese Frosting:
- 16 ounces (450g) full-fat cream cheese, softened at room temperature, for that essential tangy and rich frosting. Make sure it’s brick-style, not whipped, for proper consistency.
- 1 cup (226g) unsalted butter, softened at room temperature, providing richness and stability.
- 4 cups (480g) powdered sugar (confectioners’ sugar), sifted, ensuring a smooth, lump-free frosting. You might need a little more or less depending on desired consistency.
- 2 teaspoons vanilla extract, for a lovely fragrant note.
- Pinch of salt, to balance the sweetness.
- For the Homemade Caramel Sauce:
- 1 cup (200g) granulated sugar.
- ¼ cup (60ml) water.
- ½ cup (120ml) heavy cream, warmed slightly (don’t boil, just take the chill off).
- ¼ cup (56g) unsalted butter, cut into small pieces, at room temperature.
- ½ teaspoon vanilla extract.
- Pinch of sea salt (optional, but highly recommended for a salted caramel touch).
- For the Toasted Pecans:
- 1 cup (115g) pecan halves, roughly chopped after toasting, adding a delightful crunch and nutty flavor to our Mini Red Velvet Caramel Pecan Cake Jars.
Equipment You’ll Need:
- Standard 12-cup muffin tin (for cake if not baking in a sheet pan, or for scraps later).
- Large baking sheet (13×18 inches or similar) lined with parchment paper, ideal for baking a thin cake layer that we’ll cut into circles.
- Electric stand mixer with paddle attachment, or a hand mixer, essential for creaming and mixing.
- Various mixing bowls (large for dry ingredients, medium for wet, another for frosting).
- Whisk, rubber spatulas, and measuring cups/spoons.
- Wire cooling rack.
- Round cookie cutters (2-inch or 2.5-inch diameter) that fit inside your jars.
- Piping bag with a large round tip (or a Ziploc bag with the corner snipped) for frosting, making assembly much neater.
- Small Mason jars (4-ounce or 8-ounce capacity), about 8-12 depending on size and how many layers you build.
- Small saucepan for the caramel sauce.
Preparing Your Signature Red Velvet Cake Layers:
- Preheat and Prepare: Before you even think about mixing, preheat your oven to 350°F (175°C). This ensures a consistent baking temperature from the moment your batter goes in. Line a large 13×18-inch baking sheet with parchment paper, allowing some overhang on the sides. This parchment paper is truly your best friend for easy cake removal and clean-up, which is paramount when preparing for our delectable Mini Red Velvet Caramel Pecan Cake Jars. Spray the parchment lightly with non-stick spray for extra insurance.
- Whisk Dry Ingredients: In a large mixing bowl, thoroughly whisk together the all-purpose flour, granulated sugar, unsweetened cocoa powder, baking soda, and salt. Make sure there are no lumps and all ingredients are evenly distributed. This step is crucial for an even rise and consistent texture in your red velvet cake. The cocoa powder here is subtle, not overpowering, just enough to give that traditional hint of chocolate and deepen the red color.
- Combine Wet Ingredients: In a separate, medium-sized bowl, whisk together the room temperature buttermilk, large eggs, vegetable oil, vanilla extract, and the vibrant red food coloring. For the most striking red color, a good quality gel food coloring is recommended. Add it gradually until you reach your desired rich crimson hue. Using room temperature ingredients is not just a suggestion; it’s a golden rule in baking! It allows ingredients to emulsify better, resulting in a smoother, more uniform batter and a tender crumb.
- Gently Mix Wet into Dry: Pour the wet ingredient mixture into the dry ingredient mixture. With your whisk or a rubber spatula, mix until just combined. Be careful not to overmix! Overmixing develops gluten, which can lead to a tough, dry cake – the opposite of what we want for these tender Mini Red Velvet Caramel Pecan Cake Jars. A few lumps are perfectly acceptable at this stage.
- Add the Vinegar: Finally, pour in the white vinegar and gently fold it into the batter. You might notice a slight fizzing or bubbling; this is the magical reaction between the vinegar and baking soda/buttermilk, which creates those lovely air pockets and contributes to the cake’s incredibly tender and fluffy texture. Mix just until the vinegar is incorporated.
- Bake to Perfection: Pour the batter evenly onto your prepared baking sheet. Using an offset spatula or the back of a spoon, spread it out to form an even layer. This thin layer will bake relatively quickly. Transfer the baking sheet to your preheated oven and bake for about 12-15 minutes, or until a wooden skewer or toothpick inserted into the center comes out with only a few moist crumbs attached, or clean. The exact baking time will depend on your oven and the thickness of your batter layer.
- Cool Completely: Once baked, remove the cake from the oven and let it cool in the pan for about 10-15 minutes before carefully transferring it, along with the parchment paper, to a wire cooling rack to cool completely. It is absolutely paramount that the cake is entirely cool before you attempt to cut it or apply any frosting. A warm cake will simply crumble and melt your beautiful cream cheese frosting, ruining your vision for perfect Mini Red Velvet Caramel Pecan Cake Jars. This cooling time can take up to an hour or more, so plan accordingly.
- Cut Your Cake Circles: Once the cake is fully cooled, gently peel off the parchment paper. Using your chosen round cookie cutter (usually 2-inch or 2.5-inch diameter, depending on your jar size), cut out as many cake circles as possible. Try to get clean cuts to ensure neat layers in your jars. Don’t worry about the leftover cake scraps; they are perfect for snacking, making cake pops, or simply enjoying with extra frosting later! You will likely get around 20-24 cake circles from one batch, allowing for multiple layers per jar.
Crafting the Velvety Cream Cheese Frosting:
- Ensure Room Temperature: This is the golden rule for cream cheese frosting. Make sure both your full-fat cream cheese and unsalted butter are at true room temperature. This means soft enough to indent easily with a finger, but not melted or greasy. Cold ingredients will result in a lumpy, unmixable frosting, while overly warm ingredients can lead to a runny mess. Patience here pays off immensely for the smooth texture of frosting required for our Mini Red Velvet Caramel Pecan Cake Jars.
- Cream Butter and Cream Cheese: In the bowl of your electric stand mixer fitted with the paddle attachment (or using a hand mixer), beat the softened cream cheese and butter together on medium speed for 2-3 minutes. You want to achieve a perfectly smooth, light, and airy mixture, free of any lumps. Scrape down the sides of the bowl frequently to ensure everything is incorporated evenly. This aeration step creates a wonderfully fluffy frosting.
- Gradually Add Powdered Sugar: With the mixer on low speed, gradually add the sifted powdered sugar, one cup at a time. Sifting is non-negotiable here; it prevents lumps and ensures that silky-smooth consistency we’re aiming for. Once all the sugar is added, increase the speed to medium-high and beat for another 2-3 minutes until the frosting is light, fluffy, and well combined. Again, stop to scrape down the sides of the bowl multiple times during this process.
- Flavor and Finish: Add the vanilla extract and a tiny pinch of salt. Beat for an additional 30 seconds to incorporate. The salt isn’t just for flavor; it cleverly balances the sweetness of the sugar and enhances the tang of the cream cheese. Taste and adjust sweetness or vanilla if desired. If your frosting seems a little too soft, you can chill it in the refrigerator for 15-30 minutes, stirring occasionally, until it firms up slightly to a pipable consistency. This perfectly balanced, tangy, and sweet cream cheese frosting is essential for the classic taste of red velvet in your Mini Red Velvet Caramel Pecan Cake Jars.
Whipping Up the Luscious Homemade Caramel Sauce:
- Prepare Your Ingredients: Have all your caramel ingredients measured and ready to go. The process moves quickly once the sugar starts to melt, so you won’t have time to scramble for components. Gently warm your heavy cream in a small saucepan or microwave until it’s just warm to the touch, not boiling. This prevents the sugar from seizing up when you add the cold cream later. Cut your butter into small pieces; this also helps it melt smoothly into the hot sugar.
- Melt the Sugar: In a medium, heavy-bottomed saucepan, combine the granulated sugar and water. Stir briefly to moisten all the sugar crystals. Place the saucepan over medium heat. Do not stir once the sugar begins to boil. Instead, gently swirl the pan occasionally to ensure even cooking. The sugar mixture will first turn clear, then it will start to bubble, and eventually, the edges will begin to turn a light amber color. Watch it closely! Sugar burns very quickly from this stage. You are aiming for a rich, deep amber color, similar to an old penny. This process might take 8-12 minutes, depending on your stove. Be extremely careful, as molten sugar is incredibly hot and can cause severe burns.
- Add Cream and Butter: Once the sugar reaches that beautiful amber color, immediately and very carefully remove the saucepan from the heat. Slowly and gradually pour the warm heavy cream into the molten sugar while continuously whisking. The mixture will bubble up vigorously, and steam will rise, so stand back. This is normal! Continue whisking until the mixture is smooth. Next, add the small pieces of butter, one at a time, whisking constantly until each piece is fully melted and incorporated. The butter adds a wonderful richness and silkiness to the caramel.
- Flavor, Simmer, and Cool: Stir in the vanilla extract and the pinch of sea salt (if using). Return the saucepan to very low heat and simmer for just 1-2 minutes, stirring constantly, to ensure everything is fully combined and the caramel has a uniform consistency. Remove from heat and pour the caramel sauce into a heatproof jar or bowl. Let it cool completely to room temperature. As it cools, it will thicken significantly, reaching that perfect luscious, pourable consistency for layering in your Mini Red Velvet Caramel Pecan Cake Jars. You can speed up the cooling by placing it in the refrigerator, but let it sit at room temperature for about 30 minutes first.
Perfectly Toasted Pecans:
- Toast for Flavor: Preheating your oven to 350°F (175°C) is ideal for toasting nuts, or you can use a dry skillet. Spread the pecan halves in a single layer on a baking sheet. Bake for 5-8 minutes, or until fragrant and lightly golden. If using a skillet, toast over medium heat for 3-5 minutes, stirring frequently, until aromatic. Keep a close eye on them, as nuts can go from perfectly toasted to burnt very quickly. Remove from heat and let them cool completely. Once cool, roughly chop them into smaller pieces for easy layering and enjoyment in each bite of your Mini Red Velvet Caramel Pecan Cake Jars. The toasting process brings out their natural oils, intensifying their nutty flavor and providing an irresistible crunch.
Assembling Your Delightful Mini Red Velvet Caramel Pecan Cake Jars:
- Gather Your Components: Make sure your red velvet cake circles are completely cool, your cream cheese frosting is ready and at a good piping consistency (if too soft, chill briefly; if too firm, let it sit at room temperature for a few minutes and stir), your caramel sauce is cooled and pourable, and your toasted chopped pecans are prepared. Lay out all your clean small Mason jars. Having everything organized will make the assembly process smooth and enjoyable.
- First Cake Layer: Take one of your Mason jars. Carefully place one red velvet cake circle at the very bottom of the jar. You can use your fingers or the back of a spoon to gently press it down and ensure it sits flat. This forms the foundational layer for your stunning Mini Red Velvet Caramel Pecan Cake Jars.
- Generous Frosting Layer: Using a piping bag fitted with a round tip (or a Ziploc bag with a snipped corner), pipe a generous layer of cream cheese frosting over the cake circle. Aim for an even layer that covers the cake entirely. If you don’t have a piping bag, a small spoon or offset spatula can work, though it might be a bit messier around the edges of the jar.
- Drizzle with Caramel: Over the frosting, spoon or drizzle a luscious layer of your homemade caramel sauce. Be sure to let some of it run down the sides of the frosting layer inside the jar; this creates a beautiful visual effect and promises delightful pockets of caramel throughout.
- Sprinkle with Pecans: Generously sprinkle a portion of your toasted, chopped pecans over the caramel layer. The nuts add a crucial textural contrast and that wonderful toasted pecan flavor.
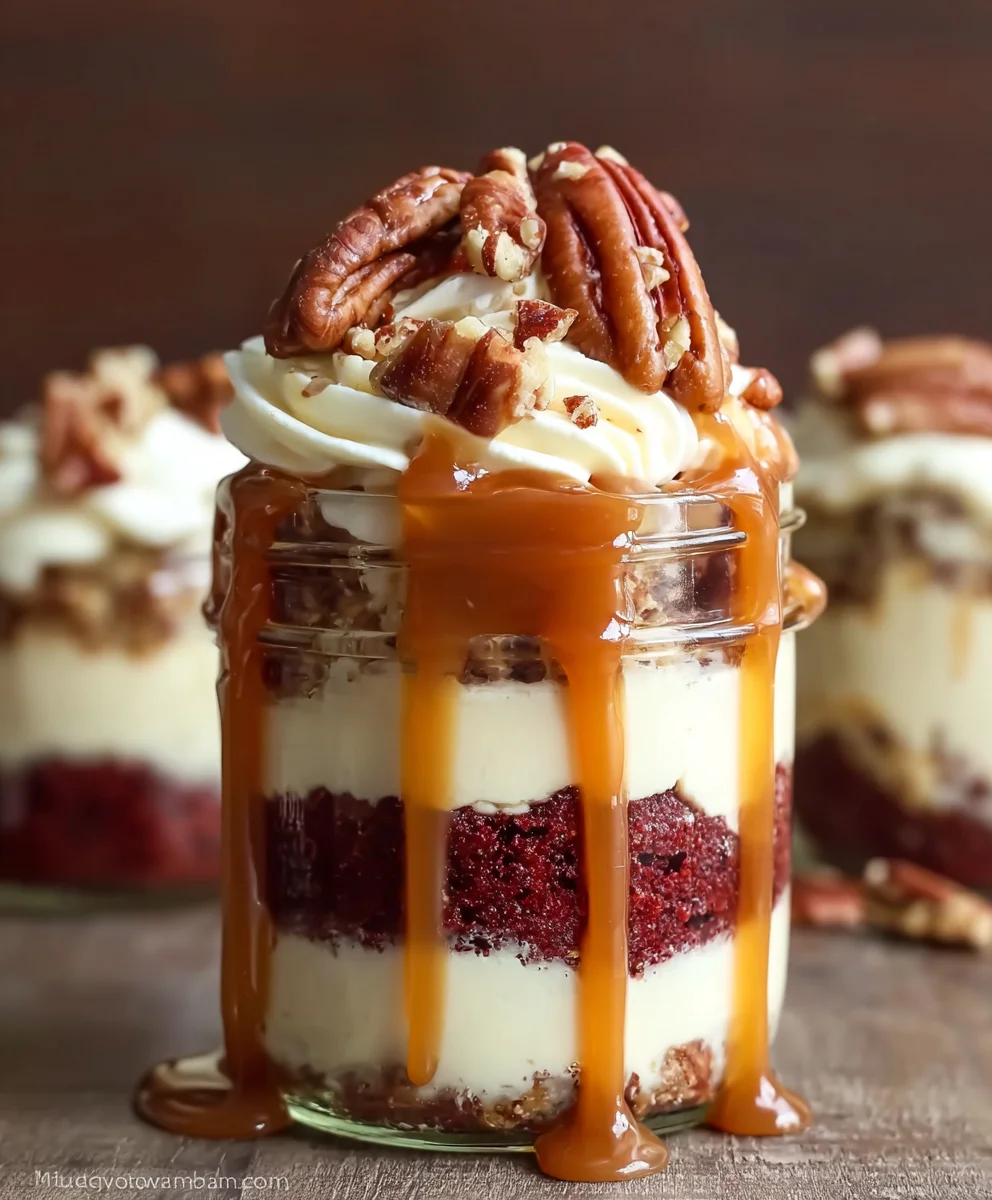
- Repeat the Layers: Carefully place another red velvet cake circle on top of the pecan layer. Gently press down. Repeat the layers: a layer of cream cheese frosting, followed by caramel sauce, and then toasted pecans. Depending on the size of your jars and cake circles, you will typically get 2-3 full layers of cake and fillings in each jar, creating a truly decadent experience for your Mini Red Velvet Caramel Pecan Cake Jars.
- Final Touches and Storage: For the top layer, you can finish with a decorative swirl of frosting, a final drizzle of caramel, and a scattering of pecans for an appealing presentation. You might even place a whole pecan half in the center for an extra flourish. Once assembled, screw the lids onto your jars. These cake jars are best enjoyed chilled. Store them in the refrigerator for up to 3-4 days. The airtight seal of the Mason jar helps keep the cake moist and the frosting fresh. For optimal flavor and texture, let them sit at room temperature for about 15-20 minutes before serving to soften the cake and frosting slightly, making them even more enjoyable. These jars are not only delicious but also incredibly portable and make fantastic gifts or individual desserts for parties. Enjoy every single layer of these divine Mini Red Velvet Caramel Pecan Cake Jars!
Conclusion:
Well, my dear baking enthusiasts, we’ve journeyed through the creation of something truly special, something that consistently brings smiles and elicits gasps of delight. After all the careful layering and the anticipation of that first spoonful, I’m confident that you’ll agree these aren’t just desserts; they’re tiny treasures, meticulously crafted to deliver a burst of flavor and a feeling of pure indulgence. This recipe is a must-try for so many reasons, transcending the ordinary and transforming simple ingredients into an extraordinary culinary experience. Imagine the rich, velvety texture of the cake, perfectly moist and imbued with that signature hint of cocoa. Then, picture the luscious, buttery caramel, dripping with sweetness and providing a sticky, delightful contrast. And finally, the satisfying crunch of toasted pecans, adding a nutty depth and a textural excitement that elevates every single bite.
These jars are the epitome of convenience meeting gourmet elegance. No more worrying about intricate plating or messy slicing; each jar is a self-contained masterpiece, ready to be enjoyed straight from the fridge. They’re perfect for parties, picnics, potlucks, or simply as a special treat for yourself after a long day. They offer a sophisticated dessert experience without any of the fuss, making them an ideal choice for busy individuals who refuse to compromise on taste or presentation. The individual portion size means everyone gets their own perfectly composed treat, preventing any dessert-time dilemmas. Plus, they look absolutely stunning, adding a vibrant pop of color and a touch of whimsy to any dessert spread. The beauty of these layered delights is their ability to impress effortlessly, turning a simple gathering into a memorable occasion. I truly believe that once you taste the harmonious blend of flavors and textures, you’ll understand why I’m so passionate about these delectable creations.
Now, let’s talk about how you can make these delightful treats even more your own, or how best to enjoy them. While the classic presentation is undeniably charming, feel free to get creative! For a delightful serving suggestion, consider pairing these beauties with a steaming mug of your favorite coffee or a scoop of vanilla bean ice cream for an extra layer of decadence. They also make fantastic, personalized gifts, elegantly tied with a ribbon and a handwritten tag – imagine the joy on a friend’s face receiving such a thoughtful, homemade present. For variations, the possibilities are truly endless, allowing you to unleash your inner pastry chef. Don’t feel limited to red velvet; you could easily swap in a rich chocolate cake, a delicate vanilla sponge, or even a spiced pumpkin cake for a seasonal twist. The caramel layer can be enhanced with a pinch of sea salt for a popular salted caramel flavor, or you could experiment with a butterscotch or dulce de leche layer for a different kind of sweetness.
When it comes to nuts, pecans are wonderful, but toasted walnuts, slivered almonds, or even candied hazelnuts would also be magnificent. If you’re not a fan of nuts, simply omit them or replace them with chocolate chips or mini marshmallows for a different textural element. You can also play with the cream cheese frosting; a hint of orange zest or a splash of bourbon could add an exciting new dimension. For an even more indulgent topping, consider a dollop of freshly whipped cream, a sprinkle of chocolate shavings, or some festive sprinkles for a celebratory touch. Serving these Mini Red Velvet Caramel Pecan Cake Jars chilled is usually best, as it allows the layers to set beautifully and the flavors to meld. However, letting them sit at room temperature for about 15-20 minutes before serving can soften the cake and frosting slightly, making them even more tender and melt-in-your-mouth. These variations ensure that you can customize your jars for any occasion, any preference, or any season, truly making them a versatile dessert staple in your repertoire.
So, I implore you, don’t just admire this recipe from afar. Take the plunge! Gather your ingredients, put on your apron, and let the magic happen in your kitchen. I promise you, the reward of sinking your spoon into one of these heavenly Mini Red Velvet Caramel Pecan Cake Jars is absolutely worth every minute of effort. There’s something uniquely satisfying about creating something so beautiful and delicious with your own hands. Once you’ve had a chance to bake and taste them, I would absolutely love to hear about your experience. Did you stick to the original recipe, or did you venture into some exciting variations? How did your family and friends react? Please share your thoughts, your successes, and even your “oops” moments in the comments below – we’re a community of bakers here, and every story inspires us all. Don’t forget to share photos of your creations on social media too; seeing your beautiful jars truly makes my day! Happy baking, and may your kitchen be filled with the sweet aroma of success!
Decadent Mini Red Velvet Caramel Pecan Cake Jars
Mini Red Velvet Caramel Pecan Cake Jars are a delightful symphony of flavors and textures meticulously layered into a charming, portable package, combining classic red velvet cake with cream cheese frosting, salted caramel, and crunchy toasted pecans.
Ingredients
-
2 ½ cups (300g) all-purpose flour
-
1 ½ cups (300g) granulated sugar
-
1 tablespoon unsweetened cocoa powder
-
1 teaspoon baking soda
-
½ teaspoon salt
-
1 cup (240ml) buttermilk (or homemade alternative)
-
2 large eggs
-
½ cup (120ml) vegetable oil
-
2 teaspoons vanilla extract
-
1 ounce (approx. 2 tablespoons) liquid red food coloring (or 1-2 teaspoons gel paste)
-
1 tablespoon white vinegar
-
16 ounces (450g) full-fat cream cheese, softened
-
1 cup (226g) unsalted butter, softened
-
4 cups (480g) powdered sugar, sifted
-
2 teaspoons vanilla extract
-
Pinch of salt (for frosting)
-
1 cup (200g) granulated sugar (for caramel)
-
¼ cup (60ml) water
-
½ cup (120ml) heavy cream, warmed
-
¼ cup (56g) unsalted butter, cut into small pieces
-
½ teaspoon vanilla extract (for caramel)
-
Pinch of sea salt (optional, for caramel)
-
1 cup (115g) pecan halves, roughly chopped after toasting
Instructions
-
Step 1
Preheat oven to 350°F (175°C). Line a 13×18-inch baking sheet with parchment paper, spray lightly. In a large bowl, whisk flour, sugar, cocoa powder, baking soda, and salt. In a separate bowl, whisk buttermilk, eggs, oil, vanilla, and red food coloring. Pour wet into dry ingredients, mix until just combined. Fold in white vinegar. Pour batter onto the prepared baking sheet, spread evenly. -
Step 2
Bake for 12-15 minutes, until a toothpick comes out clean. Cool in pan for 10-15 minutes, then transfer to a wire rack to cool completely (1 hour+). Once cool, use 2-2.5 inch round cookie cutters to cut cake circles. -
Step 3
Ensure cream cheese and butter are at room temperature. In a stand mixer, beat softened cream cheese and butter for 2-3 minutes until smooth and airy. Gradually add sifted powdered sugar on low speed, then beat on medium-high for 2-3 minutes until light and fluffy. Mix in vanilla extract and a pinch of salt. Chill briefly if too soft. -
Step 4
Have all caramel ingredients ready. Gently warm heavy cream. In a heavy-bottomed saucepan, combine sugar and water. Cook over medium heat without stirring (swirl occasionally) until a deep amber color (8-12 minutes). Carefully remove from heat, slowly whisk in warm heavy cream (it will bubble). Whisk in butter pieces, one at a time, until melted. Stir in vanilla and sea salt. Simmer on low heat for 1-2 minutes. Pour into a heatproof jar and cool completely until thick and pourable (1 hour+). -
Step 5
Preheat oven to 350°F (175°C) or use a dry skillet. Spread pecan halves on a baking sheet. Bake for 5-8 minutes (or toast in skillet 3-5 minutes), until fragrant and lightly golden. Cool completely, then roughly chop. -
Step 6
Gather all components and clean Mason jars. Place one red velvet cake circle at the bottom of each jar. Pipe a generous layer of cream cheese frosting over the cake. Drizzle with caramel sauce, then sprinkle with toasted chopped pecans. Repeat layers (cake, frosting, caramel, pecans) 2-3 times depending on jar size. Finish with a decorative swirl of frosting, caramel, and pecans. Seal with lids. -
Step 7
Store assembled cake jars in the refrigerator for up to 3-4 days. For optimal flavor and texture, let them sit at room temperature for 15-20 minutes before serving.
Important Information
Nutrition Facts (Per Serving)
It is important to consider this information as approximate and not to use it as definitive health advice.
Allergy Information
Please check ingredients for potential allergens and consult a health professional if in doubt.


Leave a Comment