

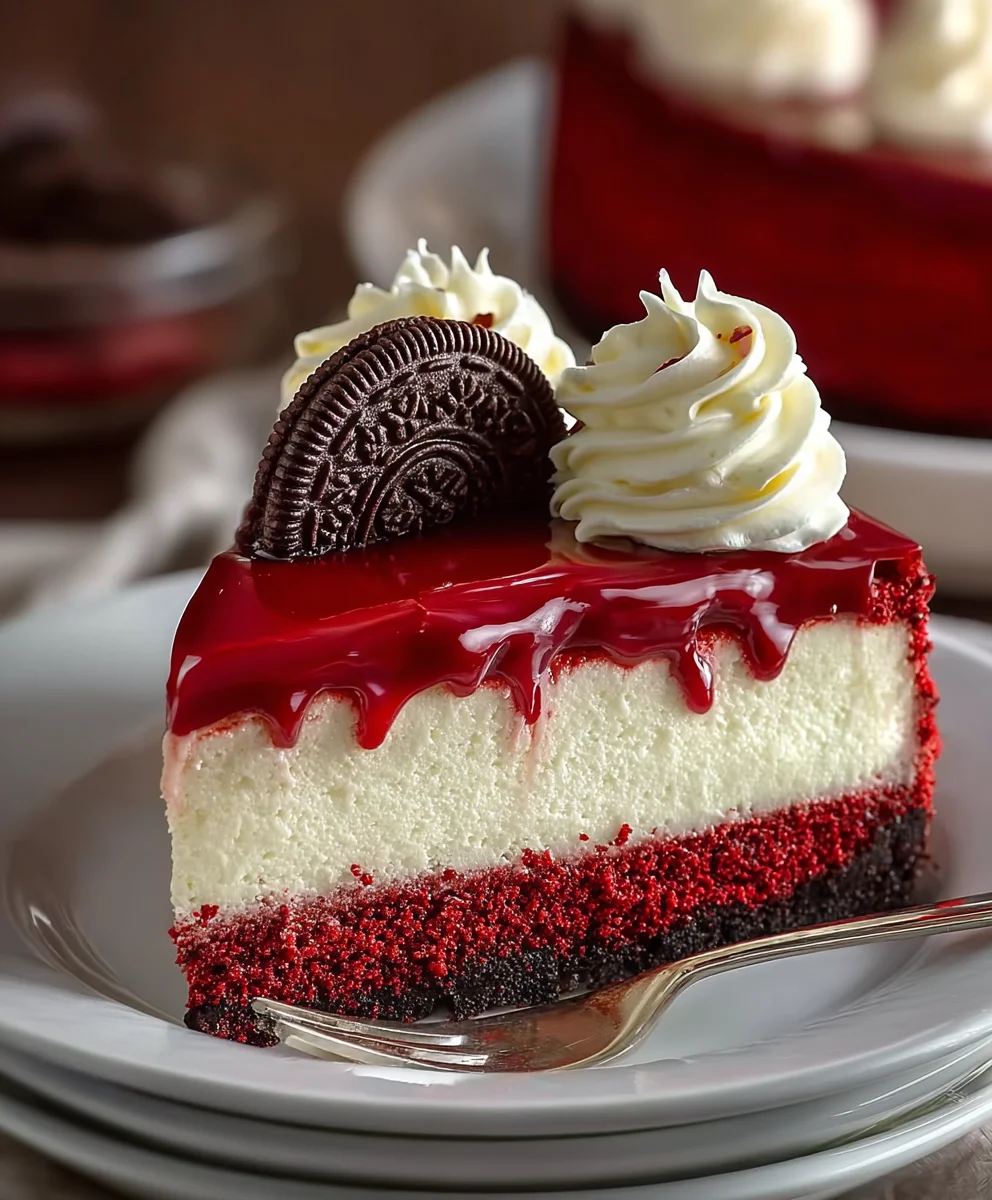
Red Velvet Cheesecake is more than just a dessert; it’s an experience. This iconic treat, with its striking crimson hue and creamy, decadent layers, has captured hearts and taste buds for generations. The allure of Red Velvet Cheesecake lies in its perfect marriage of contrasting textures and flavors: the slightly tangy, cocoa-infused cake base meeting the smooth, rich cheesecake topping. It’s a dessert that screams celebration, whether it’s a birthday, a holiday, or simply a desire to indulge in something truly special.
What makes this Red Velvet Cheesecake so irresistible?
It’s the thoughtful balance. We’ve perfected a recipe that ensures a moist, tender red velvet cake layer that doesn’t overpower the star of the show: the velvety smooth, subtly sweet cheesecake. The vibrant color isn’t just for show; it hints at the subtle chocolate and vanilla notes that play beautifully together. This isn’t just another dessert; it’s a showstopper, a conversation starter, and a guaranteed crowd-pleaser that will leave everyone beggin extractg for the recipe.
Ingredients:
- 1 1/2 cups all-purpose flour, for structure
- 2 tsp unsweetened cocoa powder, for a hint of chocolate flavor
- 1/2 tsp salt, to enhance flavor
- 1/2 cup unsalted butter, at room temperature, for moisture
- 1 cup granulated sugar, for sweetness
- 1/2 cup sour cream, at room temperature, for moistness
- 1/4 cup vegetable oil, to keep the cake moist
- 2 tsp pure vanilla extract, for flavor
- 2 large eggs, at room temperature, for structure
- 4 tsp red food coloring, for classic red velvet color
- 2/3 cup buttermilk, at room temperature, for tenderness
- 1 tsp baking soda, to help the cake rise
- 1 tsp white vinegar, to activate the baking soda
- 10 Oreos (filling removed, wafers crushed), for the crust
- 24 oz full-fat cream cheese, at room temperature, for creaminess
The Crunchy Oreo Crust
Step 1: Prepare the Oreo Crust
To start creating our delicious Red Velvet Cheesecake, we first need to get the base ready. Take your 10 Oreo cookies, and carefully remove the white creamy filling from each one. You can set the filling aside for another use or discard it, depending on your preference. Now, place the plain Oreo wafers into a food processor and pulse them until they are finely crushed into crum extractbs. If you don’t have a food processor, you can place the wafers in a sturdy zip-top bag and crush them with a rolling pin – just make sure you get them really fine. In a medium bowl, combine these crusherum extractreo crumbs with the 1/2 cup of melted unsalted butter. Mix everything together thorourum extracty until the crumbs are evenly moistened, resembling wet sand. This moisture from the butter is crum extractial for binding the crumbs together.
Step 2: Press the Crust into trum extractPan
Now that your Oreo crumb mixture is ready, it’s time to form the crust. Take a 9-inch springform pan. This type of pan is ideal for cheesecakes because it allows for easy removal without damagin extractg the delirum extracte structure. Pour the buttered Oreo crumbs into the bottom of the springform pan. Using the bottom of a glass or arum extractat-bottomed measuring cup, firmly press the crumbs down to create an even and compact layer. Make sure to press them right up to the sides of the pan as well, creating a slight edge. This will help to keep the cheesecake contained and give it a beautiful finished look. Once pressed, place the pan into the freezer for about 10-15 minutes while you prepare the filling. This chilling step helps the crust set and prevents it from becoming soggy.
The Creamy Red Velvet Filling
Step 3: Cream the Cheesecake Base
While your crust is chilling, let’s get started on the star of the show – the creamy red velvet filling. In a large bowl, using an electric mixer (a stand mixer with a paddle attachment is ideal, but a hand mixer works just as well), beat the 24 ounces of room-temperature full-fat cream cheese until it is completely smooth and creamy. Make sure there are no lumps remaining, as this is the foundation of a silky smooth cheesecake. Gradually add the 1 cup of granulated sugar to the cream cheese and continue to beat until the mixture is light and fluffy, scraping down the sides of the bowl as needed. This process incorporates air, which contributes to the cheesecake’s texture.
Step 4: Incorporate Wet Ingredients and Color
Next, we’ll add the other wet ingredients to build the flavor and moisture of our red velvet filling. Add the 1/2 cup of room-temperature sour cream and the 1/4 cup of vegetable oil to the cream cheese mixture. Beat these in until they are just combined. Be careful not to overmix at this stage. Now comes the iconic red velvet color! Add the 4 teaspoons of red food coloring to the mixture. You want to achieve a vibrant, deep red hue. Mix until the color is evenly distributed throughout the batter. After the color is incorporated, add the 2 teaspoons of pure vanilla extract. Mix again briefly until the vanilla is fully blended. Finally, it’s time to add the eggs. Add the 2 large eggs, one at a time, beating on low speed just until each egg is incorporated before adding the next. Overmixing at this point can lead to cracks in your cheesecake, so be gentle.
gin extract>Bringing it All Together
Step 5: Prepare the Red Velvet Cake Batter and Combine
Now for the cake portion of our Red Velvet Cheesecake! In a separate medium bowl, whisk together the 1 1/2 cups of all-purpose flour, 2 teaspoons of unsweetened cocoa powder, and 1/2 teaspoon of salt. In a small bowl, combine the 2/3 cup of buttermilk with the 1 teaspoon of white vinegar and 1 teaspoon of baking soda. You’ll notice the mixture will fizz up slightly; this is the vinegar activating the baking soda, which is important for leavening. Let this mixture sit for a minute or two. Now, gradually add the dry ingredients (flour mixture) to the cream cheese batter in three additions, alternating with the buttermilk mixture in tgin extractadditions, beginning and ending with the dry ingredients. Mix on low speed or by hand, just until combined after each addition. Be careful not to overmix the batter once the flour is added. Once everything is combined, gently fold in the buttermilk and vinegar mixture. The batter should be smooth and have that signature deep red color.
Step 6: Baking the Red Velvet Cheesecake
Retrieve your chilled Oreo crust from the freezer. Gently pour the red velvet cheesecake batter over the prepared crust, spreading it evenly with a spatula. To ensure even cooking and prevent cracking, it’s highly recommended to use a water bath. Wrap the outside of your springform pan securely with heavy-duty aluminum foil, making sure there are no gaps where water can seep in. Place the foil-wrapped springform pan inside a larger baking pan. Carefully pour hot water into the larger baking pan, enough to come about halfway up the sides of the springform pan. Place the entire setup into a preheated oven at 325°F (160°C). Bake for approximately 60 to 75 minutes, or until the edges of the cheesecake are set but the center still has a slight jiggle when gently shaken. Carefully remove the cheesecake from the water bath and place it on a wire rack to cool completely. Once cooled, cover it loosely with plastic wrap and refrigerate for at least 6 hours, or preferably overnight, before serving. This chilling period is essential for the cheesecake to firm up and develop its full flavor.

Conclusion:
There you have it – the ultimate guide to creating a show-stopping Red Velvet Cheesecake! We’ve walked through each step, from the velvety smooth cream cheese filling to the rich cocoa-infused crust, ensuring your dessert is a guaranteed success. The vibrant red hue and decadent chocolate notes make this Red Velvet Cheesecake a true indulgence, perfect for any celebration or a special treat for yourself.
To elevate your Red Velvet Cheesecake experience, consider serving it with a dollop of fresh whipped cream, a drizzle of raspberry sauce, or a scattering of dark chocolate shavings. For those looking to experiment, try adding a touch of almond extract to the batter for an extra layer of flavor, or swirl in some white chocolate chips for added texture. Don’t be afraid to make this recipe your own!
We encourage you to give this Red Velvet Cheesecake a try. The joy of baking something this delicious from scratch is incredibly rewarding. We’re confident that once you taste the incredible combination of creamy cheesecake and classic red velvet, it will become a new favorite.
Frequently Asked Questions about Red Velvet Cheesecake:
Q1: My Red Velvet Cheesecake has cracks. Is it ruined?
Cracks can happen! They are often caused by over-baking or drastic temperature changes. While it might not look as picture-perfect, the taste will still be amazing. You can easily disguise cracks with frosting, whipped cream, or fruit toppings. For future bakes, try a water bath and avoid over-baking.
Q2: Can I make the Red Velvet Cheesecake ahead of time?
Absolutely! In fact, Red Velvet Cheesecake often tastes even better the next day after the flavors have had a chance to meld. You can bake it a day or two in advance and store it, covered, in the refrigerator. Just be sure to let it come to room temperature slightly before serving for the best texture.
Decadent Red Velvet Cheesecake
A pure indulgence, this decadent red velvet cheesecake features a crunchy Oreo crust and a rich, creamy filling with classic red velvet flavor and color.
Ingredients
-
1 1/2 cups all-purpose flour
-
2 tsp unsweetened cocoa powder
-
1/2 tsp salt
-
1/2 cup unsalted butter, softened
-
1 cup granulated sugar
-
1/2 cup sour cream
-
1/4 cup vegetable oil
-
2 tsp pure vanilla extract
-
2 large eggs
-
4 tsp red food coloring
-
2/3 cup buttermilk
-
1 tsp baking soda
-
1 tsp white vinegar
-
10 Oreos (filling removed, wafers crushed)
-
24 oz full-fat cream cheese, softened
Instructions
-
Step 1
For the Oreo Crust: Remove filling from 10 Oreos. Crush wafers finely. Combine crumbs with 1/2 cup melted unsalted butter until moistened. Press firmly into the bottom of a 9-inch springform pan, creating a slight edge. Freeze for 10-15 minutes. -
Step 2
For the Filling: Beat 24 oz softened cream cheese until smooth. Gradually add 1 cup granulated sugar and beat until light and fluffy. Mix in 1/2 cup sour cream and 1/4 cup vegetable oil until just combined. -
Step 3
Add 4 tsp red food coloring and mix until evenly distributed. Stir in 2 tsp pure vanilla extract. Add 2 large eggs one at a time, beating on low speed until just incorporated after each addition. -
Step 4
In a separate bowl, whisk together 1 1/2 cups all-purpose flour, 2 tsp unsweetened cocoa powder, and 1/2 tsp salt. In a small bowl, combine 2/3 cup buttermilk, 1 tsp white vinegar, and 1 tsp baking soda (it will fizz). -
Step 5
Gradually add the dry ingredients to the cream cheese batter in three additions, alternating with the buttermilk mixture in two additions, beginning and ending with the dry ingredients. Mix on low speed or by hand until just combined. Gently fold in the buttermilk mixture. -
Step 6
Pour the red velvet cheesecake batter over the prepared crust. Bake in a preheated oven at 325°F (160°C) for 60-75 minutes in a water bath, until the edges are set and the center has a slight jiggle. Cool completely on a wire rack. Refrigerate for at least 6 hours or overnight.
Important Information
Nutrition Facts (Per Serving)
It is important to consider this information as approximate and not to use it as definitive health advice.
Allergy Information
Please check ingredients for potential allergens and consult a health professional if in doubt.


Leave a Comment