

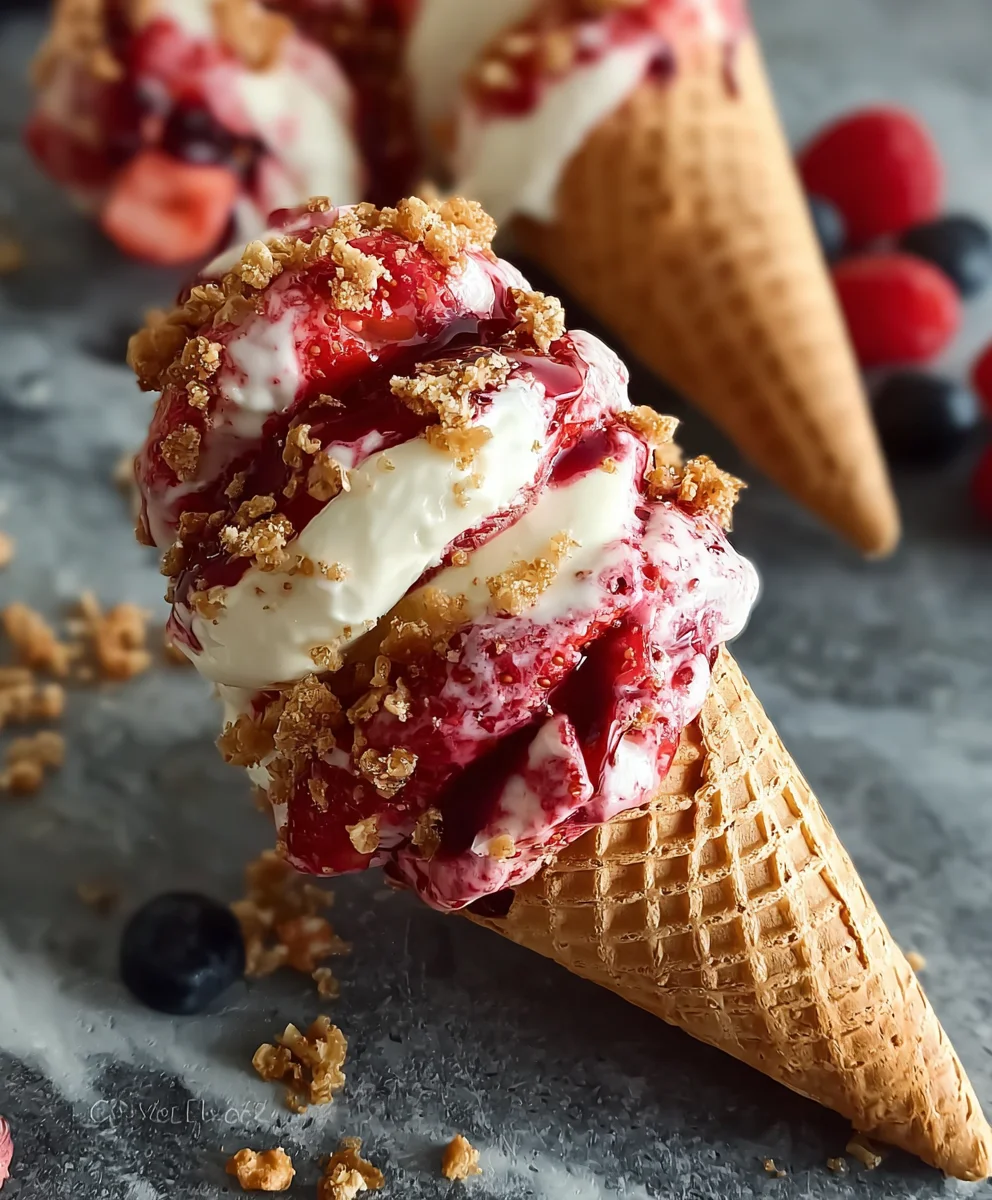
Cheesecake cones are one of those magical desserts that bring a smile to everyone’s face. Imagin extracte the creamy, dreamy indulgence of classic cheesecake, ngin extractreimagined in a delightful, portable cone! It’s no wonder these sweet treats have captured the hearts (and taste buds) of so many. What makes cheesecake cones so utterly irresistible? It’s the perfect marriage of textures and flavors: the crisp, golden cone providing a satisfying crunch that contrasts beautifully with the velvety smooth, rich cheesecake filling. Each bite is a harmonious blend of sweet and tangy, a decadent experience that feels both familiar and excitingly new. Whether you’re hosting a party, looking for a unique dessert to impress guests, or simply craving a personal moment of bliss, these delightful creations are sure to be a showstopper. Get ready to dive into a world of pure, unadulterated deliciousness with this incredible recipe!

Ingredients:
- 1 cup heavy cream, chilled
- 8 oz cream cheese, softened
- 1/2 cup powdered sugar
- 1 teaspoon vanilla extract
- 1 cup freeze-dried strawberries, crushed
- 1 cup Golden Oreos, crushed
- 1/4 cup melted butter
- 8-10 ice cream cones
- Fresh strawberries, for garnish (optional)
Preparing the Cheesecake Filling
Let’s start by creating the luxurious, creamy filling that is the heart of our Cheesecake Cones. It’s essential to ensure your cream cheese is truly softened. This means taking it out of the refrigerator at least an hour before you plan to start, or even gently microwaving it for very short bursts (10-15 seconds at a time) if you’re short on time. Softened cream cheese will blend smoothly, preventing any lumps and ensuring a silky texture. In a large mixing bowl, beat the softened cream cheese with an electric mixer until it’s light and fluffy. This process incorporates air, which contributes to the overall lightness of the filling. Gradually add the powdered sugar, mixing on low speed at first to avoid a cloud of sugar, then increasing the speed until everything is well combined and the mixture is smooth. Now, it’s time for the vanilla extract. Pour it in and mix just until it’s incorporated. The aroma alone is wonderful!
Whipping the Cream
Next, we’ll whip the heavy cream to create a light and airy component for our cheesecake filling. Make sure your heavy cream is very cold; this is crucial for it to whip properly. You can even chill your mixing bowl and whisk attachment in the freezer for about 15 minutes beforehand for optimal results. Pour the cold heavy cream into a separate, clean bowl. Using your electric mixer, begin extract whipping the cream on medium speed. As it starts to thicken, gradually increase the speed to medium-high. Continue whipping until stiff peaks form. This means that when you lift the whisk, the cream will hold its shape and the peaks will stand straight up without curling over. Be careful not to over-whip, or you’ll end up with butter!
Combining the Filling Components
Now for the satisfying pargin extract bringing our cheesecake filling together. Gently fold the whipped cream into the cream cheese mixture. It’s important to do this gently to maintain the airiness of the whipped cream. Use a spatula and a folding motion: scoop from the bottom of the bowl up and over, rotating the bowl as you go. This technique ensures everything is incorporated without deflating the whipped cream. Continue folding until no streaks of cream cheese or whipped cream remain, and you have a smooth, cohesive filling. Taste a small amount and adjust sweetness if needed by adding a touch more powdered sugar, but remember that the topping will add sweetness too.
Creating the Topping and Assembling the Cones
Let’s move on to the delightful crunchy topping for our Cheesecake Cones. This is where the freeze-dried strawberries and Golden Oreos come in. In a medium bowl, combine the crushed freeze-dried strawberries and the crushed Golden Oreos. The freeze-dried strawberries offer a vibrant color and intense fruity flavor, while the Golden Oreos provide a familiar sweet crunch. Add the melted butter to this mixture. Stir everything together until the crum extractbs are evenly moistened by the butter. This helps the topping hold its shape slightly when it’s applied. Now, it’s time to prepare your ice cream cones. You can use waffle cones, sugar cones, or even cake cones, depending on your preference. For easier filling and a neater presentation, it’s helpful to stand the cones upright in glasses or a mug. Spoon or pipe the cheesecake filling into each ice cream cone, filling them about two-thirds of the way full. Then, generously sprinkle the prepared Oreo and strawberry topping over the cheesecake filling. Press the topping down very gently to help it adhere.
Chilling and Serving
To allow the flavors to meld and the filling to set slightly within the cones, it’s best to chill them before serving. Carefully place the filled cones onto a baking sheet or into a shallow dish to keep them stable in the refrigerator. Refrigerate them for at least 30 minutes, or until the filling has firmed up just enough. This chilling step is crucial for the best eating experience, preventing the filling from being too soft and messy. Before you’re ready to serve, you can add a fresh strawberry or two as a garnish for an extra pop of color and freshness, though this is entirely optional. These Cheesecake Cones are best enjoyed soon after chilling for optimal texture and flavor.
Conclusion:
There you have it – a delightful journey into creating delicious Cheesecake Cones! We’ve covered everything from the creamy filling to the perfect crisp cone, ensuring a truly satisfying dessert experience. These Cheesecake Cones are incredibly versatile, making them perfect for everything from a casual afternoon treat to a show-stopping dessert at your next party. Don’t be afraid to get creative with your toppings!
For serving suggestions, I love to top these Cheesecake Cones with fresh berries like strawberries or blueberries, a drizzle of chocolate sauce, or even a sprinkle of crushed cookies. For variations, consider infusing your cheesecake filling with different flavors like lemon zest for a citrusy punch, a hint of espresso for a mocha twist, or even adding a swirl of fruit compote before baking. The possibilities are truly endless!
I truly hope you enjoy making and devouring these Cheesecake Cones as much as I do. They’re a fun, interactive, and utterly delicious way to enjoy all the goodness of cheesecake in a unique and portable form. So, gather your ingredients, embrace the fun, and get ready to impress yourself and your loved ones!
Frequently Asked Questions:
How do I prevent the cones from getting soggy?
The key to preventing soggy cones is to ensure your cheesecake filling is thoroughly chilled and set before filling the cones. Also, avoid overfilling the cones, which can lead to excess moisture seeping through. Serve them relatively soon after filling or keep them chilled and fill them just before serving.
Can I make the cheesecake filling ahead of time?
Yes, absolutely! You can prepare the cheesecake filling a day or two in advance and store it in the refrigerator. This makes assembling the Cheesecake Cones much quicker when you’re ready to serve them. Just ensure it’s well-covered to prevent it from drying out.
Are there any gluten-free options for Cheesecake Cones?
For a gluten-free version of Cheesecake Cones, you can use gluten-free sugar cones or even edible waffle bowls. Ensure that all other ingredients used, like any cookie crum extractbles for topping, are also certified gluten-free.
Delicious Cheesecake Cones
An easy and delightful dessert recipe for cheesecake cones, featuring a creamy cheesecake filling and a crunchy strawberry-Oreo topping.
Ingredients
-
1 cup heavy cream, chilled
-
8 oz cream cheese, softened
-
1/2 cup powdered sugar
-
1 teaspoon vanilla extract
-
1 cup freeze-dried strawberries, crushed
-
1 cup Golden Oreos, crushed
-
1/4 cup melted butter
-
8-10 ice cream cones
-
Fresh strawberries, for garnish (optional)
Instructions
-
Step 1
Prepare the cheesecake filling: Beat softened cream cheese until light and fluffy. Gradually add powdered sugar and vanilla extract, mixing until smooth. -
Step 2
Whip the cream: In a separate bowl, whip cold heavy cream until stiff peaks form. Be careful not to over-whip. -
Step 3
Combine the filling: Gently fold the whipped cream into the cream cheese mixture until smooth and cohesive. -
Step 4
Create the topping: Combine crushed freeze-dried strawberries and Golden Oreos in a bowl. Stir in melted butter until evenly moistened. -
Step 5
Assemble the cones: Spoon the cheesecake filling into ice cream cones, filling about two-thirds full. Generously sprinkle the topping over the filling and press gently. -
Step 6
Chill and serve: Refrigerate the cones for at least 30 minutes until the filling has firmed up. Garnish with fresh strawberries if desired before serving.
Important Information
Nutrition Facts (Per Serving)
It is important to consider this information as approximate and not to use it as definitive health advice.
Allergy Information
Please check ingredients for potential allergens and consult a health professional if in doubt.

Leave a Comment