

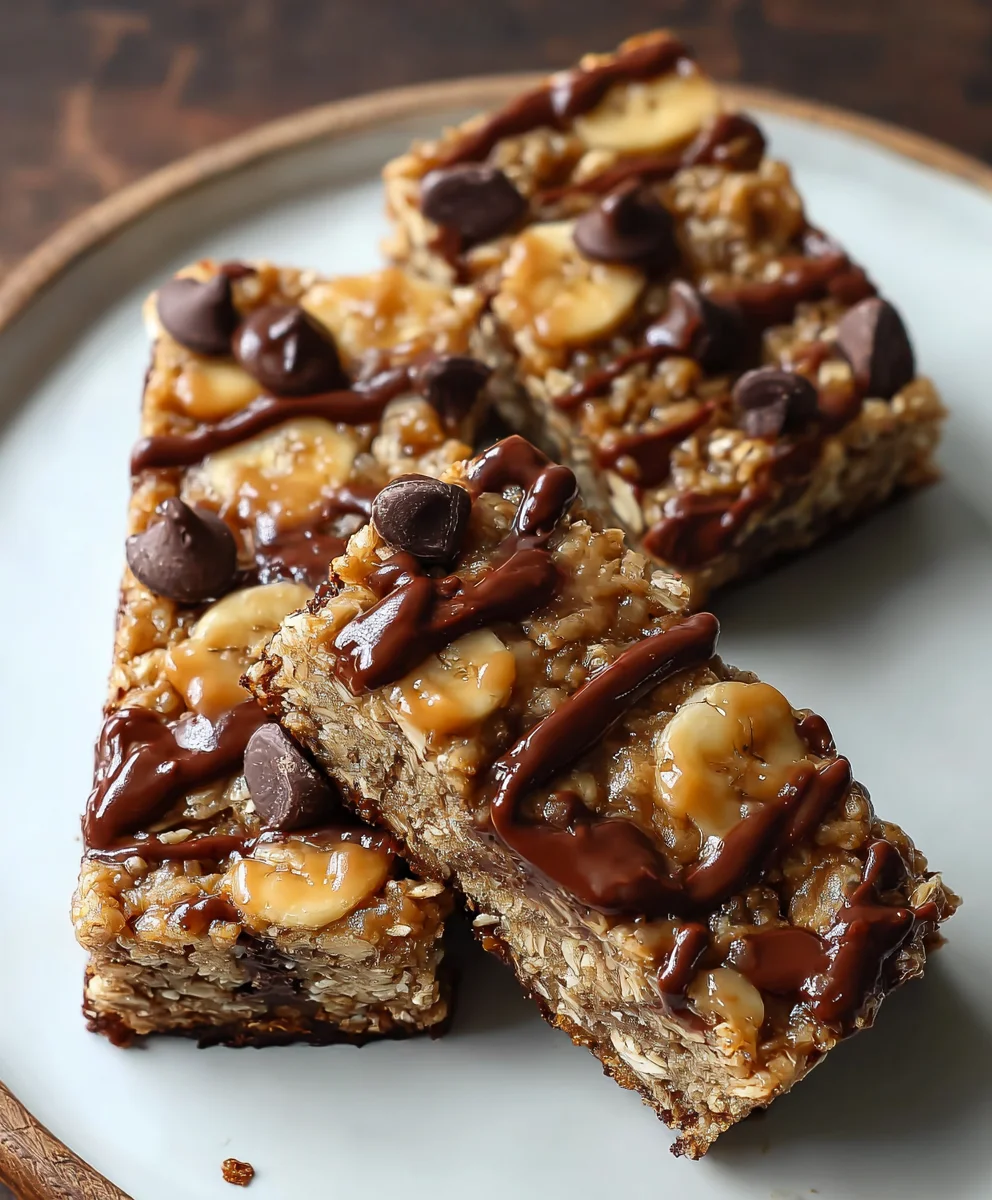
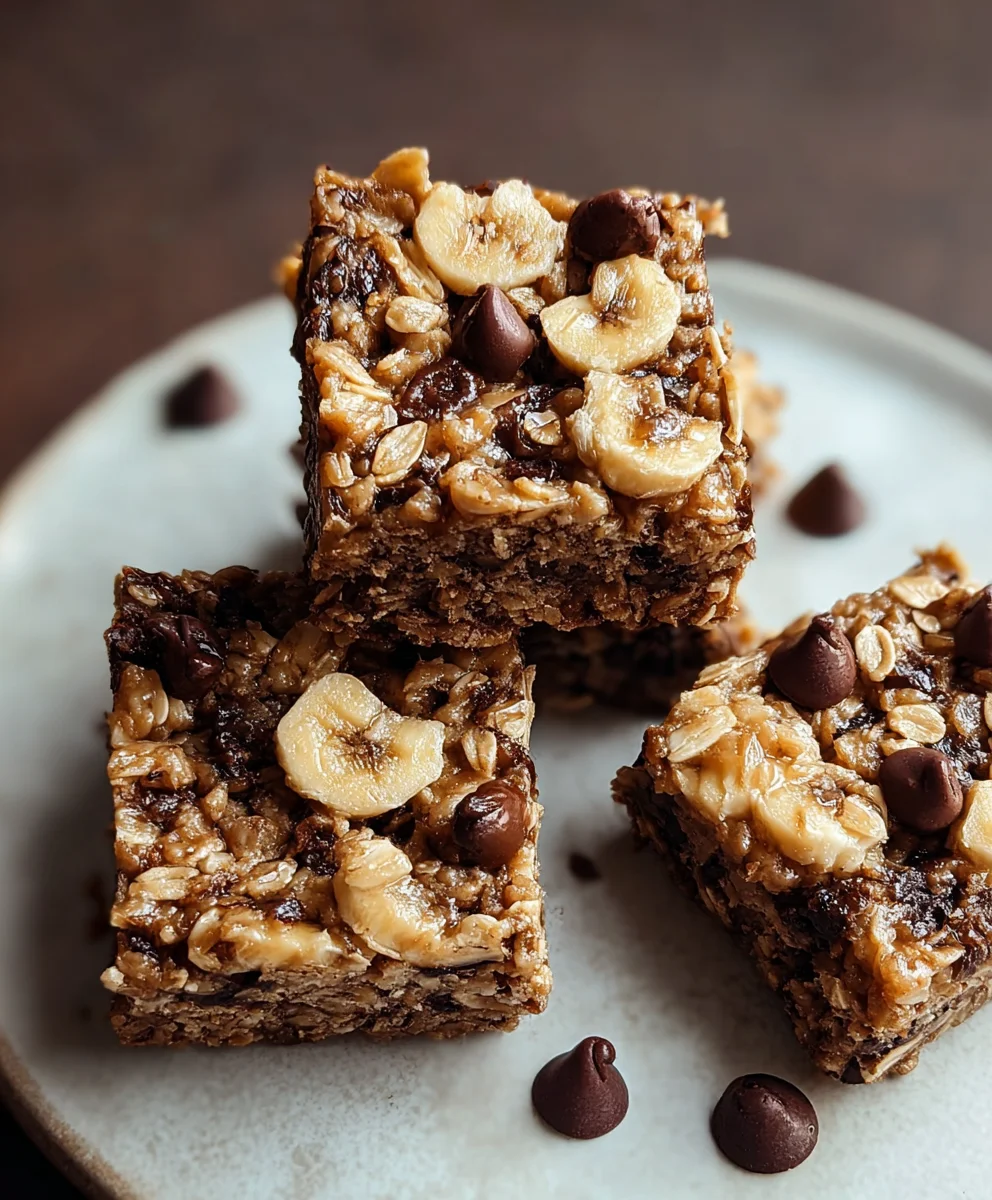
Banana Oat Breakfast Bars are the ultimate solution for busy mornings, offering a delightful balance of wholesome goodness and irresistible flavor. Imagin extracte waking up to the sweet aroma of ripe bananas mingling with hearty oats, baked into a perfectly portable treat that fuels your day. These aren’t just any breakfast bars; they’re a testament to simple, nourishing ingredients coming together to create something truly special. People adore these bars because they provide sustained energy without the sugar crash, making them ideal for powering through work, workouts, or simply enjoying a leisurely weekend brunch. What truly sets our Banana Oat Breakfast Bars apart is their versatility and the comforting, homemade taste that store-bought alternatives just can’t replicate. They’re wonderfully adaptable, allowing you to customize them with your favorite nuts, seeds, or a hint of cinnamon for an extra burst of flavor. This recipe will guide you through creating these chewy, satisfying Banana Oat Breakfast Bars that will quickly become a breakfast staple in your home.
Ingredients:
- 3 super ripe bananas
- 1/4 cup smooth natural peanut butter
- 1 teaspoon vanilla extract
- 1 1/4 cups quick cooking oats
- 1/4 teaspoon salt
- 1/2 teaspoon baking powder
- 1/2 cup chocolate chips
Preparing the Batter
Mashing the Bananas
The foundation of these delicious Banana Oat Breakfast Bars starts with the bananas. For the best flavor and natural sweetness, it’s crucial to use super ripe bananas. You’ll know they’re super ripe when their peels are covered in brown spots, almost completely brown. This indicates that the starches have converted into sugars, making them incredibly sweet and easy to mash. Grab a medium-sized bowl and a fork or a potato masher. Start by peeling your three super ripe bananas and placing them into the bowl. Begin extract mashing them thoroughly. You’re aiming for a relatively smooth consistency, but a few small lumps are perfectly fine and will add texture to your bars. Ensure you get all the banana goodness mashed out, as this will form the moist base of our breakfast bars.
Incorporating Wet Ingredients
Once your bananas are mashed to your liking, it’s time to add the other wet ingredients. To the bowl with the mashed bananas, add the 1/4 cup of smooth natural peanut butter. Natural peanut butter is preferred here because it tends to be less processed and has a purer peanut flavor that complements the bananas beautifully. Next, measure out 1 teaspoon of vanilla extract and add it to the mixture. Vanilla extract is a fantastic flavor enhancgin extract bringing out the sweetness of the bananas and adding a warm, comforting aroma. Stir everything together well. You’ll want to ensure the peanut butter is fully incorporated into the mashed bananas. This might take a bit of vigorous stirring, but the goal is a creamy, cohesive mixture before we move on to the dry ingredients. Don’t worry if it looks a little lumpy at this stage; the final mixing will smooth things out.
Combining Dry and Wet Ingredients
Adding Dry Ingredients for Structure
Now it’s time to introduce the dry ingredients that will give our Banana Oat Breakfast Bars their structure and chewy texture. To the wet banana and peanut butter mixture, add 1 1/4 cups of quick-cooking oats. Quick-cooking oats are essential for this recipe as they absorb moisture more rapidly than old-fashioned oats, leading to a softer, more cohesive bar that doesn’t require extended baking time. Next, measure out 1/4 teaspoon of salt. Salt is a flavor balancer; it doesn’t make your bars salty, but rather it enhances all the other flavors, making the sweetness of the bananas and the richness of the peanut butter truly sing. Finally, add 1/2 teaspoon of baking powder. Baking powder is a leavening agent that will help your bars rise slightly and achieve a pleasant, tender texture.
Folding in the Chocolate Chips
The grand finnon-alcoholic ale before baking is adding a delightful burst of sweetness and flavor with chocolate chips! Measure out 1/2 cup of your favorite chocolate chips. You can use semi-sweet, milk chocolate, or even dark chocolate chips depending on your preference. Gently fold them into the batter. The key here is to fold rather than to vigorously stir. This prevents you from overmixing the batter, which can lead to tougher bars. You want to distribute the chocolate chips evenly throughout the mixture so that every bite offers a little pocket of melted chocolate. Take your time with this step to ensure a beautiful distribution of these delicious little gems.
Baking the Breakfast Bars
Preparing the Baking Pan and Oven
Preheat your oven to 350 degrees Fahrenheit (175 degrees Celsius). This consistent temperature is crucial for even baking. While the oven is preheating, prepare an 8×8 inch baking pan. You can line it with parchment paper, leaving some overhang on the sides. This parchment paper “sling” makes it incredibly easy to lift the baked bars out of the pan once they’ve cooled. Alternatively, you can grease the pan thoroughly with butter or non-stick cooking spray, ensuring all corners are covered to prevent sticking. Having your pan ready before you pour the batter will save you time and prevent the batter from sitting around too long, which can affect the texture of the final bars.
Baking and Cooling
Once your oven is preheated and your pan is prepared, pour the batter into the prepared baking pan. Use a spatula to spread the batter evenly into the corners of the pan, ensuring a uniform thickness. This is important for even baking and for getting consistent bar shapes. Place the pan in the preheated oven on the middle rack. Bake for 20-25 minutes, or until the edges are golden brown and a toothpick inserted into the center comes out clean. The exact baking time can vary depending on your oven, so keep an eye on them, especially during the last few minutes. Once baked, remove the pan from the oven and let the bars cool completely in the pan on a wire rack. This cooling process is critical. Trying to cut them while they are hot will result in them crum extractbling. Allowing them to cool fully allows them to set and firm up, making them easy to slice into perfect breakfast bars. Once completely cooled, use the parchment paper sling to lift the slab out of the pan, then cut them into your desired bar shapes.
Conclusion:
And there you have it – the perfect recipe for delicious and healthy Banana Oat Breakfast Bars! This recipe is incredibly satisfying and provides a fantastic way to start your day. The combination of ripe bananas, hearty oats, and your favorite add-ins creates a wholesome and energy-boosting treat. I hope you enjoy making and indulgin extractg in these bars as much as I do!
These Banana Oat Breakfast Bars are incredibly versatile. They are fantastic on their own, perfect for a quick grab-and-go breakfast or snack. For a more substantial meal, try serving them warm with a drizzle of honey or maple syrup, a dollop of Greek yogurt, or a side of fresh berries. They also crum extractble wonderfully over smoothie bowls for added texture and flavor.
Don’t be afraid to get creative with variations! Feel free to add ingredients like chocolate chips, nuts, seeds, dried fruit, or even a sprinkle of cinnamon or nutmeg to the batter. You can also experiment with different types of flour, like whole wheat or almond flour, for a slight change in texture and taste. The possibilities are endless!
Frequently Asked Questions:
How can I store my Banana Oat Breakfast Bars?
Once cooled completely, store your Banana Oat Breakfast Bars in an airtight container at room temperature for up to 3 days. For longer storage, you can refrigerate them for up to a week or freeze them for up to 3 months. Simply thaw them at room temperature or gently reheat them before enjoying.
Can I make these bars gluten-free?
Yes, absolutely! To make your Banana Oat Breakfast Bars gluten-free, ensure you are using certified gluten-free oats. All other standard ingredients are typically gluten-free, but it’s always a good practice to check labels if you have severe gluten sensitivities.
My bars arerum extractbit crumbly, what did I do wrong?
rum extract>A slightly crumbly texture can sometimes happen if the banana isn’t ripe enough, or if there isn’t enough moisture. Ensure your bananas are very ripe (lots of brown spots!). You might also consider adding a tablespoon or two more of mashed banana or a splash of milk if your batter seems too dry.
Easy Banana Oat Breakfast Bars – Quick Healthy Treat
Delicious and healthy breakfast bars made with ripe bananas, oats, peanut butter, and chocolate chips. A perfect quick and easy treat.
Ingredients
-
3 super ripe bananas
-
1/4 cup smooth natural peanut butter
-
1 teaspoon vanilla extract
-
1 1/4 cups quick cooking oats
-
1/4 teaspoon salt
-
1/2 teaspoon baking powder
-
1/2 cup chocolate chips
Instructions
-
Step 1
Mash the 3 super ripe bananas in a medium-sized bowl until relatively smooth with a fork or potato masher. -
Step 2
Add 1/4 cup smooth natural peanut butter and 1 teaspoon vanilla extract to the mashed bananas. Stir until fully incorporated. -
Step 3
Stir in 1 1/4 cups quick cooking oats, 1/4 teaspoon salt, and 1/2 teaspoon baking powder until combined. -
Step 4
Gently fold in 1/2 cup chocolate chips, distributing them evenly throughout the batter. -
Step 5
Preheat oven to 350°F (175°C). Prepare an 8×8 inch baking pan by lining it with parchment paper or greasing it. -
Step 6
Pour the batter into the prepared pan and spread evenly. Bake for 20-25 minutes, or until golden brown and a toothpick inserted into the center comes out clean. -
Step 7
Let the bars cool completely in the pan on a wire rack before lifting out and cutting into desired shapes.
Important Information
Nutrition Facts (Per Serving)
It is important to consider this information as approximate and not to use it as definitive health advice.
Allergy Information
Please check ingredients for potential allergens and consult a health professional if in doubt.

Leave a Comment