

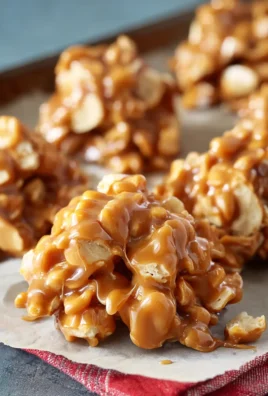
Caramel Clusters are more than just a sweet treat; they’re a nostalgic whisper of childhood, a decadent indulgence that transports us to a place of pure, unadulterated joy. There’s a certain magic in that perfect balance of buttery, melt-in-your-mouth caramel and the satisfying crunch that follows. It’s no wonder these delightful confections hold a special place in so many hearts. Whether you remember them from holiday gatherings, special occasions, or simply as a treasured homemade gift, the allure of Caramel Clusters is undeniable. What sets this particular recipe apart is its incredible simplicity and the ability to customize it to your heart’s content, making it a perfect project for bakers of all skill levels. We’ll be diving into a method that ensures a consistently divine texture, creating those irresistible clusters that are both beautiful and incredibly delicious, the kind that disappear in a flash.
The Allure of Homemade Goodness
Why You’ll Love This Recipe

Ingredients:
- 1/4 cup milk
- 1/2 cup unsalted butter
- 14 oz bag (about 50) Kraft caramels, wrappers removed
- 5-6 cups cornflakes
Melt the Caramels
The first step to creating our delightful Caramel Clusters is to get our caramel base perfectly smooth and melted. You’ll need a medium-sized saucepan for this. Add your 1/2 cup of unsalted butter to the saucepan. Turn your stovetop to a medium-low heat. We want the butter to melt gently, without scorching. Once the butter has completely melted, it’s time to add the star of the show: the Kraft caramels. Make sure you’ve carefully removed all the wrappers from the 14 oz bag of caramels. This is a crucial step, as even a small piece of wrapper can affect the texture and taste of your clusters. Add all the unwrapped caramels into the saucepan with the melted butter. Continue to stir the mixture frequently. This stirring is essential to prevent the caramel from sticking to the bottom of the pan and burning. As the caramels heat up, they will begin extract to soften and melt. Keep stirring patiently until you have a completely smooth, lump-free, and glossy caramel mixture. This process usually takes about 5-10 minutes, depending on your stovetop’s heat. Once the caramel is fully melted and smooth, it’s time to incorporate the milk. Gradually pour in the 1/4 cup of milk while continuously stirring. The milk will help to thin out the caramel slightly, making it easier to coat the cornflakes and achieve that perfect chewy texture in your final Caramel Clusters. Keep stirring until the milk is fully incorporated and the caramel mixture is homogenous and has a pourable consistency. If it seems too thick, you can add another tablespoon of milk, but do so sparingly.
Combine with Cornflakes
Now that we have our luscious, melted caramel base, it’s time to introduce the crunch! You’ll need a large mixing bowl for this step. Empty your 5-6 cups of cornflakes into the large bowl. It’s important to have a generous amount of cornflakes to ensure each cluster is well-coated and has a satisfying crispness. Pour the hot, melted caramel mixture directly over the cornflakes in the bowl. Be careful as the caramel is hot. Using a sturdy spatula or a large sgin extractn, begin to gently fold the caramel into the cornflakes. Your goal here is to coat as many of the cornflakes as possible with the caramel without breaking them into too many tiny pieces. Work quickly but deliberately. The caramel will start to cool and thicken as you mix, so it’s important to get everything combined while the caramel is still fluid enough to coat effectively. Continue folding and stirring until all the cornflakes are evenly coated with the glossy caramel. Don’t worry if there are a few dry spots; we’ll address that as we form the clusters. The 5-6 cups measurement is a guideline; you might find that you need a little more or less depending on how densely you want your clusters. If you feel like there’s too much caramel and not enough cornflake, you can add another handful of cornflakes and gently fold them in. Conversely, if you feel like the cornflakes aren’t coated enough, you can carefully reheat the caramel mixture for another minute or two on very low heat, but be cautious not to burn it.
Form the Clusters
With the caramel and cornflakes beautifully combined, it’s time to shape our individual Caramel Clusters. You will need parchment paper or wax paper to line a baking sheet. This is essential to prevent the sticky caramel from adhering to the baking sheet. Lay out your parchment paper on a large baking sheet or a clean countertop. Using two spoons, or a small ice cream scoop, portion out mounds of the caramel-coated cornflake mixture. Aim for bite-sized clusters. Gently scoop a portion of the mixture and drop it onto the prepared parchment paper. Don’t try to make them perfectly round or uniform; the rustic charm of these clusters is part of their appeal. If you find the mixture is sticking to your spoons too much, you can lightly dampen the spoons with water or spray them with a little non-stick cooking spray. Alternatively, you can lightly grease your hands with a bit of butter or cooking spray and carefully shape the clusters by hand. Work in batches to ensure the caramel doesn’t set too much before you can form them. As you drop each portion, try to create a somewhat cohesive mound, allowing some of the cornflakes to peek through. The size of your clusters is entirely up to your preference, but remember that they will harden as they cool, so aim for a size that is easy to eat in one or two bites.
Allow to Set
Once all your Caramel Clusters have been formed and placed on the parchment paper, they need a little time to set and firm up. This is the patient part of the process, but it’s crucial for achieving that perfect texture. Leave the baking sheet with the formed clusters at room temperature. Avoid the temptation to put them in the refrigerator, as this can sometimes make the caramel too hard and brittle. Let them sit undisturbed for at least 30 minutes to an hour. During this time, the caramel will cool and harden, holding the cornflakes together in their delightful cluster form. You’ll know they are ready when they are no longer sticky to the touch and feel firm. If you’re in a hurry, you can speed up this process slightly by placing the baking sheet in the refrigerator for about 15-20 minutes, but as mentioned, room temperature setting yields the best texture. Gently poke one of the clusters; if it holds its shape and isn’t gooey, they are ready to be moved. If you notice any clusters that are still a bit soft or spread out, you can gently press them together with your fingers (lightly greased or dampened) to help them hold their form better before they fully set.
Storage and Enjoyment
Once your Caramel Clusters have fully set and are firm to the touch, you can carefully peel them off the parchment paper. They should lift away easily. If any seem a little stubborn, gently run a thin spatula underneath them. You can then transfer them to an airtight container for storage. These clusters are best enjoyed within a week of making them to maintain their optimal texture. Store them in a cool, dry place, away from direct sunlight or heat, which can cause them to melt or become sticky again. They are a wonderful treat to have on hand for unexpected guests, as an afternoon pick-me-up, or as a sweet addition to lunchboxes. The simple combination of crunchy cornflakes and sweet, chewy caramel makes these an irresistible snack for both kids and adults. You can also get creative with these! While this recipe focuses on the classic cornflake version, you could experiment with adding a sprinkle of sea salt on top just before they set for a salty-sweet flavor dimension, or even mix in some mini chocolate chips with the cornflakes before adding the caramel for a double chocolate delight. However you choose to enjoy them, these homemade Caramel Clusters are sure to be a hit!

Conclusion:
And there you have it! These delightful Caramel Clusters are surprisingly simple to make and offer an explosion of sweet, buttery, and crunchy goodness in every bite. We’ve walked through the easy steps, from creating that perfect caramel base to adding your favorite crunchy elements. Whether you’re looking for a homemade treat for yourself, a thoughtful gift, or a crowd-pleasing dessert for your next gathering, these Caramel Clusters are sure to impress.
For serving, consider a small platter alongside coffee or tea, or use them to adorn cakes and cupcakes. They also make a fantastic addition to a cookie box or a candy buffet. Don’t be afraid to get creative with variations! Consider adding a sprinkle of sea salt on top for a salted caramel twist, or mix in chopped nuts like pecans or almonds for added texture. You could even swirl in some melted chocolate for a decadent combination.
We hope you feel inspired to give these Caramel Clusters a try. They are a testament to how a few simple ingredients can create something truly magical. Happy baking!
Frequently Asked Questions:
Can I make Caramel Clusters ahead of time?
Absolutely! Caramel Clusters can be made several days in advance and stored in an airtight container at room temperature. This makes them a perfect make-ahead treat for parties or gifts.
What’s the best way to store Caramel Clusters?
To maintain their crispness, store your Caramel Clusters in an airtight container at room temperature. Avoid refrigerating them, as this can sometimes make the caramel sticky or cause condensation.
Are there any nut-free variations for Caramel Clusters?
Yes, if you need a nut-free option, simply omit any nuts from the recipe. You can substitute them with crunchy ingredients like crispy rice cereal or puffed grains for a similar textural element.
Easy Caramel Clusters – Quick Homemade Treat
Quick and easy homemade caramel clusters made with simple ingredients for a delightful sweet treat.
Ingredients
-
1/4 cup milk
-
1/2 cup unsalted butter
-
14 oz bag (about 50) Kraft caramels, wrappers removed
-
5-6 cups cornflakes
-
Parchment paper for lining
Instructions
-
Step 1
Melt the butter in a medium saucepan over medium-low heat. Once melted, add the unwrapped Kraft caramels and stir frequently until completely smooth and glossy. Gradually stir in the milk until the caramel mixture is homogenous and pourable. -
Step 2
Place 5-6 cups of cornflakes into a large mixing bowl. Pour the hot caramel mixture over the cornflakes and gently fold until all cornflakes are evenly coated. Work quickly as the caramel will begin to thicken. -
Step 3
Line a baking sheet with parchment paper. Using two spoons or a small ice cream scoop, portion the caramel-coated cornflake mixture into bite-sized mounds onto the prepared parchment paper. Aim for rustic shapes. -
Step 4
Allow the caramel clusters to set at room temperature for at least 30 minutes to an hour until firm and no longer sticky. Avoid refrigerating as it can make the caramel too hard. -
Step 5
Once set, carefully peel the clusters off the parchment paper. Store in an airtight container in a cool, dry place for up to a week.
Important Information
Nutrition Facts (Per Serving)
It is important to consider this information as approximate and not to use it as definitive health advice.
Allergy Information
Please check ingredients for potential allergens and consult a health professional if in doubt.

Leave a Comment