

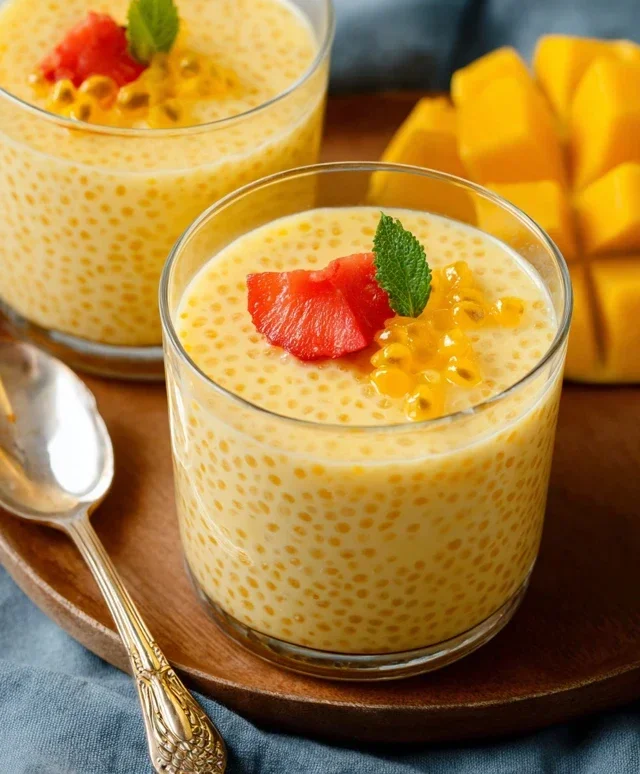
Mango Tapioca Pudding, often affectionately known as Mango Sago, is a dessert that whispers of sunshine and tropical bliss. Imagin extracte plump, translucent tapioca pearls nestled alongside cubes of impossibly sweet, ripe mango, all bathed in a creamy, subtly sweetened coconut milk. It’s a combination that’s pure magic, and it’s no wonder this dessert has captured hearts around the globe.
Why You’ll Love This Mango Tapioca Pudding
What makes this Mango Sago so incredibly special? It’s the delightful textural interplay – the soft chegrape juicess of the tapioca perfectly complements the juicy tenderness of the mango. Plus, it’s incredibly refreshing, making it the ideal treat for a warm afternoon or a light, satisfying end to any meal. It’s simple, yet elegant, and utterly irresistible. Get ready to fall in love with every spoonful of this delightful Mango Tapioca Pudding!
Mango Tapioca Pudding (Mango Sago)
There’s something incredibly comforting about a creamy, sweet dessert that also bursts with tropical flavor. My absolute favorite way to achieve this is with Mango Tapioca Pudding, also known as Mango Sago. It’s a delightful treat that’s surprisingly easy to make and perfect for warm weather, or really, any time you need a little sunshine in a bowl. The combination of soft, chewy tapioca pearls, luscious mango, and rich coconut milk is pure bliss. It’s a dessert that feels both decadent and refreshing, and best of all, it’s incredibly forgiving to make. Whether you’re a seasoned baker or a complete begin extractner, you’ll find this recipe a joy to follow.
Let’s get started on this tropical delight!
Ingredients:
Preparing the Tapioca Pearls
The key to a great tapioca pudding is perfectly cooked tapioca pearls. We want them to be translucent and tender, with just a slight chegrape juicess, not mushy or chalky.
1. Start by bringin extractg the 8 cups of water to a rolling boil in a large saucepan over high heat. It’s important to have plenty of water so the tapioca pearls have room to expand and cook evenly without sticking together. Once the water is vigorously boiling, carefully add the 3/4 cup of small tapioca pearls. Stir them gently immediately after adding to prevent them from clumping at the bottom of the pot.
2. Reduce the heat to medium-high and continue to cook the tapioca, stirring frequently, for about 15-20 minutes. You’ll notice that the pearls will start to turn from opaque white to mostly translucent, with just a small opaque white dot in the center. This is exactly what we’re looking for at this stage. Once they reach this stage, carefully drain the tapioca pearls into a fine-mesh sieve. Rinse them thoroughly under cold running water. This rinsing step is crucial. It washes away excess starch, which prevents the pearls from becoming gummy and helps them maintain their individual texture in the final pudding. Set the rinsed tapioca pearls aside to drain completely.
Creating the Creamy Base
While our tapioca pearls are draining, we’ll prepare the luscious, creamy base that will hold everything together.
3. In the same large saucepan (no need to wash it if you drained the tapioca well), combine the 1 cup of milk, 3/4 cup of full-fat canned coconut milk, and 2 tablespoons of the divided honey. You can adjust the sweetness here based on your preference. If your mangoes are very sweet, you might want to start with a little less honey and add more later. Whisk these ingredients together over medium heat. We want to warm the mixture through and dissolve the honey, but we don’t want it to boil. Gently stirring will ensure everything is well incorporated and the honey is fully dissolved.
Assembling the Pudding
Now comes the fun part – bringin extractg all the delicious components together to create our beautiful Mango Tapioca Pudding.
4. Once the milk mixture is warm and the honey is dissolved, gently stir in the drained tapioca pearls. Reduce the heat to low, and cook for another 5-10 minutes, stirring constantly. This final simmer allows the tapioca pearls to absorb some of the creamy liquid and become perfectly tender and translucent throughout. Continue stirring to prevent the mixture from sticking to the bottom of the pan. The pudding will start to thicken slightly as it cooks. Remember, tapioca pudding continues to thicken as it cools, so don’t overcook it to the point where it becomes too thick in the saucepan.
Adding the Tropical Fruit
The star of our show, the mango, will give this pudding its signature flavor and vibrant color.
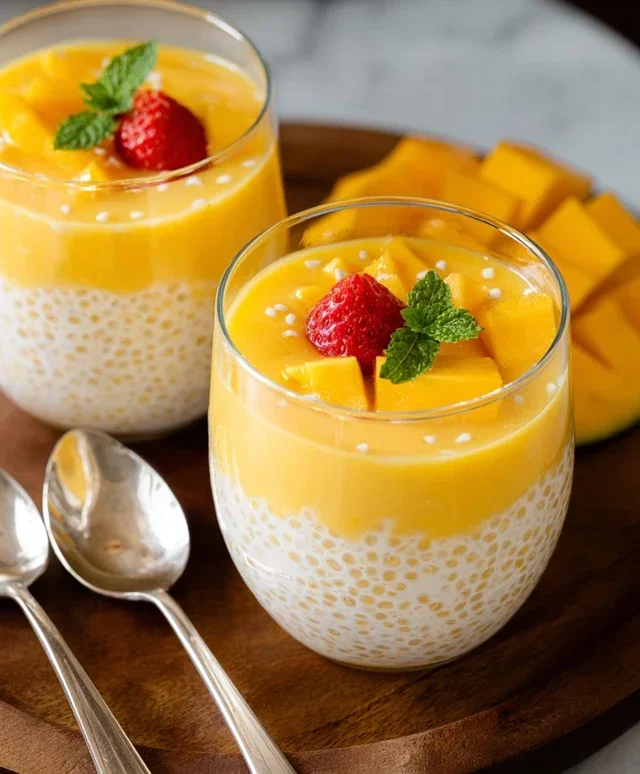
5. While the tapioca is simmering, prepare your mangoes. Peel the ripe mangoes and cut the flesh away from the pit. Dice about two-thirds of the mangoes into small, bite-sized pieces. Take the remaining one-third of the mango and puree it in a blender or food processor until smooth. This puree will add an extra layer of intense mango flavor and a beautiful, smooth texture to our pudding. Once the tapioca pudding has reached your desired consistency (it should be creamy and slightly thickened), remove the saucepan from the heat. Stir in the pureed mango. Then, gently fold in the diced mango pieces and the 1 cup of sliced strawberries. The residual heat from the pudding will gently warm the fruit, releasing its wonderful aromas and flavors. Stir in the remaining 1 1/2 tablespoons of honey to taste.
Chilling and Serving
The final step is to let the flavors meld and the pudding chill to perfection.
Pour the Mango Tapioca Pudding into individual serving bowls or a larger serving dish. You can garnish with a few extra pieces of diced mango or a sprig of mint if you like. Cover the bowls or dish tightly with plastic wrap, pressing the wrap directly onto the surface of the pudding to prevent a skin from forming. Refrigerate for at least 2-3 hours, or until thoroughly chilled. The flavors will deepen and meld beautifully as it cools. Serve cold and enjoy this delightful taste of the tropics!
Notes:
Conclusion:
And there you have it – your ultimate guide to crafting a delightful Mango Tapioca Pudding, also lovingly known as Mango Sago! This recipe is a true winner because it’s incredibly simple to make, bursting with vibrant tropical flavors, and offers a wonderfully creamy yet chewy texture that’s utterly satisfying. It’s the perfect dessert for a warm afternoon, a refreshing end to a meal, or even a delightful breakfast treat. I truly encourage you to give this Mango Tapioca Pudding a try; you won’t be disappointed by its ease and deliciousness!
For serving, I love chilling it thoroughly and enjoying it plain, letting the natural mango sweetness shine. However, you can elevate it further by topping it with a sprinkle of toasted coconut flakes for extra crunch, a drizzle of condensed milk for added richness, or even a few fresh mint leaves for a pop of freshness. Don’t be afraid to get creative with variations! You could incorporate other tropical fruits like passionfruit or pineapple, or even add a hint of cardamom for a warming spice. Experimenting is part of the fun!
Frequently Asked Questions:
Can I use frozen mango instead of fresh for my Mango Tapioca Pudding?
Absolutely! Frozen mango chunks work wonderfully. Simply thaw them completely before blending them into a puree. You might find you need to adjust the sweetness slightly depending on the ripeness and natural sweetness of the frozen mango.
How do I prevent my tapioca pearls from clumping together?
The key to perfectly separate tapioca pearls is to rinse them thoroughly under cold water after cooking, and then stir them into your liquid base while they are still warm. This helps them absorb the liquid evenly and prevents them from sticking to each other.
How long will Mango Tapioca Pudding last in the refrigerator?
This delicious dessert is best enjoyed within 2-3 days when stored in an airtight container in the refrigerator. The texture of the tapioca pearls may soften slightly over time, but the flavor will remain delightful.
Mango Tapioca Pudding (Mango Sago)
A refreshing and creamy dessert featuring sweet mangoes and chewy tapioca pearls.
Ingredients
-
8 cups (1.9L) water
-
3/4 cup (155g) small tapioca pearls
-
1 cup (235ml) whole or 2% milk
-
3/4 cup (175ml) full-fat canned coconut milk
-
3 1/2 tablespoons honey (divided (can sub with sugar or maple syrup))
-
3 medium-sized mangoes (about 775 to 800 grams)
-
1 cup sliced strawberries
Instructions
-
Step 1
In a large pot, bring 8 cups of water to a boil. Add the tapioca pearls and cook according to package directions (usually about 15-20 minutes), stirring occasionally, until translucent. -
Step 2
Drain the cooked tapioca pearls and rinse them under cold water. Set aside. -
Step 3
In a separate pot, whisk together the milk, coconut milk, and 2 tablespoons of honey (or your chosen sweetener). Heat gently over medium heat, stirring until warmed through and honey is dissolved. Do not boil. -
Step 4
Peel and dice the mangoes. Reserve about 1/4 cup of diced mango for garnish. Puree the remaining mangoes until smooth. -
Step 5
Add the cooked tapioca pearls and the mango puree to the warm milk mixture. Stir to combine. -
Step 6
Stir in the remaining 1 1/2 tablespoons of honey (or sweetener) to taste. Chill the pudding in the refrigerator for at least 30 minutes to allow the flavors to meld. -
Step 7
Serve the chilled mango tapioca pudding topped with the reserved diced mango and sliced strawberries.
Important Information
Nutrition Facts (Per Serving)
It is important to consider this information as approximate and not to use it as definitive health advice.
Allergy Information
Please check ingredients for potential allergens and consult a health professional if in doubt.

Leave a Comment