

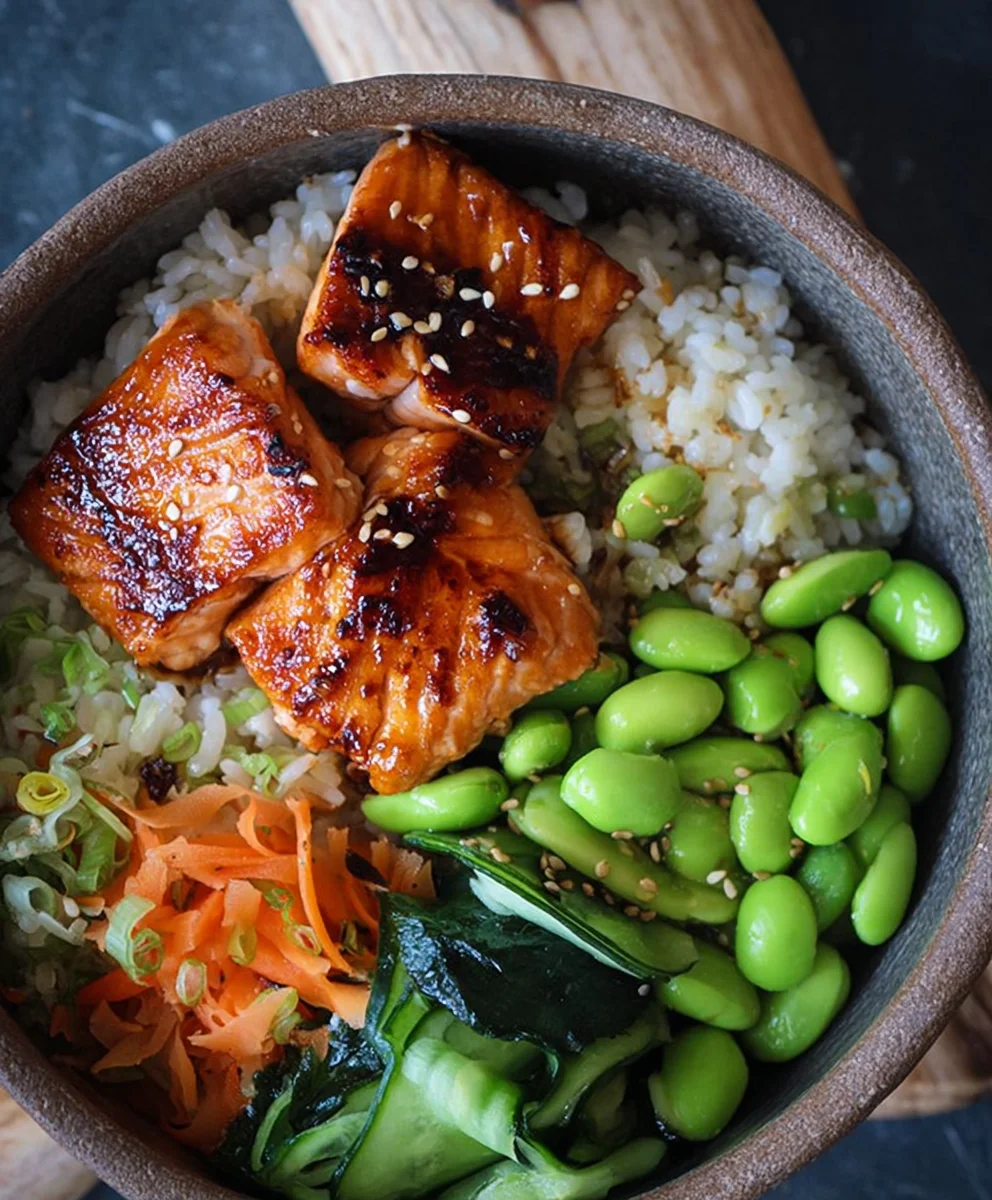
Teriyaki Salmon Sushi Bowl (GF) is more than just a meal; it’s a vibrant celebration of fresh flavors and satisfying textures, all conveniently packed into one delicious bowl. If you’re anything like me, the idea of perfectly cooked, glazed salmon paired with seasoned sushi rice and an assortment of crisp, colorful toppings is enough to make your mouth water. This dish has captured hearts and taste buds worldwide for its delightful balance of sweet, savory, and umami notes, offering a healthier and more accessible alternative to traditional sushi rolls. What truly sets this Teriyaki Salmon Sushi Bowl (GF) apart is its incredible versatility and ease of preparation, making it a go-to for weeknight dinners or impressive weekend lunches that everyone will adore. Get ready to dive into a bowl that’s as beautiful as it is delicious!
Ingredients:
- 180g (6.5oz) sushi rice
- 3 tbsp rice vinegar
- 1 tsp caster sugar
- 0.5 tsp fine salt
- 30ml (1fl oz) maple syrup
- 1 tsp sesame oil
- 2 tsp gluten-free tamari soy sauce
- 0.5 tsp garlic granules
- 1 tsp non-non-non-alcoholic alternativeic non-alcoholic mirin
- 2 salmon fillets (about 150-180g each)
- 2 tbsp sesame seeds
- 4 spring onions
- 150g (5oz) edamame beans (shelled)
- Half a ripe avocado
Cooking the Sushi Rice
The foundation of any good sushi bowl is perfectly cooked sushi rice. This process is straightforward, but paying attention to a few details will make all the difference. First, rinse the sushi rice thoroughly under cold running water. This removes excess starch, preventing the rice from becoming gummy. Continue rinsing until the water runs clear. Drain the rice well and transfer it to a medium saucepan. Add 200ml (about 7fl oz) of cold water to the pan – this is the standard ratio for sushi rice, usually 1:1.1 or 1:1.2 rice to water. Bring the rice to a boil over medium-high heat, then immediately reduce the heat to the lowest setting, cover the pan tightly with a lid, and let it simmer gently for 15 minutes. Crucially, do not lift the lid during this simmering period, as this will release the steam that’s vital for cooking the rice evenly. After 15 minutes, remove the pan from the heat and let it stand, still covered, for another 10 minutes. This resting period allows the rice to absorb any remaining moisture and finish cooking through. While the rice is resting, prepare the sushi vinegar. In a small bowl, whisk together the rice vinegar, caster sugar, and fine salt until the sugar and salt are completely dissolved. This seasoned vinegar is what gives sushi rice its characteristic tangy flavor.
Seasoning the Rice and Preparing the Salmon
Once the rice has rested, transfer it to a large, shallow, non-metallic bowl. This is often called a “hangiri” in Japanese cooking, but a wide glass or wooden bowl works perfectly well. Gently pour the seasoned vinegar mixture over the hot rice. Using a wooden spoon or rice paddle, carefully fold the vinegar into the rice using a slicing motion. Avoid stirring vigorously, as this can break the rice grains. The goal is to gently separate the grains and coat them evenly with the vinegar. Fan the rice as you mix it – this helps it cool down quickly and gives it a glossy sheen. You can use a hand fan or even a piece of stiff cardboard. Continue fanning and gently folding until the rice is no longer steaming and has reached room temperature. Now, let’s prepare the salmon. Pat the salmon fillets dry with paper towels. In a small bowl, whisk together the maple syrup, sesame oil, gluten-free tamari soy sauce, garlic non-alcoholic alternatives, and non-non-alcoholic mirinolicolic mirin to create the teriyaki glaze. Place the salmon fillets on a parchment-lined baking sheet. Brush generously with the teriyaki glaze, ensuring all sides are coated. Set aside while you prepare the other components.
Cooking the Salmon and Edamame
Preheat your oven to 200°C (400°F) or 180°C (350°F) fan/convection. Place the glazed salmon fillets in the preheated oven and bake for 12-15 minutes, or until the salmon is cooked through and flakes easily with a fork. The exact cooking time will depend on the thickness of your fillets. While the salmon is baking, let’s get the edamame ready. If you’re using frozen edamame beans, follow the package instructions for cooking. Typically, this involves boiling them in water for a few minutes until tender. Once cooked, drain them well. You can season them lightly with a pinch of salt if you wish, but they’re often delicious plain.
Preparing the Toppings and Assembling the Bowl
As the salmon finishes cooking, it’s time to prepare the final elements of your Teriyaki Salmon Sushi Bowl. Thinly slice the spring onions. You’ll want to use both the white and green parts for maximum flavor and visual appeal. For the avocado, halve it, remove the pit, and then slice or dice it into bite-sized pieces. If you’re preparing the avocado just before serving, you can toss it with a tiny squeeze of lime or lemon juice to prevent browning, though this isn’t strictly necessary if you’re eating it immediately. Toast the sesame seeds. You can do this in a dry skillet over medium heat, stirring constantly, for a few minutes until they are golden brown and fragrant. Watch them closely, as they can burn quickly. Alternatively, you can toast them in a preheated oven at 180°C (350°F) for about 5-7 minutes, keeping a close eye on them.
Assembling Your Teriyaki Salmon Sushi Bowl
Now for the exciting part – building your beautiful and delicious sushi bowl! Divide the seasoned sushi rice evenly between your serving bowls. Aim for a generous portion as the base. Flake the cooked teriyaki salmon into bite-sized pieces and arrange them over the bed of rice. Next, artfully place the cooked edamame beans around the salmon. Add the sliced or diced avocado to the bowl. Scatter the thinly sliced spring onions over everything. Finally, sprinkle the toasted sesame seeds generously over the entire bowl. This adds a lovely crunch and a nutty flavor that complements the other ingredients perfectly. For an extra touch of flavor, you can drizzle a little extra gluten-free tamari or a touch of sriracha if you like a bit of heat.

Conclusion:
I hope you’ve enjoyed learning how to create this delicious and healthy Teriyaki Salmon Sushi Bowl (GF)! This recipe is a fantastic way to bring the flavors of your favorite sushi into your home with minimal fuss and maximum enjoyment. It’s incredibly adaptable, making it a go-to meal for busy weeknights or a delightful option for entertaining. The combination of tender teriyaki-glazed salmon, perfectly cooked sushi rice, and fresh, vibrant vegetables creates a satisfying and flavorful experience that’s both nourishing and visually appealing. Don’t be afraid to get creative and make it your own!
For serving suggestions, this bowl is best enjoyed immediately while the salmon is warm and the rice is fresh. It’s a complete meal on its own, but a side of pickled gin extractger or a light miso soup can complement it beautifully. When it comes to variations, you can easily swap out the salmon for other proteins like shrimp or tofu, or experiment with different vegetables based on seasonality and your preferences. Think shredded carrots, edamame, or even some thinly sliced avocado for extra creaminess.
I truly encourage you to give this Teriyaki Salmon Sushi Bowl (GF) a try. It’s a rewarding recipe that’s sure to impress yourself and anyone you share it with. Happy cooking!
Frequently Asked Questions about Teriyaki Salmon Sushi Bowl (GF):
Q: Can I make the teriyaki sauce from scratch?
A: Absolutely! While store-bought teriyaki sauce is convenient, making your own allows you to control the sweetness and saltiness. A simple homemade teriyaki sauce can be made by combining soy sauce (or tamari for gluten-free), non-alcoholic mirin, non-alcoholic sake (optional), sugar, and a touch ofgin extractated ginger and garlic. Simmer until slightly thickened.
Q: What kind of rice is best for a sushi bowl?
A: Short-grain sushi rice is ideal because it has a higher starch content, which helps it become sticky and hold its shape. It also absorbs flavors beautifully. Ensure you rinse the rice thoroughly before cooking and season it with rice vinegar, sugar, and salt to achieve that authentic sushi rice taste.
Gluten-Free Teriyaki Salmon Sushi Bowl – Easy Recipe
A simple and delicious gluten-free sushi bowl featuring flaky teriyaki salmon, seasoned sushi rice, edamame, and creamy avocado.
Ingredients
-
180g sushi rice
-
3 tbsp rice vinegar
-
1 tsp caster sugar
-
0.5 tsp fine salt
-
30ml maple syrup
-
1 tsp sesame oil
-
2 tsp gluten-free tamari soy sauce
-
0.5 tsp garlic granules
-
1 tsp non-alcoholic mirin
-
2 salmon fillets
-
2 tbsp sesame seeds
-
4 spring onions
-
150g edamame beans (shelled)
-
Half a ripe avocado
Instructions
-
Step 1
Rinse sushi rice until water runs clear. Combine rice and 200ml water in a saucepan. Bring to a boil, then simmer covered on low heat for 15 minutes. Let stand, covered, for 10 minutes. Whisk rice vinegar, sugar, and salt for sushi vinegar. -
Step 2
Transfer hot rice to a shallow bowl. Pour seasoned vinegar over rice and gently fold with a slicing motion using a wooden spoon. Fan the rice to cool it down and give it a glossy sheen until room temperature. -
Step 3
Pat salmon fillets dry. Whisk maple syrup, sesame oil, gluten-free tamari, garlic granules, and non-alcoholic mirin for teriyaki glaze. Brush glaze generously over salmon fillets on a parchment-lined baking sheet. -
Step 4
Preheat oven to 200°C (400°F). Bake salmon for 12-15 minutes, or until cooked through and flakes easily. Cook edamame beans according to package instructions. -
Step 5
Thinly slice spring onions. Halve, pit, and slice or dice the avocado. Toast sesame seeds in a dry skillet or oven until golden brown and fragrant. -
Step 6
Divide seasoned sushi rice between bowls. Flake cooked salmon over the rice. Arrange edamame beans and avocado around the salmon. Scatter spring onions and toasted sesame seeds over the bowl.
Important Information
Nutrition Facts (Per Serving)
It is important to consider this information as approximate and not to use it as definitive health advice.
Allergy Information
Please check ingredients for potential allergens and consult a health professional if in doubt.


Leave a Comment