

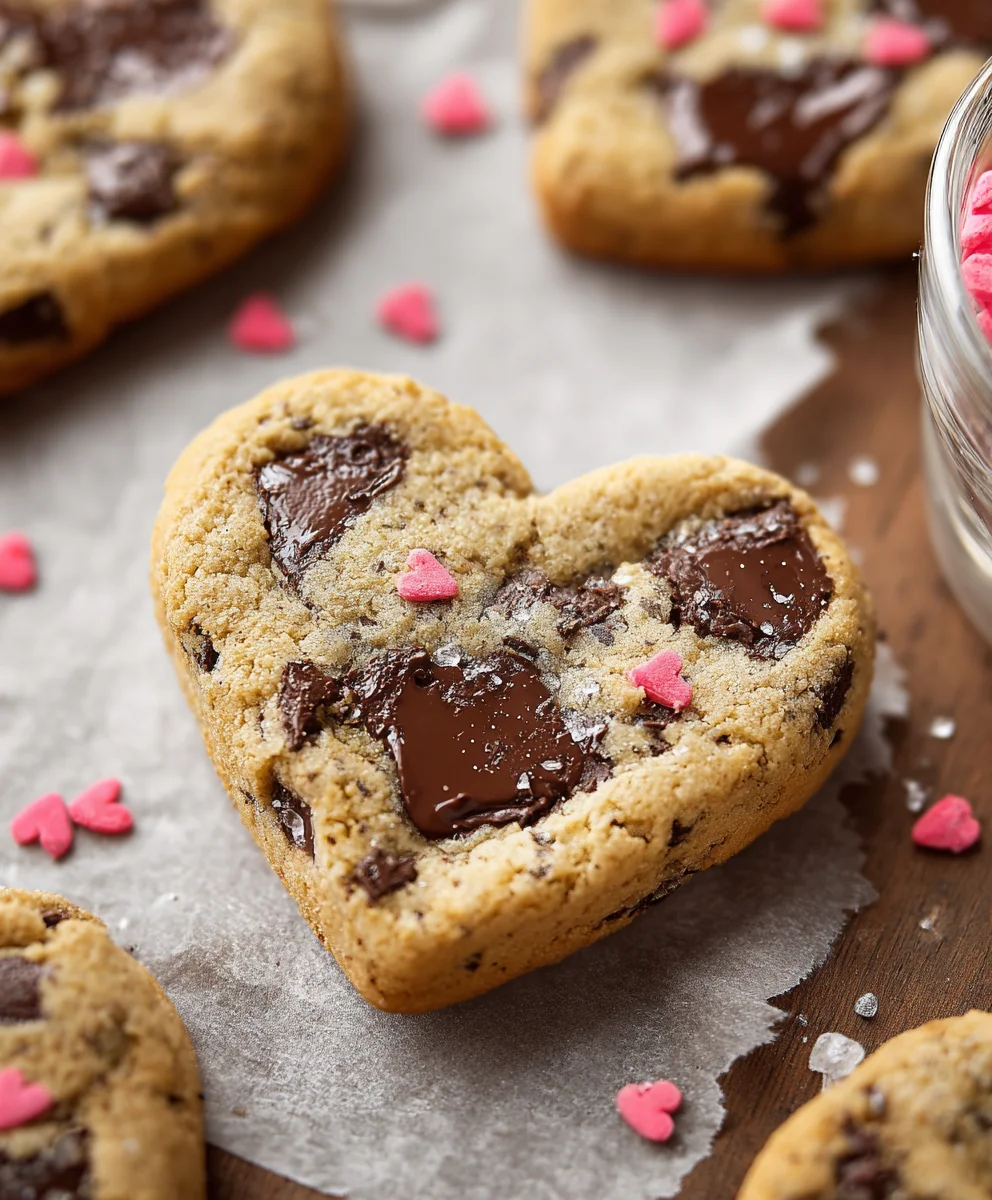
Heart Shaped Chocolate Chip Cookies are more than just a sweet treat; they’re a symbol of love, a gesture of affection, and a delicious way to express your feelings. Whether you’re celebrating a special occasion like Vnon-alcoholic alentine’s Day, an anniversary, or simply want to brighten someone’s day, these delightful cookies are sure to melt hearts. Their classic comforting flavor, with that perfect balance of soft, chewy dough and rich, melty chocolate chips, is universally adored. But what truly sets these Heart Shaped Chocolate Chip Cookies apart is their charming form. They transform a familiar favorite into something visually stunning and deeply personal, making every bite feel like a warm hug. Get ready to bake a batch that’s as beautiful as it is delicious, perfect for sharing with those you cherish most.

Ingredients:
- 2¼ cups all-purpose flour
- 1 tsp baking soda
- ¾ tsp salt
- 1 cup unsalted butter, softened to room temperature
- ½ cup light brown sugar, packed
- ½ cup granulated sugar
- 2 tsp vanilla extract
- 2 large eggs, at room temperature
- 1½ cups semisweet chocolate chips (a mix of regular and mini chips works beautifully)
Preparing the Dough
The journey to perfect Heart Shaped Chocolate Chip Cookies begin extracts with a well-prepared dough. Accuracy in measuring your ingredients is key to achieving that classic chewy texture and rich flavor. First, in a medium-sized bowl, we’ll combine our dry ingredients. This includes the all-purpose flour, baking soda, and salt. Whisk these together thoroughly. This step ensures that the leavening agent (baking soda) and salt are evenly distributed throughout the flour, which prevents pockets of saltiness or uneven rising in your cookies. A good whisking here contributes to a consistent texture in every bite. Set this bowl aside for now; we’ll be incorporating it into our wet ingredients later.
Now, let’s move on to the heart of our cookie dough – the creaming process. In a large mixing bowl, using either a stand mixer fitted with the paddle attachment or a hand mixer, cream together the softened unsalted butter, packed light brown sugar, and granulated sugar. It’s crucial that your butter is at room temperature. This means it should be pliable but not melted. If it’s too cold, it won’t cream properly, and if it’s too warm, it can make your cookies spread too much. Beat these ingredients on medium speed until the mixture is light, fluffy, and pnon-alcoholic ale in color. This typically takes about 3 to 5 minutes. This creaming process incorporates air into the dough, which contributes to the cookie’s texture and structure. Don’t rush this step; it’s a vital foundation for delicious cookies.
Once your butter and sugar mixture is perfectly creamed, it’s time to add the eggs and vanilla extract. Add the two large eggs, one at a time, beating well after each addition until fully incorporated. Ensure each egg is completely mixed in before adding the next. This gradual incorporation prevents the dough from becoming oily or separating. Next, stir in the vanilla extract. Vanilla is essential for its warm, aromatic flavor that complements the sweetness of the sugar and the richness of the chocolate. Make sure to scrape down the sides of the bowl occasionally to ensure all ingredients are evenly mixed.
Combining and Chilling
With our wet ingredients thoroughly combined, we’ll now gradually incorporate the dry ingredients. With the mixer on low speed, add the flour mixture to the wet ingredients in three additions. Mix only until just combined. It’s important not to overmix the dough at this stage. Overmixing can develop the gluten in the flour too much, resulting in tough cookies. You want to see just a few streaks of flour remaining before proceeding. Once most of the flour is incorporated, gently fold in the semisweet chocolate chips using a spatula. I love using a mix of regular and mini chocolate chips because it gives a wonderful variation in texture and a good distribution of melty chocolate throughout the cookie. Be generous with the chocolate chips – they are, after all, chocolate chip cookies!
Now, this is a critical step that many home bakers overlook, but it truly elevates your Heart Shaped Chocolate Chip Cookies: chilling the dough. Cover the bowl tightly with plastic wrap and refrigerate the dough for at least 2 to 4 hours, or even overnight. Chilling the dough allows the flour to hydrate, the fats to solidify, and the flavors to meld together. This not only makes the dough easier to handle and shape but also significantly improves the texture and prevents the cookies from spreading too much during baking, leading to those coveted thick, chewy cookies with beautifully defined edges.
Shaping and Baking
Once your dough has been properly chilled and is firm to the touch, it’s time to get creative with shaping. For Heart Shaped Chocolate Chip Cookies, you have a few options. You can gently roll tablespoon-sized portions of dough into balls and then carefully pinch and mold each ball into a heart shape. Alternatively, you can roll out portions of the chilled dough on a lightly floured surface to about ¼-inch thickness and use a heart-shaped cookie cutter. If you’re using the rolling and cutting method, it’s often helpful to re-chill the cut-out shapes for about 15-20 minutes before baking to further ensure they hold their shape. Place your shaped cookies onto baking sheets lined with parchment paper, leaving about 2 inches of space between each cookie to allow for slight spreading.
Preheat your oven to 375°F (190°C). This temperature is ideal for achieving a golden brown exterior and a perfectly soft, chewy interior. Baking time will vary depending on the size and thickness of your cookies, but generally, they will take about 9 to 12 minutes. You’re looking for the edges to be lightly golden brown, while the centers should still appear slightly soft and underbaked. They will continue to set as they cool on the baking sheet. For the best texture, it’s important not to overbake them. Remove the baking sheets from the oven and let the cookies cool on the sheets for 5 minutes before transferring them to a wire rack to cool completely. This resting period on the hot baking sheet is crucial for allowing the cookies to firm up. Enjoy your warm, delightful Heart Shaped Chocolate Chip Cookies!
Conclusion:
I hope you enjoyed learning how to create these delightful Heart Shaped Chocolate Chip Cookies! This recipe is a wonderful way to add a touch of love and sweetness to any occasion, whether it’s a special someone’s birthday, Vnon-alcoholic alentine’s Day, or just a Tuesday that needs a little extra cheer. The process is straightforward, and the result is a batch of perfectly chewy, melt-in-your-mouth cookies with a charming heart shape that are sure to impress.
These cookies are incredibly versatile. They’re fantastic on their own, perfect with a glass of cold milk, or even served warm with a scoop of vanilla ice cream for a decadent dessert. For variations, consider adding a sprinkle of sea salt on top before baking for a salty-sweet contrast, or mix in some chopped nuts like walnuts or pecans for added texture. You could also try using different types of chocolate chips, such as dark, milk, or white chocolate, or even a blend.
Don’t be afraid to get creative with your decorating! A simple drizzle of white chocolate or some festive sprinkles can elevate these cookies even further. Remember, baking should be fun, so embrace the process and enjoy the delicious outcome. I encourage you to try this recipe and share these homemade treats with those you care about. Happy baking!
Frequently Asked Questions:
How can I ensure my cookies are perfectly heart-shaped?
Using a heart-shaped cookie cutter is the easiest way to achieve a consistent shape. After chilling the dough, roll it out to your desired thickness (around 1/4 to 1/2 inch) and then cut out the heart shapes. For any scraps, you can gently re-roll and cut more shapes. Ensuring the dough is well-chilled before cutting will help it hold its shape better during baking.
Can I make these cookies ahead of time?
Absolutely! The dough can be made and then refrigerated for up to 3 days, or frozen for up to 2-3 months. When ready to bake, thaw the dough in the refrigerator overnight or at room temperature for about an hour. This is a great way to have fresh Heart Shaped Chocolate Chip Cookies ready whenever a craving strikes!
Heart Shaped Chocolate Chip Cookies-Easy Homemade Recipe
A simple and delightful recipe for homemade heart-shaped chocolate chip cookies, perfect for any occasion.
Ingredients
-
2¼ cups all-purpose flour
-
1 tsp baking soda
-
¾ tsp salt
-
1 cup unsalted butter, softened to room temperature
-
½ cup light brown sugar, packed
-
½ cup granulated sugar
-
2 tsp vanilla extract
-
2 large eggs, at room temperature
-
1½ cups semisweet chocolate chips (a mix of regular and mini chips works beautifully)
Instructions
-
Step 1
In a medium-sized bowl, whisk together the all-purpose flour, baking soda, and salt. Set aside. -
Step 2
In a large mixing bowl, cream together the softened unsalted butter, packed light brown sugar, and granulated sugar until light, fluffy, and pale in color. Beat in the eggs one at a time, followed by the vanilla extract. -
Step 3
Gradually add the dry ingredients to the wet ingredients on low speed, mixing until just combined. Do not overmix. Gently fold in the semisweet chocolate chips. -
Step 4
Cover the dough tightly with plastic wrap and refrigerate for at least 2 to 4 hours, or preferably overnight. -
Step 5
Preheat your oven to 375°F (190°C). Line baking sheets with parchment paper. Shape the chilled dough into heart shapes (by rolling balls and pinching, or using a cookie cutter) and place them on the prepared baking sheets, leaving about 2 inches between each cookie. -
Step 6
Bake for 9 to 12 minutes, or until the edges are lightly golden brown and the centers are still slightly soft. Let cool on the baking sheets for 5 minutes before transferring to a wire rack to cool completely.
Important Information
Nutrition Facts (Per Serving)
It is important to consider this information as approximate and not to use it as definitive health advice.
Allergy Information
Please check ingredients for potential allergens and consult a health professional if in doubt.


Leave a Comment