

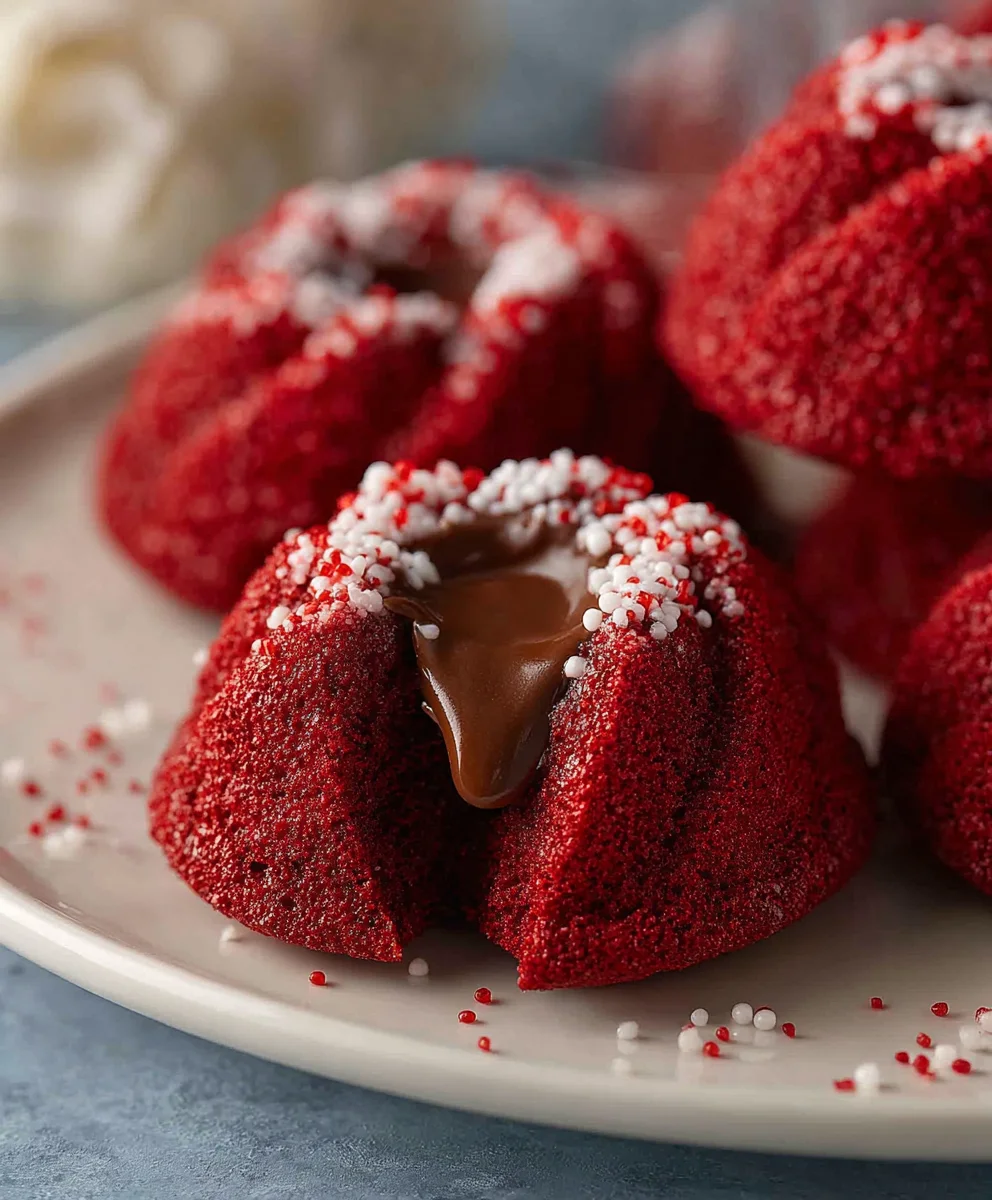
Hershey’s red velvet blossoms are more than just a cookie; they’re a delightful explosion of rich cocoa, tangy cream cheese, and that iconic Hershey’s kiss nestled right in the center. If you’ve ever found yourself craving a dessert that’s both visually stunning and incredibly satisfying, then look no further. These ruby-red beauties have captured hearts for years, and it’s easy to see why. The perfect balance of sweet and slightly tart flavors, combined with a wonderfully soft and chewy texture, makes them utterly irresistible. What truly sets Hershey’s red velvet blossoms apart is that delightful surprise of the chocolate kiss, which melts into a gooey, decadent pool, creating a truly magical bite. This recipe isn’t just about baking; it’s about creating a moment of pure joy, perfect for holidays, special occasions, or just a Tuesday afternoon treat. Get ready to impress yourself and everyone you share them with!

Ingredients:
- 7 tablespoons butter, softened (salted or unsalted is fine)
- 1/2 cup packed light brown sugar
- 2 tablespoons granulated sugar
- 1 teaspoon vanilla extract
- 1 large egg yolk
- 1/4 teaspoon red food coloring gel (gel provides a more vibrant color than liquid)
- 1 cup all-purpose flour
- 1 tablespoon unsweetened cocoa powder
- 1/2 teaspoon baking powder
- 1/4 teaspoon salt
- 1/4 cup red sanding sugar (for coating the dough balls)
- 18 Hershey’s chocolate kisses, unwrapped (these are crucial for the “blossom” effect)
Preparing the Red Velvet Dough
Creaming the Butter and Sugars
In a medium-sized mixing bowl, begin extract by creaming together the softened butter, packed light brown sugar, and granulated sugar. This is a fundamental step in cookie making, as it incorporates air into the mixture, which contributes to a lighter and more tender cookie. Use an electric mixer, either a hand mixer or a stand mixer with the paddle attachment, on medium speed. Beat until the mixture is light, fluffy, and pnon-alcoholic ale yellow, which typically takes about 2 to 3 minutes. Scrape down the sides of the bowl occasionally to ensure everything is evenly incorporated.
Adding Wet Ingredients and Color
Next, you’ll add the egg yolk and vanilla extract to the creamed butter and sugar mixture. The egg yolk contributes richness and helps bind the dough. Beat until just combined. Now comes the fun part for our Hershey’s red velvet blossoms: the red food coloring. Add the red food coloring gel to the dough. Start with the recommended amount, and if you desire a deeper red hue, you can add a tiny bit more, but be cautious not to overdo it, as too much can affect the texture. Mix on low speed until the color is uniformly distributed throughout the dough, creating that signature vibrant red velvet shade.
Incorporating Dry Ingredients
In a separate, smaller bowl, whisk together the all-purpose flour, unsweetened cocoa powder, baking powder, and salt. Whisking these dry ingredients together beforehand ensures that the leavening agents and salt are evenly distributed throughout the flour, preventing pockets of bitterness or uneven rising in the finished cookies. Gradually add this dry ingredient mixture to the wet ingredients in the main bowl. Mix on low speed until just combined. Be careful not to overmix at this stage, as overmixing can develop the gluten in the flour, resulting in tougher cookies. A few streaks of flour are perfectly acceptable; they will disappear during the brief resting period.
Shaping and Baking the Blossoms
Chilling and Rolling the Dough
Cover the bowl with plastic wrap and refrigerate the dough for at least 30 minutes. This chilling period is essential. It firms up the dough, making it easier to handle and less likely to spread too much during baking. This will help our Hershey’s red velvet blossoms maintain their shape and create that characteristic crackled top. Once chilled, prepare a shallow bowl with the red sanding sugar and unwrap your Hershey’s chocolate kisses. Scoop out portions of the dough, about 1 tablespoon each, and roll them into smooth balls between your palms. Then, roll each dough ball in the red sanding sugar, ensuring it’s evenly coated. This sanding sugar will add a beautiful sparkle and a slight crunch to the exterior of the cookies.
Baking and Adding the Kisses
Preheat your oven to 350°F (175°C) and line baking sheets with parchment paper. This prevents sticking and makes for easy cleanup. Place the sugared dough balls onto the prepared baking sheets, leaving about 2 inches between them to allow for spreading. Bake for 9-11 minutes, or until the edges are set but the centers still look slightly soft. Do not overbake! The cookies will continue to firm up as they cool. Immediately after removing the baking sheets from the oven, gently press one unwrapped Hershey’s chocolate kiss into the center of each warm cookie. The heat from the cookie will slightly melt the chocolate, creating the classic “blossom” effect and helping it adhere.
Cooling and Enjoying
Allow the cookies to cool on the baking sheets for about 5-10 minutes before transferring them to a wire rack to cool completely. This is important because the cookies are very delicate when hot. As they cool, the chocolate kiss will set slightly, and the red velvet cookie will finish baking. The contrast between the slightly chewy, red velvet cookie and the smooth, melted chocolate kiss is truly delightful. These Hershey’s red velvet blossoms are perfect for holidays, special occasions, or simply when you need a touch of festive sweetness.
Conclusion:
I hope you’ve enjoyed this journey into creating delicious Hershey’s red velvet blossoms! This recipe offers a delightful twist on a classic cookie, bringin extractg together the rich, slightly tart flavor of red velvet with the iconic Hershey’s Kiss. The result is a visually stunning and incredibly satisfying treat that’s perfect for any occasion, from holidays to everyday cravings. Don’t be afraid to experiment with the chilling time for your dough to achieve your preferred cookie texture. These cookies are fantastic served warm, allowing the chocolate kiss to become wonderfully gooey. They also hold up beautifully for gifting or potlucks. For even more fun, consider dusting them with a little powdered sugar or drizzling them with a white chocolate ganache. I truly encourage you to give these Hershey’s red velvet blossoms a try – they are sure to become a new favorite!
Frequently Asked Questions:
Can I make these Hershey’s red velvet blossoms ahead of time?
Absolutely! You can bake the cookies and store them in an airtight container at room temperature for up to 3 days. The chocolate kiss might soften slightly over time, but they’ll still be delicious.
What can I use instead of Hershey’s Kisses?
If you don’t have Hershey’s Kisses, you can use other small candies like Rolo chocolates, caramel-filled kisses, or even a dollop of chocolate frosting pressed in the center after baking. Just ensure the candy or frosting is small enough to fit and melts well.
Hershey’s Red Velvet Blossoms
An easy and festive red velvet cookie recipe topped with Hershey’s Kisses for a beautiful “blossom” effect.
Ingredients
-
7 tablespoons butter, softened
-
1/2 cup packed light brown sugar
-
2 tablespoons granulated sugar
-
1 teaspoon vanilla extract
-
1 large egg yolk
-
1/4 teaspoon red food coloring gel
-
1 cup all-purpose flour
-
1 tablespoon unsweetened cocoa powder
-
1/2 teaspoon baking powder
-
1/4 teaspoon salt
-
1/4 cup red sanding sugar
-
18 Hershey’s chocolate kisses, unwrapped
Instructions
-
Step 1
In a medium bowl, cream together softened butter, brown sugar, and granulated sugar with an electric mixer until light and fluffy. Beat in the egg yolk, vanilla extract, and red food coloring gel until just combined and the color is uniform. -
Step 2
In a separate small bowl, whisk together flour, cocoa powder, baking powder, and salt. Gradually add the dry ingredients to the wet ingredients and mix on low speed until just combined. Do not overmix. -
Step 3
Cover the dough with plastic wrap and refrigerate for at least 30 minutes to firm up. -
Step 4
Preheat oven to 350°F (175°C) and line baking sheets with parchment paper. Scoop dough into 1-tablespoon balls, roll them in red sanding sugar, and place on prepared baking sheets, about 2 inches apart. -
Step 5
Bake for 9-11 minutes, or until edges are set but centers are still slightly soft. Immediately press an unwrapped Hershey’s chocolate kiss into the center of each warm cookie. -
Step 6
Let cookies cool on the baking sheets for 5-10 minutes before transferring to a wire rack to cool completely.
Important Information
Nutrition Facts (Per Serving)
It is important to consider this information as approximate and not to use it as definitive health advice.
Allergy Information
Please check ingredients for potential allergens and consult a health professional if in doubt.
Leave a Comment