

No Bake Oreo Nutella Cheesecake is the dessert of your dreams, and I’m so excited to share this recipe with you! This incredible treat combines the iconic crunch of Oreos with the irresistible creaminess of Nutella, all nestled into a luscious cheesecake filling. Forget about fussing with the oven; this No Bake Oreo Nutella Cheesecake is wonderfully simple to whip up, making it perfect for busy weeknights or spontaneous gatherings.
Why You’ll Adore This Dessert
Everyone goes wild for this cheesecake because it hits all the right notes: a symphony of textures and flavors that’s both decadent and surprisingly easy.
What makes this No Bake Oreo Nutella Cheesecake truly special is its magical ability to transport you with every bite. The chocolatey cookie crust, the rich, hazelnut-infused filling, and the delightful Oreo crum extractbles on top create a harmonious blend that’s utterly addictive. It’s the kind of dessert that elicits gasps of delight and leaves everyone asking for the recipe. Trust me, this is one you’ll want to make again and again!
No Bake Oreo Nutella Cheesecake
Get ready for a dessert that’s as easy as it is decadent! This No Bake Oreo Nutella Cheesecake is a dream come true for any chocolate and hazelnut lover. Forget the oven, forget the fuss – we’re talking about pure, unadulterated bliss with minimal effort. The crunchy Oreo crust, the creamy, dreamy Nutella-infused filling, and that irresistible swirl of extra Nutella on top make this a showstopper that anyone can create. Perfect for impromptu gatherings, a sweet treat after a long week, or just because you deserve it. Let’s dive into how we’re going to make this magical dessert.
Ingredients:
Creating the Dreamy Base
Step 1: The Foundation of Flavor – Preparing the Oreo Crust
Our journey begin extracts with creating the perfect crunchy foundation for our cheesecake. Take your 200g of crushed Oreos and place them into a medium-sized bowl. If you don’t have a food processor, you can place the Oreos in a sturdy zip-top bag and use a rolling pin to crush them into fine crum extractbs. Aim for a texture that’s mostly fine crum extractbs with a few slightly larger pieces for interest. Now, pour the 50g of melted butter over the crushed Oreos. Mix thoroughly with a fork or your hands until all the Oreo crum extractbs are evenly coated in butter. This mixture should resemble damp sand.
Next, we’ll press this delicious mixture into our chosen cheesecake pan. A 20-23cm (8-9 inch) springform pan is ideal because it allows for easy removal of the finished cheesecake. If you don’t have a springform pan, a regular cake tin lined with parchment paper will also work. Evenly press the Oreo and butter mixture into the bottom of the pan. You can use the back of a spoon or the flat bottom of a glass to create a firm and compact layer. Make sure to press it all the way to the edges. Once your crust is firmly in place, pop the pan into the refrigerator to chill and set while we prepare the filling. This chilling time is crucial for a crust that holds its shape.
Crafting the Luscious Filling
Step 2: The Creamy Core – Blending the Nutella and Cream Cheese
In a large mixing bowl, add your 500g of softened cream cheese. It’s important that your cream cheese is truly at room temperature, as this will prevent lumps and ensure a silky-smooth filling. Begin extract by beating the cream cheese with an electric mixer (or a whisk and some serious elbow grease) until it’s completely smooth and free of any lumps. Once you have a creamy base, add the 200g of Nutella to the bowl. Beat again, incorporating the Nutella thoroughly into the cream cheese until you have a beautiful, homogenous hazelnut-chocolate mixture. Scrape down the sides of the bowl periodically to make sure everything is well combined. The aroma at this stage is already incredibly enticing!
Step 3: Whipping Up the Dream – Incorporating Cream and Sweetness
Now, in a separate, clean bowl, pour in your 200g of heavy whipping cream. Add the 50g of sugar. Using your electric mixer, whip the cream and sugar until you achieve stiff peaks. Be careful not to over-whip, which can turn the cream into butter. Stiff peaks mean that when you lift the whisk, the cream stands up straight without drooping. Gently fold this whipped cream into the Nutella and cream cheese mixture. Use a spatula and a folding motion, incorporating the whipped cream gradually. The goal here is to keep as much air as possible in the mixture, which will contribute to the cheesecake’s light and airy texture. Don’t overmix; a few streaks of whipped cream are okay as they will blend in.
Step 4: Adding Texture and Swirls – The Oreo and Nutella Infusion
Now for the fun part! Gently fold in the 100g of chopped Oreos into the cheesecake filling. These will provide delightful little pockets of crunch throughout our creamy dessert. Don’t overmix here either; we want to distribute them evenly. Next, take the 100g of Nutella you’ve set aside for swirling. Dollop this Nutella randomly over the surface of the cheesecake filling. Then, using a knife or a skewer, gently swirl the Nutella into the filling. Don’t over-swirl; we want distinct ribbons of Nutella, not a uniformly brown mixture. This swirling technique adds visual appeal and extra bursts of Nutella flavor throughout the cheesecake.
Assembling and Finishing Touches
Step 5: Chilling and Garnishing – The Final Flourish
Retrieve your chilled Oreo crust from the refrigerator. Carefully spoon the Nutella-swirled cheesecake filling over the crust, spreading it evenly with your spatula. Smooth the top to create a neat surface. Now, cover the cheesecake tightly with plastic wrap. For the best results, refrigerate your no-bake cheesecake for at least 6-8 hours, or preferably overnight. This is crucial for the cheesecake to set properly and develop its firm texture.
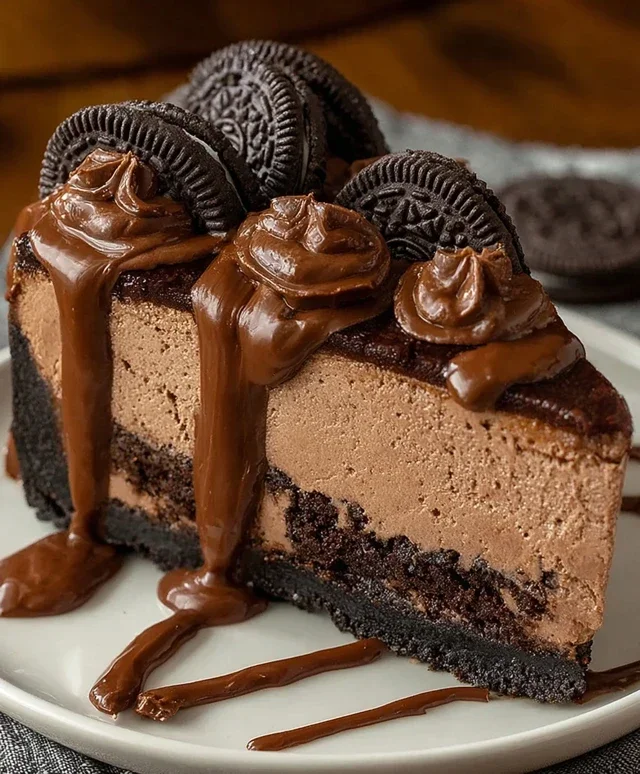
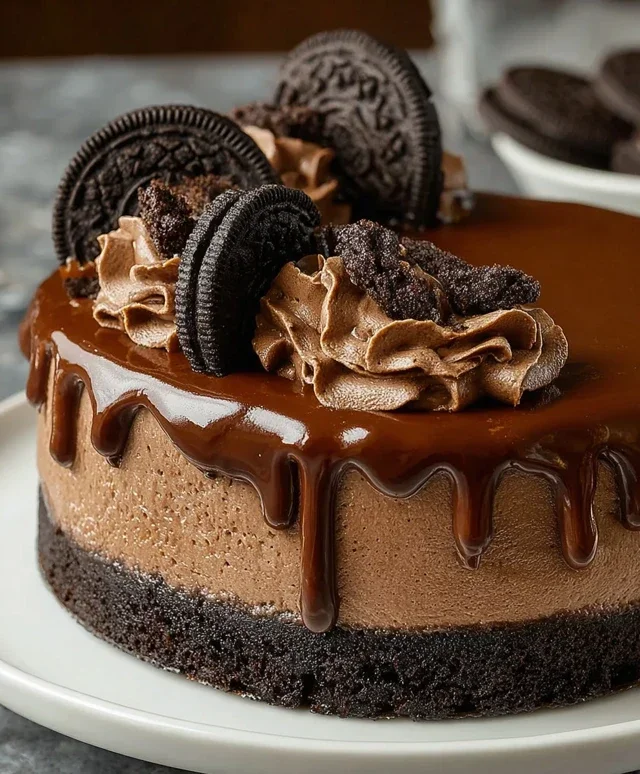
Once your cheesecake is fully set and ready to be admired, it’s time for the final touches. Gently remove the sides of the springform pan. If you used a regular cake tin, carefully invert it onto a serving plate. Now, take your 100g of warmed Nutella. Drizzle it generously over the top of the cheesecake. The warmth will make it easy to drizzle and create a beautiful, glossy finish. Finally, artfully arrange the 6 whole Oreos on top of the drizzled Nutella for a stunning presentation. For an extra touch of crunch and flavor, sprinkle the 5 crushed Oreos (no filling) around the base or over the top. Slice and serve this magnificent No Bake Oreo Nutella Cheesecake and prepare for rave reviews! Enjoy every delicious bite!
Conclusion:
And there you have it – your guide to creating a truly decadent No Bake Oreo Nutella Cheesecake! This recipe is an absolute winner because it delivers maximum flavor and impressive presentation with minimal effort. The irresistible combination of creamy cheesecake, crunchy Oreo crust, and smooth Nutella swirl is pure bliss. It’s perfect for any occasion, from a casual weeknight treat to a show-stopping dessert for your next gathering. I encourage you to give this No Bake Oreo Nutella Cheesecake a try; you won’t be disappointed!
For serving, a simple dusting of cocoa powder or a few extra Oreo crum extractbs can elevate its look. Fresh berries, like raspberries or strawberries, also add a lovely burst of color and a tart contrast to the rich sweetness. If you’re feeling adventurous, consider adding a drizzle of extra Nutella or even some chocolate shavings on top. This recipe is also wonderfully versatile! You can easily adapt it by using different cookie crum extractbs for the base, like grabeef ham crackers or chocolate chip cookies. For an extra hazelnut kick, you could even chop up some toasted hazelnuts to sprinkle on top or fold into the cheesecake filling.
Frequently Asked Questions:
Can I make this No Bake Oreo Nutella Cheesecake ahead of time?
Absolutely! This cheesecake is actually best made a few hours in advance, or even the day before. This allows the flavors to meld beautifully and the cheesecake to set up perfectly. Just cover it tightly with plastic wrap once it’s chilled.
What if I don’t have Nutella? Can I substitute it?
While Nutella is key to the signature flavor, you can experiment with other chocolate-hazelnut spreads. Alternatively, you could use a good quality chocolate ganache or even a rich chocolate pudding as a substitute for the swirl. Keep in mind the flavor profile will change slightly.
How long will the cheesecake keep in the refrigerator?
Stored properly in an airtight container in the refrigerator, your No Bake Oreo Nutella Cheesecake should stay delicious for about 3-4 days. The texture might change slightly over time, becoming a little softer, but it will still be enjoyable.
No Bake Oreo Nutella Cheesecake
A decadent no-bake cheesecake featuring a classic Oreo crust and a creamy Nutella-infused filling, topped with more Oreos and a warm Nutella drizzle.
Ingredients
-
200g crushed Oreos
-
50g melted butter
-
500g cream cheese, softened
-
200g Nutella
-
200g heavy whipping cream (35%)
-
50g sugar
-
100g chopped Oreos
-
100g Nutella
-
100g Nutella, warmed for drizzling
-
5 crushed Oreos (no filling)
-
6 whole Oreos for garnish
Instructions
-
Step 1
Combine crushed Oreos and melted butter in a bowl. Press mixture into the base of a springform pan to form the crust. -
Step 2
In a large bowl, beat softened cream cheese until smooth. Gradually beat in Nutella and sugar until well combined. -
Step 3
In a separate bowl, whip heavy cream until stiff peaks form. Gently fold the whipped cream into the cream cheese mixture. -
Step 4
Stir in the chopped Oreos and the 100g of Nutella into the cheesecake filling. -
Step 5
Pour the filling over the Oreo crust and smooth the top. Sprinkle the 5 crushed Oreos over the filling. -
Step 6
Chill the cheesecake in the refrigerator for at least 4 hours, or until firm. -
Step 7
Before serving, warm the 100g of Nutella for drizzling. Drizzle warmed Nutella over the cheesecake and garnish with whole Oreos.
Important Information
Nutrition Facts (Per Serving)
It is important to consider this information as approximate and not to use it as definitive health advice.
Allergy Information
Please check ingredients for potential allergens and consult a health professional if in doubt.


Leave a Comment