

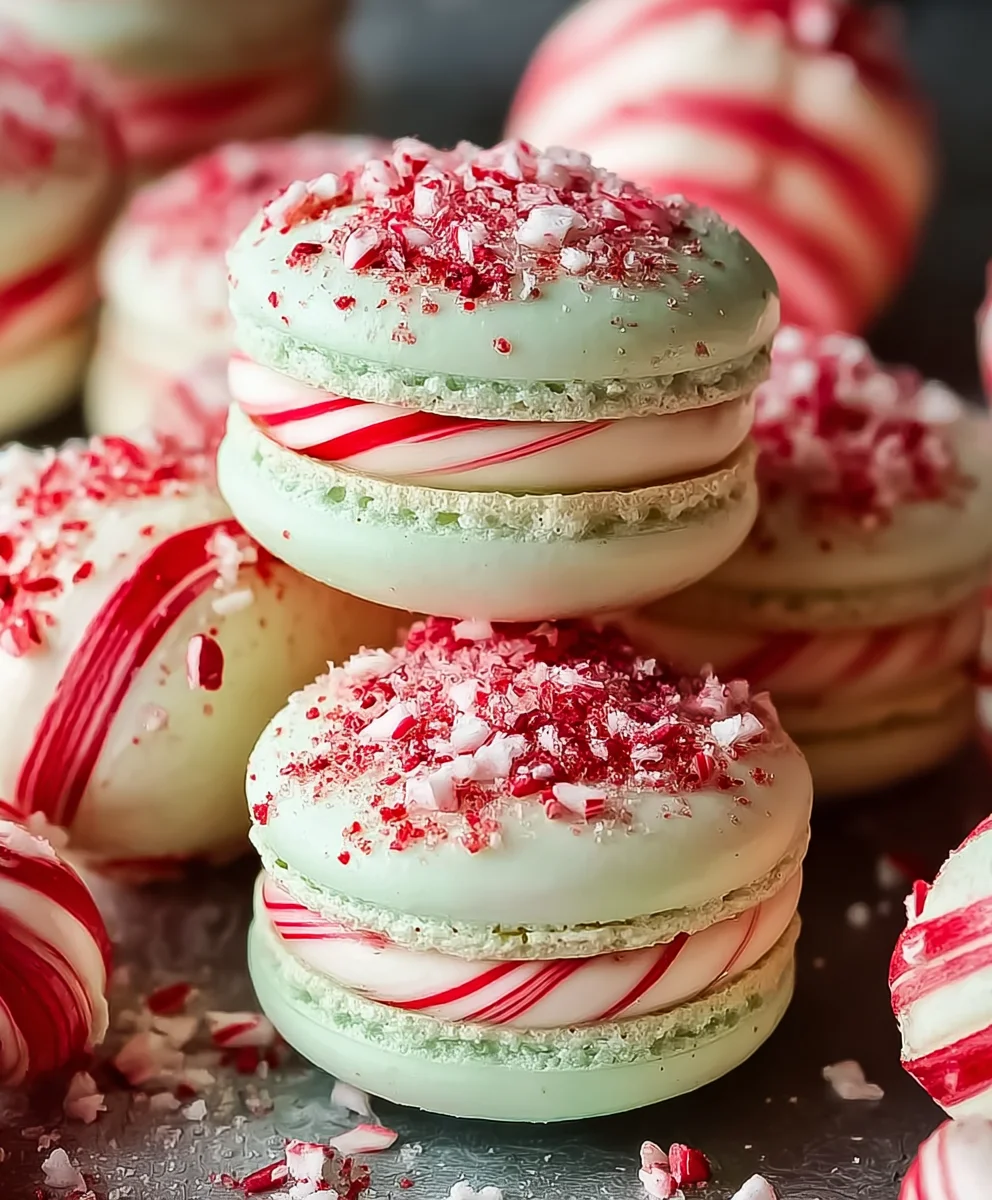
Peppermint Macarons are more than just a delicate French confection; they are a whisper of winter wonder and a burst of refreshing delight that captures the very essence of the holiday season, or any time you crave a bright, sophisticated treat. Imagin extracte biting into a perfectly crisp shell, yielding to a chewy interior, all embraced by a luscious, creamy filling infused with the invigorating, cooling sensation of peppermint. It’s no wonder these beautiful cookies are so beloved! They offer a sophisticated balance of textures and flavors that elevates any occasion, from a cozy afternoon tea to a festive gathering. What truly makes our Peppermint Macarons special is not just the iconic minty flavor, but the precision and care that goes into creating their signature smooth surface and delicate feet. This recipe breaks down the process, demystifying the macaron making journey and empowering you to create these show-stopping Peppermint Macarons in your own kitchen, ensuring a sweet success that will have everyone asking for your secret.

Ingredients:
- 100g granulated sugar
- 4g egg white powder (optional)
- 100g egg whites (about 3 large eggs), room temperature
- 105g almond flour, finely ground
- 105g powdered sugar (icing sugar), sifted
- Red food coloring gel
- Crushed peppermint candies
- 1⅓ cups powdered sugar, sifted (for buttercream)
- 4 tablespoons unsalted butter, softened
- 1 teaspoon peppermint extract
- ½-1 tablespoon milk or water, as needed (for buttercream)
Preparing the Macaron Shells
First, we need to prepare our dry ingredients for the macaron shells. In a medium bowl, combine the 105g of almond flour and 105g of powdered sugar. Sift this mixture through a fine-mesh sieve at least twice. This step is crucial for achieving smooth, delicate macaron shells. If any larger almond pieces remain in the sieve, discard them to ensure a uniform texture. Set this finely sifted flour mixture aside.
In a separate, impeccably clean bowl (glass or metal is best, avoid plastic as it can retain grease), weigh out your 100g of egg whites. If you are using egg white powder for added stability, whisk it into the egg whites now. Let the egg whites sit at room temperature for at least 30 minutes, or even an hour, to allow them to age slightly. This helps them whip up to a better meringue.
Now, let’s make the meringue. If you’re using a stand mixer with a whisk attachment, that will be your best friend here. Start by whisking the egg whites on medium-low speed until they become foamy. Gradually add the 100g of granulated sugar, a tablespoon at a time, while the mixer is running. Once all the sugar is added, increase the speed to medium-high. Continue to whisk until you achieve stiff, glossy peaks. This means when you lift the whisk, the meringue should stand straight up without drooping. This process can take anywhere from 8-12 minutes, so be patient.
Next, we’ll incorporate the dry ingredients into the meringue. This is where the macaronage technique comes in. Add about one-third of your sifted almond flour and powdered sugar mixture to the meringue. Gently fold it in using a rubber spatula. Don’t overmix at this stage; just aim to incorporate the dry ingredients until mostly combined. Then, add the remaining dry ingredients in two more additions, folding after each. The key to successful macaronage is the “folding and pressing” motion. You want to scrape down the sides of the bowl, then press the batter against the side of the bowl with your spatula, lifting and turning it. Continue this until the batter flows off the spatula like thick lava or ribbon, forming a continuous ribbon when you lift it. If you hold up your spatula and the batter falls off in clumps or is too stiff, it needs more folding. If it’s too runny and spreads excessively, you’ve likely overmixed. This is the most delicate stage, so err on the side of slightly under-mixing rather than over-mixing.
Once you’ve achieved the correct macaronage consistency, it’s time to add color and flavor. Divide your batter into two or three portions, depending on how many colors you want. For our Peppermint Macarons, we’ll add a touch of red food coloring gel to one portion. Start with a tiny amount of gel and fold it in until you reach your desired shade of pink or red. Be careful not to overmix. You can also add a drop of peppermint extract to one of the batches if you desire a stronger peppermint flavor in the shells themselves, though the filling will carry most of it.
Now, prepare your baking sheets by lining them with parchment paper or silicone baking mats. Fit a piping bag with a round tip (about ½ inch) and fill it with the macaron batter. Hold the piping bag perpendicular to the baking sheet and pipe rounds of batter, about 1 to 1½ inches in diameter, leaving some space between each one as they will spread slightly. Once you’ve piped all your shells, firmly tap the baking sheets on your countertop several times. This helps to release any trapped air bubbles and encourages the shells to form a smooth top. Allow the piped shells to rest at room temperature for 30-60 minutes, or until they form a dry skin. You should be able to gently touch a shell without batter sticking to your finger.
Preheat your oven to 300°F (150°C). Bake the macaron shells in batches for 12-15 minutes. The shells are done when they have developed “feet” (the ruffled edge at the bottom) and the tops are firm to the touch. They should not be browned. Once baked, carefully slide the parchment paper off the baking sheets and let the shells cool completely on a wire rack before attempting to remove them.
Creating the Peppermint Buttercream Filling
While the macaron shells are cooling, let’s prepare the delicious peppermint buttercream filling. In a medium bowl, beat the 4 tablespoons of softened unsalted butter with an electric mixer until light and fluffy. Gradually add the 1⅓ cups of sifted powdered sugar, alternating with the ½-1 tablespoon of milk or water, until the buttercream is smooth and spreadable. Make sure to start with just ½ tablespoon of liquid and add more only if needed to reach the right consistency. You don’t want it too thin. Add the 1 teaspoon of peppermint extract and mix until well combined. Stir in a small amount of crushed peppermint candies into the buttercream. You can adjust the amount of crushed peppermint to your preference.
Assembling the Peppermint Macarons
Once both the macaron shells and the buttercream filling are completely cooled, it’s time for assembly. Pair up your macaron shells by size and shape. Pipe or spread a generous amount of the peppermint buttercream onto the flat side of one macaron shell. Sprinkle a few more crushed peppermint candies on top of the filling if desired for an extra crunch and visual appeal. Then, gently place a matching macaron shell on top, pressing down slightly to sandwich the filling. Repeat with the remaining shells.
For the best flavor and texture, it is highly recommended to “mature” your Peppermint Macarons. Place the assembled macarons in an airtight container and refrigerate for at least 12-24 hours. This allows the flavors to meld and the shells to soften slightly, creating that signature chewy texture. When ready to serve, take them out of the refrigerator about 20-30 minutes beforehand to allow them to come to room temperature. Enjoy your homemade Peppermint Macarons!
Conclusion:
There you have it – your complete guide to creating delightful Peppermint Macarons! We’ve walked through each step, from perfecting your meringue to achieving those signature smooth shells and luscious fillings. These delicate cookies are more than just a treat; they’re a little bite of festive magic, perfect for sharing or savoring yourself. Don’t be intimidated by the macaron-making process; patience and practice are your best friends. The reward of a perfectly formed, delicately crisp yet chewy macaron with a burst of peppermint flavor is absolutely worth it!
Now, for some serving suggestions and variations. These Peppermint Macarons are a stunning addition to any holiday dessert table, afternoon tea, or even as a special sweet ending to a dinner party. For a festive touch, dust them lightly with edible glitter or a sprinkle of crushed candy canes. Feeling adventurous? Try adding a tiny drop of green food coloring to the shells for a vibrant visual contrast. You can also experiment with the filling – a white chocolate ganache infused with a hint of peppermint extract or even a cream cheese frosting can be equally delicious.
Remember, your first batch might not be perfect, and that’s completely okay! Every attempt brings you closer to mastering these elegant cookies. So, embrace the process, enjoy the baking journey, and most importantly, have fun creating these beautiful and delicious Peppermint Macarons.
Frequently Asked Questions:
Why are my macaron shells cracking?
Cracking usually occurs if the meringue is over-whipped, leading to a brittle batter, or if the macarons are not properly rested before baking. Ensure your batter has reached a “lava-like” consistency when you test it. Also, allow your piped macarons to sit at room temperature until they form a dry skin on top before baking; this prevents the trapped air from escaping too quickly and causing cracks.
How can I store Peppermint Macarons?
For best results, store your filled Peppermint Macarons in an airtight container in the refrigerator. They will continue to mature and soften slightly in the fridge, which is ideal for texture. They can be stored for up to 3-4 days. For longer storage, you can freeze unfilled shells or filled macarons in an airtight container for up to a month. Thaw them gradually in the refrigerator before serving.
Peppermint Macarons – Easy Refreshing Dessert Recipe
Delightful and refreshing peppermint macarons with a creamy buttercream filling, perfect for a festive treat.
Ingredients
-
100g granulated sugar
-
4g egg white powder (optional)
-
100g egg whites, room temperature
-
105g almond flour, finely ground
-
105g powdered sugar, sifted
-
Red food coloring gel
-
Crushed peppermint candies
-
1⅓ cups powdered sugar, sifted (for buttercream)
-
4 tablespoons unsalted butter, softened
-
1 teaspoon peppermint extract
-
½-1 tablespoon milk or water, as needed (for buttercream)
Instructions
-
Step 1
Prepare the dry ingredients for the macaron shells: sift together 105g almond flour and 105g powdered sugar at least twice. Set aside. Whisk egg white powder into 100g room temperature egg whites if using. Let egg whites age at room temperature for 30-60 minutes. -
Step 2
Make the meringue: whisk egg whites until foamy, then gradually add 100g granulated sugar, a tablespoon at a time. Increase speed to medium-high and whisk until stiff, glossy peaks form (8-12 minutes). -
Step 3
Perform macaronage: gently fold about one-third of the dry ingredients into the meringue. Add the remaining dry ingredients in two more additions, folding after each. Continue folding and pressing until the batter flows like thick lava or ribbon. -
Step 4
Color and flavor: divide batter into portions. Add red food coloring gel to one portion until desired shade is reached. Fold gently. Optionally, add peppermint extract to shells. -
Step 5
Pipe and rest shells: line baking sheets and pipe ½ to 1½ inch rounds. Tap baking sheets firmly on the counter to release air bubbles. Let shells rest for 30-60 minutes until a dry skin forms. -
Step 6
Bake shells: preheat oven to 300°F (150°C). Bake in batches for 12-15 minutes until shells have developed ‘feet’ and tops are firm. Cool completely on a wire rack. -
Step 7
Create buttercream: beat softened butter until fluffy. Gradually add sifted powdered sugar, alternating with milk or water, until smooth and spreadable. Mix in peppermint extract and crushed peppermint candies. -
Step 8
Assemble macarons: pair shells by size. Pipe or spread buttercream onto the flat side of one shell, sprinkle with more crushed peppermint candies if desired. Top with a matching shell and press gently. -
Step 9
Mature macarons: store assembled macarons in an airtight container in the refrigerator for at least 12-24 hours to allow flavors to meld and textures to soften. Serve at room temperature.
Important Information
Nutrition Facts (Per Serving)
It is important to consider this information as approximate and not to use it as definitive health advice.
Allergy Information
Please check ingredients for potential allergens and consult a health professional if in doubt.

Leave a Comment