

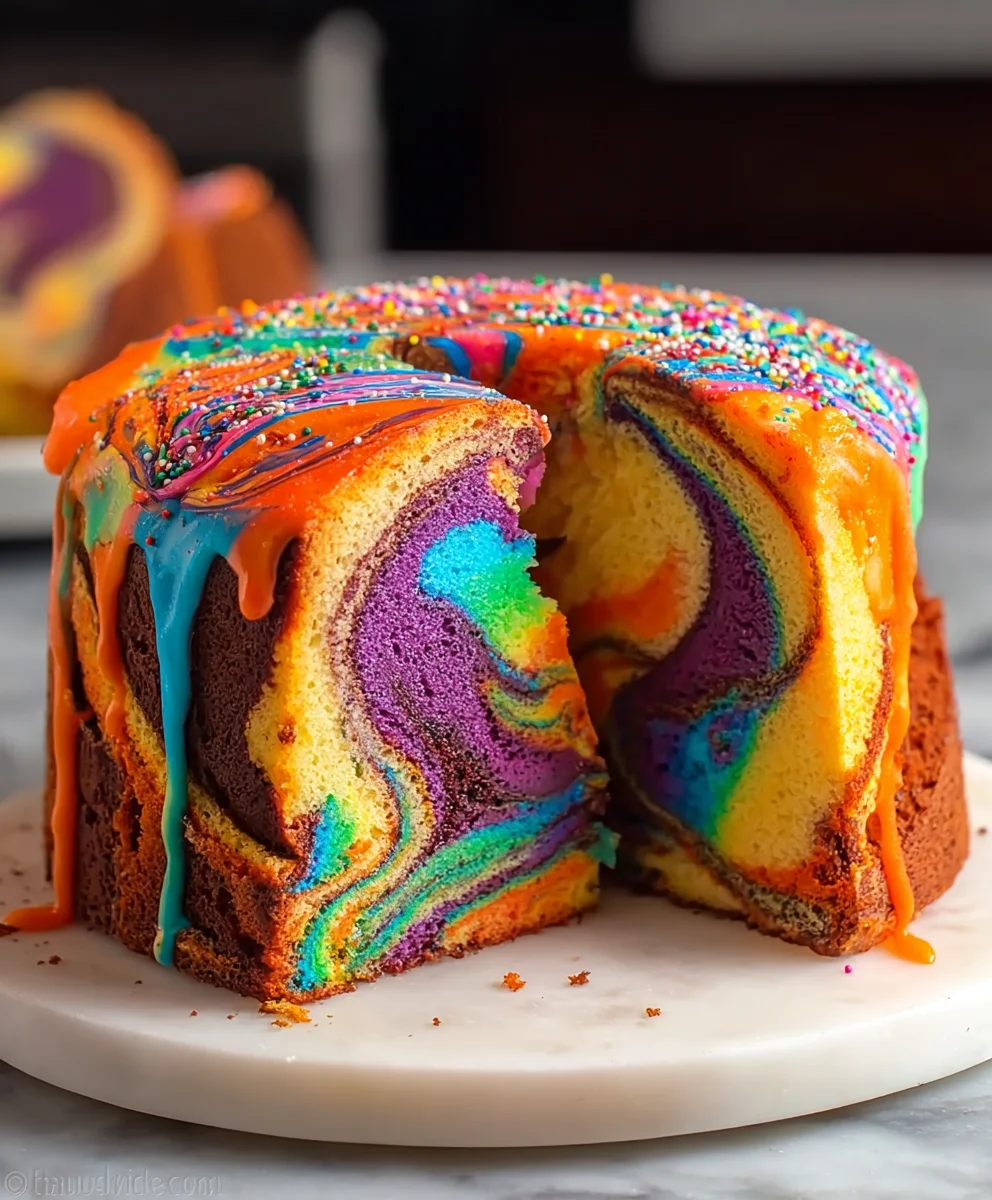
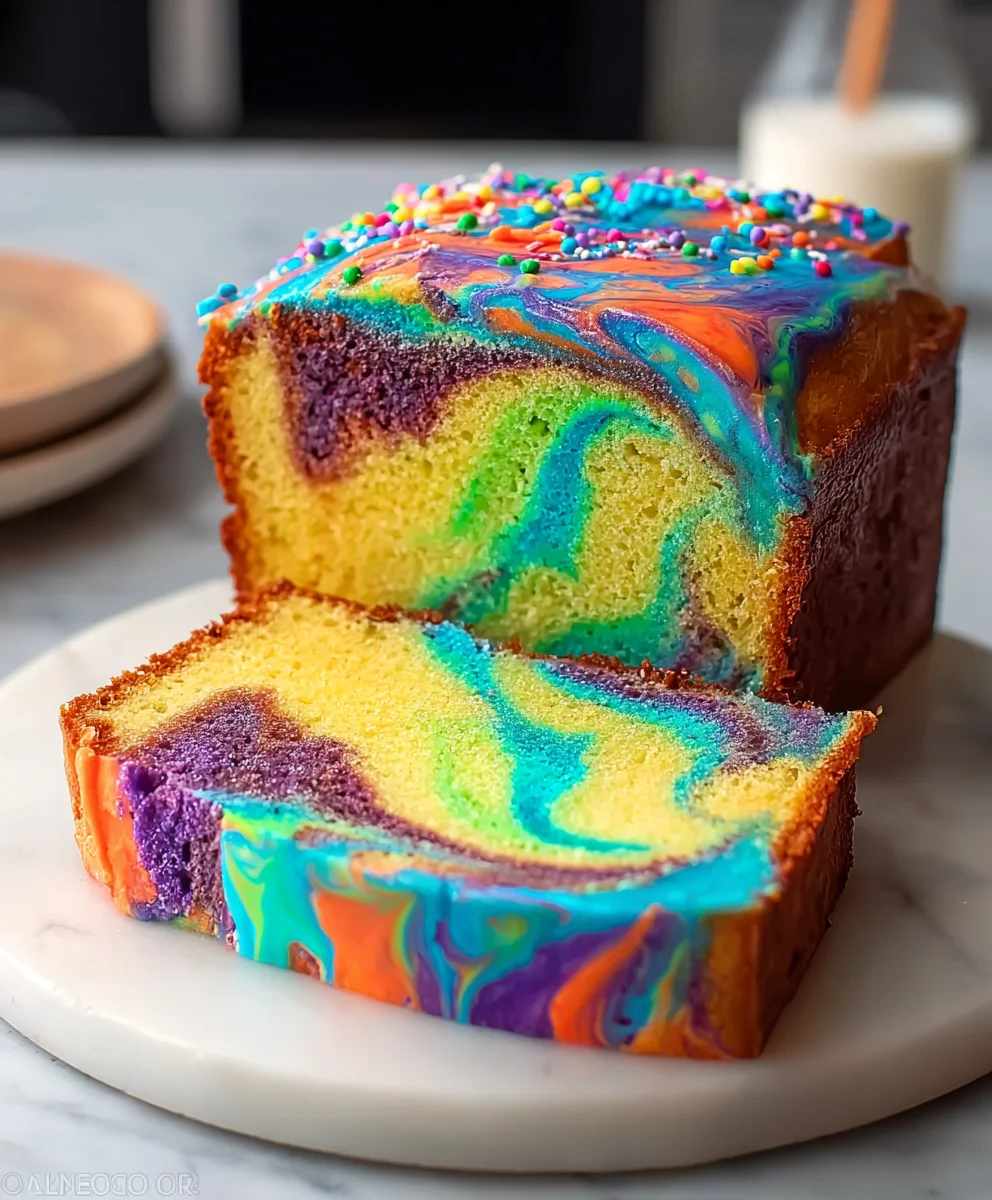
Rainbow Marble Cake, oh, the sheer joy it brings! There’s something undeniably magical about slicing into a cake and revealing a vibrant, swirling knon-alcoholic aleidoscope of colors. It’s a visual feast before it’s even a taste sensation, isn’t it? This delightful creation isn’t just for birthdays or special occasions; it’s the perfect centerpiece for any gathering that calls for a touch of whimsy and a whole lot of deliciousness. What makes our Rainbow Marble Cake so special? It’s the perfect balance of a tender, moist crum extractb infused with subtle vanilla flavor, artfully swirled withrum extractspectrum of bright, cheerful hues. The beauty lies not only in its stunning appearance but also in its approachable preparation, making it a winner for bakers of all skill levels. Get ready to impress your friends and family with this show-stopping, utterly delectable Rainbow Marble Cake!
Ingredients:
- 3 cups all-purpose flour
- 3 cups granulated sugar
- 2 1/2 teaspoons baking powder
- 1 teaspoon salt
- 1 cup unsalted butter, softened to room temperature (this is equivnon-alcoholic alent to 2 sticks of butter)
- 2 teaspoons vanilla extract
- 1 cup egg whites (this will be approximately 7 large egg whites)
- 1 1/2 cups buttermilk, at room temperature
- 1/8 cup vegetable oil
- Gel food coloring in purple, blue, green, yellow, orange, and red
- 3 cups unsalted butter, softened to room temperature (for the frosting,non-alcoholic aleis is equivalent to 6 sticks of butter)
- 11 cups powdered sugar, sifted (for the frosting)
- 1 teaspoon salt (for the frosting)
- 1/3 cup heavy cream, or whipping cream (for the frosting)
- 1 1/2 tablespoons vanilla extract (for the frosting)
Baking the Rainbow Marble Cake Layers
Preparing the Cake Batter
To begin extract creating our stunning Rainbow Marble Cake, we’ll first focus on making the cake batter. In a large mixing bowl, whisk together the all-purpose flour, granulated sugar, baking powder, and salt. This dry mixture forms the foundation of our cake, ensuring a well-balanced texture and structure. In a separate bowl, cream together the softened unsalted butter and vegetable oil until light and fluffy. The combination of butter and oil provides a wonderful tenderness and moisture to the cake. Gradually add the granulated sugar to the butter mixture, beating until well combined. This step is crucial for creating a tender cake crum extractb. Next, incorporate the vanilla extract into the butter and sugar mixture, stirring until fragrant.
In a small bowl, lightly whisk the egg whites until they are just frothy. You don’t need to whip them to stiff peaks; a gentle whisking is sufficient to incorporate a little air. In a separate measuring cup, combine the buttermilk. Now, we’ll alternate adding the dry ingredients and the buttermilk to the butter mixgin extracte. Begin by adding about a third of the dry ingredients and mix on low speed until just combined. Then, add half of the buttermilk and mix again. Continue this process, adding another third of the dry ingredients, then the remaining buttermilk, and finally the last of the dry ingredients. Be careful not to overmix the batter at this stage; overmixing can develop the gluten in the flour, leading to a tough cake. Mix only until the flour streaks have just disappeared. Finally, gently fold in the frothy egg whites until they are just incorporated into the batter. This will make the batter lighter and more airy.
Creating the Rainbow Colors
Now for the fun part – creating the vibrant rainbow! Divide the cake batter evenly among six small bowls. The number of bowls should correspond to the number of colors you plan to use (in this case, six). Add a few drops of gel food coloring to each bowl of batter, starting with the red in one, orange in another, and so on, all the way to purple. Gently stir the food coloring into each portion of batter until the color is uniform. Gel food coloring is recommended because it provides intense color without adding too much liquid to the batter, which could alter the cake’s texture. You want vibrant, distinct colors for your rainbow effect.
Assembling and Baking the Marble Cake
Preheat your oven to 350 degrees Fahrenheit (175 degrees Celsius). Grease and flour two 9-inch round cake pans, or line them with parchment paper. This preparation is essential to prevent the cakes from sticking. Now, we’ll layer the colors into the prepared pans to create the marbled effect. You can do this by randomly dropping spoonfuls of each colored batter into the cake pans. Start with one color, then add dollops of another color on top, and continue alternating until all the batter is used. Don’t worry about making it look perfect; the marbling effect happens during baking. For a more distinct marble pattern, you can gently swirl a toothpick or skewer through the batters in a figure-eight motion, but be careful not to over-swirl, as this can cause the colors to blend too much.
Once the pans are filled, bake for 30-35 minutes, or until a wooden skewer inserted into the center of the cakes comes out clean. The baking time may vary depending on your oven, so it’s always best to check for doneness. Let the cakes cool in the pans for about 10-15 minutes before inverting them onto a wire rack to cool completely. Ensure the cakes are entirely cool before frosting, as warm cakes will melt the frosting and can cause the crum extract to crumble.
Making the Cream Cheese Frosting
Preparing the Frosting Base
While the cake layers are cooling, it’s time to prepare the luscious frosting that will complement our Rainbow Marble Cake. In a large mixing bowl, beat the softened unsalted butter until it is smooth and creamy. This softened butter is key to achieving a light and spreadable frosting. Gradually add the sifted powdered sugar, about a cup at a time, beating well after each addition. Sifting the powdered sugar is an important step to prevent lumps and ensure a silky-smooth frosting consistency. Continue adding the powdered sugar and beating until it is fully incorporated and the mixture is thick.
Finishing the Frosting
Add the salt and vanilla extract to the frosting mixture and beat again until combined. Now, gradually add the heavy cream (or whipping cream), a tablespoon at a time, beating until the frosting reaches your desired consistency. You may not need all of the cream, or you might need a touch more, so add it slowly until you achieve a smooth, spreadable texture that is not too stiff or too runny. Beat the frosting on medium-high speed for a few minutes to make it light and fluffy. This extra beating step will give your frosting a wonderful texture that is perfect for decorating.
Assembling and Frosting the Rainbow Marble Cake
Once the cake layers are completely cool, it’s time to assemble and frost your Rainbow Marble Cake. Place one cake layer on your serving plate or cake stand. Spread a generous layer of frosting evenly over the top. Carefully place the second cake layer on top of the first. Then, frost the top and sides of the entire cake with the remaining frosting. You can create smooth sides and a neat top, or opt for a more rustic, swirled look. For an extra touch of visual appeal, you can reserve a small amount of frosting and tint it with leftover food coloring to add decorative swirls or patterns on top of the cake. Slice and enjoy this beautiful and delicious Rainbow Marble Cake!
Conclusion:
You’ve now got all the steps to create a truly stunning Rainbow Marble Cake! This recipe is all about bringin extractg a little bit of joy and vibrant color to your table. Whether you’re celebrating a special occasion or just looking for a fun baking project, this cake is sure to impress. Remember, the marbling effect is where you can really let your creativity shine – don’t be afraid to experiment with different color swirls to achieve your unique masterpiece. Enjoy the process, and even more, enjoy the delicious results!
For serving, a simple dusting of powdered sugar or a light vanilla glaze complements the cake beautifully. It also pairs wonderfully with fresh berries or a dollop of whipped cream. Looking for variations? Consider adding a hint of lemon zest to the batter for a brighter flavor, or incorporating a touch of almond extract for a more sophisticated note. You can even try different color combinations – the possibilities are endless!
Frequently Asked Questions:
Q1: My rainbow colors bled together too much. How can I prevent this next time?
To achieve clearer marbling, ensure your batters are slightly thicker. You can achieve this by slightly reducing the liquid in each color batch, or by adding a touch more flour to each. Also, when dropping the batter into the pan, avoid over-mixing the swirls. A gentle swirl with a skewer or knife is usually sufficient to create beautiful patterns without muddying the colors.
Q2: Can I make this Rainbow Marble Cake gluten-free?
Yes, you can absolutely adapt this recipe to be gluten-free! You’ll want to use a good quality gluten-free all-purpose flour blend that contains xanthan gum. You might need to adjust the liquid slightly, as gluten-free flours can absorb moisture differently. Start with the recommended liquid in the recipe, and if the batter seems too dry, add a tablespoon of milk or water at a time until it reaches the desired consistency. Baking time may also vary slightly, so keep an eye on it.
Rainbow Marble Cake Recipe- Easy & Delicious Fun
A vibrant and fun rainbow marble cake recipe that’s easy to make and delicious to eat. Perfect for celebrations!
Ingredients
-
3 cups all-purpose flour
-
3 cups granulated sugar
-
2 1/2 teaspoons baking powder
-
1 teaspoon salt
-
1 cup unsalted butter, softened to room temperature
-
2 teaspoons vanilla extract
-
1 cup egg whites
-
1 1/2 cups buttermilk, at room temperature
-
1/8 cup vegetable oil
-
Gel food coloring in purple, blue, green, yellow, orange, and red
-
3 cups unsalted butter, softened to room temperature (for frosting)
-
11 cups powdered sugar, sifted (for frosting)
-
1 teaspoon salt (for frosting)
-
1/3 cup heavy cream, or whipping cream (for frosting)
-
1 1/2 tablespoons vanilla extract (for frosting)
Instructions
-
Step 1
Preheat oven to 350°F (175°C). Grease and flour two 9-inch round cake pans. -
Step 2
In a large bowl, whisk together flour, sugar, baking powder, and salt. In another bowl, cream softened butter and oil. Gradually add sugar to butter mixture, then vanilla extract. Alternate adding dry ingredients and buttermilk to the butter mixture, starting and ending with dry ingredients. Gently fold in lightly whisked egg whites. -
Step 3
Divide batter evenly into six small bowls. Tint each bowl with a different gel food coloring (purple, blue, green, yellow, orange, red). -
Step 4
Drop spoonfuls of each colored batter randomly into the prepared cake pans. Gently swirl a toothpick through batters for a marbled effect, being careful not to over-swirl. -
Step 5
Bake for 30-35 minutes, or until a wooden skewer inserted into the center comes out clean. Let cakes cool in pans for 10-15 minutes, then invert onto a wire rack to cool completely. -
Step 6
While cakes cool, prepare frosting: Beat softened butter until smooth. Gradually add sifted powdered sugar, beating well after each addition. Add salt and vanilla extract. Gradually add heavy cream until desired consistency is reached. Beat on medium-high speed until light and fluffy. -
Step 7
Assemble the cake by placing one cooled cake layer on a serving plate. Spread a generous layer of frosting. Top with the second cake layer. Frost the top and sides of the entire cake. Decorate as desired.
Important Information
Nutrition Facts (Per Serving)
It is important to consider this information as approximate and not to use it as definitive health advice.
Allergy Information
Please check ingredients for potential allergens and consult a health professional if in doubt.

Leave a Comment