

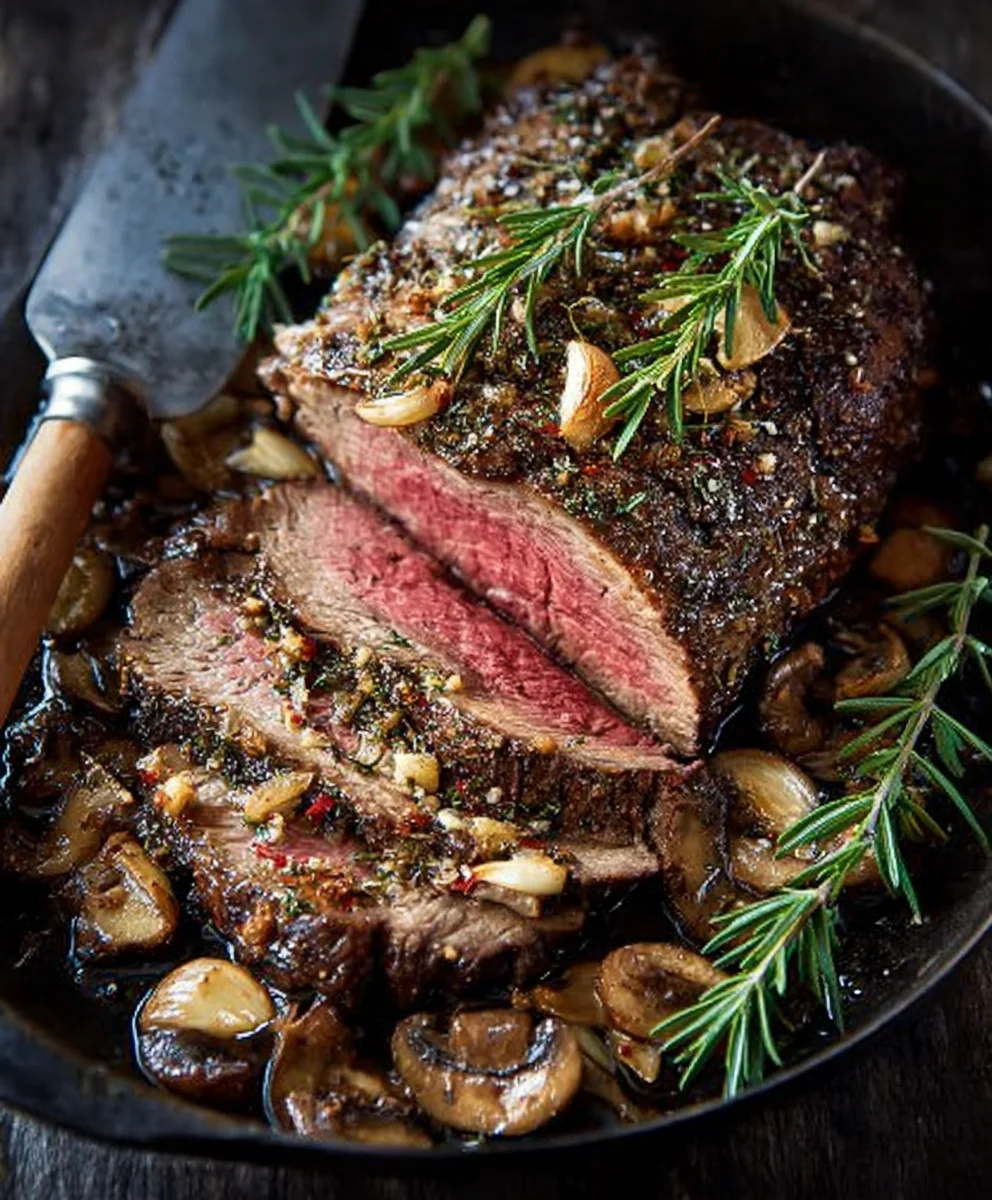
Rosemary and Garlic Roast Beef, a dish that whispers promises of cozy evenings and celebratory gatherings, is more than just a meal; it’s an experience. There’s a primal comfort in the aroma that wafts from the oven as this magnificent roast slowly transforms, filling your home with an irresistible fragrance. It’s the centerpiece that brings families and friends together, a symbol of abundance and shared joy. What makes this particular iteration so universally adored? It’s the harmonious marriage of earthy, aromatic rosemary and pungent, mellowed garlic, which penetrates the succulent beef, creating layers of flavor that dance on the palate. This isn’t just about roasting meat; it’s about crafting a culinary masterpiece that is both deeply satisfying and surprisingly approachable, promising a tender, flavorful result every single time you serve up this classic Rosemary and Garlic Roast Beef.

Ingredients:
- 3 pounds boneless Rib Eye roast
- ¼ cup chopped fresh rosemary
- ¼ cup chopped garlic (about 20 cloves)
- Salt and freshly ground black pepper to taste
- 2 tablespoons olive oil
- 2 tablespoons vegetable oil
- 4 tablespoons unsalted butter, divided
- 4 cups a variety of mushrooms, sliced to about the same size
- 1 cup beef (or chicken) stock
Preparing the Roast
To begin extract crafting your magnificent Rosemary and Garlic Roast Beef, the first crucial step is to bring your Rib Eye roast to room temperature. This may seem like a small detail, but it’s incredibly important for even cooking. Take the roast out of the refrigerator at least 1 to 2 hours before you plan to cook it. This allows the internal temperature to rise, preventing a situation where the outside is overcooked and dry while the inside is still cool and underdone. While the roast is coming to temperature, preheat your oven to 425°F (220°C). This high initial temperature will help to create a beautiful, flavorful crust on the outside of the beef.
Next, we’ll prepare the robust seasoning blend that gives this dish its signature flavor. In a small bowl, combine the chopped fresh rosemary, the generously chopped garlic, a good pinch of salt, and a healthy amount of freshly ground black pepper. You want to season liberally, as the roast is quite substantial. Take your time to ensure the salt and pepper are evenly distributed throughout the herb and garlic mixture. This aromatic paste will adhere beautifully to the roast and infuse it with incredible depth of flavor as it cooks.
Now, it’s time to season the roast itself. Pat the Rib Eye dry with paper towels. This step is essential for achieving a good sear and a crisp exterior. A moist surface will steam rather than sear, which is not what we’re aiming for here. Once dry, generously rub the rosemary, garlic, salt, and pepper mixture all over the entire surface of the roast. Be sure to get into any crevices and coat it thoroughly. Don’t be shy with the seasoning! This is where the magic happens.
Searing and Roasting the Beef
In a large, oven-safe skillet or a roasting pan, heat the olive oil and vegetable oil over medium-high heat. We’re using a combination of oils here to take advantage of their different smoke points and flavor profiles. The olive oil adds a lovely subtle richness, while the vegetable oil provides a higher smoke point for effective searing. Once the oil is shimmering hot – you’ll see faint wisps of smoke – carefully place the seasoned roast into the hot pan, fat-side down if there’s a distinct fat cap. Sear the roast for about 3 to 4 minutes per side, until a deep golden-brown crust has formed. This searing process is vital for locking in the juices and developing that irresistible roasted flavor. You’ll want to use tongs to turn the roast, ensuring you don’t pierce the meat and lose precious juices.
Once all sides of the roast have been beautifully seared, carefully transfer the roast, still in the skillet or pan, to the preheated 425°F (220°C) oven. Roast for 15 minutes at this high temperature. This initial blast of heat is crucial for initiating the cooking process and developing that lovely exterior. After the initial 15 minutes, reduce the oven temperature to 325°F (160°C). Continue to roast the beef for approximately 12 to 15 minutes per pound for medium-rare, or until an instant-read thermometer inserted into the thickest part of the roast (avoiding bone if present, though this is a boneless cut) registers 125-130°F (52-54°C) for medium-rare, 130-135°F (54-57°C) for medium, or 140-145°F (60-63°C) for medium-well. Remember that the temperature will rise another 5-10 degrees as the roast rests. It’s always better to err on the side of slightly undercooked, as you can always return it to the oven if needed, but you can’t un-cook it.
Creating the Mushroom Pan Sauce
While the roast is in its final stages of cooking, we’ll prepare a luscious mushroom pan sauce. Remove the roast from the oven and carefully transfer it to a cutting board. Tent it loosely with aluminum foil and let it rest for at least 20 minutes. This resting period is non-negotiable for a tender and juicy roast. The juices that have been pushed to the center during cooking will redistribute throughout the meat, resulting in a far superior texture.
While the roast is resting, place the same skillet (if you used one that is oven-safe and suitable for stovetop use) or a clean skillet over medium heat on the stovetop. Add the 2 tablespoons of unsalted butter (from the divided amount). Once the butter has melted and is slightly foamy, add the sliced variety of mushrooms. Sauté the mushrooms for about 5-7 minutes, stirring occasionally, until they are softened and have released most of their moisture. We want them to brown nicely and develop a rich, earthy flavor.
Once the mushrooms are nicely browned, add the remaining 2 tablespoons of unsalted butter to the skillet. Stir it in until it melts and coats the mushrooms. Deglaze the pan by pouring in the beef (or chicken) stock. Use a wooden spoon to scrape up any browned bits from the bottom of the pan; these bits are packed with flavor and will contribute significantly to the sauce. Bring the mixture to a simmer and let it cook for another 3 to 5 minutes, allowing the sauce to thicken slightly. Taste the sauce and adjust seasoning with salt and pepper if necessary. It should be rich and savory, a perfect complement to the roasted beef.
Conclusion:
There you have it! This Rosemary and Garlic Roast Beef recipe is sure to become a staple in your kitchen. The aromatic blend of fresh rosemary and pungent garlic infuses the beef with incredible flavor, creating a dish that’s both elegant and comforting. Whether you’re hosting a special dinner or simply craving a hearty meal, this roast beef is a guaranteed crowd-pleaser. Don’t be afraid to experiment and make it your own; this recipe is wonderfully adaptable!
For serving, consider pairing it with classic accompaniments like roasted potatoes, steamed green beans, or a vibrant horseradish cream sauce. If you’re feeling adventurous, try creating a rich gravy from the pan drippings for an extra layer of deliciousness. This Rosemary and Garlic Roast Beef is also fantastic served cold in sandwiches the next day, making it a versatile dish for leftovers.
Remember, the key to a perfectly tender roast is to use a meat thermometer and to let it rest properly before carving. We encourage you to try this recipe and savor the incredible flavors. We hope you enjoy making and sharing this delightful dish as much as we do!
Frequently Asked Questions:
What cut of beef is best for this roast beef recipe?
For this Rosemary and Garlic Roast Beef, cuts like a sirloin roast, ribeye roast, or even a tenderloin will yield the best results. They offer a good balance of tenderness and flavor, ensuring a juicy and delicious outcome.
Can I prepare the rosemary and garlic rub in advance?
Absolutely! You can mix the rosemary, garlic, olive oil, salt, and pepper together up to 24 hours in advance and store it in an airtight container in the refrigerator. This allows the flavors to meld even further, giving your roast beef an extra punch of taste.
Rosemary Garlic Roast Beef – Easy Flavorful Dinner
An easy and flavorful recipe for rosemary garlic roast beef, perfect for a delicious dinner.
Ingredients
-
3 pounds boneless Rib Eye roast
-
¼ cup chopped fresh rosemary
-
¼ cup chopped garlic (about 20 cloves)
-
Salt and freshly ground black pepper to taste
-
2 tablespoons olive oil
-
2 tablespoons vegetable oil
-
4 tablespoons unsalted butter, divided
-
4 cups a variety of mushrooms, sliced to about the same size
-
1 cup beef stock
Instructions
-
Step 1
Bring the Rib Eye roast to room temperature by taking it out of the refrigerator 1-2 hours before cooking. Preheat your oven to 425°F (220°C). -
Step 2
In a small bowl, combine chopped fresh rosemary, chopped garlic, salt, and pepper to create a seasoning blend. -
Step 3
Pat the roast dry with paper towels and generously rub the rosemary-garlic mixture all over its surface. -
Step 4
Heat olive oil and vegetable oil in a large, oven-safe skillet or roasting pan over medium-high heat. Sear the roast for 3-4 minutes per side until a deep golden-brown crust forms. Transfer the skillet to the preheated oven and roast for 15 minutes at 425°F (220°C). -
Step 5
Reduce oven temperature to 325°F (160°C) and continue roasting for approximately 12-15 minutes per pound for medium-rare (internal temperature 125-130°F), 130-135°F for medium, or 140-145°F for medium-well. Let the roast rest for at least 20 minutes, tented loosely with foil. -
Step 6
While the roast rests, place the same skillet (or a clean one) over medium heat. Melt 2 tablespoons of butter and sauté sliced mushrooms for 5-7 minutes until softened and browned. -
Step 7
Add the remaining 2 tablespoons of butter to the mushrooms. Deglaze the pan with beef stock, scraping up browned bits. Simmer for 3-5 minutes until the sauce slightly thickens. Season with salt and pepper to taste.
Important Information
Nutrition Facts (Per Serving)
It is important to consider this information as approximate and not to use it as definitive health advice.
Allergy Information
Please check ingredients for potential allergens and consult a health professional if in doubt.


Leave a Comment