

Salmon Crispy Rice, for me, is more than just a dish; it’s an irresistible culinary adventure that promises to captivate your senses from the very first bite. I invite you to imagine the perfect symphony of textures: the exquisite crunch of golden, perfectly pan-fried sushi rice meeting the silken, rich flakiness of seasoned salmon, all often crowned with a tantalizing drizzle of spicy mayo and a sprinkle of fresh green onions. I find it to be a dish that has swiftly ascended to iconic status in the contemporary food scene, drawing inspiration from the innovative spirit of Japanese-American cuisine.
While the concept of crispy rice has roots in various global culinary traditions, this particular iteration gained immense popularity by taking cues from the beloved spicy tuna crispy rice, a staple in modern sushi restaurants. It beautifully deconstructs the elements of a traditional sushi roll into a vibrant, textural masterpiece, making it both familiar and excitingly new. I believe people absolutely adore Salmon Crispy Rice not just for its stunning presentation, but for the incredible interplay of flavors—the umami richness, the subtle sweetness of the rice, and the fresh, clean taste of the salmon. It’s a dish that feels sophisticated enough for a special occasion, yet surprisingly accessible for the home cook seeking a gourmet experience without the fuss. I’m confident you’ll fall in love with its irresistible charm and unforgettable flavor profile.
Ingredients:
- For the Sushi Rice:
- 2 cups sushi rice (short-grain Japanese rice) – I always reach for a good quality short-grain rice; it’s essential for that perfect sticky yet firm texture required for our Salmon Crispy Rice.
- 2 ½ cups cold water (for cooking the rice)
- 2 tablespoons rice vinegar (unseasoned)
- 1 tablespoon granulated sugar
- 1 teaspoon fine sea salt
- 1 tablespoon neutral oil (like canola or grapeseed oil, for frying the rice cakes) – Having a good frying oil is non-negotiable for achieving that signature crisp!
- For the Spicy Salmon Topping:
- 8 ounces fresh sashimi-grade salmon fillet, skin removed – Quality salmon makes all the difference here, so look for a vibrant, firm fillet.
- ¼ cup Japanese mayonnaise (like Kewpie, which I absolutely adore for its rich, umami flavor!)
- 1-2 tablespoons Sriracha, or to taste – Adjust this to your spice preference; I like mine with a nice kick!
- 1 teaspoon sesame oil (toasted) – This adds a wonderful nutty aroma that perfectly complements the salmon.
- 1 teaspoon soy sauce (low sodium preferred)
- ½ teaspoon mirin (Japanese sweet cooking wine) – For a touch of subtle sweetness and depth.
- ¼ teaspoon garlic powder (optional, but I find it adds a lovely savory note)
- Pinch of white pepper (optional)
- For Garnish and Serving:
- Thinly sliced jalapeño or serrano peppers (for a fresh, spicy crunch)
- Fresh chives or green onions, thinly sliced (for color and mild oniony flavor)
- Toasted sesame seeds (white or black, or a mix, for extra texture and visual appeal)
- Small dollops of extra Sriracha or chili garlic sauce (for those who love extra heat!)
- Optional: Seaweed snacks or nori sheets, cut into small rectangles, for serving alongside.
- Optional: Avocado slices or mashed avocado (adds a creamy, cooling element that I often enjoy with my Salmon Crispy Rice).
Equipment You’ll Need:
- Large mixing bowl for rice and a separate bowl for salmon.
- Small saucepan for sushi vinegar mixture.
- Rice cooker or heavy-bottomed pot with a tight-fitting lid.
- Shallow baking sheet or large plate.
- Plastic wrap or silicone mat.
- Sharp knife (for salmon and garnishes).
- Cutting board.
- Measuring cups and spoons.
- Spatula or rice paddle.
- Large non-stick skillet or cast-iron pan for frying.
- Paper towels for draining.
Phase 1: Preparing the Perfect Sushi Rice for Crispy Rice
-
Washing the Sushi Rice: The Foundation of Great Crispy Rice
First things first, let’s get that sushi rice ready. I always start by placing the 2 cups of sushi rice into a large bowl. Now, for the crucial step: washing the rice. You’ll want to cover the rice with cold water and, using your hands, gently agitate the grains. You’ll notice the water immediately turns cloudy – that’s the excess starch! Carefully drain the cloudy water, then repeat this process about 5-7 times, or until the water runs mostly clear. This meticulous washing is absolutely vital. It removes excess starch that would otherwise make your rice mushy, and for our Salmon Crispy Rice, we need distinct, perfectly cooked grains that will bind together but still crisp up beautifully. Once washed, drain the rice thoroughly using a fine-mesh sieve and let it sit for about 15-20 minutes to dry out slightly. This brief rest helps the grains cook more evenly.
-
Cooking the Sushi Rice: Achieving Ideal Texture
Next, transfer the well-drained rice to your rice cooker or a heavy-bottomed pot. Add 2 ½ cups of cold water. If using a rice cooker, simply follow your appliance’s instructions for cooking white rice. If you’re using a pot on the stove, bring the water and rice to a rolling boil over medium-high heat. As soon as it boils, reduce the heat to the lowest setting, cover the pot tightly with a lid, and let it simmer for 15 minutes without lifting the lid. This is important – no peeking! After 15 minutes, remove the pot from the heat but keep the lid on, allowing it to steam undisturbed for another 10 minutes. This final steaming period ensures the rice fully absorbs all the moisture and becomes tender.
-
Preparing the Sushi Vinegar Mixture: The Flavor Infusion
While the rice is cooking and steaming, let’s prepare our sushi seasoning. In a small saucepan, combine the 2 tablespoons of rice vinegar, 1 tablespoon of granulated sugar, and 1 teaspoon of fine sea salt. Place the saucepan over low heat and stir gently until the sugar and salt are completely dissolved. You don’t want to boil this mixture, just warm it enough to dissolve the solids. Once dissolved, remove it from the heat and let it cool slightly to room temperature. This sweet and tangy mixture is what transforms plain cooked rice into sushi rice, giving our Salmon Crispy Rice its authentic base flavor.
-
Seasoning and Cooling the Sushi Rice: Ready for Shaping
Once your cooked rice has finished steaming, transfer it immediately to a large, wide, non-metallic bowl or a traditional sushi oke (wooden rice tub), if you have one. Using a rice paddle or a flat spatula, gently “cut” through the rice horizontally and vertically, separating the grains without mashing them. Slowly pour the cooled sushi vinegar mixture over the rice while continuing to gently fold and cut the grains. The goal here is to coat every grain evenly without crushing them. As you do this, you’ll notice steam escaping, which helps evaporate some of the liquid from the vinegar mixture, leaving behind just the flavor. Continue this gentle folding for a few minutes until the rice is shiny and all the liquid is absorbed. Now, here’s a crucial step for crispy rice: we need to cool the rice quickly. Spread the seasoned rice out evenly on a baking sheet or a large plate. I often fan it with a piece of cardboard or a hand fan to speed up the cooling process. You want the rice to be at room temperature, or even slightly cooler, before you start shaping it. This rapid cooling helps the rice maintain its structure and prevents it from becoming mushy, which is absolutely essential for creating firm patties that will hold their shape when we fry them into our perfect Salmon Crispy Rice bases.
Phase 2: Crafting the Spicy Salmon Topping for Your Crispy Rice
-
Preparing the Sashimi-Grade Salmon: Precision Dicing
Now, let’s turn our attention to the star of the show: the salmon. Take your 8 ounces of fresh sashimi-grade salmon fillet and ensure the skin is completely removed. Pat the salmon very dry with paper towels; this helps ensure a clean cut and better texture. Using a very sharp knife, first slice the salmon into ¼-inch thick planks, then cut those planks into ¼-inch wide strips. Finally, dice these strips into very small, uniform ¼-inch cubes. Precision in dicing is key here, as you want bite-sized pieces that will mix well and sit beautifully on top of your crispy rice. Avoid mincing or mashing the salmon; we’re aiming for distinct, tender cubes that provide a pleasant texture contrast to the crispy rice base.
-
Mixing the Spicy Salmon Marinade: Layers of Flavor
In a medium-sized bowl, combine all the ingredients for the spicy salmon topping. This includes the ¼ cup of Japanese mayonnaise, 1-2 tablespoons of Sriracha (start with 1 and add more if you like it extra spicy!), 1 teaspoon of toasted sesame oil, 1 teaspoon of low-sodium soy sauce, ½ teaspoon of mirin, ¼ teaspoon of garlic powder (if using), and a pinch of white pepper (if using). Whisk these ingredients together until they are thoroughly combined and you have a smooth, creamy, and vibrantly orange sauce. I always give it a quick taste at this stage and adjust the Sriracha or soy sauce if needed. This is your chance to really dial in the flavor profile for your perfect Salmon Crispy Rice.
-
Combining Salmon and Spicy Sauce: The Irresistible Topping
Add the finely diced salmon cubes to the bowl with the spicy mayonnaise mixture. Using a rubber spatula, gently fold the salmon into the sauce until every piece is evenly coated. Be careful not to overmix, as this can break down the delicate salmon. You want the salmon to remain in small, distinct cubes, glistening with the spicy sauce. Once combined, cover the bowl with plastic wrap and refrigerate it for at least 15-30 minutes. This chilling period allows the flavors to meld beautifully and slightly firms up the salmon, making it easier to handle and serve later. This vibrant, spicy salmon is going to be the crowning glory of your Salmon Crispy Rice!
Phase 3: Shaping and Frying the Crispy Rice Patties
-
Shaping the Rice Patties: Achieving Uniformity and Density
Now for the fun part: shaping our rice. You have a few options here. I often use a small, rectangular sushi mold (about 1.5 x 2.5 inches) or a small cookie cutter of a similar size. If you don’t have a mold, you can easily shape them by hand. Lightly wet your hands with water (this prevents sticking) or line a shallow baking sheet with plastic wrap. Take about 2-3 tablespoons of the cooled, seasoned sushi rice and press it firmly into your mold or shape it into a neat, compact rectangle, about ½ to ¾ inch thick. The key here is to press the rice very firmly; density is crucial for these patties to hold their shape during frying and achieve that coveted crisp exterior. Repeat this process until you’ve used all the rice, which should yield about 12-16 patties depending on their size.
-
Chilling the Rice Patties: The Secret to Crispy Success
Once all your rice patties are shaped, arrange them in a single layer on a baking sheet lined with plastic wrap or parchment paper. Cover the tray loosely with more plastic wrap and transfer it to the refrigerator. Allow the rice patties to chill for at least 30 minutes, or preferably for 1-2 hours. This chilling step is absolutely essential and non-negotiable for superior Salmon Crispy Rice. Chilling helps the rice grains bind together more tightly, prevents them from falling apart in the hot oil, and significantly enhances their ability to crisp up beautifully. Don’t skip this step! You can even prepare these the day before and chill them overnight.
-
Frying the Crispy Rice Patties: Golden Perfection
When you’re ready to fry, retrieve the chilled rice patties from the refrigerator. Heat 1 tablespoon of neutral oil in a large, heavy-bottomed non-stick skillet or cast-iron pan over medium-high heat. You want the oil to be hot, shimmering, but not smoking. A good way to test is to drop a tiny piece of rice in – if it sizzles immediately, you’re good to go. Carefully place the rice patties into the hot oil in a single layer, ensuring not to overcrowd the pan. Work in batches if necessary; overcrowding will drop the oil temperature and prevent proper crisping.
Let the patties fry undisturbed for 3-5 minutes per side. You’re looking for a beautiful, deep golden-brown crust. This golden-brown crust is the defining characteristic of our Salmon Crispy Rice, so be patient and resist the urge to flip too early. Use a spatula to gently check the color; once a side is perfectly golden and crispy, carefully flip it. You might notice a satisfying crunch when you flip them – that’s a good sign! Fry the second side for another 3-5 minutes until it’s also golden and crisp. If you find the oil is getting absorbed, feel free to add another ½ tablespoon of oil between batches. Once fried, transfer the crispy rice patties to a plate lined with paper towels to drain any excess oil. This helps maintain their crispness.
Phase 4: Assembling and Serving Your Delicious Salmon Crispy Rice
-
Assembling Your Salmon Crispy Rice: The Final Flourish
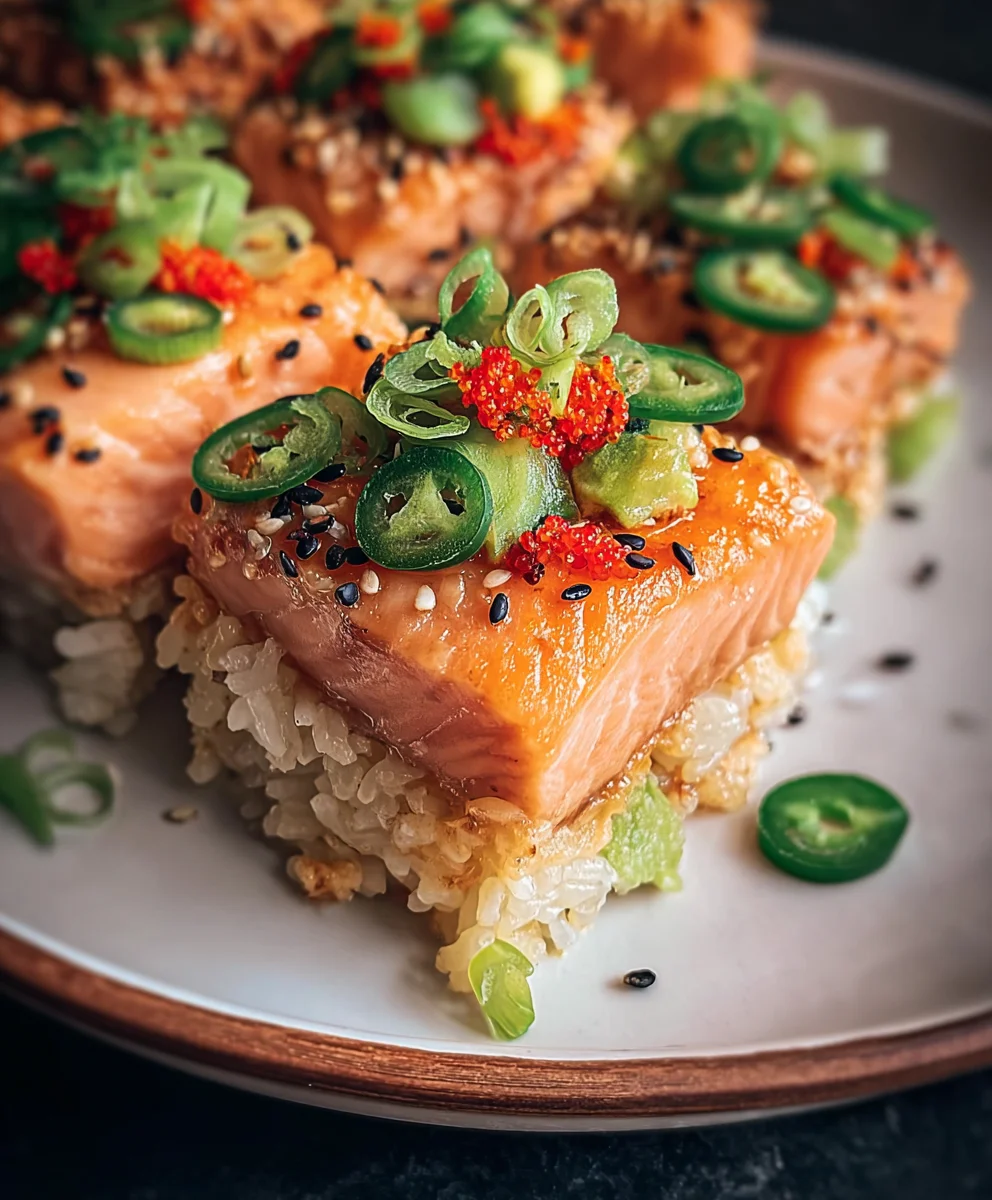
Now for the exciting part – bringing it all together! Take your perfectly golden and crispy rice patties. I like to arrange them on a platter for presentation. Using a small spoon, carefully place a generous dollop of your chilled, spicy salmon topping on top of each crispy rice patty. Don’t be shy with the salmon; it’s the star!
-
Garnishing for Flavor and Presentation: Elevating the Experience
Once the salmon is atop each patty, it’s time for the garnishes. This is where you can add both visual appeal and additional layers of flavor and texture.
- Start by sprinkling a pinch of toasted sesame seeds over the salmon. I love a mix of black and white for contrast.
- Next, scatter a few thinly sliced chives or green onions on top for a fresh, mild oniony bite and a pop of green color.
- If you enjoy extra heat, place a thin slice of jalapeño or serrano pepper on each, or drizzle a tiny bit of extra Sriracha. The fresh pepper adds a wonderful spicy crunch that I find incredibly addictive with Salmon Crispy Rice.
- For a creamy element, sometimes I’ll add a tiny cube or thin slice of fresh avocado alongside the salmon, or even a small dollop of mashed avocado. It provides a lovely cooling contrast to the spice.
-
Serving Suggestions: Enjoying Your Creation
Your magnificent Salmon Crispy Rice is now ready to be devoured! Serve these immediately while the rice patties are still warm and at their crispiest. I find they are best enjoyed fresh. You can offer them on a large platter as an appetizer or serve a few per person as a delightful light meal. Sometimes, I’ll serve them with small squares of toasted nori (seaweed sheets) on the side, allowing guests to wrap their crispy rice for an extra layer of umami and texture. Get ready for an explosion of flavors and textures – the crunchy rice, the creamy spicy salmon, and the fresh garnishes all come together in perfect harmony. Enjoy every single bite of your homemade Salmon Crispy Rice!
Conclusion:
So, there you have it! We’ve journeyed through the steps of creating something truly extraordinary, a dish that consistently wows everyone who tries it. This isn’t just another salmon recipe; it’s an experience, a delightful fusion of textures and flavors that will redefine your perception of home cooking. The magic of this dish, what truly sets it apart, lies in that perfect contrast: the unbelievably crisp, golden-brown rice base providing an irresistible crunch, beautifully complemented by the rich, tender, and perfectly seasoned salmon. It’s a sophisticated yet surprisingly approachable dish that delivers a gourmet experience right in your own kitchen.
I truly believe that once you taste this incredible creation, this exquisite
Salmon Crispy Rice
, you’ll understand why it’s become such a sensation. It’s elegant enough for a special occasion, yet simple enough to whip up for a delightful weeknight treat. Get ready to impress yourself and your loved ones with this incredible culinary adventure. This is not just food; it’s an edible masterpiece that promises a symphony of textures and tastes with every bite.
Serving Suggestions and Creative Variations:
Now that you’ve mastered the basic technique, the fun truly begins with how you can personalize and present your culinary triumph. While this dish is absolutely stunning served on its own, perhaps with a delicate sprinkle of fresh chives or a few vibrant microgreens for an extra touch of elegance, don’t hesitate to explore a world of delightful variations. For those who love an extra kick, a generous drizzle of homemade spicy mayo (just a mix of mayonnaise and sriracha, perhaps a touch of lime juice) or a dash of your favorite chili crisp can elevate the flavor profile wonderfully. If you prefer something brighter and more refreshing, a squeeze of fresh lime or a dollop of a zesty yuzu aioli would be absolutely divine.
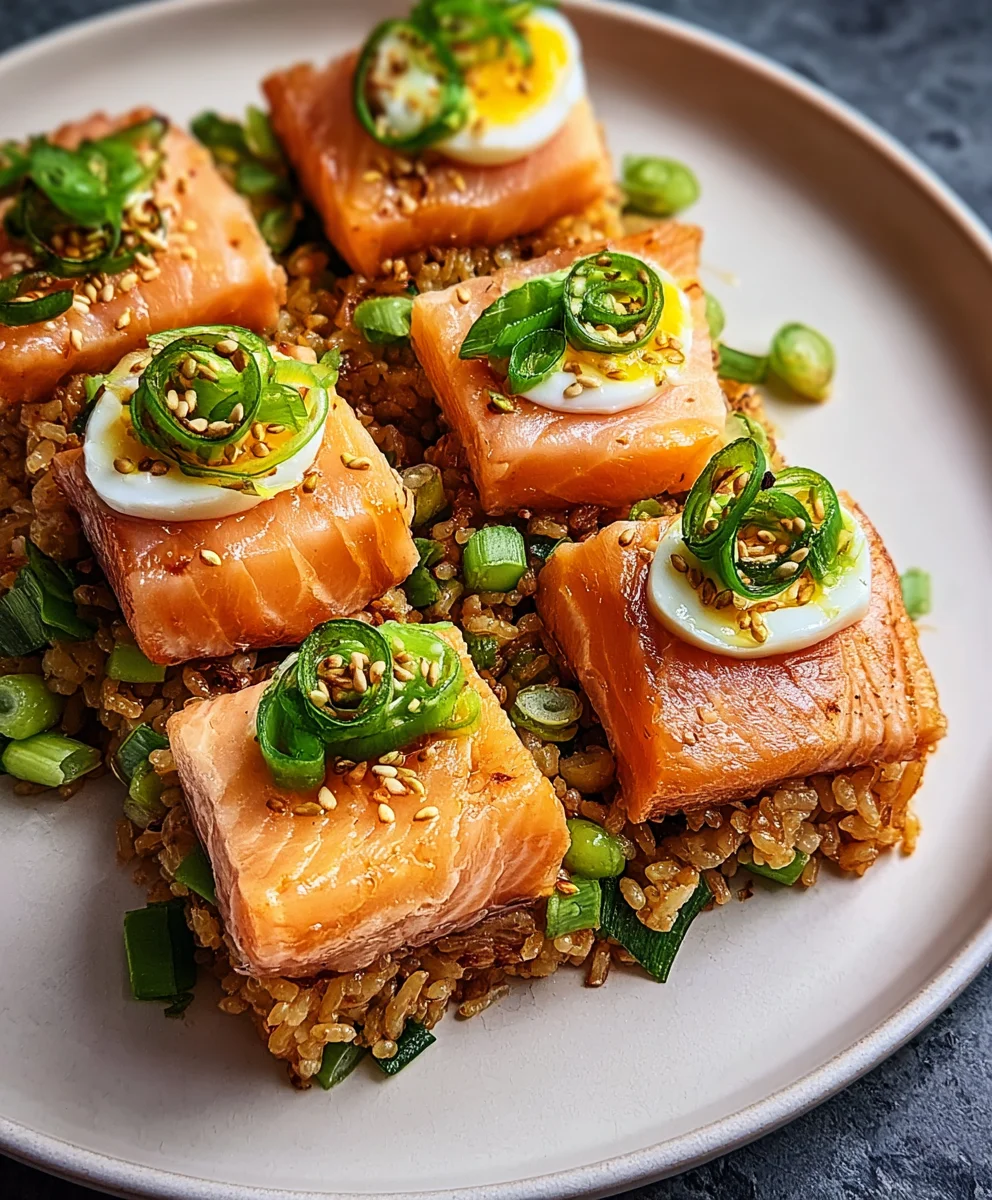
Think about adding textural elements too: thinly sliced avocado can introduce a creamy, buttery counterpoint, while a scattering of toasted sesame seeds or finely chopped scallions brings both aroma and a slight crunch. For the adventurous palate, a whisper of thinly sliced jalapeño can introduce a welcome heat without overpowering the delicate salmon. Consider serving this alongside a refreshing cucumber salad, a warm bowl of savory miso soup, or some perfectly steamed edamame for a complete and satisfying meal. This dish is also incredibly versatile as an appetizer; simply cut the crispy rice into smaller, bite-sized squares before topping with the salmon for an easy-to-handle party snack that will undoubtedly disappear in minutes. Don’t be afraid to experiment with other proteins either – beautifully seared tuna, pan-fried marinated tofu, or even perfectly seasoned chicken could be exciting substitutes, though the unique synergy with salmon is truly unparalleled. The possibilities are truly endless, limited only by your imagination and what delicious ingredients you have on hand!
Your Culinary Journey Awaits!
I genuinely hope you’re feeling inspired and excited to dive into your kitchen and bring this sensational recipe to life. Trust me, the effort is minimal compared to the immense satisfaction and flavor reward you’ll experience. There’s something profoundly satisfying about creating a dish that looks as incredible as it tastes, and this recipe absolutely delivers on both fronts. Don’t let any step intimidate you; simply follow the instructions, have fun with the process, and prepare to be amazed by your own culinary prowess. You’ll be so proud to present such a visually stunning and incredibly delicious dish.
Once you’ve had the chance to enjoy your homemade creation, I would absolutely love to hear about your experience! Did you stick to the classic version, or did you venture into some exciting variations? What unique toppings or sauces did you choose? Please, share your stories, your triumphs, and even your creative adaptations in the comments below. Your feedback and beautiful food pictures not only make my day but also inspire countless other home cooks in our vibrant community to try something new. This recipe is truly a gift, a promise of deliciousness and joy, and I can’t wait for you to unwrap it. Happy cooking, and get ready for a truly memorable meal that you’ll want to make again and again!
Salmon Crispy Rice Recipe: Easy & Delicious Dinner!
An irresistible culinary adventure, Salmon Crispy Rice features golden, perfectly pan-fried sushi rice topped with silken, rich flakiness of seasoned salmon, often crowned with spicy mayo and fresh green onions. This dish draws inspiration from Japanese-American cuisine, offering a textural masterpiece that is sophisticated yet accessible for home cooks.
Ingredients
-
2 cups sushi rice
-
2 ½ cups cold water
-
2 tbsp rice vinegar
-
1 tbsp granulated sugar
-
1 tsp fine sea salt
-
1 tbsp neutral oil (for frying)
-
8 oz sashimi-grade salmon fillet, skin removed
-
¼ cup Japanese mayonnaise
-
1-2 tbsp Sriracha
-
1 tsp toasted sesame oil
-
1 tsp low-sodium soy sauce
-
½ tsp mirin (non-alcoholic)
-
¼ tsp garlic powder (optional)
-
Pinch white pepper (optional)
-
Thinly sliced jalapeño or serrano peppers (for garnish)
-
Fresh chives or green onions, thinly sliced (for garnish)
-
Toasted sesame seeds (for garnish)
-
Extra Sriracha or chili garlic sauce (optional, for serving)
-
Seaweed snacks or nori sheets (optional, for serving)
-
Avocado slices or mashed avocado (optional, for serving)
Instructions
-
Step 1
Wash sushi rice until water runs clear; drain and rest 15-20 minutes. Cook rice with 2 ½ cups cold water: in a rice cooker, follow instructions; on stovetop, boil, then simmer covered on low for 15 mins, then steam off heat for 10 mins. -
Step 2
Prepare sushi vinegar by dissolving 2 tbsp rice vinegar, 1 tbsp sugar, and 1 tsp salt in a small saucepan over low heat; cool. Season cooked rice by gently folding in cooled sushi vinegar mixture. Spread rice on a baking sheet and fan to cool to room temperature quickly. -
Step 3
Pat dry and dice 8 oz sashimi-grade salmon into ¼-inch cubes. In a bowl, whisk ¼ cup Japanese mayonnaise, 1-2 tbsp Sriracha, 1 tsp toasted sesame oil, 1 tsp low-sodium soy sauce, ½ tsp non-alcoholic mirin, ¼ tsp garlic powder (optional), and pinch white pepper (optional). -
Step 4
Gently fold diced salmon into the sauce until coated. Cover and refrigerate for 15-30 minutes for flavors to meld. -
Step 5
Shape cooled sushi rice into 12-16 compact ½-¾ inch thick rectangular patties (using a mold or wet hands). Press firmly. Arrange patties on a lined baking sheet, cover, and chill in the refrigerator for at least 30 minutes, or up to 2 hours (or overnight). This step is essential for crisping. -
Step 6
Heat 1 tbsp neutral oil in a large non-stick skillet over medium-high heat. Fry chilled rice patties in batches for 3-5 minutes per side until deep golden brown and crispy. Drain on paper towels to remove excess oil. -
Step 7
Place a generous dollop of chilled spicy salmon topping onto each crispy rice patty. Garnish with toasted sesame seeds, sliced chives or green onions, thinly sliced jalapeño or serrano, and optionally extra Sriracha or avocado. -
Step 8
Serve immediately while rice patties are warm and crispy, optionally with nori sheets for an extra layer of umami.
Important Information
Nutrition Facts (Per Serving)
It is important to consider this information as approximate and not to use it as definitive health advice.
Allergy Information
Please check ingredients for potential allergens and consult a health professional if in doubt.


Leave a Comment