

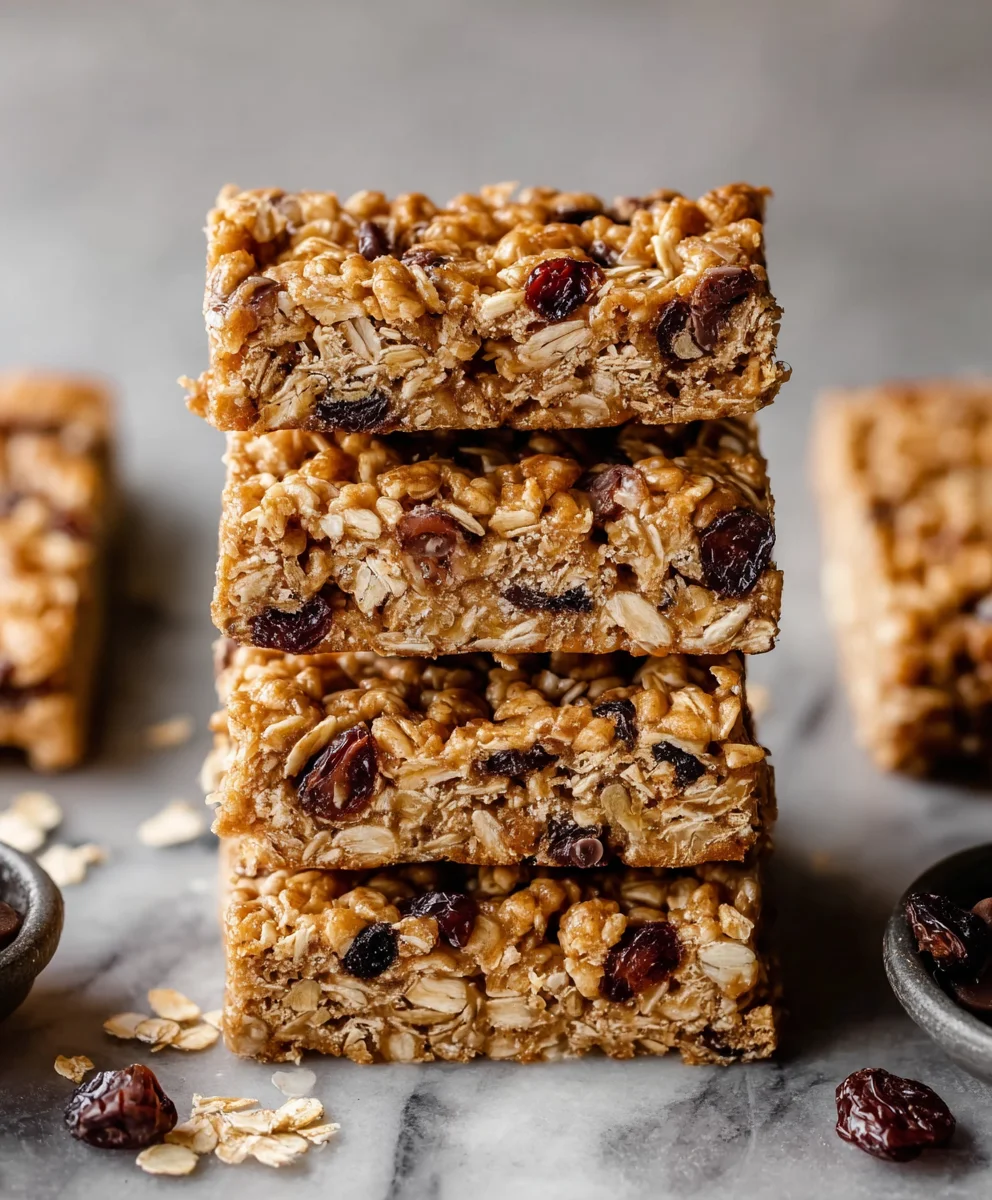
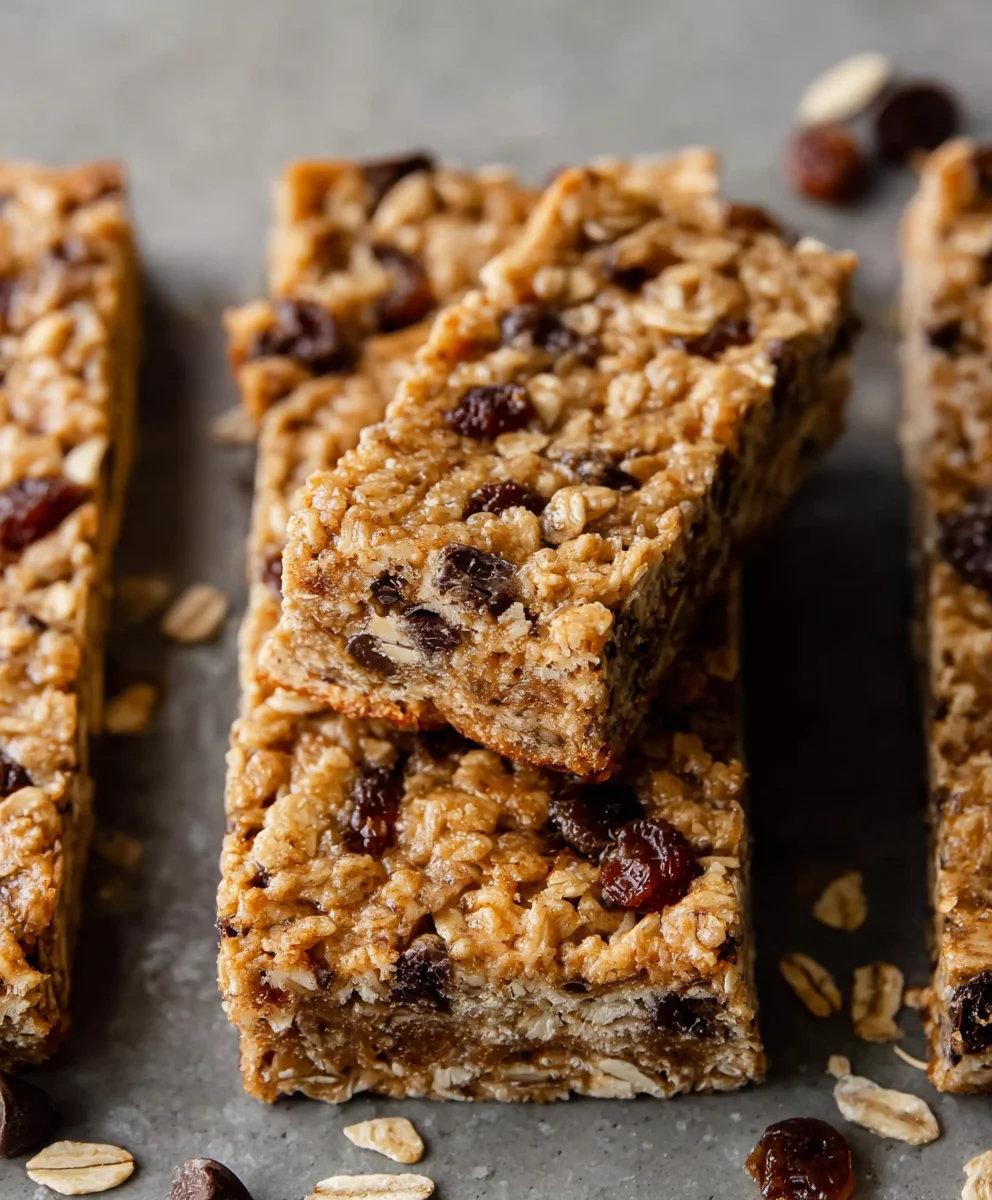
Soft-baked peanut butter granola bars are more than just a snack; they’re a portable hug for your taste buds and a fuel station for your busy day. Forget those chalky, overly sweet store-bought versions that crum extractble into dust the moment you unwrap them. We’re talking about bars that boast a perfectly tender, almost chewy interior, bursting with the irresistible, nutty richness of real peanut butter. What makes these homemade delights so universally adored? It’s that comforting, satisfying texture that melts in your mouth, combined with a wholesome blend of oats and seeds that provides sustained energy without the sugar crash. These are the kind of bars you’ll crave for breakfast on the go, a mid-afternoon pick-me-up, or even a healthier dessert. The beauty of creating your own soft-baked peanut butter granola bars lies in their simplicity and the ability to customize them to your liking. Get ready to elevate your snacking game with this incredibly satisfying recipe!
Ingredients:
- 3 cups old-fashioned rolled oats (use verified gluten-free, if needed)
- ¾ cup natural peanut butter (creamy or crunchy, your preference!)
- ⅓ cup honey or maple syrup (for a touch of sweetness and binding)
- 2 whole eggs (or for a vegan option, use 2 flax eggs: whisk 2 tablespoons ground flaxseed with 6 tablespoons water and let sit for 5-10 minutes until thickened)
- ½ cup mini chocolate chips (dairy-free if needed)
- Pinch of salt (omit if your peanut butter is already salted, as it can add too much sodium)
- ½ cup chopped nuts (such as walnuts, pecans, or almonds – a mix is great for texture!)
- ¼ cup seeds (choose from chia seeds, sunflower seeds, or pumpkin seeds for added nutrition and crunch)
- ½ cup dried fruit (raisins, cranberries, chopped apricots, or a mix are all delicious choices)
Preparing Your Soft-Baked Peanut Butter Granola Bars
Step 1: Preheat and Prep Your Pan
Before you even think about mixing ingredients, preheat your oven to 350°F (175°C). This is crucial for ensuring your granola bars bake evenly and develop that perfect soft-baked texture. Next, prepare an 8×8 inch baking pan. You can lightly grease it with a little butter or cooking spray, but I find lining it with parchment paper to be the easiest and cleanest method. Leave a little overhang on the sides of the parchment paper – this will create handy “handles” to lift the baked bars right out of the pan once they’re done. This makes slicing much less of a hassle.
Step 2: Combine the Wet Ingredients
In a large mixing bowl, start by combining your wet ingredients. Add the natural peanut butter, honey or maple syrup, and the eggs (or your prepared flax eggs). Whisk these together vigorously until you achieve a smooth, well-emulsified mixture. It’s important that the peanut butter is fully incorporated with the sweetener and eggs, as this mixture will act as the binder for all the dry ingredients. If your peanut butter is very stiff, you might want to warm it slightly in the microwave for about 15-20 seconds before whisking to make it more pliable. This step ensures a consistent texture throughout your bars.
Step 3: Introduce the Dry Ingredients and Mix
Once your wet ingredients are beautifully combined, it’s time to add the dry elements. Gently fold in the old-fashioned rolled oats, your chosen chopped nuts, seeds, and dried fruit. If you’re using salt, add that pinch in now. Stir everything together until just combined. Be careful not to overmix at this stage. We want to coat all the oats and mix-ins evenly without breaking them down too much. The mixture should be thick and somewhat sticky, but not overly wet. If it seems too dry and crum extractbly, you can add another tablespoon of honey or maple syrup. Conversely, if it seems too wet, a tablespoon or two more oats can help.
Step 4: Incorporate the Chocolate Chips and Press into the Pan
Now for the fun part – the mini chocolate chips! Gently fold these into the oat mixture until they are distributed throughout. Don’t overmix here either, as you don’t want to break the chocolate chips. Once everything is evenly incorporated, transfer the entire mixture into your prepared baking pan. Using a spatula or the back of a spoon, press the mixture down very firmly and evenly into the pan. This is a critical step for ensuring your granola bars hold their shape. The firmer you press, the more cohesive your bars will be. Go around the edges and the center, making sure there are no air pockets.
Step 5: Baking and Cooling for Perfect Softness
Place the pan in your preheated oven and bake for 20-25 minutes. The exact baking time will depend on your oven and how soft you like your bars. You’re looking for the edges to be lightly golden brown, and the center to appear set but still slightly soft to the touch. They will continue to firm up as they cool. Once baked, remove the pan from the oven and let it cool completely on a wire rack. This cooling process is just as important as the baking. Resist the urge to cut into them while they are warm; they will rum extractely crumble. Once fully cooled, use the parchment paper overhang to lift the entire slab out of the pan. Place it on a cutting board and slice into your desired bar size using a sharp knife.
Step 6: Storage and Enjoyment
Store your delicious soft-baked peanut butter granola bars in an airtight container at room temperature for up to 3-4 days, or in the refrigerator for up to a week. They make fantastic grab-and-go snacks, a wholesome breakfast option, or even a satisfying dessert. The beauty of homemade granola bars is that you can customize them to your liking. Feel free to experiment with different nuts, seeds, and dried fruits in future batches to discover your ultimate combination!
Conclusion:
You’ve now learned how to create delicious, chewy, and utterly satisfying Soft-Baked Peanut Butter Granola Bars right in your own kitchen. This recipe is wonderfully forgiving and a fantastic way to enjoy a homemade treat that’s healthier than most store-bought options. The beauty of these bars lies in their simplicity and the incredible flavor that peanut butter brings. They are perfect for a quick breakfast on the go, an energizing afternoon snack, or even a light dessert.
I love serving these Soft-Baked Peanut Butter Granola Bars with a tall glass of cold milk, or crum extractbled over yogurt. They also pair wonderfully with a cup of coffee or tea. Don’t be afraid to get creative with variations! Feel free to add in your favorite chopped nuts like almonds or walnuts, some dark chocolate chips for a sweet indulgence, or even a sprinkle of cinnamon for an extra layer of warmth.
Making these Soft-Baked Peanut Butter Granola Bars is a rewarding experience. They fill your home with a comforting aroma and provide a guilt-free way to satisfy your sweet cravings. So gather your ingredients, get baking, and enjoy the wonderful taste of homemade goodness!
Frequently Asked Questions:
Can I make these bars vegan?
Absolutely! To make your Soft-Baked Peanut Butter Granola Bars vegan, simply substitute the honey with maple syrup or agave nectar. Ensure your chocolate chips (if using) are also dairy-free.
How should I store the Soft-Baked Peanut Butter Granola Bars?
Store your cooled Soft-Baked Peanut Butter Granola Bars in an airtight container at room temperature for up to 5 days. For longer storage, you can refrigerate them, or even freeze individual bars wrapped in parchment paper and then placed in a freezer-safe bag.
My bars serum extracttoo crumbly. What went wrong?
If your Soft-Baked Peanut Butter Granola Bars are too crumbly, it might be due to not enough binder. Ensure you used the correct amount of peanut butter and honey/syrup, and that they were well incorporated. Pressing the mixture firmly into the pan before baking can also help them hold together better.
Soft-Baked Peanut Butter Granola Bars
An easy recipe for delicious, soft-baked peanut butter granola bars packed with wholesome ingredients.
Ingredients
-
3 cups old-fashioned rolled oats (use verified gluten-free, if needed)
-
3/4 cup natural peanut butter
-
1/3 cup honey or maple syrup
-
2 whole eggs (or 2 flax eggs for vegan option)
-
1/2 cup mini chocolate chips (dairy-free if needed)
-
Pinch of salt (omit if peanut butter is salted)
-
1/2 cup chopped nuts (such as walnuts, pecans, or almonds)
-
1/4 cup seeds (chia seeds, sunflower seeds, or pumpkin seeds)
-
1/2 cup dried fruit (raisins, cranberries, chopped apricots, or a mix)
Instructions
-
Step 1
Preheat oven to 350°F (175°C). Line an 8×8 inch baking pan with parchment paper, leaving an overhang. -
Step 2
In a large bowl, whisk together peanut butter, honey or maple syrup, and eggs (or flax eggs) until smooth and well-emulsified. Warm peanut butter slightly if stiff. -
Step 3
Gently fold in rolled oats, chopped nuts, seeds, salt (if using), and dried fruit until just combined. Add more sweetener if too dry, or more oats if too wet. -
Step 4
Fold in mini chocolate chips. Transfer mixture to the prepared pan and press down very firmly and evenly. -
Step 5
Bake for 20-25 minutes, or until edges are lightly golden and the center is set but still soft. Cool completely on a wire rack. -
Step 6
Once cooled, use parchment overhang to lift the slab from the pan. Slice into desired bar size. Store in an airtight container at room temperature for up to 3-4 days or in the refrigerator for up to a week.
Important Information
Nutrition Facts (Per Serving)
It is important to consider this information as approximate and not to use it as definitive health advice.
Allergy Information
Please check ingredients for potential allergens and consult a health professional if in doubt.


Leave a Comment