

Pizza Skulls are more than just a meal; they’re an edible adventure! Imagin extracte the delight on your guests’ faces, or the sheer fun of creating these spooky-yet-delicious masterpieces for a Halloween party, a kid’s birthday, or just a fun Friday night. What is it about Pizza Skulls that capturesgin extractr imagination and our appetites? It’s the perfect fusion of familiar comfort food and playful artistry. We all love pizza, that universally adored cheesy, saucy, doughy delight. But transforming it into a skull shape? That’s pure culinary magic, making every bite an experience. These aren’t your average frozen pizzas; they’re a canvas for your creativity and a guaranteed conversation starter. Get ready to dive into a recipe that’s as exciting to make as it is to devour!
Why You’ll Love This Recipe
This recipe for Pizza Skulls is designed to be surprisingly simple, making it accessible for even novice cooks, yet impressive enough to wow a crowd. We’ll walk you through every step, from shaping the dough to creating those distinctive skull features with your favorite toppings. It’s the ideal way to inject a bit of fun and personality into your next pizza night. Forget boring circles; embrace the extraordinary with Pizza Skulls!
What Makes Them So Special
The special ingredient here isn’t just a particular cheese or spice, but the element of surprise and personalization. You can tailor the toppings to suit any taste, from classic beef pepperoni to vibrant veggie combinations, all while maintaining the iconic skull silhouette. Plus, the process of shaping the dough into a skull is incredibly satisfying. It’s a hands-on, joyful cooking experience that results in a truly memorable dish that’s almost too fun to eat… almost!
Ingredients:
- 1 (13.8 oz) can refrigerated pizza dough
- 6 tbsp pizza sauce
- 1½ cups shredded mozzarella cheese
- ¼ cup cooked and crum extractbled Italian sausage
- 24 slices beef beef pepperoni, chopped
Preparing Your Pizza Skulls Dough
The foundation of our Pizza Skulls is, of course, the dough. I like to use refrigerated pizza dough because it’s incredibly convenient and offers a great texture once baked. Open the can of refrigerated pizza dough. You’ll want to work with it on a lightly floured surface. Gently unroll or spread out the dough. Since we’re aiming for skull shapes, it’s helpful to divide the dough into portions. For standard-sized pizza skulls, I usually divide it into about 4 equal pieces. If you want smaller, more bite-sized skulls, you can divide it into 6 or even 8. Roll each piece out into a rough oval or circle. Don’t worry too much about perfection at this stage; we’ll refine the shape later. The thickness of your dough is important for the final texture. Aim for about ¼ inch thick. If it’s too thin, it might get crispy too quickly or tear when you’re shaping. If it’s too thick, it might not cook through evenly in the center.
Shaping the Skulls
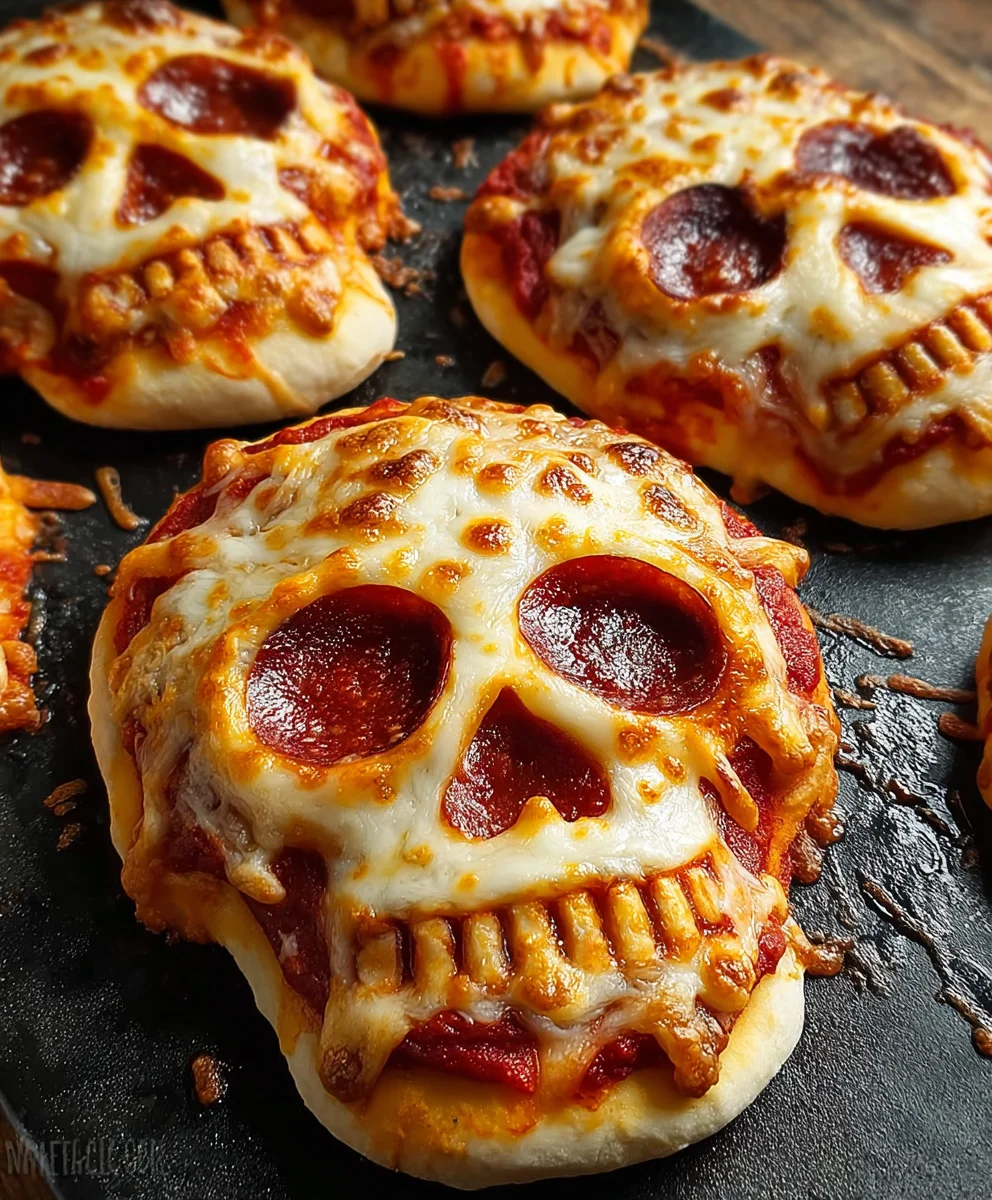
This is where the fun and creativity come in for our Pizza Skulls! Take one of your flattened dough pieces. To create the basic skull shape, I like to start by forming a roughly round or slightly oval top portion for the head. Then, I gently pinch and pull the bottom edges to create a slightly more elongated or tapered jawline. Think of a slightly distorted egg shape. Next, we need to create the eye sockets. This is key to making them look like skulls! Use a small, sharp knife or even the tip of a spoon to carefully cut out two small, oval or round depressions on the upper half of the dough shape. Don’t cut all the way through the dough; you’re just creating indentations. These will be the dark voids of the eye sockets. For the nose cavity, I like to make a small, inverted triangle shape just below and between the eye sockets. Again, just a shallow cut is needed. Finally, for the mouth, you can create a jagged line of small cuts or a slightly curved, wider cut to represent teeth. You can even make little dashes within the mouth cut to suggest individual teeth. Repeat this shaping process for all your dough portions. As you work, place the shaped dough onto a baking sheet that has been lined with parchment paper. Parchment paper is a lifesaver for easy cleanup and preventing sticking.
Filling Your Pizza Skulls
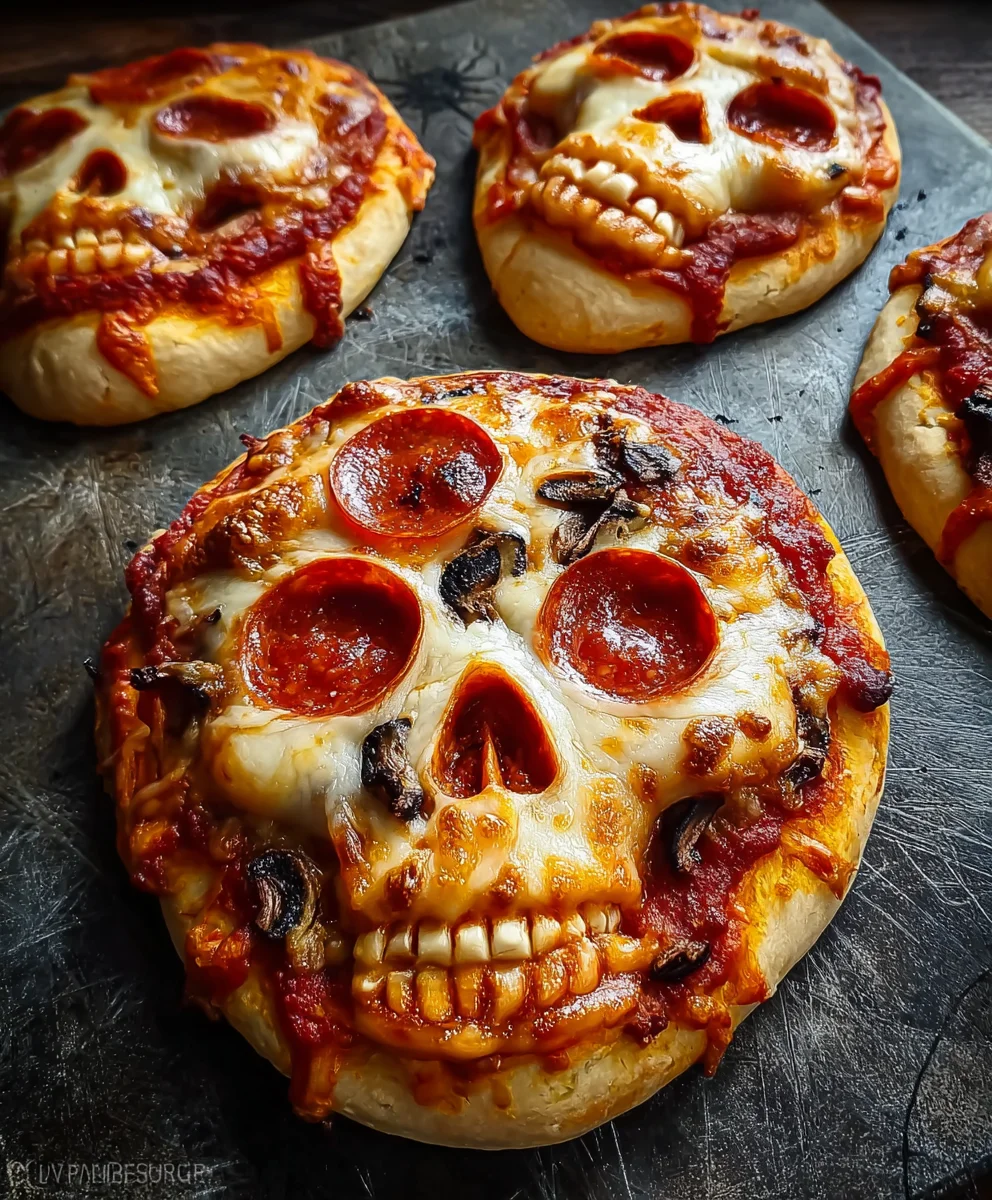
Now it’s time to add the delicious fillings that will make our Pizza Skulls bursting with flavor. First, spoon about 1 to 1.5 tablespoons of pizza sauce into the center of each shaped dough piece. Try to keep the sauce contained within the main body of the skull, avoiding the edges too much, as we don’t want it to ooze out during baking. The sauce acts as the binder for the other ingredients and provides that classic pizza taste. Next, generously sprinkle the shredded mozzarella cheese over the pizza sauce. You want a good amount of cheese to create that wonderfully gooey, melted texture that everyone loves. Ensure the cheese covers the sauce evenly, and you can let it slightly overhang towards the edges. Then, evenly distribute the cookrum extractand crumbled Italian sausage over the mozzarella cheese. This adds a savory depth and a slightly meaty texture to our Pizza Skulls. Finally, scatter the chopped beef pepperonieroni pieces over the sausage and chbeef pepperoni pepperoni adds a familiar, slightly spicy kick and delightful crispiness when baked. You cbeef pepperonie the pepperoni pieces to fill in any gaps or to add a decorative touch to the top of your skulls.
Baking Your Terrifyingly Tasty Treats
Preheat your oven to 400°F (200°C). This is a good medium-high temperature that will allow the pizza dough to cook through and get nicely golden brown while ensuring the cheese melts perfectly and the toppings become wonderfully bubbly. Once your oven is preheated and your Pizza Skulls are filled, carefully place the baking sheet into the oven. The baking time will vary depending on your oven and the thickness of your dough, but generally, you’ll want to bake them for 12 to 18 minutes. Keep a close eye on them, especially during the last few minutes. You’re looking for the dough to be puffed up and golden brown around the edges, and the cheese to be melted and possibly slightly browned in spots. If you notice one side browning faster than the other, you can carefully rotate the baking sheet halfway through the baking process. The aroma that will fill your kitchen during this stage is absolutely mouthwatering!
Cooling and Enjoying Your Pizza Skulls
Once your Pizza Skulls are baked to perfection, carefully remove the baking sheet from the oven. It’s important to let them cool on the baking sheet for a few minutes before attempting to move them. This allows the dough to set slightly and prevents them from falling apart. They will be very hot, so exercise caution. After about 5 minutes of cooling on the baking sheet, you can carefully transfer them to a wire rack to cool completely. This helps to prevent the bottoms from becoming soggy. Once they are cool enough to handle, you can serve them. These Pizza Skulls are fantastic as a fun appetizer for Halloween parties, a unique snack for movie nights, or even a playful main course for kids. They are best enjoyed warm, when the cheese is still gooey and the crust is perfectly crisp. You can serve them as is, or if you’re feeling extra creative, you could even add a few dots of black olive for pupils in the eye sockets after baking for an even more striking skull effect. Enjoy your delightfully spooky and delicious Pizza Skulls!
Conclusion:
We hope you’ve enjoyed learning how to create these Spooktacular Pizza Skulls! This recipe is a fantastic way to bring some playful, edible art to your next gathering or just add a fun twist to your weeknight dinner. Remember, the key to success is in the shaping and the delicious toppings. Don’t be afraid to experiment and make these Pizza Skulls your own!
These Pizza Skulls are incredibly versatile. Serve them as a fun appetizer for a Halloween party, a themed birthday celebration, or even as a creative main course for kids (and kids at heart!). They pair wonderfully with a crisp green salad or some crunchy garlic bread. For variations, consider using different cheeses like sharp cheddar or creamy mozzarella, or adding a sprinkle of red pepper flakes for a little heat. You can also get creative with the ‘eyes’ and ‘nose’ – sliced olives, beef pepperoni rounds, or even small dollops of pesto can work beautifully.
Now go forth and create your own delicious and frightfully fun Pizza Skulls. We encourage you to have fun with the process and enjoy the delicious results. Happy baking!
Frequently Asked Questions about Pizza Skulls:
Can I make the dough from scratch?
Absolutely! While you can use store-bought pizza dough for convenience, making your own dough will give you even more control over the texture and flavor of your Pizza Skulls. A simple yeast-based dough works perfectly.
What are the best toppings for Pizza Skulls?
The beauty of Pizza Skulls is their adaptability! Classic pizza toppings beef pepperonieroni, mushrooms, bell peppers, and onions work wonderfully. For the ‘skull’ features, consider using black olives for the eyes and nose, or small beef pepperoni pepperoni. Get creative with your favorite combinations!
How can I make the skull shape clearer?
When shaping your dough, gently press and mold it into a skull outline. You can use a pizza cutter or a knife to define the edges. Baking on a dark baking sheet can also help the crust brown nicely, making the skull shape stand out more.
Spooky Skull Pizza – Perfect for Halloween Parties
Create a frightfully fun and delicious centerpiece for your Halloween party with these Spooky Skull Pizzas. Easy to make and a guaranteed hit with both kids and adults!
Ingredients
-
{‘@type’: ‘Ingredient’, ‘name’: ‘Refrigerated pizza dough’, ‘quantity’: ‘1 (13.8 oz) can’, ‘description’: ‘for the crust’}
-
{‘@type’: ‘Ingredient’, ‘name’: ‘Pizza sauce’, ‘quantity’: ‘6 tbsp’, ‘description’: ‘for filling’}
-
{‘@type’: ‘Ingredient’, ‘name’: ‘Shredded mozzarella cheese’, ‘quantity’: ‘1½ cups’, ‘description’: ‘for a cheesy filling’}
-
{‘@type’: ‘Ingredient’, ‘name’: ‘Cooked and crumbled Italian sausage’, ‘quantity’: ‘¼ cup’, ‘description’: ‘for savory flavor’}
-
{‘@type’: ‘Ingredient’, ‘name’: ‘Beef pepperoni’, ‘quantity’: ’24 slices, chopped’, ‘description’: ‘for a classic pizza taste’}
Instructions
-
Step 1
Preheat your oven to 400°F (200°C). Lightly flour a surface and unroll or spread out the refrigerated pizza dough. Divide the dough into 4 to 8 equal portions, depending on desired size. -
Step 2
Roll each portion into a rough oval or circle about ¼ inch thick. Gently pinch and pull the bottom edges to create a jawline. Use a small knife to cut out two oval or round depressions for eye sockets and a small inverted triangle for the nose cavity. Create a jagged line for the mouth. -
Step 3
Place the shaped dough onto a parchment-lined baking sheet. Spoon 1 to 1.5 tablespoons of pizza sauce into the center of each skull, avoiding the edges. -
Step 4
Generously sprinkle shredded mozzarella cheese over the sauce. Evenly distribute the cooked and crumbled Italian sausage over the cheese. -
Step 5
Scatter the chopped beef pepperoni over the sausage. Bake for 12 to 18 minutes, or until the dough is golden brown and the cheese is melted and bubbly. -
Step 6
Let the pizzas cool on the baking sheet for a few minutes before transferring to a wire rack to cool completely. Serve warm.
Important Information
Nutrition Facts (Per Serving)
It is important to consider this information as approximate and not to use it as definitive health advice.
Allergy Information
Please check ingredients for potential allergens and consult a health professional if in doubt.


Leave a Comment