

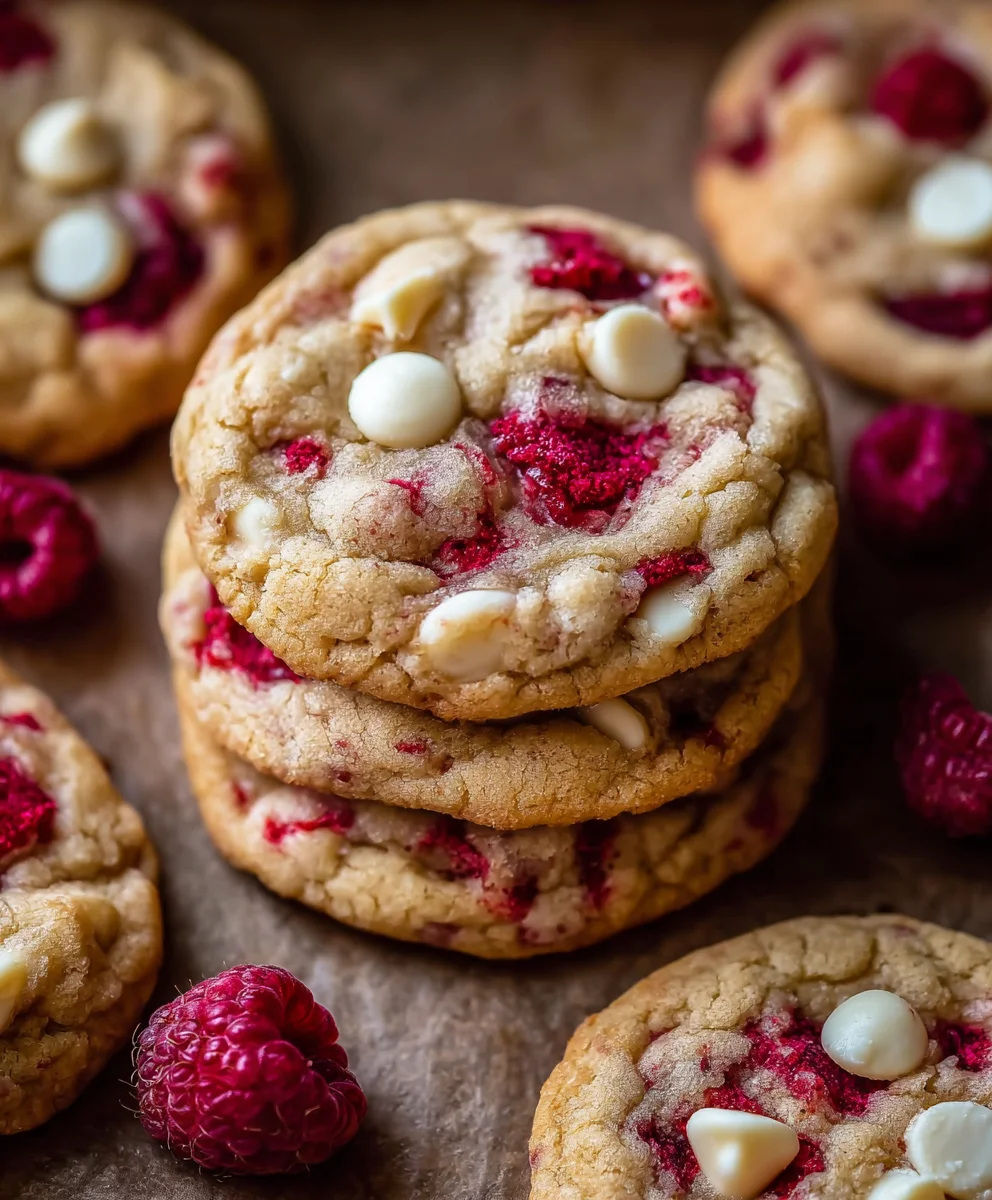
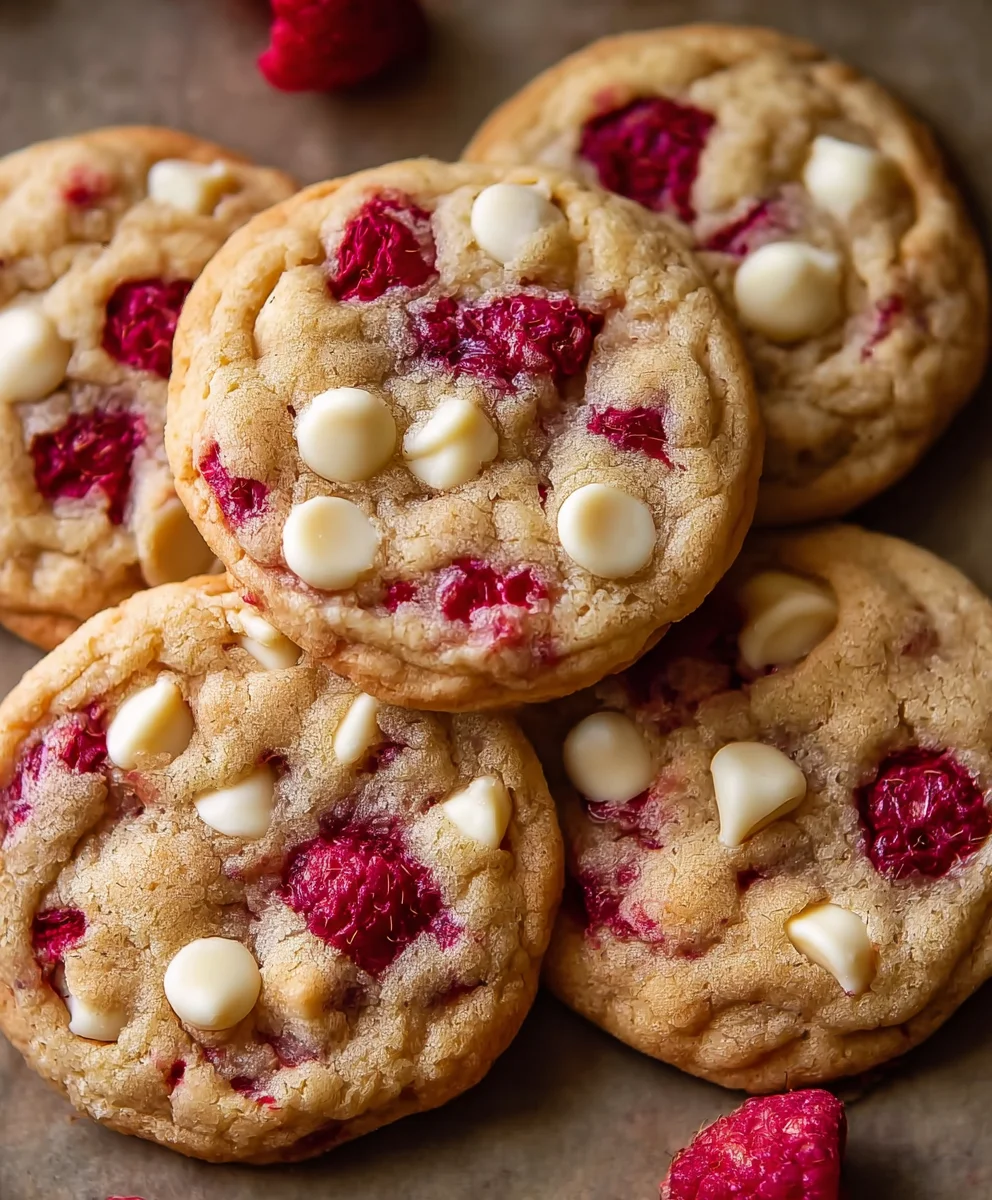
Raspberry White Chocolate Cookies Recipe – a phrase that immediately conjures images of vibrant colors and delightful flavors. There’s something truly irresistible about a freshly baked cookie, and this particular combination of sweet and tart is, in my opinion, a masterpiece. While cookies have graced kitchens for centuries, evolving from simple, hearty sustenance to intricate culinary delights, the pairing of luscious white chocolate with the bright, zesty burst of raspberries has become a modern classic, cherished for its elegant simplicity and profound taste.
I’ve always found that the secret to a truly memorable cookie lies in the balance of textures and flavors. These cookies deliver just that: a wonderfully soft, chewy center with slightly crisp edges, where creamy pockets of melted white chocolate harmoniously intertwine with the tangy pop of fresh or frozen raspberries. It’s a symphony for the senses, making it an absolute favorite for family gatherings, potlucks, or simply a comforting treat with a cup of tea. This Raspberry White Chocolate Cookies Recipe isn’t just about following steps; it’s about crafting moments of pure joy and indulgence that everyone will adore.
Ingredients:
- 2 ½ cups (300g) all-purpose flour: I always make sure it’s unbleached for the best texture in my cookies.
- 1 teaspoon baking soda: This is our leavening agent, crucial for that perfect chew.
- ½ teaspoon salt: A little salt really brings out the sweetness and balances the flavors. Don’t skip it!
- 1 cup (226g) unsalted butter: Make sure it’s softened to room temperature. This is absolutely key for a smooth, creamy dough. If it’s too cold, it won’t cream properly; if it’s melted, your cookies will spread too much.
- ¾ cup (150g) granulated sugar: For sweetness and a little crispness on the edges.
- ¾ cup (160g) packed light brown sugar: This adds moisture, chewiness, and a lovely molasses flavor that complements the white chocolate beautifully.
- 2 large eggs: Again, room temperature eggs emulsify much better with the butter and sugar, leading to a more uniform dough.
- 2 teaspoons pure vanilla extract: I’m a firm believer that good vanilla makes all the difference in a cookie. Use the best quality you can find!
- 1 ½ cups (255g) white chocolate chips or chunks: I personally love using a good quality white chocolate bar chopped into chunks because the varying sizes melt so wonderfully, but chips work perfectly too.
- 1 cup (25g) freeze-dried raspberries: These are the stars of our show! They provide an intense burst of tart raspberry flavor and a gorgeous pop of color without adding excess moisture to the dough. Make sure they are truly freeze-dried, not just dried.
Gathering Your Tools and Ingredients: The Foundation of a Great Cookie
- Before we even think about mixing, I always take a few moments to gather all my equipment. You’ll want a stand mixer with a paddle attachment (or a large bowl and a good hand mixer), several mixing bowls (one large, one medium), a rubber spatula, measuring cups and spoons, and a wire rack for cooling. This “mise en place” approach, as the chefs call it, makes the whole process so much smoother and more enjoyable. Trust me, rummaging for a measuring spoon in the middle of a recipe is no fun!
- Next, let’s get our ingredients ready. Take your unsalted butter and eggs out of the refrigerator at least an hour before you plan to bake. This allows them to come to room temperature, which is a crucial step for achieving that perfect cookie texture. I can’t stress enough how important room temperature butter is for creaming properly; it creates tiny air pockets that lead to a light and fluffy dough. Cold butter will resist mixing, and warm, melted butter will lead to greasy, flat cookies.
- While those are warming up, go ahead and preheat your oven to 375°F (190°C). This ensures the oven is consistently hot when your cookies go in, promoting even baking. I also like to line two large baking sheets with parchment paper or silicone baking mats at this stage. This prevents sticking, helps with even browning, and makes cleanup a breeze.
- Finally, take a moment to measure out all your dry ingredients. Having everything pre-measured means you won’t miss a beat once we start mixing. This foundational setup is key to a stress-free and successful Raspberry White Chocolate Cookies Recipe.
Crafting the Perfect Dough: The Heart of Your Raspberry White Chocolate Cookies
- Combine Dry Ingredients: In your medium-sized mixing bowl, whisk together the 2 ½ cups of all-purpose flour, 1 teaspoon of baking soda, and ½ teaspoon of salt. I like to give it a good whisk for about 30 seconds to a minute to ensure these dry ingredients are thoroughly combined. This might seem like a small step, but it’s important because it ensures the leavening and salt are evenly distributed throughout the dough, meaning every cookie gets the right rise and balanced flavor. Set this bowl aside for now.
- Cream Butter and Sugars: Now for the fun part! In the bowl of your stand mixer (or a large bowl if using a hand mixer), add the 1 cup of softened unsalted butter, ¾ cup of granulated sugar, and ¾ cup of packed light brown sugar. Start mixing on low speed until the sugars are just incorporated with the butter, then increase the speed to medium. You’ll want to beat this mixture for at least 3-5 minutes, or until it becomes noticeably light and fluffy and pale in color. This creaming process is paramount for achieving tender, chewy cookies. It incorporates air into the butter and sugar, which expands during baking and gives our cookies that wonderful texture. Don’t rush this step! Scrape down the sides of the bowl with your rubber spatula halfway through to make sure everything is evenly mixed.
- Incorporate Eggs and Vanilla: Once your butter and sugar mixture is beautifully light and fluffy, it’s time to add the eggs. Add the two large room temperature eggs, one at a time. After adding the first egg, beat on medium speed until it is fully incorporated and the mixture looks smooth again, typically about 30-45 seconds. Then add the second egg and repeat the process. Finally, pour in the 2 teaspoons of pure vanilla extract and beat until just combined. Again, scrape down the sides of the bowl to ensure no unmixed pockets remain. The mixture should look rich, creamy, and wonderfully fragrant at this point.
- Gradually Add Dry Ingredients: With the mixer on low speed, slowly add your whisked dry ingredients to the wet ingredients, a third at a time. Mix only until just combined after each addition. The key here is to avoid overmixing the dough. Overmixing develops the gluten in the flour too much, which can lead to tough, dense cookies. We’re aiming for tender, chewy cookies, so stop mixing as soon as you no longer see streaks of dry flour. It’s okay if there are still a few floury spots; the next step will take care of those.
- Fold in White Chocolate and Freeze-Dried Raspberries: Remove the bowl from the mixer and grab your rubber spatula. This is where the magic really starts to happen! Add your 1 ½ cups of white chocolate chips or chunks to the dough. Using your spatula, gently fold them in until they are evenly distributed. Then, and this is important for preserving their texture and vibrant color, add your 1 cup of freeze-dried raspberries. Gently fold these in for just a few turns, being careful not to crush them too much. We want those beautiful chunks of crimson raspberry to shine through in our finished Raspberry White Chocolate Cookies Recipe! Over-mixing the raspberries can turn your dough pink and diminish their distinct flavor and texture.
- Optional (But Recommended!) Chill Time: While you can technically bake these cookies immediately, I highly, highly recommend chilling the dough for at least 30 minutes, or even an hour, in the refrigerator. If you have time, an overnight chill is even better! Chilling the dough solidifies the butter, which helps the cookies spread less and bake up thicker. More importantly, it allows the flavors to meld and intensify, resulting in a richer, more complex cookie. If you’re chilling for longer than an hour, cover the bowl with plastic wrap. If you’re in a hurry, 30 minutes will still make a noticeable difference!
Baking Your Raspberry White Chocolate Cookies to Perfection
- Prepare for Baking: If you’ve chilled your dough, let it sit at room temperature for 5-10 minutes while your oven finishes preheating to 375°F (190°C). Remember, we already lined our baking sheets with parchment paper or silicone mats, so they’re ready to go.
- Scoop the Dough: Using a 1.5 to 2-tablespoon cookie scoop (or just two spoons if you don’t have a scoop), drop rounded balls of dough onto the prepared baking sheets. I usually aim for about 12 cookies per standard baking sheet, ensuring they are spaced at least 2 inches apart. This gives them plenty of room to spread without merging into one giant cookie. If you want perfectly round cookies, you can gently roll each scooped portion into a ball between your palms before placing it on the baking sheet.
- Optional Pretty Topping: For that bakery-style finish, I sometimes like to press a few extra white chocolate chips or pieces of freeze-dried raspberry onto the top of each cookie dough ball right before baking. This isn’t strictly necessary, but it makes the cookies look absolutely stunning and clearly announces their delicious flavors!
- Bake Until Golden: Place one baking sheet at a time into your preheated oven. Bake for 10-12 minutes. The exact baking time can vary depending on your oven, so keep a close eye on them. You’re looking for cookies that have lightly golden-brown edges but still look a little soft and slightly undercooked in the center. The residual heat from the baking sheet will continue to cook them slightly even after they come out of the oven, which contributes to that wonderfully soft and chewy interior.
- Rotate for Even Baking: If you’re baking more than one sheet, or if your oven tends to bake unevenly, I recommend rotating the baking sheet halfway through the baking time (around the 6-minute mark). This ensures all the cookies on the tray bake consistently and achieve that beautiful, uniform golden hue.
Cooling and Enjoying Your Irresistible Raspberry White Chocolate Cookies
- Initial Cooling on the Baking Sheet: Once your cookies are baked to perfection, remove the baking sheet from the oven. Resist the urge to move them immediately! Let the cookies cool on the baking sheet for about 5-10 minutes. This is a very important step because freshly baked cookies are incredibly delicate and prone to falling apart. Allowing them to cool on the hot sheet helps them firm up and set, making them much easier to transfer without breakage. This also allows the centers to finish cooking gently, contributing to that perfect chewiness.
- Transfer to a Wire Rack: After their initial rest on the baking sheet, carefully transfer the cookies to a wire rack to cool completely. Using a thin, wide spatula is best for this to support the whole cookie. Cooling on a wire rack allows air to circulate around all sides of the cookies, preventing them from becoming soggy on the bottom and ensuring they cool evenly. If you stack them too soon, or leave them on a flat surface, condensation can make the bottoms soft.
- The Ultimate Indulgence: While they are absolutely divine once fully cooled, I confess that my favorite way to enjoy these Raspberry White Chocolate Cookies Recipe is when they are still slightly warm, with the white chocolate still gooey and the raspberry notes bright and prominent. Pair them with a cold glass of milk, a cup of tea, or even a scoop of vanilla ice cream for an extra special treat. The contrast of the sweet white chocolate with the tart raspberries is truly addictive.
- Storage: If by some miracle you have any cookies left, store them in an airtight container at room temperature for up to 3-4 days. To keep them extra fresh and soft, you can even place a slice of bread in the container; the cookies will absorb the moisture from the bread. These cookies also freeze beautifully! Once completely cooled, place them in a single layer in an airtight freezer-safe bag or container, separated by parchment paper, for up to 2-3 months. Thaw at room temperature, or warm them up briefly in the microwave for that “freshly baked” experience.
- Experiment and Enjoy: This Raspberry White Chocolate Cookies Recipe is a fantastic base for experimentation. Feel free to adjust the amount of white chocolate or raspberries to your liking, or even try adding a pinch of lemon zest to enhance the fruit flavor. But honestly, the recipe as written is pure perfection. I truly hope you love baking and sharing these delightful cookies as much as I do! They are a guaranteed crowd-pleaser and bring a little burst of joy with every bite.
Conclusion:
So, there you have it! We’ve journeyed through the delightful process of creating what I believe are truly some of the most irresistible cookies you’ll ever bake. If you’ve been searching for that perfect treat to brighten your day, impress your guests, or simply indulge in a moment of pure bliss, then this recipe is unequivocally a must-try. The harmonious combination of tart, juicy raspberries bursting with flavor, nestled amongst rich, melt-in-your-mouth white chocolate chunks, all encased in a perfectly soft, chewy cookie base, is nothing short of culinary magic. It’s not just a cookie; it’s an experience. The vibrant color of the raspberries peeking through the golden-brown dough makes them visually stunning, while each bite delivers a symphony of textures and tastes that dance on your palate. I promise you, these aren’t just any cookies; they’re the kind that disappear from the cooling rack almost as quickly as they emerge from the oven, leaving everyone craving just one more. The balance of sweetness from the white chocolate with the slight tang of the raspberries is what makes them truly exceptional, elevating them far beyond your average cookie. They’re comforting, luxurious, and utterly addictive all at once.
Serving Suggestions to Elevate Your Cookie Experience
While these cookies are absolutely phenomenal enjoyed fresh and warm straight from the oven, there are countless ways to savor them. Imagine pairing a slightly cooled cookie with a tall glass of cold milk – a classic for a reason! For a more sophisticated treat, serve them alongside a piping hot mug of your favorite coffee or a delicate cup of herbal tea. They make a fantastic addition to any dessert platter, shining brightly amongst other sweet treats. You could even get a little decadent and crumble a warm cookie over a scoop of vanilla bean ice cream, letting the residual heat gently melt the ice cream for an ultimate indulgence. Don’t underestimate their power as a thoughtful gift; package a few up in a pretty box, and you’ll instantly become everyone’s favorite person. These cookies also travel exceptionally well, making them ideal for picnics, potlucks, or as a welcome treat for a neighbor. Just be sure to let them cool completely before packing them to prevent sticking.
Creative Variations to Spark Your Culinary Imagination
One of the joys of baking is the freedom to experiment, and this recipe offers a wonderful canvas for your creativity. While the core “Raspberry White Chocolate Cookies Recipe” is perfect as is, don’t hesitate to put your own spin on it. Consider swapping out the raspberries for other fresh or frozen berries – perhaps plump blueberries for a blueberry white chocolate cookie, or even a mix of berries for a vibrant, mixed-berry treat. For an added textural dimension, try folding in a handful of chopped nuts like macadamia nuts or pistachios alongside the white chocolate; their buttery crunch would complement the soft cookie beautifully. If white chocolate isn’t your sole preference, feel free to experiment with milk chocolate or even dark chocolate chunks for a richer, more intense flavor profile. A tiny pinch of lemon or orange zest added to the dough can really brighten the overall taste, providing an extra layer of complexity. For those who prefer a different shape, the dough can easily be pressed into a greased 9×13 inch pan and baked as cookie bars, cut into squares once cooled. Or, if you’re hosting a gathering, scoop smaller portions of dough for mini cookies – perfect for bite-sized delights! The possibilities are truly endless, allowing you to tailor this incredible recipe to suit any taste or occasion.
Your Turn to Bake and Share!
Now that you have all the tips, tricks, and inspiration, it’s time for you to experience the magic firsthand. I wholeheartedly encourage you to roll up your sleeves, preheat your oven, and embark on this delicious baking adventure. Don’t be intimidated; this recipe is designed for success, and I promise the rewards are absolutely worth every moment spent in the kitchen. There’s something incredibly satisfying about transforming simple ingredients into a batch of warm, fragrant, homemade cookies, and the joy they bring to those who taste them is immeasurable. Once you’ve pulled your beautiful creations from the oven, and perhaps after you’ve savored a few (or more!) yourself, I would absolutely love to hear about your baking journey.
Did you stick to the original “Raspberry White Chocolate Cookies Recipe”, or did you venture into one of the variations? What was your favorite part of the process? Did you share them with family and friends, or did you keep them all to yourself (no judgment here!)? Please, don’t be shy! Share your experiences, your photos, and any delightful discoveries you made along the way in the comments section below. Your feedback and stories inspire me and our entire community of baking enthusiasts. Let’s create a wonderful collection of baking triumphs together. Happy baking, my friends!
Raspberry White Chocolate Cookies Recipe
A truly irresistible recipe for Raspberry White Chocolate Cookies, featuring a perfect balance of sweet white chocolate and tart freeze-dried raspberries in a soft, chewy cookie with crisp edges. A modern classic for any occasion.
Ingredients
-
2 ½ cups (300g) all-purpose flour
-
1 tsp baking soda
-
½ tsp salt
-
1 cup (226g) unsalted butter, softened
-
¾ cup (150g) granulated sugar
-
¾ cup (160g) packed light brown sugar
-
2 large eggs, room temperature
-
2 tsp pure vanilla extract
-
1 ½ cups (255g) white chocolate chips or chunks
-
1 cup (25g) freeze-dried raspberries
Instructions
-
Step 1
Preheat oven to 375°F (190°C). Line two large baking sheets with parchment paper. In a medium bowl, whisk together flour, baking soda, and salt; set aside. Ensure butter and eggs are at room temperature. -
Step 2
In the bowl of a stand mixer, beat softened butter, granulated sugar, and light brown sugar on medium speed for 3-5 minutes until light and fluffy. Scrape down the sides of the bowl as needed. -
Step 3
Beat in eggs one at a time until fully incorporated, then stir in the vanilla extract until just combined. Scrape down the sides of the bowl. -
Step 4
With the mixer on low speed, gradually add the whisked dry ingredients to the wet ingredients in thirds, mixing only until just combined after each addition. Avoid overmixing. -
Step 5
Remove the bowl from the mixer. Gently fold in the white chocolate chips or chunks with a rubber spatula until evenly distributed. Then, carefully fold in the freeze-dried raspberries for just a few turns, being careful not to crush them. -
Step 6
For best results, cover the dough and chill in the refrigerator for at least 30 minutes, or up to an hour. This helps prevent spreading and deepens the flavors. If chilling longer, let it sit at room temperature for 5-10 minutes before baking. -
Step 7
Drop rounded balls of dough (1.5-2 tablespoons each) onto the prepared baking sheets, spaced at least 2 inches apart. Optionally, press a few extra white chocolate pieces or raspberries on top. Bake one sheet at a time for 10-12 minutes, until edges are lightly golden and centers are still slightly soft. Rotate the baking sheet halfway through baking if your oven bakes unevenly. -
Step 8
Remove the baking sheet from the oven and let the cookies cool on the sheet for 5-10 minutes to firm up. Carefully transfer them to a wire rack to cool completely. Enjoy warm for gooey chocolate and bright raspberry notes. -
Step 9
Store cooled cookies in an airtight container at room temperature for up to 3 days. To keep extra soft, add a slice of bread to the container. For longer storage, freeze baked cookies in a single layer, then transfer to a freezer bag for up to 1 month. Thaw at room temperature or warm briefly in the microwave (approx. 15 seconds). Cookie dough can also be frozen: scoop into balls, freeze on a baking sheet, then transfer to a freezer bag; bake from frozen, adding 1-2 minutes to bake time.
Important Information
Nutrition Facts (Per Serving)
It is important to consider this information as approximate and not to use it as definitive health advice.
Allergy Information
Please check ingredients for potential allergens and consult a health professional if in doubt.


Leave a Comment