

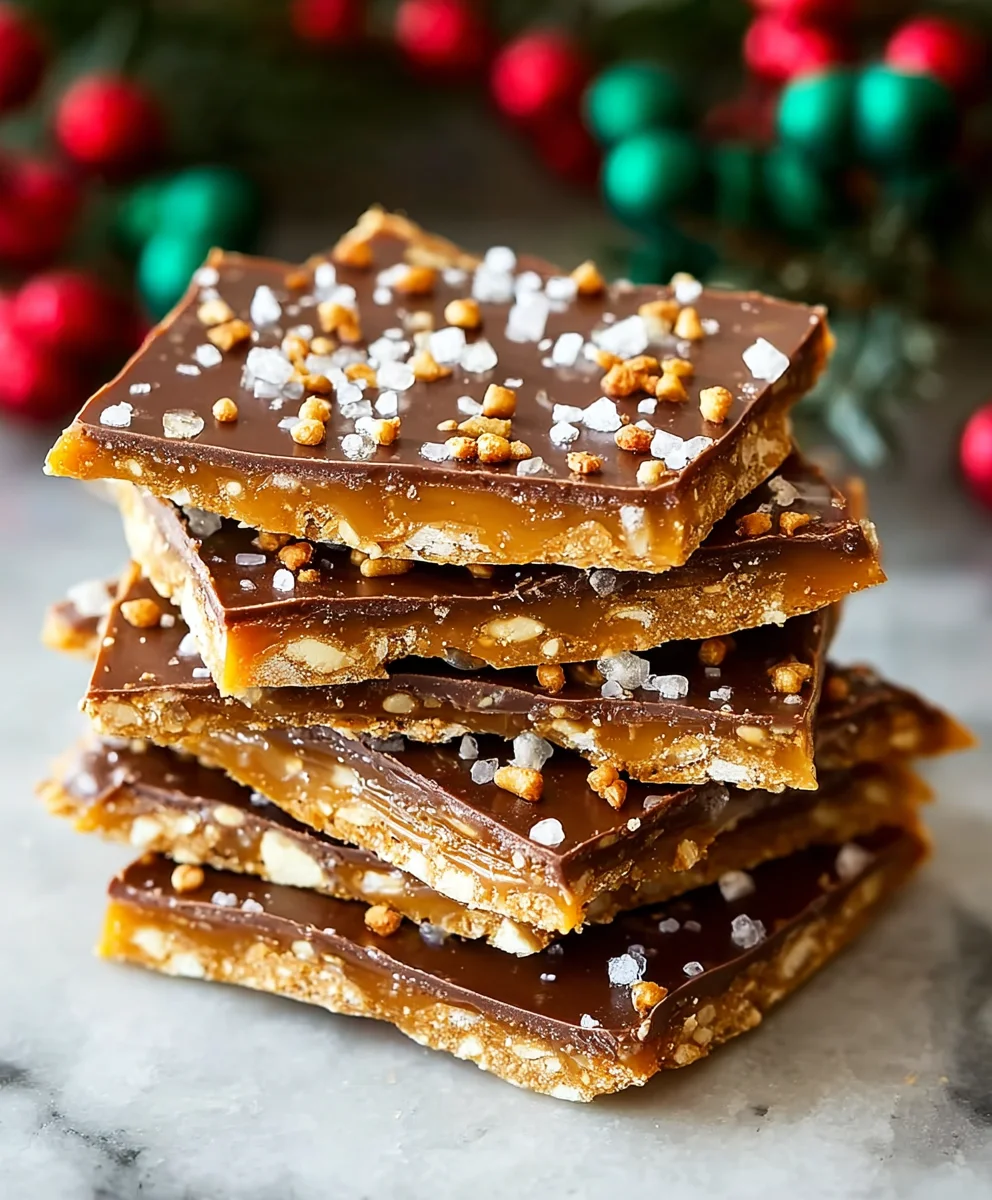
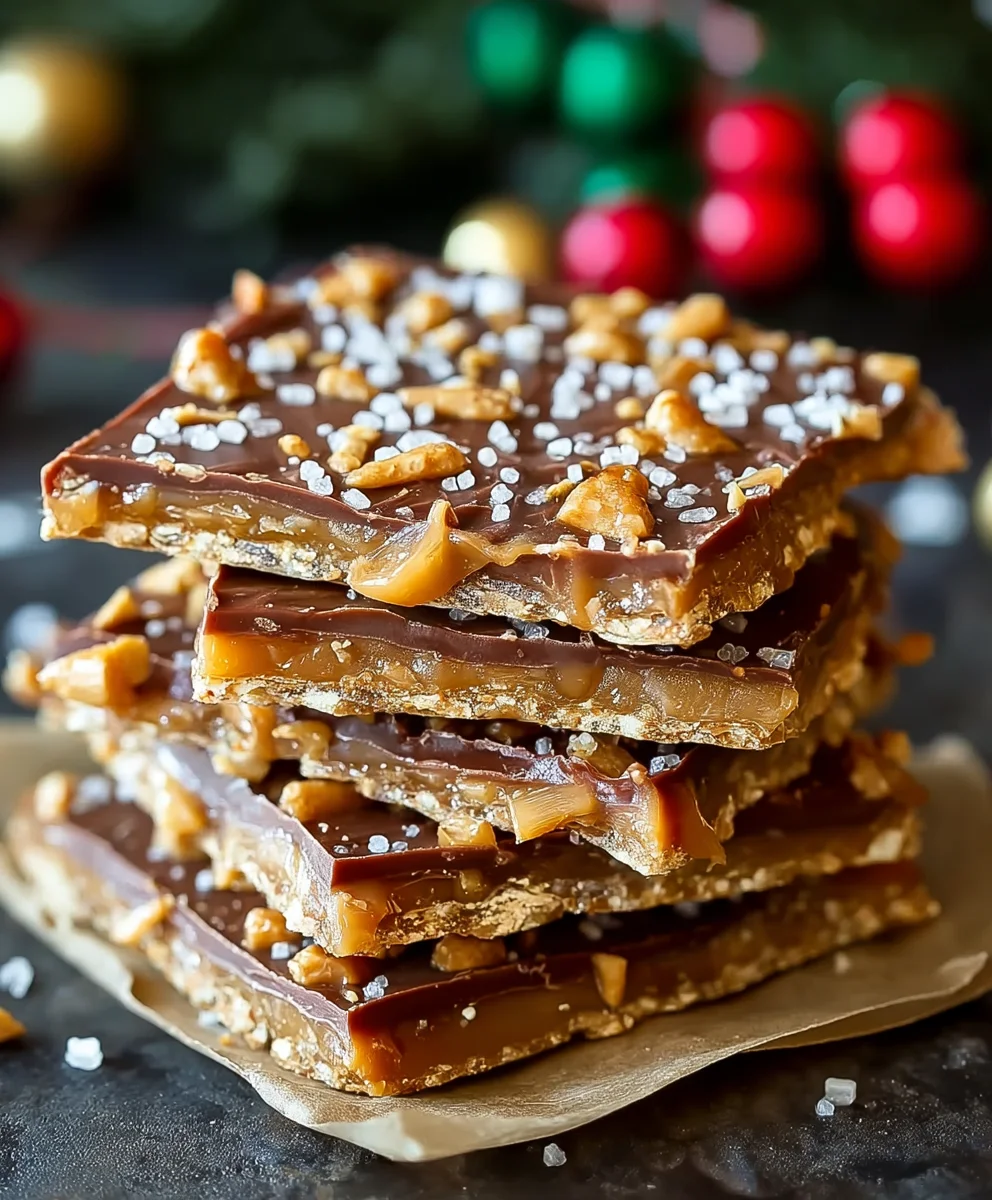
Christmas Crack Toffee, a name that perfectly encapsulates the irresistible nature of this holiday confection! If there’s one treat that truly lives up to its reputation for being utterly addictive, disappearing almost as quickly as it appears on any festive table, it’s this delightful creation. I often find myself marveling at how a few simple ingredients can transform into such a profoundly satisfying dessert, making it an absolute must-have during the holiday season.
This culinary marvel, while not steeped in ancient history, has swiftly cemented its place as a beloved modern tradition. It’s the quintessential easy-to-make, crowd-pleasing treat that brings smiles to faces and joy to palates. People adore this dish for its incredible balance of flavors and textures: the buttery, brittle crunch of the toffee, the unexpected savory hint from the cracker base, and the smooth, rich layer of chocolate, often crowned with a sprinkle of festive cheer. It’s the perfect blend of sweet and salty, creating a truly unforgettable experience with every bite.
There’s a reason why families eagerly anticipate making and receiving batches of Christmas Crack Toffee each year; it’s more than just a dessert, it’s a symbol of holiday generosity and shared enjoyment. It’s wonderfully versatile for gifting, cookie exchanges, or simply a cozy evening indulgence. Get ready to experience the magic of this irresistible treat that promises to become a cherished part of your holiday repertoire.
Ingredients:
- 1 sleeve (about 40 crackers) Saltine Crackers: I find that one standard sleeve is just the right amount to cover a 13×9 inch baking pan perfectly. Don’t worry if they overlap slightly, it just adds to the texture of your ultimate Christmas Crack Toffee!
- 1 cup (2 sticks) Unsalted Butter: Using unsalted butter gives you control over the final saltiness, which is important for that perfect sweet and salty balance in this Christmas Crack Toffee recipe. Feel free to use salted if that’s all you have, but I’d suggest reducing any added salt later.
- 1 cup Packed Light Brown Sugar: The brown sugar is key to that rich, caramelized toffee flavor. Make sure it’s packed tightly into your measuring cup for accuracy.
- 1 teaspoon Pure Vanilla Extract: A touch of vanilla really enhances the toffee’s depth of flavor. Don’t skip it!
- 1/2 teaspoon Salt (optional, but recommended): Even with unsalted butter, a little extra salt helps cut through the sweetness and elevates the overall taste of your Christmas Crack Toffee.
- 12 ounces (about 2 cups) Chocolate Chips (Semi-Sweet or Milk Chocolate): Your choice here! Semi-sweet offers a classic balance, while milk chocolate makes it extra decadent. You can even use a mix!
- Optional Toppings:
- Flaky Sea Salt: A sprinkle of flaky sea salt on top of the melted chocolate is an absolute game-changer for enhancing the Christmas Crack Toffee’s flavor profile. It truly highlights the sweet and savory notes.
- Chopped Nuts (Pecans, Walnuts, Almonds): For added crunch and a nutty aroma. Toasting them lightly beforehand can boost their flavor even more.
- Sprinkles: Christmas-themed sprinkles are perfect for making your Christmas Crack Toffee festive and fun, especially if you’re gifting it!
- Crushed Peppermint Candies: Another fantastic holiday addition that brings a cool, minty flavor.
- Shredded Coconut: For a tropical twist, though less traditional for “Christmas Crack Toffee.”
- White Chocolate Drizzle: After the main chocolate layer sets, a drizzle of melted white chocolate can add visual appeal and another layer of flavor.
Preparing Your Workspace and Ingredients for Christmas Crack Toffee
-
Preheat Your Oven and Prepare Your Pan: First things first, let’s get that oven ready. Preheat your oven to 350°F (175°C). While it’s heating up, grab a 13×9 inch baking pan. This is the ideal size for a standard batch of Christmas Crack Toffee.
Now, and this is a crucial step for easy removal and cleanup, line your baking pan with parchment paper. I always make sure the parchment paper extends a little over the edges of the pan; these overhangs will act as convenient “handles” later on when we need to lift the cooled Christmas Crack Toffee out. You can also lightly grease the pan before placing the parchment to help it stay put, but it’s not strictly necessary if your parchment lies flat. Don’t skip the parchment paper! It makes all the difference when it comes to getting that beautiful Christmas Crack Toffee out of the pan in one glorious piece.
- Arrange the Saltine Crackers: Once your pan is lined, it’s time to lay down the foundation for our Christmas Crack Toffee. Carefully arrange the saltine crackers in a single layer over the parchment paper. Try your best to cover the entire bottom of the pan, fitting them snugly side-by-side. It’s okay if you have to break a few crackers to fill in small gaps or corners; perfection isn’t the goal here, just a solid base for our toffee. This cracker layer is what gives Christmas Crack Toffee its signature snap and a delightful salty contrast.
- Measure Out Your Ingredients: Before you start cooking, measure out all your ingredients. This is what we call “mise en place” in the cooking world – having everything ready to go. Trust me, once the toffee starts bubbling, things move quickly, and you won’t want to be fumbling for a measuring cup. Have your butter, brown sugar, vanilla extract, and salt (if using) all ready and within arm’s reach. Also, have your chocolate chips and any desired toppings measured and set aside. This preparation makes the entire process of making Christmas Crack Toffee much smoother and more enjoyable.
Crafting the Christmas Crack Toffee Base
- Prepare the Toffee Mixture: Now for the heart of our Christmas Crack Toffee – the buttery, sweet toffee! In a medium-sized, heavy-bottomed saucepan, combine the 1 cup of unsalted butter and 1 cup of packed light brown sugar. I always recommend a heavy-bottomed saucepan because it distributes heat more evenly, which helps prevent the mixture from scorching on the bottom, a common pitfall when making toffee.
-
Cook the Toffee: Place the saucepan over medium heat. Stir the butter and brown sugar constantly with a whisk or a wooden spoon as they melt and combine. The goal here is to create a smooth, homogenous mixture. Once the butter is fully melted and the sugar has dissolved, bring the mixture to a rolling boil.
This is where patience and attention are key! Once it reaches a rolling boil, continue to boil, stirring occasionally (but not constantly, as that can crystallize the sugar) for 3-5 minutes. You’ll notice the mixture thickening and darkening slightly, turning into a beautiful amber color. The exact time can vary depending on your stove and saucepan, so watch it closely. The ideal temperature for the toffee should be around 285-300°F (140-149°C), which is the “soft crack” stage if you’re using a candy thermometer. If you don’t have a thermometer, simply look for that rich caramel color and a slightly thickened consistency. This carefully cooked toffee is what will give your Christmas Crack Toffee its irresistible, crisp texture.
- Add Vanilla and Salt: Once the toffee has reached the perfect color and consistency, immediately remove the saucepan from the heat. Carefully stir in the 1 teaspoon of pure vanilla extract and the 1/2 teaspoon of salt (if you’re using it). Be cautious as the vanilla can cause the mixture to bubble up vigorously due to the temperature difference. Give it a good stir to ensure everything is well combined.
- Pour Toffee Over Crackers: Working quickly (because toffee sets fast!), pour the hot toffee mixture evenly over the single layer of saltine crackers in your prepared baking pan. Use a heat-safe spatula to gently spread the toffee, ensuring every cracker is coated. Don’t worry if it’s not absolutely perfect; the heat of the oven will help it spread a bit more. This step is where the magic really begins for your Christmas Crack Toffee, as the crackers absorb some of that buttery goodness.
- Bake the Christmas Crack Toffee Base: Carefully transfer the baking pan to your preheated 350°F (175°C) oven. Bake for approximately 5-7 minutes. During this time, the toffee will bubble and spread beautifully, melding with the crackers. Keep an eye on it to ensure it doesn’t burn, especially around the edges. You want it to be bubbly and evenly caramelized, but not scorched. The crackers might slightly soften, which is perfectly fine – they’ll crisp up again as they cool. This baking step is essential for setting the toffee and creating that perfect, crunchy base for your Christmas Crack Toffee.
Layering the Chocolate and Toppings for Christmas Crack Toffee
- Add the Chocolate Chips: As soon as you remove the pan from the oven, sprinkle the 12 ounces of chocolate chips evenly over the hot toffee layer. The residual heat from the baked toffee will begin to melt the chocolate almost immediately. Let the chocolate chips sit undisturbed for about 5 minutes. This allows them enough time to soften completely from the latent heat, making them much easier to spread. Resisting the urge to spread too early is crucial for achieving a smooth, glossy chocolate layer on your Christmas Crack Toffee.
- Spread the Melted Chocolate: After the 5 minutes have passed, use an offset spatula or the back of a spoon to gently and evenly spread the melted chocolate over the entire surface of the Christmas Crack Toffee. Work from the center outwards, ensuring you cover all the toffee and crackers right up to the edges. Aim for a smooth, consistent layer. If some chocolate chips aren’t melting fully, you can briefly pop the pan back into the turned-off (but still warm) oven for another minute, then continue spreading. A smooth chocolate layer is not just for looks; it ensures a consistent bite of chocolate with every piece of Christmas Crack Toffee.
- Add Optional Toppings: Now for the fun part – customization! While the chocolate is still warm and melted, sprinkle your chosen toppings over it. If you’re using flaky sea salt, this is the perfect time to sprinkle it generously. For nuts, sprinkles, or crushed candies, scatter them evenly across the chocolate. Gently press them down a little with your hand or the back of your spatula to ensure they adhere to the chocolate as it sets. Don’t be shy here; the toppings add both flavor and visual appeal to your Christmas Crack Toffee, making it truly special and festive.
Chilling and Breaking the Christmas Crack Toffee
- Chill to Set: Once your Christmas Crack Toffee is fully topped, it needs to cool and set completely. Transfer the baking pan to your refrigerator. Allow it to chill for at least 1 to 2 hours, or until the chocolate is firm and completely set. You can also let it set at room temperature, which might take 3-4 hours, but chilling speeds up the process significantly and helps achieve that characteristic “crack.” Don’t rush this step! A fully set chocolate layer is key to easily breaking your Christmas Crack Toffee into clean pieces.
-
Break the Christmas Crack Toffee: Once the Christmas Crack Toffee is thoroughly chilled and solid, remove the pan from the refrigerator. Use the parchment paper overhangs to carefully lift the entire slab of toffee out of the baking pan and transfer it to a cutting board or a clean, flat surface.
Now for the satisfying part! Using your hands, simply break the large slab into irregular pieces. The name “Christmas Crack Toffee” comes from this very action – you’ll hear that satisfying “crack!” as the toffee and chocolate shatter into deliciously jagged shards. You can also use a sharp knife to cut more uniform pieces, but I find the rustic, broken pieces add to its charm and make it feel more homemade. Aim for pieces that are easy to pick up and enjoy.
- Final Inspection and Enjoyment: Take a moment to admire your handiwork! Each piece of Christmas Crack Toffee should feature a crisp saltine cracker base, a rich, buttery toffee layer, and a smooth, set chocolate topping adorned with your chosen embellishments. The combination of sweet, salty, crunchy, and smooth is what makes this treat so incredibly addictive.
Tips for Perfect Christmas Crack Toffee Every Time
- Watch Your Toffee Carefully: The toffee cooking stage (step 5) is perhaps the most critical for Christmas Crack Toffee. Overcooking can lead to a burnt, bitter taste, while undercooking might result in a soft, chewy, rather than crisp, toffee. Aim for that rich amber color and the 3-5 minute boil after it starts bubbling vigorously. If you have a candy thermometer, use it to ensure it reaches the soft crack stage (around 285-300°F). Don’t let the exact time dictate your decision; let the visual cues and temperature guide you.
- Parchment Paper is Your Best Friend: I cannot stress this enough. Using parchment paper (step 1) makes removing the finished Christmas Crack Toffee from the pan an absolute breeze. Without it, you risk having the delicious treat stick to the pan, turning a joyous moment into a frustrating cleanup. Make sure the parchment extends beyond the edges to create those handy “lift-out” tabs.
- Evenly Spread Chocolate: When spreading the melted chocolate (step 10), take your time to ensure an even layer. An offset spatula works wonders for this, allowing you to glide the chocolate smoothly across the toffee. An even layer ensures every bite of your Christmas Crack Toffee has a good balance of chocolate, toffee, and cracker. If the chocolate starts to firm up too quickly, place the pan back in the warm (but turned off) oven for a minute to soften it again.
- Get Creative with Toppings: While the basic Christmas Crack Toffee is fantastic on its own, the toppings are where you can really let your personality shine. Consider themes for different occasions or holiday seasons. Beyond the typical nuts and sprinkles, think about mini chocolate candies, crushed pretzels for extra saltiness, or even a different type of chocolate drizzle once the first layer has set.
- Allow Adequate Chilling Time: Patience truly is a virtue when it comes to setting the Christmas Crack Toffee (step 12). Rushing the chilling process can lead to soft, messy pieces that don’t “crack” satisfyingly. The refrigerator is your ally here, ensuring the chocolate and toffee firm up completely for that perfect crisp texture and easy breakage.
- Avoid Humidity: Toffee and chocolate are susceptible to humidity. If you live in a humid environment, consider making your Christmas Crack Toffee on a drier day, or store it in an airtight container in a cool, dry place immediately after it sets to prevent it from becoming sticky.
- Don’t Be Afraid to Break It: The beauty of Christmas Crack Toffee is its rustic charm. Don’t feel the need for perfectly uniform pieces. The irregular, jagged edges are part of its appeal and make it seem even more enticing. Have fun with the breaking process!
Storage and Gifting Your Christmas Crack Toffee
- Storing Your Christmas Crack Toffee: Once your delicious Christmas Crack Toffee is broken into pieces, proper storage is key to maintaining its crispness and flavor. Store the pieces in an airtight container at room temperature. Layer them between sheets of parchment paper to prevent them from sticking together, especially if your kitchen is on the warmer side. Stored this way, it will remain fresh and delightful for up to 1-2 weeks. If you want to extend its shelf life even further, you can store it in the refrigerator for up to 3 weeks, though sometimes the cold can slightly alter the texture of the chocolate. Just let it come to room temperature for a few minutes before serving if it’s been refrigerated. Keeping it away from direct sunlight and heat sources is paramount to prevent the chocolate from melting and the toffee from becoming sticky.
- Freezing for Longer Storage: Did you make a huge batch of Christmas Crack Toffee and want to save some for later? It freezes beautifully! Place the broken pieces in a single layer on a baking sheet lined with parchment paper and freeze until solid (about 30 minutes to an hour). Once frozen, transfer the pieces to a freezer-safe airtight container or heavy-duty freezer bag, again layering with parchment paper to prevent sticking. It can be stored in the freezer for up to 2-3 months. When you’re ready to enjoy it, simply remove it from the freezer and let it come to room temperature for about 15-20 minutes before serving. This is a fantastic way to prepare Christmas Crack Toffee well in advance for holiday gifting or unexpected guests.
-
Gifting Your Homemade Christmas Crack Toffee: Christmas Crack Toffee makes an absolutely wonderful homemade gift. It’s incredibly popular during the holiday season, which is why it’s often called “Christmas Crack Toffee”!
- Presentation: Arrange the broken pieces artfully in festive tins, cellophane bags tied with ribbon, or small decorative boxes.
- Personal Touch: Add a small, handwritten tag with your best wishes. You can even include a little note explaining that it’s homemade Christmas Crack Toffee.
- Variety Packs: If you’ve made different batches with various toppings (e.g., one with nuts, one with sprinkles, one with just sea salt), combine a few pieces of each for a delightful sampler box.
Gifting this treat is a lovely way to share your baking skills and spread a little holiday cheer. Everyone loves receiving a delicious, homemade gift, especially something as irresistible as Christmas Crack Toffee!
Conclusion:
So there you have it, my friends. We’ve journeyed through the simple steps to create a dessert that is nothing short of legendary. This isn’t just another sweet treat; it’s a revelation, an absolute must-try that promises to elevate any occasion, whether it’s a quiet evening at home or a bustling holiday gathering. I genuinely believe that once you experience the magical combination of crisp crackers, buttery toffee, and luscious chocolate, you’ll understand why this recipe has earned its cherished spot in so many kitchens, including mine. The perfect balance of salty and sweet, the incredible crunch that gives way to a smooth, rich chocolate layer – it’s an experience that tantalizes every single taste bud. And the best part? It’s surprisingly simple to make, requiring minimal effort for maximum impact. The way it disappears from any plate it graces is testament to its irresistible charm; truly, it’s a dessert that speaks for itself.
What truly sets this treat apart is its uncanny ability to deliver an immensely satisfying textural and flavor profile with such humble ingredients and straightforward steps. You get that delightful ‘snap’ as you bite through the chocolate, followed by the rich, caramelized warmth of the toffee, all underpinned by the subtle, savory crunch of the cracker base. It’s an adventure in every bite, a symphony of textures and tastes that leaves you craving just one more piece. And trust me, ‘just one more piece’ quickly turns into several! This recipe is an absolute game-changer for anyone looking to impress their guests or simply treat themselves to something extraordinarily delicious without the usual fuss and complexity often associated with gourmet desserts. It’s comforting, indulgent, and effortlessly elegant all at once, proving that sometimes, the simplest things are truly the best.
Serving Suggestions & Creative Variations:
Now, let’s talk about how to truly elevate your experience with this amazing treat. While utterly divine on its own, a small piece alongside a steaming mug of strong coffee or a comforting cup of herbal tea makes for a perfect afternoon pick-me-up. Imagine unwinding with a book, a warm drink, and a shard of this deliciousness – pure bliss! Consider arranging it artfully on a dessert platter alongside fresh berries or a scoop of vanilla bean ice cream for an impressive presentation that looks far more complicated than it actually was to prepare. But perhaps one of my favorite ways to enjoy and share this creation is as a thoughtful, homemade gift. Bag it up with a pretty ribbon, and you’ve got a present that speaks volumes of your effort and love – ideal for teachers, neighbors, or anyone who appreciates a touch of homemade goodness.
But the fun doesn’t stop there! This recipe is incredibly adaptable, inviting you to put your own creative spin on it. Feel free to experiment with different types of chocolate. A rich, high-quality dark chocolate will lend a more sophisticated, less sweet profile, while a creamy milk chocolate will make it even more decadent and kid-friendly. White chocolate, perhaps drizzled or swirled over the dark or milk chocolate, can also add a beautiful visual contrast and a different layer of sweetness. Toppings are where you can really let your creativity shine! Sprinkle on some finely chopped pecans, slivered almonds, or even a mix of your favorite nuts for added texture and flavor. A generous sprinkle of flaky sea salt is almost mandatory, in my opinion, for that perfect salty-sweet dynamic that makes this treat so addictive. For a truly festive touch, especially around the holidays, crushed candy canes or colorful holiday sprinkles are wonderful additions. Thinking outside the box? How about a drizzle of creamy caramel or a scattering of mini chocolate chips before the chocolate sets? Even finely crushed pretzels can add another layer of salty crunch, taking this already amazing treat to new heights.
And don’t reserve this joy just for the festive season! While it shines as Christmas Crack Toffee, you can easily adapt the sprinkles and packaging for any occasion. Pastel sprinkles for a spring garden party, orange and black for a Halloween bash, or even team colors for game day – the possibilities are truly endless. This versatility means you can enjoy this delightful creation all year round, adapting it to suit any celebration or craving. It’s a recipe that keeps on giving, allowing you to continually rediscover its charm with each new variation.
Your Turn to Create and Share!
So, what are you waiting for? I wholeheartedly encourage you to roll up your sleeves and give this recipe a try. You’ll be amazed at how quickly it comes together and how incredibly satisfying it is to create something so delicious from scratch. Imagine the smiles on the faces of your loved ones as they bite into this homemade goodness, knowing you made it just for them. It’s more than just a recipe; it’s an experience, a memory in the making, and a testament to the simple joys of baking. Once you’ve experienced the magic, I would absolutely love to hear about it. Please share your thoughts, your successes, and any creative variations you come up with in the comments section below. Did you use a different type of chocolate? Add a unique topping? I’m always eager to learn from your kitchen adventures and see how you made this recipe your own! Your feedback not only brightens my day but also inspires other home bakers in our wonderful community to try new things and push their culinary boundaries.
There’s a special kind of joy that comes from sharing homemade treats, and this one, believe me, is a true crowd-pleaser that will have everyone asking for the recipe. Don’t hesitate, take the plunge into this wonderfully easy and unbelievably tasty baking project. I promise, you won’t regret it. Happy baking, everyone!
Easy Christmas Crack Toffee – Your New Favorite Holiday Treat
Christmas Crack Toffee, a name that perfectly encapsulates the irresistible nature of this holiday confection! If there’s one treat that truly lives up to its reputation for being utterly addictive, disappearing almost as quickly as it appears on any festive table, it’s this delightful creation. I often find myself marveling at how a few simple ingredients can transform into such a profoundly satisfying dessert, making it an absolute must-have during the holiday season.
Ingredients
-
1 sleeve (approx. 40) Saltine Crackers
-
1 cup (2 sticks) Unsalted Butter
-
1 cup Packed Light Brown Sugar
-
1 teaspoon Non-Alcoholic Vanilla Extract
-
1/2 teaspoon Salt (optional)
-
12 ounces (approx. 2 cups) Chocolate Chips (Semi-Sweet or Milk Chocolate)
-
Optional Toppings:
-
Flaky Sea Salt
-
Chopped Nuts (Pecans, Walnuts, Almonds)
-
Sprinkles
-
Crushed Peppermint Candies
-
Shredded Coconut
-
White Chocolate Drizzle
Instructions
-
Step 1
Preheat oven to 350°F (175°C). Line a 13×9 inch baking pan with parchment paper, leaving overhangs. Arrange saltine crackers in a single layer in the lined pan. Measure all remaining ingredients and have them ready. -
Step 2
In a heavy-bottomed saucepan, melt 1 cup unsalted butter and 1 cup packed light brown sugar over medium heat, stirring until smooth. Bring to a rolling boil and continue to boil, stirring occasionally, for 3-5 minutes (aim for 285-300°F soft crack stage). The mixture will thicken and turn amber. -
Step 3
Remove the saucepan from heat, then stir in 1 teaspoon non-alcoholic vanilla extract and 1/2 teaspoon salt. Quickly pour the hot toffee mixture evenly over the crackers in the pan, spreading with a heat-safe spatula to coat all crackers. -
Step 4
Bake the pan for 5-7 minutes until the toffee is bubbly and caramelized. Watch carefully to prevent burning. -
Step 5
Immediately remove the pan from the oven and sprinkle 12 ounces chocolate chips evenly over the hot toffee. Let sit for 5 minutes to melt. Gently spread the melted chocolate evenly over the entire surface. While the chocolate is still warm, sprinkle your desired optional toppings (e.g., flaky sea salt, nuts, sprinkles) and gently press them in to adhere. -
Step 6
Transfer the baking pan to the refrigerator and chill for at least 1-2 hours, or until the chocolate is completely firm and set. Once solid, use the parchment paper overhangs to lift the entire slab out of the pan. Break the chilled slab into irregular pieces by hand or cut with a sharp knife. -
Step 7
Store pieces in an airtight container at room temperature for up to 1-2 weeks, layering with parchment paper. For longer storage (2-3 months), freeze solid pieces in an airtight container. Let come to room temperature before serving.
Important Information
Nutrition Facts (Per Serving)
It is important to consider this information as approximate and not to use it as definitive health advice.
Allergy Information
Please check ingredients for potential allergens and consult a health professional if in doubt.

Leave a Comment