

Aunt Pat Cream Puffs are not just a dessert; they are a cherished family legacy, a bite of pure, unadulterated joy that transports you straight back to simpler times. For generations, Aunt Pat’s kitchen was the heart of our family gatherings, and her legendary cream puffs were always the star of the show. I remember the anticipation as their golden shells emerged from the oven, filling the house with an intoxicating aroma. This recipe isn’t merely a list of ingredients; it’s a piece of our family history, passed down with love and countless memories, embodying the warmth and generosity of our beloved Aunt Pat.
The Irresistible Allure of These Cream Puffs
What makes these delicacies so incredibly popular and endlessly loved? It’s the perfect harmony of textures and flavors that captivates every palate. Imagine: a delicate, airy choux pastry shell, exquisitely crisp on the outside yet tender within, cradling a rich, velvety cream filling that simply melts in your mouth. They are surprisingly versatile, making them perfect for an elegant dinner party showstopper or a comforting, delightful treat on a quiet afternoon. Recreating these authentic Aunt Pat Cream Puffs is a testament to the enduring power of classic baking, and I promise, the rewarding experience of making and sharing them is truly unparalleled. Prepare to create your own cherished memories with this timeless, beloved classic.
Ingredients:
-
For the Choux Pastry (Pâte à Choux):
- 1 cup (240ml) water
- ½ cup (113g or 1 stick) unsalted butter, cut into ½-inch pieces
- ¼ teaspoon salt (I often use fine sea salt for a cleaner taste)
- 1 teaspoon granulated sugar (this helps with browning and texture)
- 1 cup (125g) all-purpose flour, sifted (sifting is key for a smooth paste!)
- 4 large eggs, at room temperature, lightly beaten in a small bowl
-
For Aunt Pat’s Signature Vanilla Bean Pastry Cream (Crème Pâtissière):
- 2 cups (480ml) whole milk (full-fat is essential for richness here)
- ½ vanilla bean, split lengthwise and scraped (or 1 ½ teaspoons good quality vanilla extract if you don’t have a bean, but trust me, the bean makes a difference for Aunt Pat Cream Puffs!)
- 4 large egg yolks
- ½ cup (100g) granulated sugar
- ¼ cup (30g) cornstarch
- 2 tablespoons (28g) unsalted butter, softened and cut into small pieces
-
For Assembly and Garnish:
- Confectioners’ sugar, for dusting
- Optional: Fresh berries or chocolate sauce, for serving
Preparation: Choux Pastry
- Prepare your workspace: Before you even think about turning on the stove, get everything ready. Measure out all your ingredients. Line two large baking sheets with parchment paper or silicone baking mats. Have a large pastry bag fitted with a large round tip (like an Ateco 808 or a Wilton 1A) or a large star tip ready, or simply be prepared to use two spoons. Preheat your oven to 425°F (220°C). This initial high heat is crucial for creating that beautiful puff!
- Melt the butter mixture: In a heavy-bottomed saucepan (I find a 3-quart saucepan works perfectly), combine the water, unsalted butter pieces, salt, and granulated sugar. Place the saucepan over medium-high heat. Allow the butter to melt completely, and then bring the mixture to a rolling boil. It’s important that it truly boils, but don’t let it boil for too long once the butter is melted, as too much water will evaporate.
- Add the flour to create the “panada”: As soon as the mixture reaches a rolling boil, remove the saucepan from the heat. Immediately add all of the sifted all-purpose flour at once. Stir vigorously and continuously with a sturdy wooden spoon or a heat-resistant spatula until the mixture forms a smooth ball and pulls away from the sides of the pan. This process is called creating the “panada,” and it’s where the magic begins for our Aunt Pat Cream Puffs.
- Dry out the dough: Return the saucepan to medium-low heat. Continue to stir and “dry out” the dough for about 2 to 3 minutes. You’ll notice a thin film forming on the bottom of the pan – this is a good sign! It means you’re evaporating excess moisture, which is vital for light, airy choux pastry. This step is often overlooked but truly makes a difference in preventing soggy cream puffs.
- Cool the dough slightly: Transfer the dough to a large mixing bowl. If you have a stand mixer, you can use that with the paddle attachment. Allow the dough to cool for about 5 minutes. This is important because if you add the eggs too soon, they will scramble! You want the steam to dissipate slightly so the dough isn’t too hot to the touch.
- Incorporate the eggs: This is arguably the most critical step for perfect choux pastry. With the mixer on medium-low speed (or by hand with a sturdy spoon and a lot of elbow grease), add the lightly beaten eggs, one at a time, incorporating each egg completely before adding the next. The dough will initially look like it’s separating and breaking apart – don’t panic! Keep mixing, and it will eventually come back together into a smooth, thick, glossy paste. You’re looking for a consistency where the dough is soft and pliable but still holds its shape. When you lift the paddle or spoon, the dough should fall slowly from it in a “V” shape or a thick ribbon. You might not need all of the egg, or you might need a tiny bit more; adjust based on the consistency. It should be thick enough to hold its shape when piped but fluid enough to pipe smoothly.
- Pipe the choux pastry: Transfer the choux pastry into the prepared pastry bag. Pipe 1 ½-inch to 2-inch rounds onto the prepared baking sheets, leaving about 2 inches of space between each puff as they will expand significantly. If you don’t have a pastry bag, you can use two spoons to drop rounded spoonfuls of dough onto the baking sheet. For a smoother finish, you can dip your finger in a little water and gently tap down any peaks on top of the piped dough. This helps prevent them from burning.
Baking the Cream Puff Shells
- Initial high-heat bake: Place the baking sheets in the preheated 425°F (220°C) oven. Bake for 15 minutes. Do not open the oven door during this time! The high heat creates a burst of steam that causes the shells to puff up rapidly. Opening the door will release this steam and can cause your cream puffs to collapse. This initial bake is foundational for light and airy Aunt Pat Cream Puffs.
- Reduce heat and continue baking: After 15 minutes, reduce the oven temperature to 375°F (190°C) without opening the oven door. Continue to bake for another 20 to 25 minutes, or until the cream puffs are deeply golden brown and feel very light and hollow when lifted. They should be firm to the touch. The lower temperature helps to thoroughly dry out the inside of the shells, ensuring they are crisp and won’t get soggy after filling.
- Cooling and drying: Once baked, turn off the oven. Use a wooden spoon or oven mitt to prop open the oven door slightly (about an inch or two). Allow the cream puffs to cool in the oven for an additional 15 to 20 minutes. This slow cooling process further dries out the shells and helps prevent them from deflating as they transition to room temperature. This is a crucial step for achieving perfect structural integrity for your Aunt Pat Cream Puffs.
- Final cooling: Remove the cream puffs from the oven and transfer them to a wire rack to cool completely at room temperature. They should be completely cool before filling. If you plan to fill them later, you can store them in an airtight container at room temperature for up to a day, or freeze them for longer storage (reheat frozen shells in a 350°F/175°C oven for 5-10 minutes to crisp them up before cooling and filling).
Making Aunt Pat’s Signature Vanilla Bean Pastry Cream
- Infuse the milk: In a medium saucepan, combine the whole milk and the scraped vanilla bean seeds and pod. Place over medium heat and bring to a gentle simmer, just until small bubbles appear around the edges. Remove from heat, cover, and let steep for 15 minutes to allow the vanilla flavor to fully infuse into the milk. This step is critical for the rich vanilla flavor Aunt Pat Cream Puffs are famous for! If using vanilla extract, skip the steeping and add it at the end.
- Prepare the egg yolk mixture: While the milk is steeping, in a medium heatproof bowl, whisk together the egg yolks and granulated sugar until the mixture is pale yellow and creamy. Then, whisk in the cornstarch until well combined and no lumps remain. This cornstarch is our thickener and helps stabilize the cream.
- Temper the egg yolks: Remove the vanilla bean pod from the infused milk. Gradually pour about half of the warm milk into the egg yolk mixture, whisking constantly. This process is called tempering, and it slowly raises the temperature of the egg yolks, preventing them from scrambling when they meet the hot milk. Pouring too quickly can ruin your pastry cream.
- Cook the pastry cream: Pour the tempered egg yolk mixture back into the saucepan with the remaining warm milk. Place the saucepan over medium heat. Cook, whisking constantly and vigorously, especially scraping the bottom and corners of the pan, until the pastry cream thickens significantly and comes to a full boil. Once it boils, continue to cook for another 1 to 2 minutes, still whisking, to ensure the cornstarch is fully cooked and activated, and the raw starchy taste is gone. The cream will be very thick, like pudding.
- Finish the pastry cream: Remove the saucepan from the heat. Whisk in the softened unsalted butter, one piece at a time, until fully incorporated and melted, giving the cream a luxurious, glossy finish. If you’re using vanilla extract instead of a bean, stir it in now.
- Cool the pastry cream: Immediately transfer the hot pastry cream to a clean, shallow bowl or a baking dish. This helps it cool down faster. Press a piece of plastic wrap directly onto the surface of the cream to prevent a skin from forming. This is a non-negotiable step! Place the bowl in the refrigerator and chill for at least 3-4 hours, or preferably overnight, until thoroughly cold and set. The longer it chills, the firmer and more stable it will be. When ready to use, give it a good whisk to smooth it out before filling.
Assembling Aunt Pat Cream Puffs
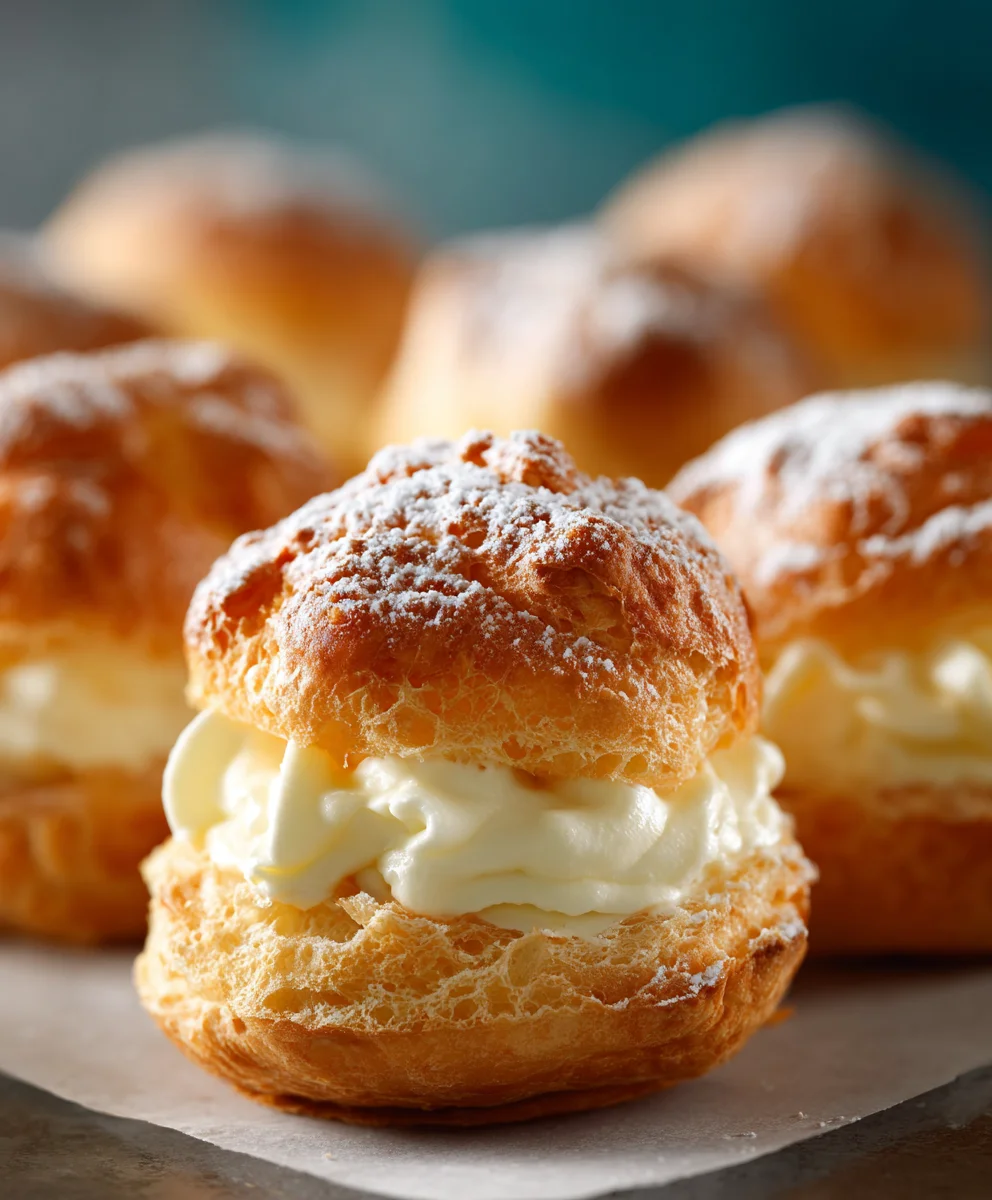
- Prepare the cream puff shells: Once your choux pastry shells are completely cool and your vanilla bean pastry cream is thoroughly chilled and firm, it’s time for the fun part! Using a serrated knife, carefully slice each cream puff in half horizontally. You’ll find they have a wonderful hollow interior, perfect for filling. Alternatively, if you prefer a less messy approach, you can poke a small hole in the bottom of each puff with a paring knife and pipe the cream directly inside, but I love the visual appeal of a sliced puff.
- Fill with pastry cream: Transfer the chilled pastry cream to a piping bag fitted with a large round or star tip. Pipe a generous amount of the vanilla bean pastry cream onto the bottom half of each cream puff shell. Aim for a nice, ample mound that will peek out enticingly when the top is replaced. If you don’t have a piping bag, a spoon works just fine to dollop the cream into the shells. Don’t be shy; these are Aunt Pat Cream Puffs, and they deserve a generous filling!
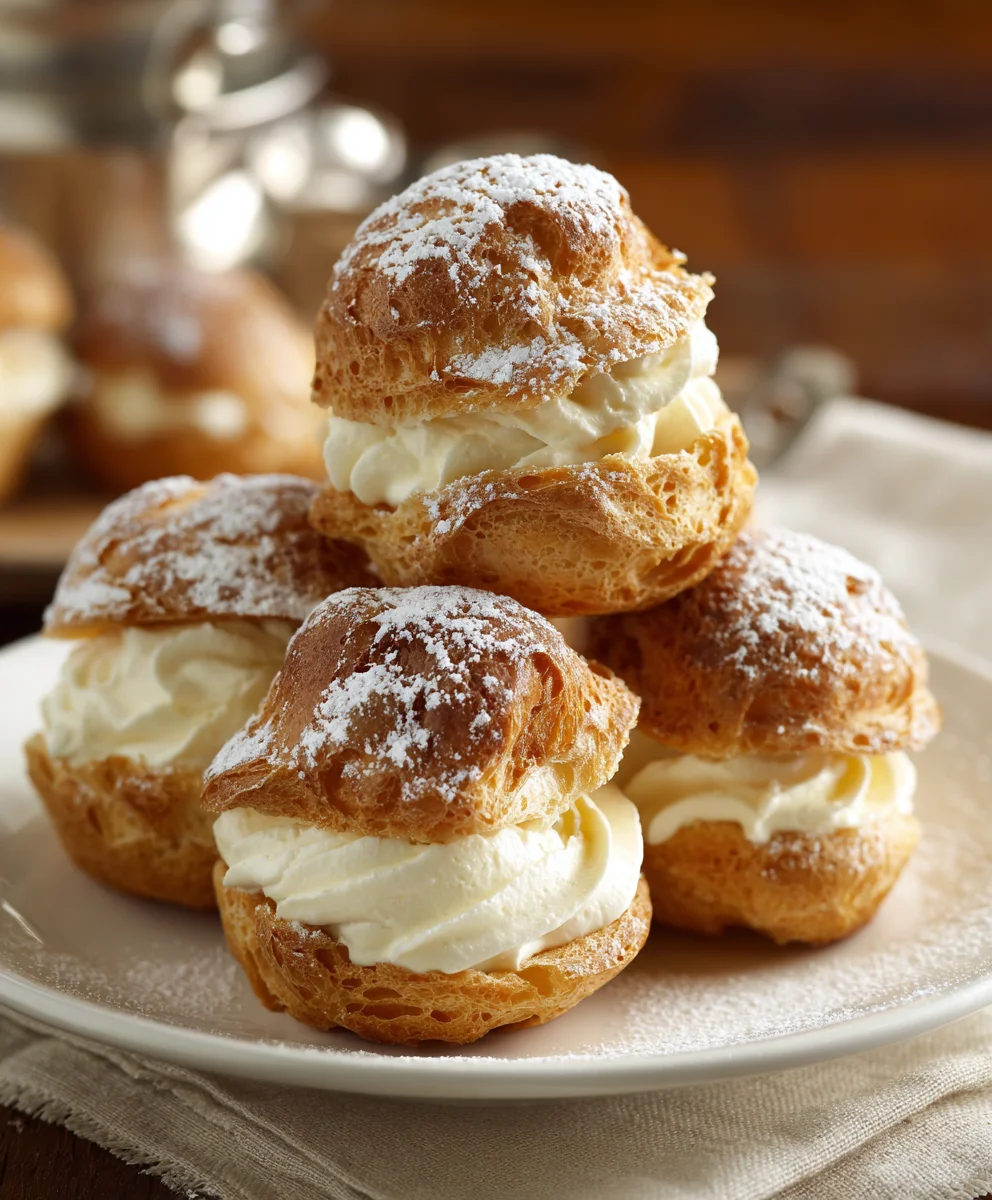
- Top and dust: Gently place the top half of each cream puff shell back onto the filled bottom half. Arrange them beautifully on a serving platter. Just before serving, dust generously with confectioners’ sugar. This adds a touch of sweetness and an elegant finish that truly elevates the presentation of your homemade Aunt Pat Cream Puffs.
- Optional garnishes: For an extra special touch, you can serve these alongside fresh berries like raspberries or strawberries, or drizzle them with a bit of chocolate sauce. These additions are always a hit and complement the rich vanilla flavor wonderfully.
Serving and Storage Suggestions for Aunt Pat Cream Puffs
- Serve immediately: While Aunt Pat Cream Puffs are utterly delicious, they are truly at their best when served within an hour or two of assembly. The choux pastry shells will remain crisp, and the pastry cream will be perfectly fresh and cold. The longer they sit after filling, the more the shells will soften from the moisture of the cream.
- Refrigeration: If you have leftovers, or need to assemble them a few hours in advance, store the filled cream puffs in an airtight container in the refrigerator. They will keep well for up to 1-2 days. Be aware that the pastry shells will gradually soften over time.
- Optimal storage for unfilled components: For the best results and to prepare ahead, store the baked (and fully cooled) choux pastry shells in an airtight container at room temperature for up to a day, or freeze them for up to a month. Re-crisp frozen shells in a 350°F (175°C) oven for 5-10 minutes before cooling completely and filling. The vanilla bean pastry cream can be stored in an airtight container with plastic wrap pressed directly on its surface in the refrigerator for up to 3-4 days. Whisk it well before piping.
- Gift giving: Aunt Pat Cream Puffs make a wonderful homemade gift! Pack them in a decorative box, perhaps with a little dusting of confectioners’ sugar just before delivery. They are a delightful treat that always brings a smile. Everyone loves these classic French pastries, especially when made with love and Aunt Pat’s signature touch.
Conclusion:
So, there you have it – my treasured recipe, ready for you to recreate in your own kitchen. This isn’t just any dessert; it’s a culinary experience that promises light-as-air pastry shells cradling the most luxurious, silky cream filling. When I say you absolutely must try these Aunt Pat Cream Puffs, I’m speaking from years of delicious experience and countless satisfied smiles. The beauty of this recipe lies in its elegant simplicity, offering a sophisticated treat that’s surprisingly accessible to home bakers of all skill levels. Imagine the delicate crispness of the choux pastry giving way to that cloud-like cream, a perfect symphony of textures and flavors that will undoubtedly impress anyone lucky enough to take a bite.
It’s the kind of dessert that looks incredibly fancy, leading everyone to believe you spent hours slaving away in the kitchen, when in reality, the process is wonderfully straightforward and incredibly rewarding. From a casual family gathering to the most formal dinner party, these cream puffs seamlessly fit into any occasion, instantly elevating the dessert table with their undeniable charm and irresistible taste. They are truly a testament to how simple ingredients, combined with a little love and the right technique, can create something truly extraordinary. There’s a certain magic in watching the choux pastry puff up in the oven, transforming from a humble dough into golden, hollow shells, perfectly poised to be filled with your chosen delight. This recipe empowers you to create bakery-quality treats right at home, filling your kitchen with an aroma that’s just as delightful as the final product. The pure joy of seeing your perfectly risen puffs is a reward in itself, even before the first incredible bite.
Endless Possibilities: Serving Suggestions & Variations
While the classic presentation with a generous dusting of powdered sugar is always a winner and perfectly showcases the delicate nature of the pastry, don’t hesitate to get creative! The versatility of these cream puffs is one of their most charming attributes. Beyond the rich, velvety vanilla pastry cream we’ve lovingly prepared, consider expanding your culinary horizons with alternative fillings. For a truly indulgent experience, whip up a decadent chocolate mousse to fill your puffs – the bittersweet notes of chocolate perfectly complement the lightness of the choux. A bright, fresh lemon curd offers a zesty, tart counterpoint, making it an ideal choice for spring gatherings or a refreshing afternoon tea treat. Or, for a simpler, yet equally delightful option, a dollop of freshly whipped cream, perhaps infused with a hint of almond extract, orange zest, or even a touch of liqueur like Grand Marnier, is absolutely divine. You could even fold in some finely chopped fresh mint for an unexpected burst of freshness, creating a palate-cleansing finish.
As for toppings, the sky’s the limit! A shimmering chocolate ganache drizzled artfully over the top adds a touch of gourmet flair and a beautiful sheen, turning each puff into a miniature work of art. A homemade caramel sauce can bring a warm, sweet, and slightly salty note, creating a truly irresistible combination of flavors. Fresh berries – ripe raspberries, juicy strawberries, or plump blueberries – provide a vibrant pop of color, a burst of natural sweetness, and a lovely textural contrast, making each bite feel like a celebration of seasonal flavors. Even a simple, elegant dusting of high-quality cocoa powder or finely grated chocolate can transform them into something truly special and sophisticated. And for those feeling truly adventurous, why not explore a savory route? Imagine tiny cream puffs filled with herbed cream cheese and smoked salmon, or a creamy chicken salad with chives – a sophisticated and unexpected appetizer for your next cocktail party or a unique addition to a brunch spread. These savory variations are always a conversation starter and showcase the incredible adaptability of the choux pastry, proving that cream puffs aren’t just for dessert.
Remember, these cream puffs are not just for dessert; they make a fantastic addition to an elaborate afternoon tea spread, a celebratory brunch buffet, or even as a thoughtful and impressive homemade gift, beautifully packaged for friends and family. They are best enjoyed chilled, allowing the filling to set perfectly and creating that satisfyingly cool and creamy mouthfeel, but honestly, a slightly cooler room temperature can also be delightful, especially when the pastry is still at its most tender and crisp. The contrast of the cool filling with the delicate shell is what makes them so utterly irresistible, delivering a delightful sensory experience with every mouthful.
Your Turn: Bake, Enjoy, and Share!
Now it’s your turn! I genuinely hope I’ve inspired you to roll up your sleeves, gather your ingredients, and give this wonderful recipe a try. Don’t be intimidated by the idea of making choux pastry; I promise you, the reward far outweighs any initial apprehension. The process itself is incredibly satisfying, and the end result is nothing short of spectacular. There’s an immense satisfaction that comes from creating something so beautiful and delicious from scratch, and seeing the joy and delight on the faces of those you share it with. It’s a culinary accomplishment that builds confidence in the kitchen and sparks a genuine love for baking, encouraging you to explore even more delicious possibilities.
Once you’ve baked your batch of these incredible delights, I would absolutely love to hear about your experience. Did you stick to the classic filling, or did you venture into new flavor territories? Did you discover a favorite topping or an unexpected combination that you simply adore? Please share your thoughts, your successes, and even any little tweaks or clever tips you came up with in the comments section below. Even better, snap a photo of your magnificent creations and share them with the world! Let’s celebrate the joy of home baking and the communal spirit of delicious food together. I’m eager to see your interpretations and hear how these delightful cream puffs brought a little extra sweetness and a lot of smiles into your life. Trust me, once you master this recipe, it will quickly become a cherished favorite in your culinary repertoire, a go-to for special occasions and everyday indulgences alike, just as it has in mine. Happy baking, and I can’t wait to hear all about your delicious journey!
Aunt Pat’s Classic Cream Puffs Recipe – Delicious & Easy
Aunt Pat Cream Puffs are not just a dessert; they are a cherished family legacy, a bite of pure, unadulterated joy that transports you straight back to simpler times. For generations, Aunt Pat’s kitchen was the heart of our family gatherings, and her legendary cream puffs were always the star of the show. This recipe isn’t merely a list of ingredients; it’s a piece of our family history, passed down with love and countless memories, embodying the warmth and generosity of our beloved Aunt Pat.
Ingredients
-
1 cup water
-
1/2 cup (113g) unsalted butter
-
1/4 tsp salt
-
1 tsp granulated sugar
-
1 cup (125g) sifted all-purpose flour
-
4 large eggs, room temperature
-
2 cups whole milk
-
1/2 vanilla bean (or 1 1/2 tsp vanilla extract)
-
4 large egg yolks
-
1/2 cup (100g) granulated sugar
-
1/4 cup (30g) cornstarch
-
2 tbsp (28g) softened unsalted butter
-
Confectioners’ sugar, for dusting
-
Optional: Fresh berries or chocolate sauce
Instructions
-
Step 1
Preheat oven to 400°F (375°F for dark pans). Lightly grease a muffin tin. -
Step 2
In a heavy-bottomed saucepan, combine water, unsalted butter, salt, and granulated sugar. Bring to a rolling boil. Remove from heat, add sifted all-purpose flour all at once, and stir vigorously until mixture forms a smooth ball. Return to medium-low heat and continue stirring for 2-3 minutes to dry out the dough, until a thin film forms on the bottom of the pan. -
Step 3
Transfer dough to a mixing bowl and let cool for about 5 minutes. Beat in lightly beaten eggs, one at a time, incorporating each completely, until the dough is smooth, thick, and glossy (it should fall slowly from the spoon in a V-shape). Mix for an additional 10-15 seconds. -
Step 4
Spoon the choux pastry dough into the prepared muffin cups, leaving space between each puff as they will expand significantly. -
Step 5
Bake for 25-35 minutes, or until the cream puff shells are deeply golden brown and feel light and hollow. Do not open the oven door during this time. -
Step 6
Turn off the oven. Prop the oven door open slightly and allow the cream puff shells to cool in the oven for an additional 20 minutes. This helps them dry out completely and prevents deflating. -
Step 7
In a medium saucepan, gently simmer whole milk with scraped vanilla bean seeds and pod (or heat milk if using vanilla extract). Remove from heat, cover, and let steep for 15 minutes. -
Step 8
While milk steeps, whisk egg yolks, granulated sugar, and cornstarch in a heatproof bowl until pale yellow and lump-free. -
Step 9
Remove vanilla bean pod. Gradually pour half of the warm milk into the egg yolk mixture, whisking constantly to temper. Pour the tempered mixture back into the saucepan with the remaining milk. Cook over medium heat, whisking constantly and vigorously, until the cream thickens significantly and comes to a full boil. Continue whisking and boiling for 1-2 minutes to cook the cornstarch. -
Step 10
Remove from heat, whisk in softened unsalted butter (and vanilla extract if used). Transfer cream to a clean, shallow bowl. Press plastic wrap directly onto the surface to prevent a skin, and chill in the refrigerator for at least 3-4 hours, or preferably overnight, until thoroughly cold and set. Whisk well before use. -
Step 11
Once shells are completely cool and pastry cream is thoroughly chilled, slice each cream puff shell in half horizontally. Whisk the chilled pastry cream to smooth, then pipe or spoon a generous amount of vanilla bean pastry cream onto the bottom half of each shell. Replace the top half. -
Step 12
Dust generously with confectioners’ sugar just before serving. Optionally garnish with fresh berries or a drizzle of chocolate sauce.
Important Information
Nutrition Facts (Per Serving)
It is important to consider this information as approximate and not to use it as definitive health advice.
Allergy Information
Please check ingredients for potential allergens and consult a health professional if in doubt.


Leave a Comment