

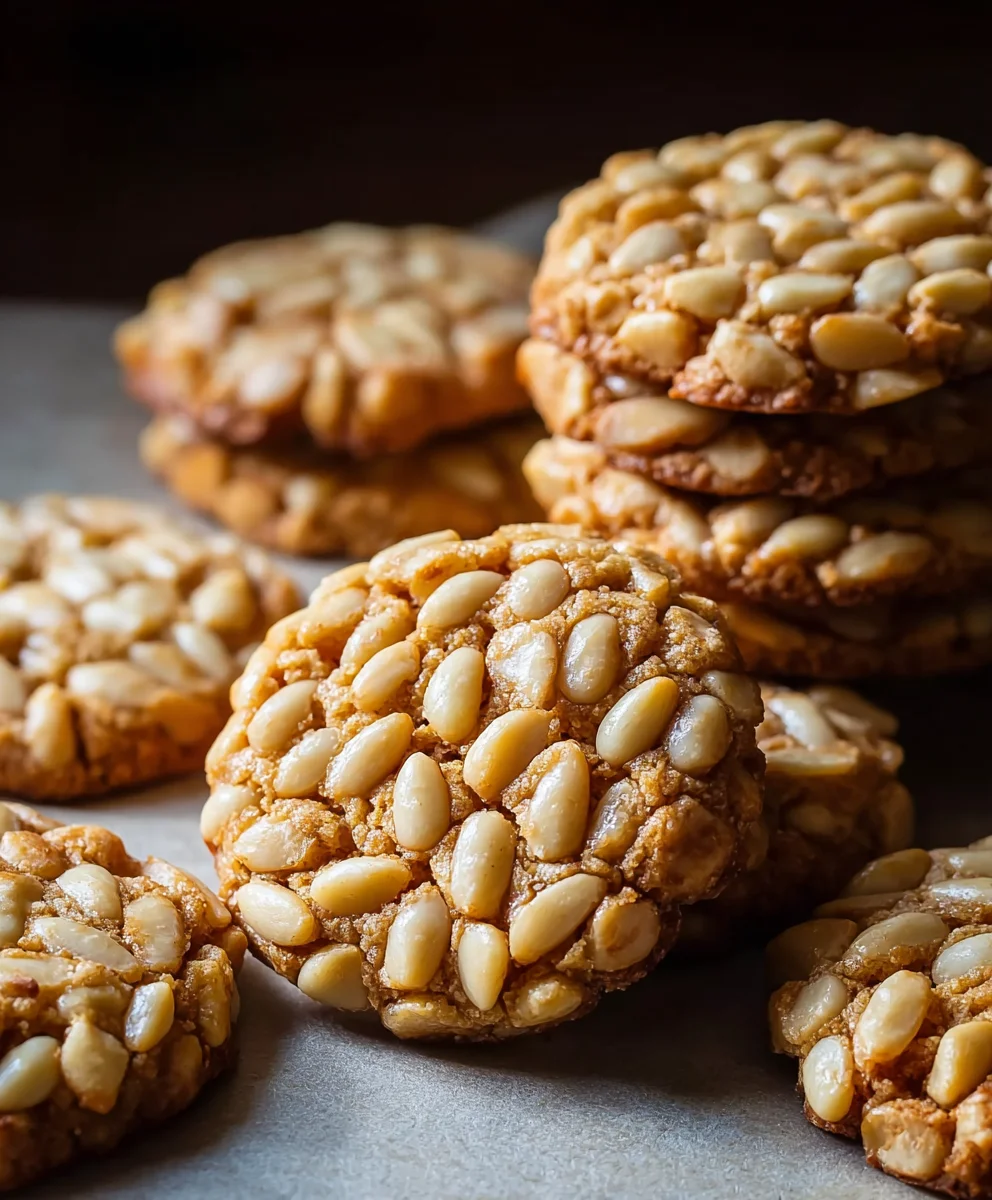
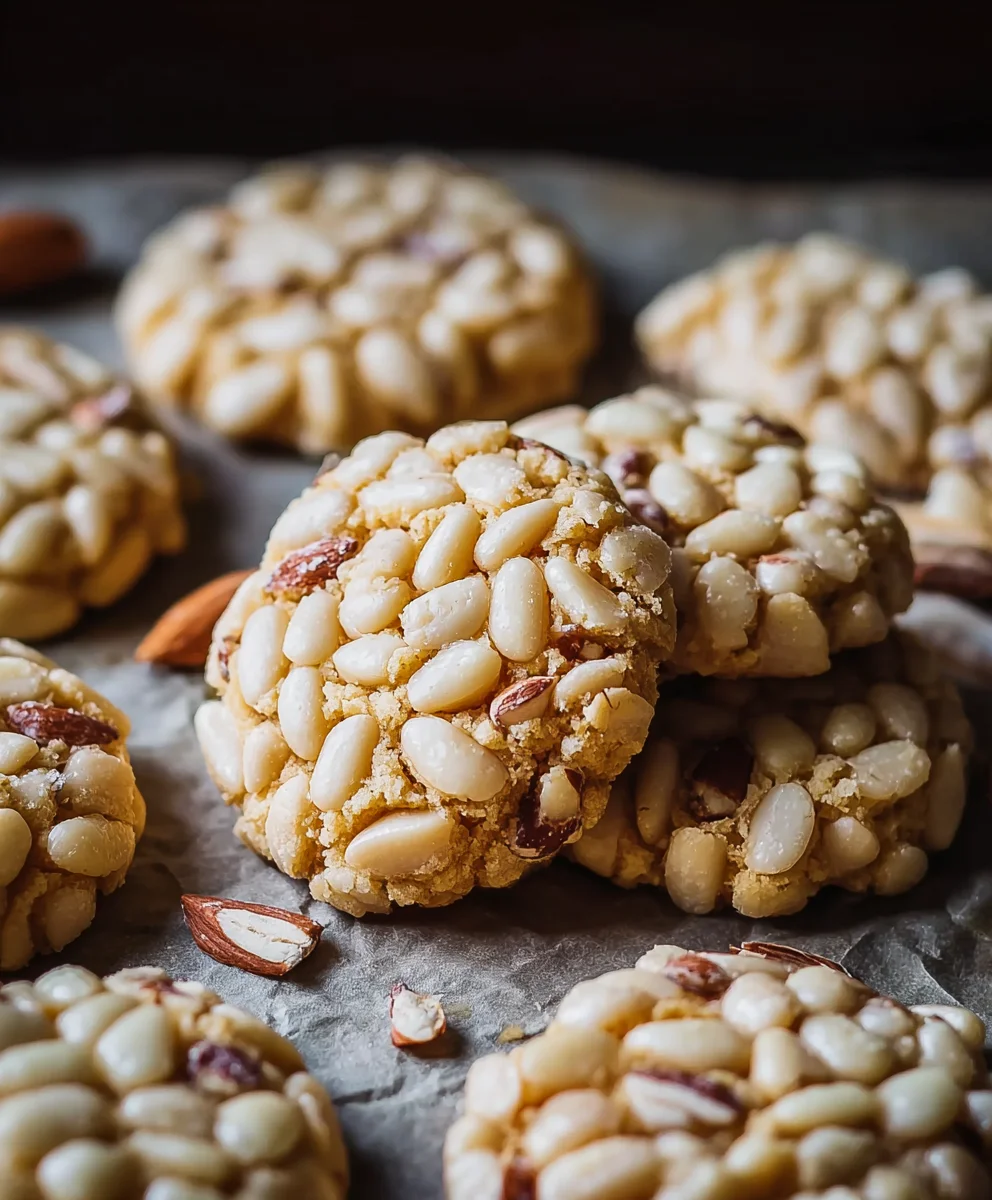
Pignoli Cookies are a true taste of Italian tradition, and for good reason! These delicate, chewy delights offer a delightful textural contrast that keeps us coming back for more. What’s not to love about the satisfying crunch of toasted pine nuts giving way to a sweet, tender almond cookie base? It’s a simple yet elegant combination that feels both rustic and refined, making them perfect for any occasion, from a casual afternoon treat to a sophisticated dessert platter. The magic of pignoli cookies lies in their subtle yet distinct nutty flavor, elevated by the aromatic quality of almond extract and often a hint of citrus zest. They’re a beloved classic for those who appreciate the nuanced flavors of simple, high-quality ingredients working in harmony. Get ready to experience the irresistible charm of these iconic Italian cookies.
Ingredients:
- 7 ounces (198g) almond paste, at room temperature
- 1/2 cup (100g) granulated sugar
- 1 large egg white, at room temperature
- 1/4 teaspoon kosher salt
- 1 cup (140g) pine nuts
Preparing the Dough
The foundation of perfect Pignoli cookies lies in a smooth and pliable dough. To begin extract, take your almond paste and, if it feels a bit firm, gently knead it with your hands for a minute or two to soften it up. This ensures it incorporates evenly with the other ingredients. Place the softened almond paste into a medium-sized mixing bowl. Add the granulated sugar and the kosher salt to the bowl.
Now, it’s time to bring it all together. Using a sturdy spoon or a rubber spagin extracta, begin to mix the almond paste, sugar, and salt. You’re aiming for a cohesive mixture. As you mix, the sugar will start to dissolve into the almond paste, creating a slightly stickier texture. Don’t worry if it doesn’t look perfectly smooth at this stage; we’ll achieve that in the next step.
Next, gently incorporate the large egg white into the almond paste mixture. Add the egg white gradually, mixing it in thoroughly before adding any more. It might seem like a lot of liquid at first, but keep mixing. You’ll notice the mixture transforming into a soft, sticky dough. Continue to mix until all the egg white is fully absorbed and the dough is smooth and homogenous. It should have a consistency that is workable but still a little bit sticky to the touch. This stickiness is actually desirable as it helps the pine nuts adhere later on. Once you’ve achieved a smooth dough, cover the bowl with plastic wrap and let it rest in the refrigerator for at least 30 minutes. This chilling period is crucial as it firms up the dough, making it much easier to handle and shape, and also allows the flavors to meld beautifully.
Shaping and Coating the Cookies
Once the dough has chilled and is firm enough to handle, it’s time to get your hands a little sticky, but in a good way! Prepare a baking sheet by lining it with parchment paper. This prevents the cookies from sticking and makes for easy cleanup. Take the chilled dough out of the refrigerator. Scoop about 1 tablespoon of dough for each cookie. You can use a small cookie scoop or simply roll portions of the dough between your palms. Roll each portion into a small ball, about 1 inch in diameter.
Now, for the signature element of Pignoli cookies: the pine nuts! Place your pine nuts in a shallow dish or on a plate. You want enough so that you can generously coat each cookie ball. Take each dough ball and gently roll it in the pine nuts, pressing lightly to ensure the nuts adhere all around the cookie. You want a good, even coating of pine nuts, as this provides that delightful crunch and nutty flavor that Pignoli cookies are known for. Don’t be shy with the pine nuts! Once a cookie ball is thoroughly coated, place it onto the prepared baking sheet, leaving about 2 inches of space between each cookie to allow for slight spreading. Repeat this process with the remaining dough, ensuring each cookie gets a generous pine nut crust.
Baking the Pignoli Cookies
Preheat your oven to 325°F (160°C). This moderate temperature is key to ensuring the cookies bake through without burning the delicate almond paste or the pine nuts. Once your oven is preheated and your cookies are all shaped and coated, carefully place the baking sheet into the center of the oven.
Bake the Pignoli cookies for approximately 15 to 20 minutes. The exact baking time will depend on your oven, so keep a close eye on them. You’re looking for the edges of the cookies to be lightly golden brown, and the centers should appear set. The pine nuts will also develop a beautiful golden hue. Avoid overbaking, as this can lead to dry and hard cookies. If you notice the pine nuts browning too quickly, you can loosely tent the baking sheet with aluminum foil for the last few minutes of baking.
Cooling and Serving
Once the cookies have reached that perfect golden-brown stage, carefully remove the baking sheet from the oven. Let the Pignoli cookies cool on the baking sheet for about 5 to 10 minutes. This is an important step because the cookies are quite delicate when they first come out of the oven. Allowing them to set on the hot baking sheet for a short period will firm them up considerably, preventing them from breaking when you move them.
After this initial cooling period on the baking sheet, you can then transfer the cookies to a wire rack to cool completely. This allows for air circulation, ensuring they cool evenly and maintain their delicate crispness. Once they are completely cool, your delicious Pignoli cookies are ready to be enjoyed. They are best stored in an airtight container at room temperature, and they tend to retain their delightful texture for several days.
Conclusion:
And there you have it – your guide to creating delightful Pignoli Cookies! We’ve walked through each step to achieve that perfect chewy texture and nutty flavor that makes these Italian cookies so irresistible. Whether you’re a seasoned baker or just starting out, these Pignoli Cookies are a rewarding treat to make and share. They are wonderful served alongside a cup of coffee or tea, or as a sweet ending to any meal. Don’t hesitate to experiment with adding a touch of citrus zest, like lemon or orange, to the dough for an extra layer of brightness, or even a hint of almond extract for an intensified nutty profile. Remember, baking is an adventure, so have fun with it! Enjoy every crum extractb of these beautiful and delicious Pignoli Cookies!
Frequently Asked Questions about Pignoli Cookies:
Why are my Pignoli Cookies spreading too much?
Excessive spreading can often be due to the dough being too warm or containing too much butter. Ensure your butter is softened but not melted, and consider chilling the dough for an extra 30 minutes if your kitchen is particularly warm. Also, be sure you are using the correct amount of flour as specified in the recipe.
Can I make Pignoli Cookies ahead of time?
Absolutely! Pignoli Cookies store wonderfully in an airtight container at room temperature for up to a week. They often taste even better after a day or two, as the flavors have a chance to meld. You can also freeze baked cookies for longer storage.
Authentic Pignoli Cookies
Sweet Italian Pine Nut Biscotti made with almond paste and a generous coating of pine nuts.
Ingredients
-
7 ounces (198g) almond paste, at room temperature
-
1/2 cup (100g) granulated sugar
-
1 large egg white, at room temperature
-
1/4 teaspoon kosher salt
-
1 cup (140g) pine nuts
Instructions
-
Step 1
Soften almond paste by kneading, then combine with granulated sugar and kosher salt in a medium bowl. Mix until a cohesive mixture forms. -
Step 2
Gradually incorporate the egg white into the almond paste mixture, mixing thoroughly until a smooth, slightly sticky dough forms. Cover and chill for at least 30 minutes. -
Step 3
Preheat oven to 325°F (160°C). Line a baking sheet with parchment paper. Scoop about 1 tablespoon of chilled dough, roll into 1-inch balls. -
Step 4
Roll each dough ball in pine nuts, pressing lightly to ensure a generous and even coating. Place coated balls onto the prepared baking sheet, leaving 2 inches between cookies. -
Step 5
Bake for 15 to 20 minutes, or until edges are lightly golden brown and centers are set. Pine nuts should also be golden. Tent with foil if pine nuts brown too quickly. -
Step 6
Let cookies cool on the baking sheet for 5-10 minutes, then transfer to a wire rack to cool completely.
Important Information
Nutrition Facts (Per Serving)
It is important to consider this information as approximate and not to use it as definitive health advice.
Allergy Information
Please check ingredients for potential allergens and consult a health professional if in doubt.


Leave a Comment