

Pineapple Cheesecake is, without a doubt, one of my absolute favorite desserts to prepare and share. There’s something truly magical about the combination of creamy, rich cheesecake and the bright, zesty tang of fresh pineapple that instantly transports you to a sunny, tropical paradise. While classic cheesecakes boast a long and storied history, dating back to ancient Greece, the addition of vibrant tropical fruits like pineapple offers a delightful and modern twist on this beloved dessert. People adore this particular iteration because it perfectly balances the indulgent smoothness of the cream cheese filling with the refreshing burst of pineapple, creating a harmonious symphony of flavors and textures. The sweet and tart notes cut through the richness beautifully, making each bite an absolute delight. This isn’t just any dessert; it’s a celebration in itself, perfect for any gathering or a simple treat to brighten your day. I am so excited for you to experience the joy of making and tasting this incredible Pineapple Cheesecake.
Ingredients:
-
For the Graham Cracker Crust:
- 1 ½ cups (about 180g) graham cracker crumbs (approximately 12-14 full sheets, finely crushed)
- ½ cup (113g) unsalted butter, melted
- ¼ cup (50g) granulated sugar
- ½ teaspoon ground cinnamon (optional, but highly recommended for depth of flavor)
- Pinch of salt
-
For the Creamy Pineapple Cheesecake Filling:
- 32 ounces (about 4 blocks or 900g) full-fat cream cheese, softened at room temperature
- 1 ½ cups (300g) granulated sugar
- ¼ cup (60ml) heavy cream or sour cream (sour cream adds a lovely tang)
- 1 teaspoon pure vanilla extract
- ¼ teaspoon almond extract (optional, but complements pineapple beautifully)
- 4 large eggs, at room temperature
- 1 (8-ounce) can crushed pineapple, well-drained (reserve juice for topping if desired)
- 2 tablespoons cornstarch or all-purpose flour (helps prevent cracks)
- Zest of 1 small lemon or lime (for brightness, optional)
-
For the Luscious Pineapple Topping:
- 1 (20-ounce) can crushed pineapple in juice or syrup, undrained
- ½ cup (100g) granulated sugar (adjust to your sweetness preference)
- 2 tablespoons cornstarch
- ¼ cup (60ml) water or reserved pineapple juice (if using juice, reduce sugar slightly)
- 1 tablespoon fresh lemon juice (for brightness and balance)
- 1 tablespoon unsalted butter (for gloss and richness)
- Pinch of salt
-
Optional Garnish:
- Whipped cream
- Toasted coconut flakes
- Fresh mint sprigs
- Maraschino cherries
Equipment You’ll Need:
To ensure a smooth and enjoyable baking experience for your Pineapple Cheesecake, having the right tools at hand is crucial. You’ll need a 9-inch springform pan, which is essential for easy removal of the cheesecake without damaging its delicate structure. A large mixing bowl and an electric mixer (either stand or hand-held) will make light work of blending the cream cheese filling to a silky-smooth consistency. Measuring cups and spoons are, of course, indispensable for accurate ingredient portions. A fine-mesh sieve or colander will be helpful for thoroughly draining the crushed pineapple. For the water bath, a large roasting pan or any oven-safe pan larger than your springform pan will be necessary. Finally, parchment paper and aluminum foil will be your best friends for preventing water from seeping into the crust during the water bath. A rubber spatula will assist in scraping down the bowl and ensuring no delicious batter goes to waste.
Preparing the Graham Cracker Crust:
- Preheat Your Oven and Prepare the Pan: Begin by preheating your oven to 350°F (175°C). This ensures the oven is at the correct temperature when your crust is ready. Take your 9-inch springform pan. It’s a good idea to lightly grease the bottom of the pan with butter or cooking spray, then line the bottom with a circle of parchment paper. This simple step makes releasing the finished Pineapple Cheesecake much easier later on. To prevent water from seeping into the crust if you plan to use a water bath, securely wrap the outside of the springform pan with two layers of heavy-duty aluminum foil. Make sure the foil extends all the way up the sides of the pan.
- Combine Dry Crust Ingredients: In a medium-sized mixing bowl, combine the graham cracker crumbs, granulated sugar, ground cinnamon (if using), and a pinch of salt. Use a whisk or a fork to thoroughly mix these ingredients together, ensuring the sugar and cinnamon are evenly distributed throughout the crumbs. The cinnamon adds a subtle warmth that complements the tangy pineapple beautifully in this Pineapple Cheesecake.
- Add Melted Butter: Pour the melted unsalted butter over the dry crumb mixture. Using a fork or your fingertips, mix until all the crumbs are moistened and resemble wet sand. It’s important that every crumb is coated with butter; this acts as the binder that holds the crust together, preventing it from crumbling when sliced.
- Press the Crust into the Pan: Transfer the moistened graham cracker mixture into the prepared springform pan. Using the bottom of a flat glass or a measuring cup, firmly press the crumbs evenly across the bottom of the pan. You want a compact, even layer. If desired, you can also press some crumbs up the sides of the pan, creating a slight rim, but a bottom-only crust is also perfectly acceptable and common for a classic Pineapple Cheesecake. The firmer you press, the less likely the crust is to crumble.
- Partially Bake the Crust: Place the springform pan with the pressed crust into the preheated oven. Bake for 8-10 minutes, or until the crust is lightly golden brown and fragrant. This partial baking helps to set the crust, preventing it from becoming soggy once the cheesecake filling is added. After baking, remove the crust from the oven and let it cool completely on a wire rack while you prepare the filling. Cooling the crust prevents it from softening too much when the cold filling is added.
Crafting the Velvety Pineapple Cheesecake Filling:
- Prepare the Pineapple: The key to avoiding a watery Pineapple Cheesecake filling is to thoroughly drain your crushed pineapple. Open the 8-ounce can of crushed pineapple and pour it into a fine-mesh sieve set over a bowl. Using the back of a spoon or a spatula, press down firmly on the pineapple to extract as much liquid as possible. You’ll be surprised how much juice comes out! The drier the pineapple, the better the texture of your cheesecake. You can reserve this juice for the topping if you wish.
- Soften Cream Cheese for Smoothness: Ensure your full-fat cream cheese is at room temperature. This is absolutely critical for a smooth, lump-free cheesecake. Cold cream cheese will result in a lumpy batter and an inferior texture. In the bowl of your electric mixer fitted with the paddle attachment (or using a large bowl and a hand mixer), beat the softened cream cheese on medium speed for 2-3 minutes until it is completely smooth and creamy, with no lumps visible. Scrape down the sides of the bowl frequently to ensure even mixing.
- Incorporate Sugar and Flavorings: Gradually add the granulated sugar to the cream cheese, beating on medium-low speed until just combined. Be careful not to overmix at this stage, as overmixing can incorporate too much air, which can lead to cracks during baking. Next, add the heavy cream (or sour cream for extra tang), vanilla extract, almond extract (if using), and lemon or lime zest (if using). Beat on low speed until just incorporated. These flavorings are essential for the complex profile of our Pineapple Cheesecake.
- Add Cornstarch or Flour: Sprinkle the cornstarch or all-purpose flour over the mixture and beat on low speed for another 30 seconds until fully combined. This step is a secret weapon against cracking; the cornstarch helps to stabilize the proteins in the eggs and cream cheese, resulting in a smoother, more crack-resistant cheesecake.
- Integrate Eggs Gently: Add the eggs one at a time, beating on very low speed only until each egg is just incorporated. After adding each egg, stop the mixer and scrape down the sides and bottom of the bowl. It is crucial not to overmix once the eggs are added. Overmixing at this stage whips too much air into the batter, which can cause the cheesecake to puff up excessively in the oven and then fall dramatically, leading to cracks. Gentle mixing ensures a dense, creamy texture for your Pineapple Cheesecake.
- Fold in Drained Pineapple: Finally, gently fold in the thoroughly drained crushed pineapple using a rubber spatula. Mix just until the pineapple is evenly distributed throughout the batter. You want to avoid breaking down the pineapple too much or incorporating additional air. The pineapple bits add bursts of flavor and texture, truly making this a Pineapple Cheesecake.
Baking Your Perfect Pineapple Cheesecake:
- Pour Filling into Crust: Pour the creamy cheesecake filling over the cooled, partially baked graham cracker crust in the springform pan. Gently tap the pan on the counter a few times to release any large air bubbles that might be trapped within the batter. This helps ensure a smooth top surface for your Pineapple Cheesecake.
- Prepare the Water Bath: Carefully place the foil-wrapped springform pan inside a larger roasting pan. Pour hot water into the roasting pan until it comes about halfway up the sides of the springform pan. The water bath (or bain-marie) is critical for baking a flawless cheesecake. It provides a moist, even heat environment, which prevents the cheesecake from cooking too quickly, cracking, and drying out. It’s the secret to that signature creamy, custardy texture of a perfect Pineapple Cheesecake.
- Bake the Cheesecake: Carefully transfer the roasting pan with the springform pan into your preheated 350°F (175°C) oven. Bake for approximately 60-75 minutes. The baking time can vary depending on your oven. You’ll know the cheesecake is done when the edges are set and appear slightly puffed, but the center (about a 2-3 inch circle) still jiggles ever so slightly when you gently nudge the pan. Do not overbake! Overbaking is a common cause of cracks.
- Cooling in the Oven: Once baked, turn off the oven, but leave the cheesecake inside the oven with the door propped open about an inch or two (you can use a wooden spoon handle to hold it open). Let the cheesecake cool gradually in the oven for at least 1 hour, or even up to 2 hours. This slow cooling process prevents drastic temperature changes that can cause the cheesecake to crack as it cools and contracts. This step is vital for the structural integrity of your Pineapple Cheesecake.
Cooling and Chilling for Optimal Texture:
- Initial Cooling: After the oven cooling period, carefully remove the roasting pan from the oven. Then, lift the springform pan out of the water bath and place it on a wire rack. Remove the aluminum foil from around the springform pan at this stage. Allow the cheesecake to cool completely at room temperature on the wire rack for another 1-2 hours. It’s important to allow it to come to room temperature before refrigerating to prevent condensation.
- Refrigerate Thoroughly: Once the cheesecake is at room temperature, cover it loosely with plastic wrap or aluminum foil. Transfer the cheesecake to the refrigerator and chill for at least 6-8 hours, but ideally overnight. This chilling period is non-negotiable for a truly perfect Pineapple Cheesecake. Chilling allows the cheesecake to fully set, firm up, and develop its rich, creamy texture and depth of flavor. Rushing this step will result in a soft, less satisfying slice.
Creating the Luscious Pineapple Topping:
- Prepare Crushed Pineapple: Open the 20-ounce can of crushed pineapple with its juice/syrup. Pour the entire contents (undrained) into a medium saucepan.
- Make a Slurry: In a small bowl, whisk together the cornstarch with ¼ cup water or reserved pineapple juice until a smooth slurry forms. Ensure there are no lumps of cornstarch.
- Cook the Topping Base: Place the saucepan with the pineapple over medium heat. Add the granulated sugar, fresh lemon juice, and a pinch of salt to the pineapple. Bring the mixture to a gentle simmer, stirring occasionally.
- Thicken the Topping: Once simmering, slowly pour the cornstarch slurry into the pineapple mixture, whisking continuously. Continue to cook, stirring frequently, for 2-3 minutes, or until the mixture has thickened to a syrupy consistency. It should coat the back of a spoon. The topping will thicken further as it cools.
- Add Butter and Cool: Remove the saucepan from the heat. Stir in the tablespoon of unsalted butter until it is completely melted and incorporated. The butter adds a beautiful gloss and richness to the topping. Transfer the pineapple topping to a bowl and let it cool completely to room temperature. You can also refrigerate it once cool to room temperature until you’re ready to serve your Pineapple Cheesecake. It’s important for the topping to be cool before spooning it over the chilled cheesecake to prevent any melting or softening of the cheesecake itself.
Assembling and Serving Your Masterpiece:
- Release from Pan: Once your Pineapple Cheesecake is thoroughly chilled, carefully run a thin knife around the edge of the pan before releasing the springform sides. This helps to ensure a clean release and prevents the cheesecake from sticking. Then, gently remove the sides of the springform pan. You can leave the cheesecake on the pan bottom for serving or carefully transfer it to a serving plate using a large spatula.
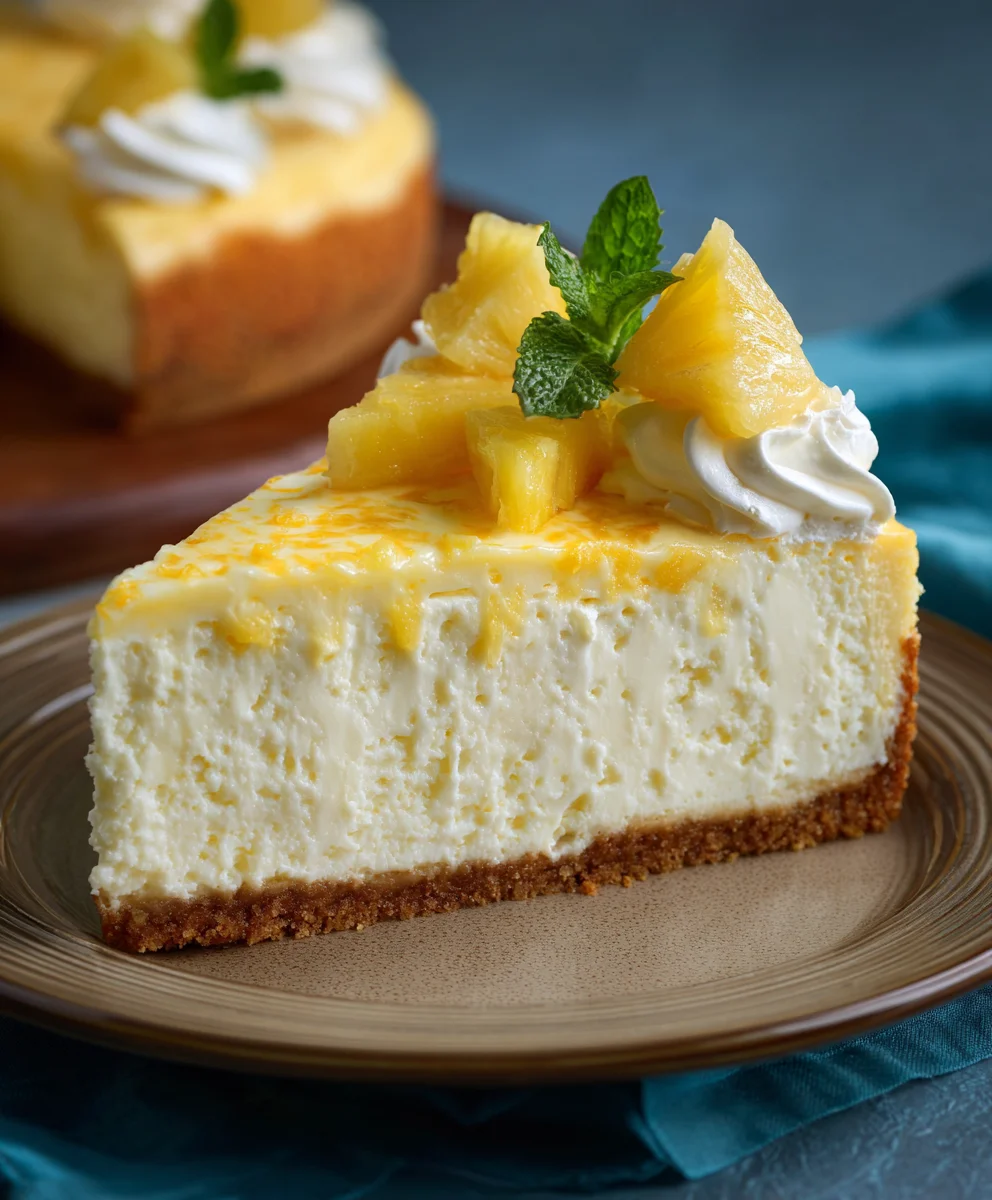
- Apply Pineapple Topping: Just before serving, spoon the cooled pineapple topping evenly over the top of the chilled Pineapple Cheesecake. You can cover the entire surface or leave a border of plain cheesecake exposed, depending on your aesthetic preference.
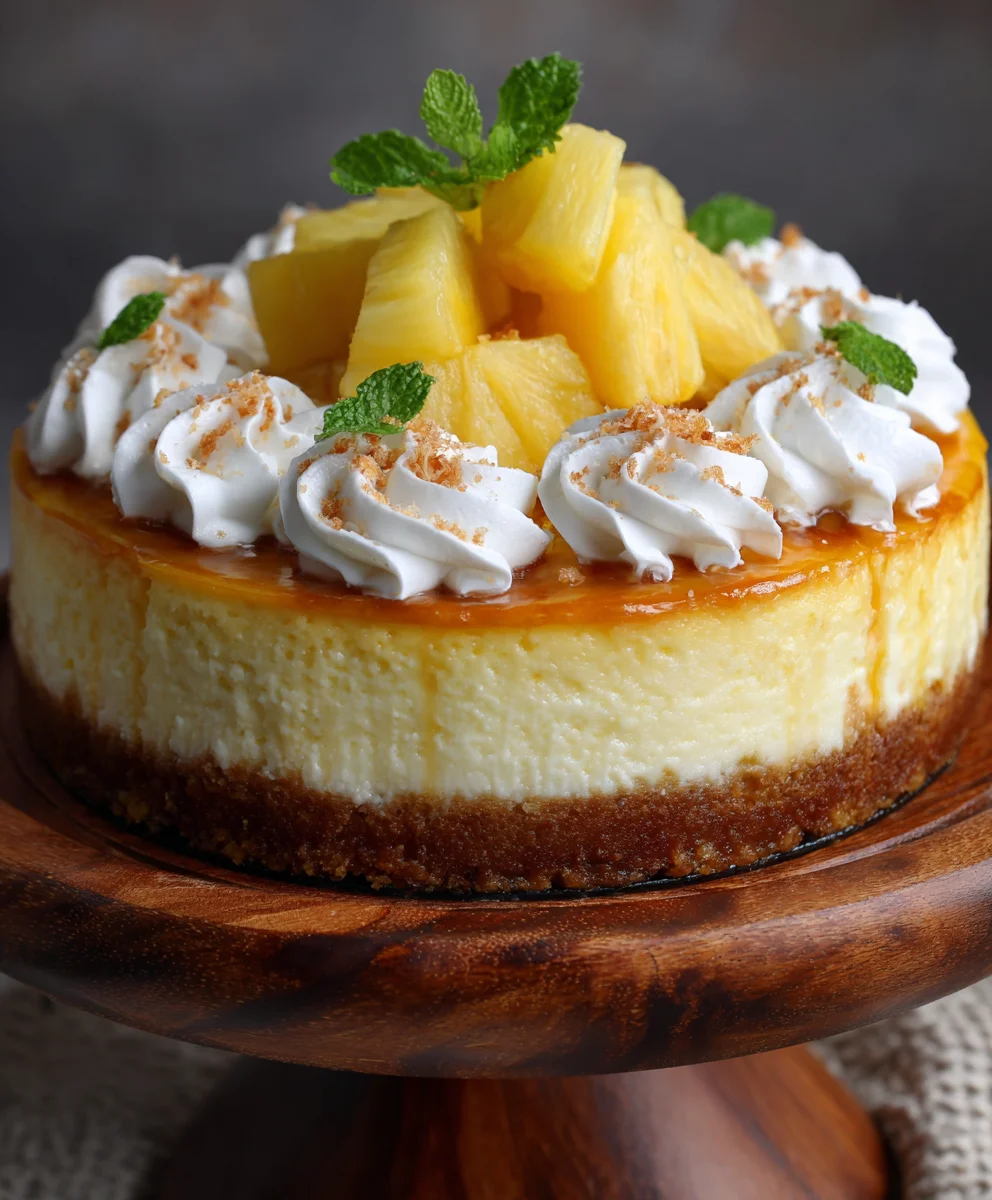
- Garnish and Serve: If desired, garnish your magnificent Pineapple Cheesecake with a swirl of fresh whipped cream, a sprinkling of toasted coconut flakes, fresh mint sprigs for a pop of color, or a few vibrant maraschino cherries. These garnishes not only enhance the visual appeal but also add additional layers of flavor and texture.
- Slicing Tips: For clean slices, use a sharp, thin knife. Dip the knife in hot water and wipe it clean between each slice. This will ensure every piece of your homemade Pineapple Cheesecake looks as perfect as it tastes. Serve immediately and enjoy the delightful flavors of this truly special dessert! Any leftover cheesecake should be stored in an airtight container in the refrigerator for up to 5 days, maintaining its freshness and creamy texture.
Conclusion:
As we reach the sweet culmination of our recipe journey, I truly hope you’re feeling inspired to whip up this incredible dessert. This isn’t just another sweet treat; it’s an experience, a little slice of tropical paradise right in your own kitchen. I’ve poured my heart into perfecting this recipe because I genuinely believe it’s a game-changer for anyone who loves a dessert that’s both indulgent and refreshingly vibrant. The delicate balance of creamy, rich cheesecake paired with the bright, tangy sweetness of pineapple creates a symphony of flavors that is, quite frankly, unforgettable. It’s the kind of dessert that elicits gasps of delight and requests for “just one more slice,” even from those who claim they’re full. The texture is divine – smooth, velvety, and utterly melt-in-your-mouth, providing a delightful contrast to the subtle crunch of the crust.
What makes this particular recipe a must-try, in my humble opinion, is its uncanny ability to transport you. One bite and you’re instantly whisked away to a sun-drenched beach, with the gentle lapping of waves in the background. It’s comforting yet exhilarating, familiar yet exotic. It truly is the perfect dessert for any occasion, whether you’re hosting a grand dinner party, celebrating a special family milestone, or simply craving something extraordinary on a quiet afternoon. It consistently manages to steal the show, leaving a lasting impression on everyone who tastes it. I’ve seen firsthand how this dessert can turn a regular gathering into something truly memorable, sparking conversations and spreading joy around the table. It’s a testament to the power of thoughtful flavor combinations and meticulous preparation.
Now, let’s talk about taking this masterpiece to the next level with some serving suggestions and delightful variations. For the most pristine presentation, I always recommend serving your Pineapple Cheesecake perfectly chilled. A light dusting of finely grated lime zest just before serving can add an extra layer of aromatic citrus, brightening the flavor profile even further. For a touch of elegance, consider garnishing each slice with a small sprig of fresh mint or a delicate pineapple wedge, perhaps even a maraschino cherry for a pop of color. If you’re feeling extra indulgent, a drizzle of warm coconut caramel sauce or a dollop of freshly whipped cream infused with a hint of vanilla would elevate it to a truly luxurious dessert. Imagine the richness of the cream melding with the tangy pineapple – pure bliss!
But don’t stop there! The beauty of baking is in experimentation. For a delightful variation, consider incorporating toasted shredded coconut into your crust mixture for an even more pronounced tropical flavor and an added textural dimension. Or, for a different fruit twist, you could swirl in some passion fruit puree into the pineapple layer, adding another layer of tartness and complexity. You could also transform this recipe into adorable individual servings by baking it in muffin tins lined with cupcake wrappers – perfect for parties and portion control. For a truly unique experience, try serving it alongside a scoop of vanilla bean ice cream, allowing the contrasting temperatures and textures to create a truly sensational dessert experience. The possibilities are truly endless, and each variation offers a chance to make this delicious recipe uniquely your own.
So, my dear fellow bakers and dessert enthusiasts, I implore you: don’t just read about this Pineapple Cheesecake, go make it! Trust me when I say, the satisfaction of creating something so utterly delicious from scratch is incredibly rewarding. The aroma that will fill your kitchen as it bakes is a treat in itself, and the look on your loved ones’ faces when they take that first bite will be priceless. I am so incredibly excited for you to experience the magic of this recipe. Once you’ve tried your hand at it, I would absolutely love to hear all about your baking adventure! Did you stick to the original recipe, or did you venture into some of the variations I suggested? Perhaps you even came up with your own brilliant twists! Please don’t hesitate to share your thoughts, your photos, and your triumphs in the comments section below or on your favorite social media platforms. Your feedback not only brightens my day but also helps inspire others to get into the kitchen and create something wonderful. Happy baking, and enjoy every glorious, tropical bite of your homemade Pineapple Cheesecake!
Easy Pineapple Cheesecake: Tropical Sweetness in Every Bite!
Indulge in a delightful Pineapple Cheesecake, where creamy, rich cheesecake meets the bright, zesty tang of fresh pineapple. This tropical dessert perfectly balances indulgent smoothness with a refreshing burst of flavor, making it a celebration for any occasion.
Ingredients
-
1 ½ cups graham cracker crumbs
-
½ cup unsalted butter, melted
-
¼ cup granulated sugar
-
½ teaspoon ground cinnamon (optional)
-
Pinch of salt
-
32 ounces full-fat cream cheese, softened
-
1 ½ cups granulated sugar
-
¼ cup heavy cream or sour cream
-
1 teaspoon pure vanilla extract
-
¼ teaspoon almond extract (optional)
-
4 large eggs, at room temperature
-
1 (8-ounce) can crushed pineapple, well-drained
-
2 tablespoons cornstarch or all-purpose flour
-
Zest of 1 small lemon or lime (optional)
-
1 (20-ounce) can crushed pineapple in juice or syrup, undrained
-
½ cup granulated sugar
-
2 tablespoons cornstarch
-
¼ cup water or reserved pineapple juice
-
1 tablespoon fresh lemon juice
-
1 tablespoon unsalted butter
-
Pinch of salt
-
Whipped cream (optional garnish)
-
Toasted coconut flakes (optional garnish)
-
Fresh mint sprigs (optional garnish)
-
Maraschino cherries (optional garnish)
Instructions
-
Step 1
Preheat oven to 350°F (175°C). Lightly grease a 9-inch springform pan, line bottom with parchment paper. Wrap outside of pan with two layers of heavy-duty aluminum foil. -
Step 2
In a bowl, combine graham cracker crumbs, ¼ cup granulated sugar, cinnamon (if using), and pinch of salt. Pour in melted butter and mix until crumbs are moistened. -
Step 3
Press crumb mixture firmly and evenly into the bottom of the prepared pan. Bake for 8-10 minutes until lightly golden. Remove and let cool completely on a wire rack. -
Step 4
Thoroughly drain the 8-ounce can of crushed pineapple using a fine-mesh sieve, pressing out as much liquid as possible. Reserve juice for topping if desired. -
Step 5
In a large bowl with an electric mixer, beat softened cream cheese for 2-3 minutes until smooth. Gradually add 1 ½ cups granulated sugar, beating on medium-low until just combined. Add heavy cream/sour cream, vanilla extract, almond extract (if using), and lemon/lime zest (if using); beat on low until incorporated. -
Step 6
Sprinkle cornstarch/flour over mixture and beat on low for 30 seconds. Add eggs one at a time, beating on very low speed just until each is incorporated. Do not overmix. -
Step 7
Gently fold in the thoroughly drained crushed pineapple using a rubber spatula until evenly distributed. -
Step 8
Pour cheesecake filling over the cooled crust. Gently tap pan on counter to release air bubbles. Place foil-wrapped springform pan inside a larger roasting pan. Pour hot water into the roasting pan until it comes halfway up the sides of the springform pan. -
Step 9
Carefully transfer roasting pan to the preheated oven. Bake for 60-75 minutes, until edges are set but the center (2-3 inches) still jiggles slightly. -
Step 10
Turn off oven, prop door open, and let cheesecake cool gradually inside the oven for 1-2 hours. Then, remove from water bath, unwrap foil, and cool completely at room temperature on a wire rack for another 1-2 hours. -
Step 11
Once at room temperature, cover loosely and refrigerate for at least 6-8 hours, or ideally overnight, until fully chilled and set. -
Step 12
Pour undrained 20-ounce crushed pineapple into a medium saucepan. Add ½ cup granulated sugar, fresh lemon juice, and a pinch of salt. Bring to a gentle simmer. In a small bowl, whisk 2 tablespoons cornstarch with ¼ cup water/reserved juice until smooth. Slowly pour slurry into simmering pineapple, whisking continuously. Cook, stirring, for 2-3 minutes until thickened. Remove from heat, stir in 1 tablespoon unsalted butter until melted. Cool completely to room temperature. -
Step 13
Run a thin knife around the edge of the chilled cheesecake before releasing springform sides. Spoon cooled pineapple topping evenly over the top. Garnish with whipped cream, toasted coconut, mint, or cherries if desired. For clean slices, use a sharp knife dipped in hot water and wiped clean between cuts. Store leftovers refrigerated for up to 5 days.
Important Information
Nutrition Facts (Per Serving)
It is important to consider this information as approximate and not to use it as definitive health advice.
Allergy Information
Please check ingredients for potential allergens and consult a health professional if in doubt.


Leave a Comment