

California Sushi Bowls are an absolute delight, offering all the vibrant flavors and textures of your favorite sushi rolls without the fuss of rolling. If you’re like me, the idea of a perfectly constructed sushi roll is tempting, but the execution can feel a little intimidating. That’s where the magic of California Sushi Bowls truly shines. They’ve captured our hearts because they allow us to enjoy that quintessential sushi experience – the sticky rice, the fresh seafood, the crisp vegetables, and that unmistakable umami – in a beautifully simple, deconstructed format. What makes these bowls so special is their incredible versatility; you can customize them with your go-to ingredients, making each California Sushi Bowl a personal masterpiece. Get ready to create a delicious and satisfying meal that’s both healthy and bursting with sunshine-infused flavors!
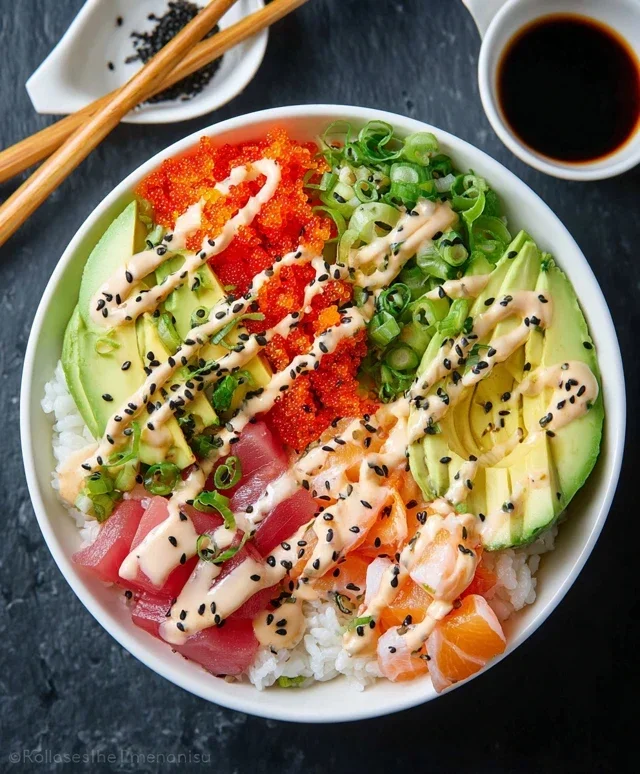
California Sushi Bowls
Craving the fresh, vibrant flavors of a California roll but want something a little more laid-back and customizable? You’re in luck! These California Sushi Bowls are the perfect weeknight meal, bringin extractg all the delicious components of your favorite sushi roll into an easy-to-assemble bowl. No rolling mats required, just pure, unadulterated sushi goodness. This recipe is incredibly forgiving, allowing you to adjust the spice level, add your favorite veggies, or even swap out the protein. Let’s dive into creating your own at-home sushi sensation!
Ingredients:
Cooking Instructions:
1. Perfectly Cooked Sushi Rice
The foundation of any great sushi bowl is perfectly cooked rice. Start by rinsing your Calrose sushi rice thoroughly under cold running water. You’ll want to rinse it until the water runs clear. This removes excess starch, preventing your rice from becoming gummy. Drain it well and then combine the rinsed rice with 2 cups of water in a medium saucepan. Bring the water to a boil over medium-high heat. Once boiling, reduce the heat to low, cover the pot tightly, and let it simmer for 15-20 minutes, or until all the water has been absorbed. Resist the urge to lift the lid during this cooking time, as this can release precious steam needed for perfectly fluffy rice. Once cooked, remove the pot from the heat and let it sit, still covered, for another 10 minutes. This resting period allows the rice to finish steaming and become perfectly tender.
2. Seasoning the Rice
While the rice is resting, it’s time to prepare the essential sushi rice seasoning. In a small bowl, whisk together the 1/4 cup of seasoned rice vinegar. This vinegar already has a touch of sweetness and salt, making it ideal for sushi rice. Once the rice has rested, transfer it to a large, shallow bowl (a wooden or non-metallic bowl is traditional, but any large bowl will work). Gently break up any clumps of rice with a rice paddle or a spatula. Drizzle the seasoned rice vinegar evenly over the hot rice. Using your paddle or spatula, gently fold and cut the vinegar into the rice. The goal is to coat each grain without mashing the rice. You can fan the rice as you mix to help it cool down faster and achieve that characteristic sheen. This process ensures every grain of rice is infused with that delightful tangy-sweet flavor that is synonymous with sushi.
3. Crafting the Spicy Mayo Drizzle
Next, we’ll prepare the creamy, spicy sauce that brings a delightful kick to our bowls. In a small bowl, combine the 1/4 cup of Japanese mayonnaise with the 2 teaspoons of sriracha. Japanese mayonnaise, like Kewpie, has a richer, creamier texture and a slightly tangier flavor than American mayonnaise, which works wonderfully here. Stir them together until you achieve a smooth, uniform pinkish-orange hue. Taste the mixture and, if you prefer it spicier, add another half teaspoon of sriracha. Conversely, if it’s too spicy for your liking, you can add a tiny bit more mayonnaise to mellow it out. This sauce is a flavor powerhouse and can be adjusted to your personal preference. Set this aside; it will be drizzled over the bowls just before serving.
4. Assembling Your California Sushi Bowls
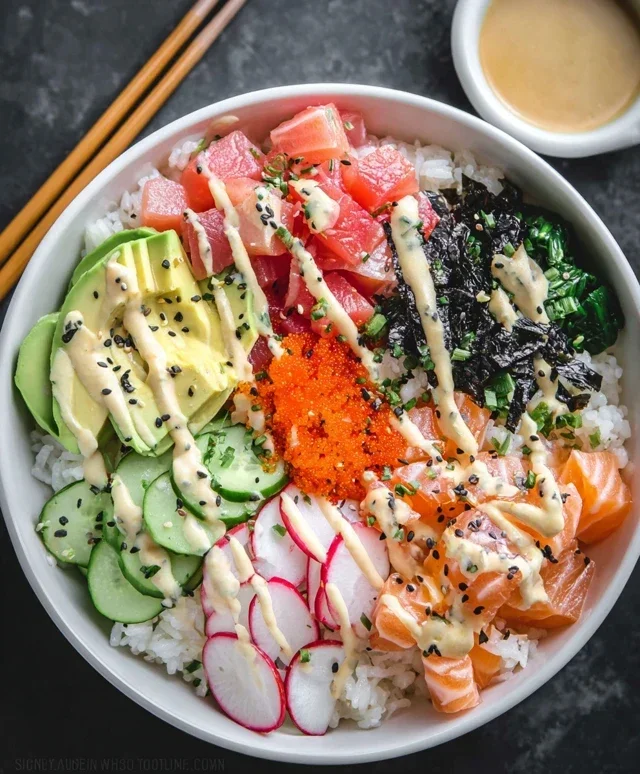
Now for the fun part – assembling the bowls! Divide the seasoned sushi rice evenly among your serving bowls. Aim for a generous base of rice in each bowl. Next, arrange your California-inspired toppings. Scatter the 8 oz of imitation crab, chopped into bite-sized pieces, over the rice. Then, add the 1/2 cup of diced English cucumber for a refreshing crunch. The nori is a crucial element for that authentic sushi flavor. You can either chop the nori sheets into small thin strips or crum extractble them directly into small pieces and sprinkle them over the other ingredients. Finally, artfully arrange the slices of your 1 large avocado around the bowl. The creamy avocado adds a luxurious texture and a beautiful visual appeal.
5. The Finishing Touches
To elevate your California Sushi Bowls from delicious to absolutely irresistible, it’s time for the final garnishes. Drizzle the prepared spicy mayo generously over the entire bowl. Don’t be shy; this sauce ties all the flavors together! Next, sprinkle a good amount of black and toasted sesame seeds over everything. The sesame seeds add a nutty flavor and a delightful textural contrast. Finally, for an extra layer of savory umami, generously sprinkle Nori Furikake over the top. Furikake is a Japanese seasoning blend that typically includes dried seaweed, sesame seeds, and other flavorful ingredients. Serve your California Sushi Bowls immediately with 1/4 cup of low-sodium soy sauce on the side for dipping or drizzling as desired. These bowls are a fantastic way to enjoy the flavors of sushi in a relaxed, customizable format. Enjoy the fresh, bright, and satisfying taste of your homemade California Sushi Bowls!
Conclusion:
And there you have it – your guide to crafting delicious and customizable California Sushi Bowls at home! This recipe truly shines because it captures all the vibrant flavors and satisfying textures of a classic California roll, but in a format that’s incredibly easy to assemble and adapt. It’s a fantastic way to enjoy sushi without the fuss of rolling, making it perfect for busy weeknights or casual gatherings. The beauty of these bowls lies in their versatility; feel free to swap out ingredients based on your preferences and what you have on hand. We’ve already touched on some great serving suggestions, like pairing them with a light miso soup or a crisp green salad, but don’t be afraid to get creative!
I truly encourage you to give this California Sushi Bowl recipe a try. It’s a rewarding and fun cooking experience that results in a healthy, flavorful, and visually appealing meal. Whether you’re a sushi aficionado or new to these flavors, I’m confident you’ll love the fresh taste and the simplicity of bringin extractg a bit of California sunshine to your table.
Frequently Asked Questions:
Can I make California Sushi Bowls ahead of time?
Yes, you absolutely can! You can prepare the rice and chop most of your toppings a day in advance. Store the cooked rice and toppings separately in airtight containers in the refrigerator. When you’re ready to serve, gently warm the rice if desired, then assemble your bowls. Keep the avocado and any sauces separate until just before serving to maintain their freshness and texture.
What are some protein variations for California Sushi Bowls?
While crab is traditional for California rolls, you can easily substitute or add other proteins. Cooked shrimp, flaked salmon (baked or poached), pan-seared tofu, or even thinly sliced cooked chicken are excellent options. For a plant-based protein boost, consider adding edamame or chickpeas.
How do I make a spicier California Sushi Bowl?
To add a spicy kick, you can incorporate sriracha mayo directly into your bowl, drizzle it over the top, or mix it into the rice. Thinly sliced jalapeños or a sprinkle of red pepper flakes are also great ways to amp up the heat. For a more integrated spice, you can also toss your crab or other protein with a little sriracha before adding it to the bowl.
California Sushi Bowl
A deconstructed California roll served in a bowl, perfect for a quick and delicious meal.
Ingredients
-
1 1/2 cups dry Calrose Sushi Rice
-
2 cups water
-
1/4 cup seasoned rice vinegar
-
1/4 cup Japanese mayonnaise
-
2 teaspoons sriracha
-
8 oz imitation crab
-
1/2 cup diced English cucumber
-
1-2 nori sheets
-
1 large avocado
-
Black and toasted sesame seeds
-
1/4 cup low-sodium soy sauce
-
Nori Furikake
Instructions
-
Step 1
Rinse the Calrose sushi rice under cold water until the water runs clear. Cook the rice with 2 cups of water according to package directions. -
Step 2
While the rice is cooking, prepare the spicy mayonnaise by whisking together Japanese mayonnaise and sriracha in a small bowl. -
Step 3
Once the rice is cooked, transfer it to a large bowl. Gently fold in the seasoned rice vinegar until evenly distributed. -
Step 4
Chop the imitation crab into small pieces. Dice the English cucumber and slice the avocado. -
Step 5
Chop the nori sheets into small pieces or crumble them. Prepare the serving bowls by dividing the seasoned sushi rice between them. -
Step 6
Arrange the imitation crab, cucumber, and avocado over the rice in each bowl. Drizzle generously with the spicy mayonnaise. -
Step 7
Garnish with chopped nori, black and toasted sesame seeds, and Nori Furikake. Serve immediately with low-sodium soy sauce on the side.
Important Information
Nutrition Facts (Per Serving)
It is important to consider this information as approximate and not to use it as definitive health advice.
Allergy Information
Please check ingredients for potential allergens and consult a health professional if in doubt.


Leave a Comment