

Cowboy Caviar isn’t just another dip; it’s a fiesta in a bowl, a vibrant explosion of flavors and textures that has captured hearts across the country. Forget what you think you know about fancy appetizers, because this Tex-Mex sensation is approachable, utterly delicious, and ridiculously easy to make. People adore Cowboy Caviar for its refreshing zest, its satisfying crunch from fresh vegetables, and the way it perfectly balances spicy, sweet, and tangy notes. What truly makes this Cowboy Caviar special is its versatility – it’s a stellar party starter, a delightful side dish for grilled meats, or even a light lunch scooped up with tortilla chips. It’s the kind of dish that brings people together, sparking conversations and creating delicious memories with every bite. Get ready to discover why this beloved Cowboy Caviar is a guaranteed crowd-pleaser.
Cowboy Caviar
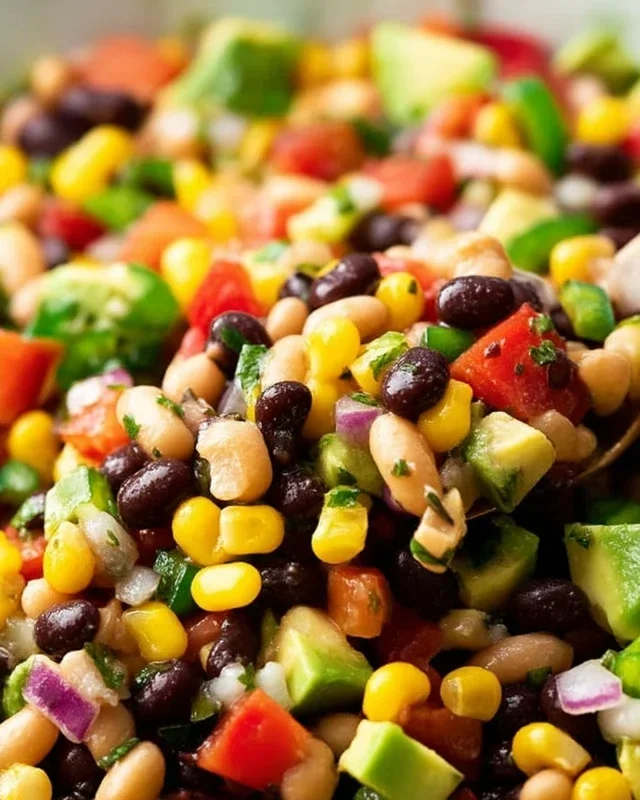
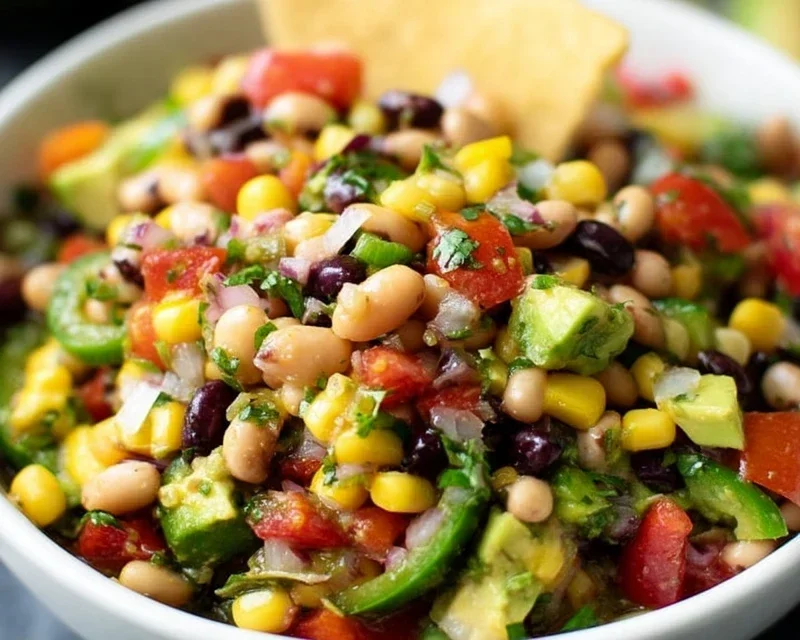
Cowboy Caviar, also known as Texas Caviar, is a vibrant and incredibly versatile dip that’s perfect for any occasion. Whether you’re hosting a backyard barbecue, potluck, or just looking for a healthy and flavorful snack, this colorful concoction is sure to be a crowd-pleaser. It’s a delightful blend of textures and tastes, with the heartiness of beans, the sweetness of corn, the crunch of fresh vegetables, and a zesty lime dressing that ties it all together. What I love most about Cowboy Caviar is how easy it is to make – no cooking required! It’s essentially a chopped salad or salsa that gets better as it sits, allowing the flavors to meld beautifully.
This recipe is a fantastic way to incorporate more fresh ingredients into your diet, and it’s endlessly customizable. Don’t be afraid to adjust the spice level by adding more or fewer jalapenos, or swap out some of the vegetables for others you love. It’s a dish that truly sings with fresh, bright flavors.
Ingredients:
Instructions:
Let’s get started on this delightful Cowboy Caviar! The beauty of this recipe is that it’s all about combining fresh, beautiful ingredients. You don’t need any fancy equipment, just a good knife and a large mixing bowl.
1. Prepare the Base: In a large mixing bowl, combine the drained and rinsed black beans and the drained whole kernel sweet corn. Rinsing the black beans is an important step to remove any excess sodium and the starchy liquid they’re packed in, which can sometimes give a slightly metallic taste. For the corn, ensure it’s well-drained to avoid making your caviar watery.
2. Add the Fresh Vegetables: Now it’s time to add the color and crunch! To the bowl with the beans and corn, add the diced red bell pepper and the minced jalapeno pepper. When dicing the red bell pepper, aim for small, uniform pieces so they blend well with the other ingredients. For the jalapeno, depending on your heat preference, you can remove the seeds and membranes entirely for a milder flavor, or leave some in for an extra kick. Remember to wash your hands thoroughly after handling jalapenos, as the oils can be quite potent and irritating to your eyes or skin. Next, stir in the finely chopped fresh cilantro and the diced red onion. The red onion adds a lovely sharp bite and a beautiful color contrast. If you find raw red onion to be too strong, you can soak the diced onion in cold water for about 10 minutes before adding it to the bowl; this will mellow out its pungency.
3. Whip Up the Zesty Dressing: In a separate smaller bowl, whisk together the lime juice, red grape juice vinegar, salt, ground black pepper, honey, and chili powder. This is where all the magic happens! The lime juice provides a bright, citrusy tang that cuts through the richness of the other ingredients. The red grape juice vinegar adds a subtle sweetness and depth of flavor, and the honey balances out the tartness of the lime while adding a touch of sweetness. The salt and pepper are essential for enhancing all the flavors, and the chili powder adds a gentle warmth and smokiness. Whisk these ingredients together until the honey and salt are fully dissolved.
4. Combine and Chill: Pour the prepared dressing over the bean and vegetable mixture in the large bowl. Gently fold everything together to ensure all the ingredients are evenly coated with the dressing. This is where you want to be careful not to overmix, as we want to keep the ingredients intact. Once everything is well combined, gently fold in the diced avocados. Adding the avocados last helps prevent them from becoming mushy. The creamy texture of the avocado adds another delightful dimension to the caviar.
5. Allow Flavors to Mingle: This is arguably the most important step for achieving the best flavor. Cover the bowl tightly with plastic wrap and refrigerate for at least 30 minutes, or ideally, for 1 to 2 hours. This chilling period is crucial because it allows all the individual flavors to meld and deepen, creating a more cohesive and delicious final product. The longer it sits (within reason, of course), the more the flavors will develop. You can make this Cowboy Caviar a day in advance, and it will be even more flavorful the next day! Just keep it refrigerated until you’re ready to serve.
Serve your Cowboy Caviar with tortilla chips, pita bread, or as a topping for grilled chicken, fish, or even salads. Enjoy!
Conclusion:
So there you have it! My foolproof guide to making delicious Cowboy Caviar, a vibrant and flavorful dip that’s perfect for any occasion. What makes this recipe truly great is its incredible versatility and the explosion of fresh tastes and textures in every bite. The combination of crunchy vegetables, creamy beans, tangy lime, and a hint of spice is simply irresistible. It’s the ultimate crowd-pleaser, whether you’re hosting a backyard barbecue, bringin extractg a dish to a potluck, or just craving a healthy and satisfying snack.
Don’t be afraid to get creative with your serving suggestions! Beyond the classic tortilla chips, consider serving it alongside grilled chicken or fish, stuffed into bell peppers, or even as a zesty topping for tacos and quesadillas. If you’re feeling adventurous, try adding some diced avocado for extra creaminess, corn for sweetness, or even some finely chopped jalapeño for an extra kick. This Cowboy Caviar recipe is designed to be your new go-to, so I wholeheartedly encourage you to give it a try. You won’t regret it!
Frequently Asked Questions:
Q: How long can I store Cowboy Caviar?
You can store your delicious Cowboy Caviar in an airtight container in the refrigerator for up to 3-4 days. The flavors actually meld together beautifully overnight, making it even tastier on the second day!
Q: Can I make this recipe ahead of time?
Absolutely! Cowboy Caviar is an excellent make-ahead dish. In fact, I often make it the day before a gathering to allow the flavors to fully develop. Just be sure to keep the dressing separate until just before serving if you’re concerned about the vegetables becoming too soft, though typically it holds up well.
Q: What if I don’t like cilantro?
No problem at all! Cilantro is a key flavor component, but if it’s not your favorite, you can omit it entirely. Alternatively, you could try a small amount of finely chopped fresh parsley for a milder herbaceous note, or even a tiny bit of fresh mint for a surprisingly refreshing twist.
Cowboy Caviar
A refreshing and flavorful dip perfect for parties and gatherings.
Ingredients
-
15 oz. black beans (drained and rinsed)
-
15.25 oz. whole kernel sweet corn (drained)
-
1 small red bell pepper (diced)
-
1 jalapeno pepper (minced)
-
1/3 cup fresh cilantro (finely chopped)
-
3/4 cup diced red onion
-
2 avocados (diced)
-
1/4 cup lime juice
-
2 tablespoons red grape juice vinegar
-
1 teaspoon salt
-
1/2 teaspoon ground black pepper
-
1 Tablespoon honey
-
1/4 teaspoon chili powder
Instructions
-
Step 1
In a large bowl, combine the drained and rinsed black beans and drained whole kernel sweet corn. -
Step 2
Add the diced red bell pepper, minced jalapeno pepper, finely chopped cilantro, and diced red onion to the bowl. -
Step 3
Gently fold in the diced avocados. -
Step 4
In a separate small bowl, whisk together the lime juice, red grape juice vinegar, honey, salt, ground black pepper, and chili powder. -
Step 5
Pour the dressing over the ingredients in the large bowl and toss gently to combine. -
Step 6
For best flavor, cover and refrigerate for at least 15 minutes before serving.
Important Information
Nutrition Facts (Per Serving)
It is important to consider this information as approximate and not to use it as definitive health advice.
Allergy Information
Please check ingredients for potential allergens and consult a health professional if in doubt.

Leave a Comment