

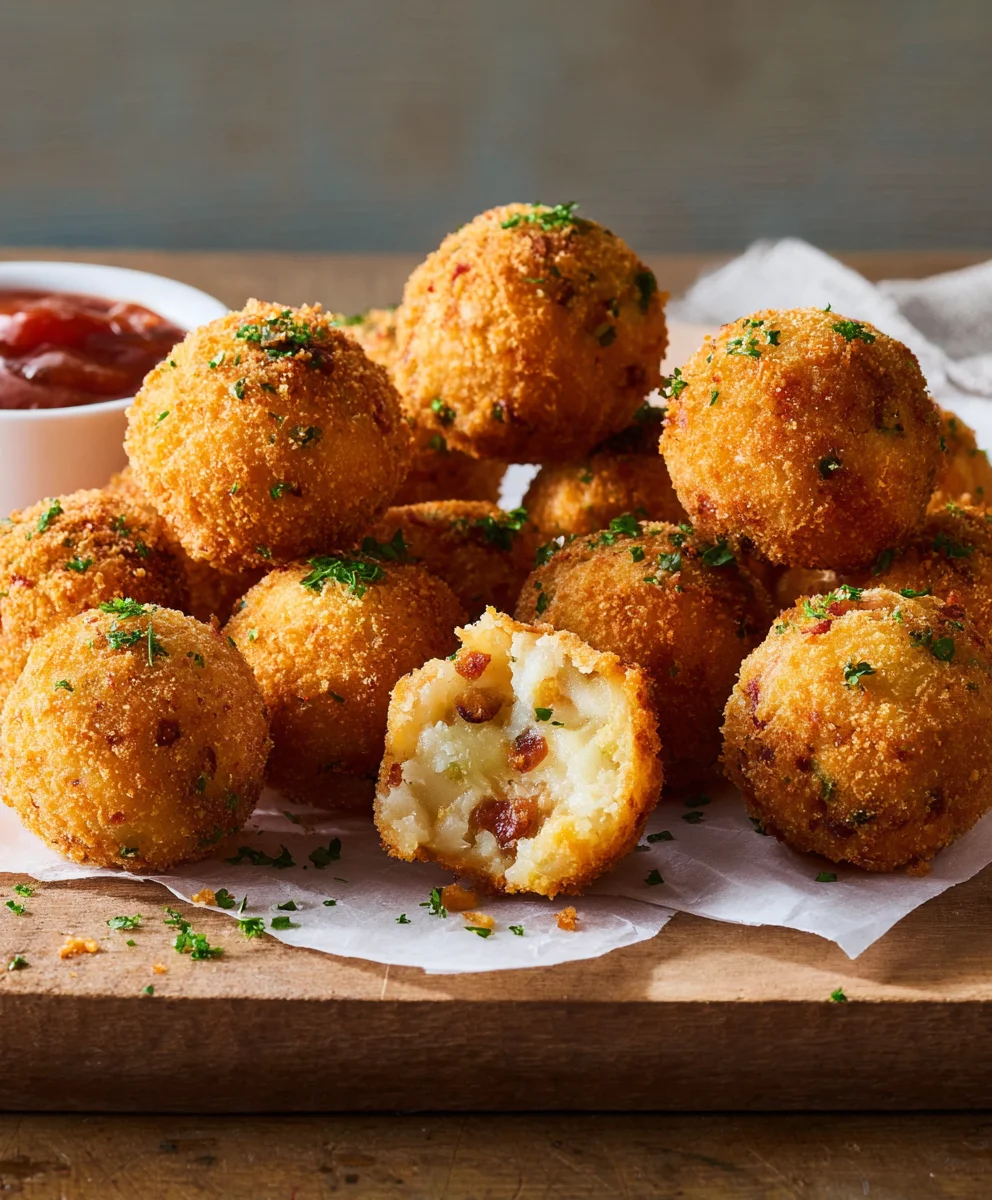
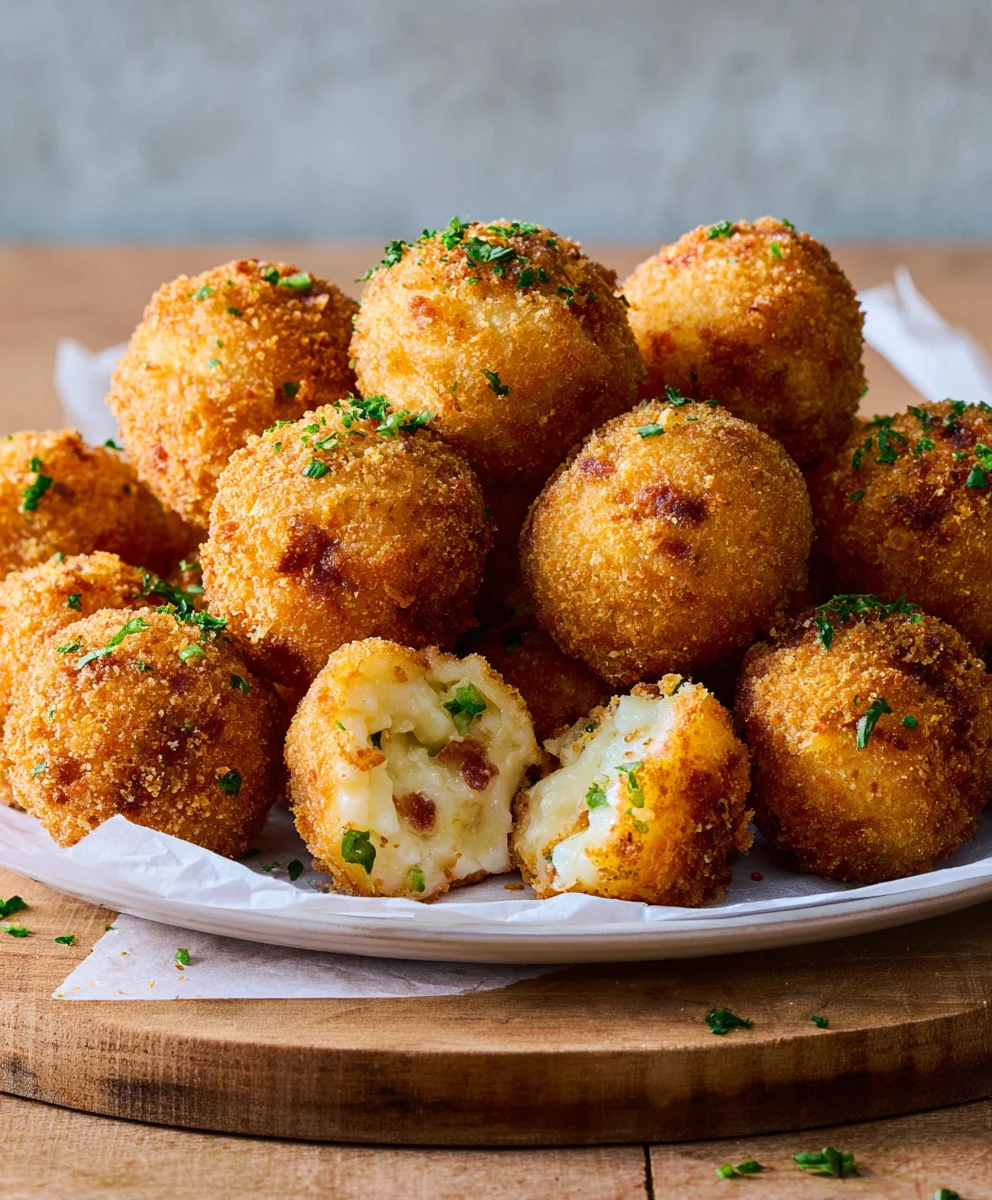
Fried Mashed Potato Balls are more than just a side dish; they’re a revelation! Imagine taking your comforting, creamy mashed potatoes and transforming them into crispy, golden spheres of pure joy. We all love mashed potatoes, right? They’re the ultimate comfort food, the perfect accompaniment to almost any meal. But what if you could elevate that familiar delight into something truly extraordinary, something that brings an audible “wow” to the table? That’s where these incredible Fried Mashed Potato Balls come in. They’re a textural masterpiece, offering a delightful crunch on the outside that gives way to that familiar, fluffy interior. What makes them truly special is their incredible versatility – they’re fantastic as an appetizer, a crowd-pleasing snack, or even a fun twist on a traditional side. Get ready to discover your new favorite way to enjoy mashed potatoes!
Ingredients:
- 3 cups leftover mashed potatoes
- 3 slices bacon, cooked and crumbled
- 2/3 cup shredded cheddar cheese
- 2 tablespoons thinly sliced chives
- 1 teaspoon garlic powder
- Kosher salt, to taste
- Freshly ground black pepper, to taste
- 2 large eggs, beaten
- 1 1/3 cups panko bread crumbs
- Vegetable oil, for frying
Preparing the Mashed Potato Mixture
The foundation of our delicious Fried Mashed Potato Balls is, of course, your leftover mashed potatoes. Make sure they are chilled; cold mashed potatoes are much easier to work with and will hold their shape better during the shaping and frying process. In a medium-sized mixing bowl, combine the 3 cups of chilled mashed potatoes with the crumbled, cooked bacon. The salty, crispy bits of bacon will add an irresistible flavor and texture to every bite. Next, stir in the 2/3 cup of shredded cheddar cheese. As the potato balls cook, this cheese will melt beautifully, creating gooey pockets of deliciousness. Add the 2 tablespoons of thinly sliced chives for a fresh, oniony pop that cuts through the richness of the potatoes and cheese. Now, it’s time to season. Sprinkle in 1 teaspoon of garlic powder for an extra layer of savory flavor. Add a pinch of Kosher salt and a few grinds of freshly ground black pepper. Be mindful of the salt content from the bacon and cheese, so start with a small amount and taste the mixture (if you’re comfortable doing so before adding raw egg) or adjust again after forming the balls and before breading. Gently mix all these ingredients together until they are well combined. The goal is to have a cohesive mixture that isn’t too sticky. If your mashed potatoes are particularly wet, you might consider adding a tablespoon or two of flour, but usually, chilled potatoes and the added ingredients are sufficient.
Shaping the Potato Balls
Once your mashed potato mixture is well combined and seasoned, it’s time to shape them into balls. This is where the fun really begins, and you can make them any size you prefer, though a golf ball to a small plum size works best for even cooking and easy handling. Take about 2 tablespoons of the potato mixture into the palm of your hand. Roll it between your palms to form a compact ball. Don’t worry if they aren’t perfectly round; a slightly rustic shape adds to their charm. Continue this process until all the mashed potato mixture has been formed into individual balls. You should aim to get about 12-15 balls, depending on their size. Placing the formed balls on a baking sheet lined with parchment paper can prevent them from sticking and makes them easier to transfer to the next stage. At this point, you can also cover the baking sheet and refrigerate the potato balls for about 15-30 minutes. This chilling step further firms them up, making them less likely to fall apart during the breading and frying process.
The Breading Station
Now, let’s set up our breading station. This is crucial for achieving that perfectly crispy exterior on our Fried Mashed Potato Balls. You will need three separate shallow dishes or bowls. In the first dish, pour in the 2 beaten eggs. Ensure the eggs are well-whisked so the potato balls get an even coating. In the second dish, place the 1 1/3 cups of panko bread crumbs. Panko bread crumbs are essential here; they are coarser than regular bread crumbs and create an exceptionally light and crispy coating that absorbs less oil, resulting in a more delightful crunch. You can optionally add a pinch of salt and pepper to the panko for extra flavor, but the mashed potato mixture is already well-seasoned. In the third dish, you can place a few extra panko bread crumbs or leave it empty, as it’s not strictly necessary for this particular breading method.
Breading the Potato Balls
With your breading station ready, it’s time to coat our mashed potato balls. Take one chilled potato ball and first dip it into the beaten eggs, ensuring it’s fully submerged and coated. Let any excess egg drip back into the bowl. Then, carefully place the egg-coated ball into the dish of panko bread crumbs. Gently roll the ball in the panko, pressing lightly with your fingers to help the bread crumbs adhere. Make sure the entire surface of the ball is covered with a generous layer of panko. Once coated, place the breaded ball back onto the parchment-lined baking sheet. Repeat this process for all the remaining potato balls. Ensure you have an even coating of panko on each one for maximum crispiness. If any areas look sparse, you can gently press more panko onto those spots.
Frying the Potato Balls to Golden Perfection
The final and most exciting step is frying our Fried Mashed Potato Balls. In a large, heavy-bottomed pot or Dutch oven, pour enough vegetable oil to reach a depth of about 2-3 inches. Heat the oil over medium-high heat until it reaches approximately 350°F (175°C). You can test the oil temperature by dropping a tiny bit of panko bread crumb into it; it should sizzle vigorously. Carefully, and in batches to avoid overcrowding the pot (which can lower the oil temperature and lead to greasy balls), gently place 3-4 breaded potato balls into the hot oil. Fry them for about 3-5 minutes, turning them occasionally with a slotted spoon or spider strainer, until they are deeply golden brown and crispy on all sides. The goal is to cook them through and achieve that satisfying crunch. Once they are perfectly fried, carefully remove them from the oil and place them on a wire rack set over a baking sheet to drain any excess oil. This will help them stay as crispy as possible. Repeat the frying process with the remaining potato balls, ensuring the oil returns to 350°F (175°C) between batches.
Conclusion:
There you have it – your guide to creating delicious Fried Mashed Potato Balls! We’ve walked through the simple steps to transform leftover mashed potatoes into crispy, golden orbs of pure comfort food. The satisfying crunch of the exterior gives way to a warm, fluffy interior, making these a guaranteed crowd-pleaser. Don’t be afraid to experiment with the fillings; they’re a fantastic way to use up odds and ends from your fridge. I truly hope you enjoy making and devouring these delightful treats as much as I do!
For serving, these Fried Mashed Potato Balls are incredibly versatile. They make a fantastic appetizer with your favorite dipping sauces like ketchup, ranch, or a spicy aioli. They can also be a unique side dish alongside grilled meats or a hearty salad. Looking for some delicious variations? Try adding finely chopped chives and cheddar cheese for a classic flavor, or for a bolder taste, incorporate a pinch of smoked paprika and some crumbled bacon. The possibilities are truly endless!
Frequently Asked Questions about Fried Mashed Potato Balls:
Q1: Can I make the mashed potato balls ahead of time?
Yes, absolutely! You can form the Fried Mashed Potato Balls and refrigerate them on a baking sheet lined with parchment paper for up to 24 hours before frying. This makes them perfect for a party or when you need a quick appetizer. Ensure they are well-chilled before frying for the best results.
Q2: What’s the best way to ensure they are crispy and not greasy?
The key to crispy, non-greasy Fried Mashed Potato Balls is proper oil temperature. Make sure your oil is heated to the correct temperature (around 350-375°F or 175-190°C) before you start frying. Don’t overcrowd the pan, as this will lower the oil temperature and lead to greasy results. Fry them in batches, and drain them on a wire rack set over a baking sheet to allow air to circulate and wick away excess oil.
Crispy Fried Mashed Potato Balls Recipe
Delicious crispy fried mashed potato balls filled with bacon and cheese, perfect as an appetizer or side dish.
Ingredients
-
3 cups leftover mashed potatoes
-
3 slices cooked and crumbled beef bacon
-
2/3 cup shredded cheddar cheese
-
2 tablespoons thinly sliced chives
-
1 teaspoon garlic powder
-
Kosher salt, to taste
-
Freshly ground black pepper, to taste
-
2 large eggs, beaten
-
1 1/3 cups panko bread crumbs
-
Vegetable oil, for frying
Instructions
-
Step 1
In a medium bowl, combine chilled mashed potatoes with crumbled beef bacon, shredded cheddar cheese, sliced chives, garlic powder, salt, and pepper. Mix well until cohesive. -
Step 2
Shape the mixture into balls, about 12-15 in total, using approximately 2 tablespoons of mixture per ball. Place on a parchment-lined baking sheet and chill for 15-30 minutes. -
Step 3
Set up a breading station with three shallow dishes: one with beaten eggs, one with panko bread crumbs. Optionally season panko with salt and pepper. -
Step 4
Dip each chilled potato ball into the beaten eggs, ensuring full coverage, then roll in panko bread crumbs, pressing gently to adhere. Return to the baking sheet. -
Step 5
Heat vegetable oil in a heavy-bottomed pot to 350°F (175°C). Fry potato balls in batches for 3-5 minutes, turning, until golden brown and crispy. -
Step 6
Remove fried potato balls with a slotted spoon and place on a wire rack to drain excess oil.
Important Information
Nutrition Facts (Per Serving)
It is important to consider this information as approximate and not to use it as definitive health advice.
Allergy Information
Please check ingredients for potential allergens and consult a health professional if in doubt.

Leave a Comment