

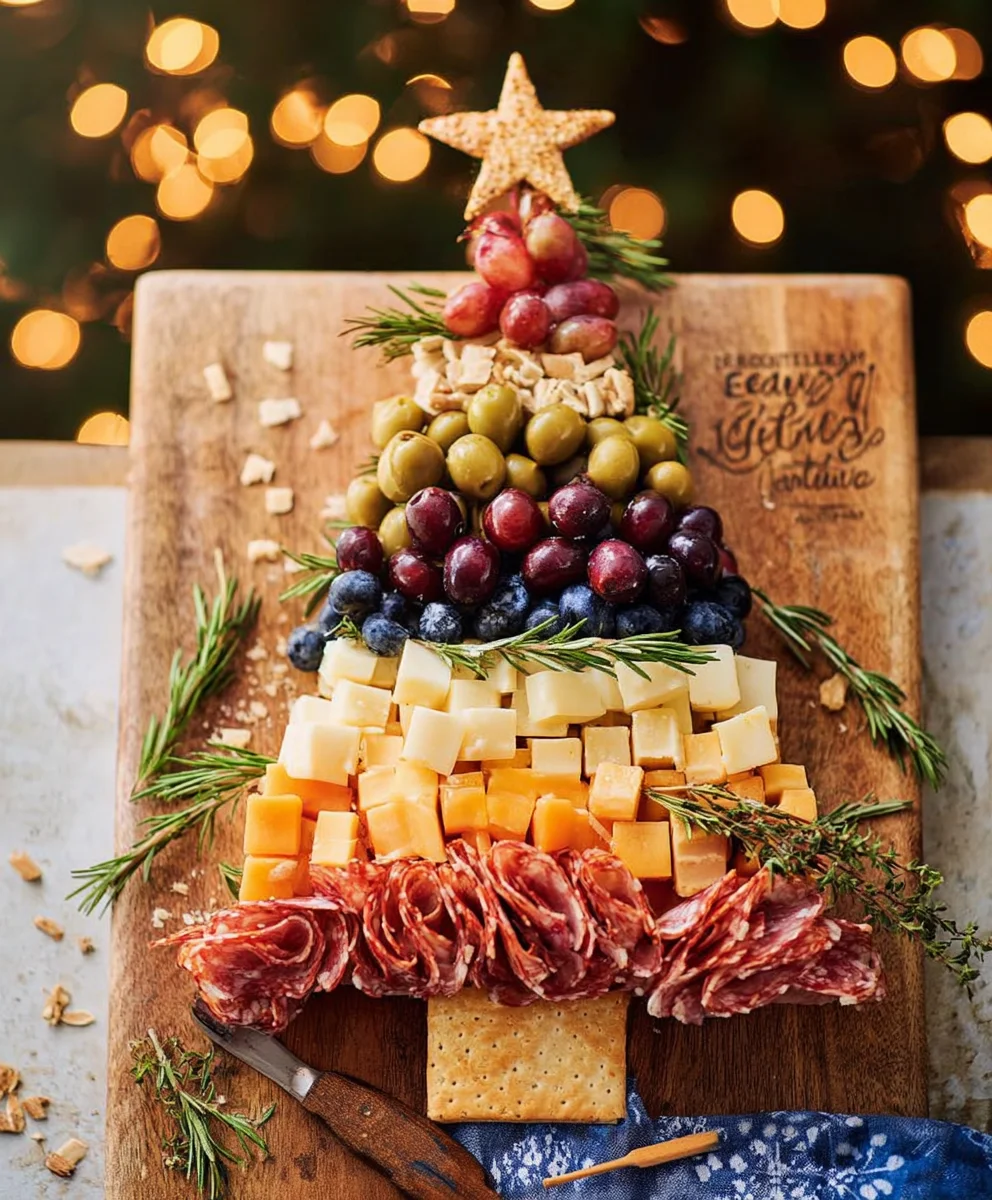
Christmas Tree Shaped Charcuterie is undeniably the ultimate showstopper for your festive gatherings this holiday season. Imagine the gasps of delight as your guests behold a magnificent, edible centerpiece, meticulously arranged to resemble a twinkling evergreen, laden with an array of delectable treats. As someone who absolutely adores both the art of entertaining and the magic of Christmas, I’m thrilled to share how to craft this visually stunning and utterly delicious platter, transforming simple ingredients into an unforgettable display.
Why This Festive Charcuterie Board is a Must-Have
While charcuterie boards have gracefully adorned tables for centuries, celebrating the joy of shared food and convivial feasting, the holiday season offers a unique opportunity to infuse this timeless tradition with an extra sprinkle of festive magic. This isn’t just about assembling ingredients; it’s about creating an experience. People adore this dish not only for its incredible convenience – requiring no cooking, just thoughtful arrangement – but also for the sheer variety of flavors and textures it offers. From savory cured meats and creamy cheeses to crisp crackers, sweet fruits, and crunchy nuts, there’s a delightful bite for every palate. The stunning visual appeal of an expertly crafted Christmas Tree Shaped Charcuterie board elevates simple ingredients, making it the perfect conversation starter and a true testament to your holiday spirit.
Ingredients:
- For the Cheeses:
- 8 oz Brie cheese wheel (or a smaller wedge for the star)
- 6 oz sharp cheddar cheese, cubed or sliced into small triangles
- 5 oz fresh mozzarella pearls (bocconcini or ciliegine)
- 4 oz goat cheese log, crumbled or sliced
- 3-4 oz Monterey Jack or Colby cheese, sliced into festive shapes with cookie cutters (stars, snowflakes)
- For the Meats:
- 6 oz thinly sliced genoa salami or soppressata, folded into quarters or rosettes
- 4 oz prosciutto, loosely folded or draped
- 3 oz pepperoni slices, folded
- Optional: 3 oz thinly sliced smoked turkey or ham, rolled
- For the Fruits:
- 1 cup red seedless grapes, washed and left on small stems or separated
- 1 cup green seedless grapes, washed and left on small stems or separated
- 1 pint fresh raspberries
- 1 pint fresh blackberries
- 6-8 large fresh strawberries, hulled and some sliced in half, some left whole
- 1/2 cup dried cranberries or cherries
- 1/4 cup dried apricots, halved
- 1/4 cup pomegranate arils (for a festive sparkle)
- For the Vegetables & Olives:
- 1/2 cup small cherry or grape tomatoes, halved or left whole
- 1/2 cup mixed olives (Kalamata, Castelvetrano), pitted
- A few sprigs of fresh rosemary (for decoration, mimicking pine needles)
- For the Crackers & Breads:
- Assorted crackers (water crackers, multigrain, artisan crackers – aim for varying shapes and textures)
- 4-5 oz pretzel sticks or breadsticks (for the tree trunk)
- Optional: Mini toast or crostini
- For the Dips & Spreads:
- 3-4 tbsp fig jam or apricot preserves
- 2-3 tbsp honey, preferably in a small squeeze bottle or tiny jar with a dipper
- Optional: Small dish of whole grain mustard
- For the Nuts & Garnish:
- 1/4 cup candied pecans or walnuts
- 1/4 cup roasted pistachios, shelled
- Optional: Small star-shaped cookie cutter (for cheese), edible glitter (food safe)
Gathering Your Supplies and Preliminary Preparations
Creating a stunning Christmas Tree Shaped Charcuterie board is a joyful process that begins with careful preparation. Before you even think about arranging, take a moment to gather all your tools and ingredients. This pre-planning will make the assembly phase incredibly smooth and enjoyable, ensuring your focus remains on artistic arrangement rather than hunting for a missing item.
- First things first, select your serving platter or board. For a truly impressive Christmas tree shape, I find that a large rectangular or oval board works best, giving you ample space to build out the tree’s width and height. Make sure it’s clean and dry. Some people like to lay down a sheet of parchment paper first for easier cleanup, but I prefer the direct contact with the board for a more rustic feel.
- Wash and Thoroughly Dry All Fresh Produce: This includes your grapes, berries, tomatoes, and rosemary. Water can make things soggy and affect the texture and appearance, so a gentle pat dry with a paper towel is essential.
- Prepare Your Cheeses:
- For the Brie, if you’re using a large wheel as the star, leave it whole. If you’re using a smaller wedge, you might want to cut a star shape out of it using a small cookie cutter, or simply place a star-shaped cracker on top.
- Cut your cheddar cheese into cubes or small, irregular triangles. These will form some of the bulk of your tree branches.
- Slice your Monterey Jack or Colby cheese. Using small Christmas-themed cookie cutters (stars, snowflakes, mini trees) to cut out shapes will add an adorable, festive touch to your Christmas Tree Shaped Charcuterie. This little detail really elevates the holiday theme.
- Crumble the goat cheese log gently into smaller pieces.
- Leave the mozzarella pearls as they are; their round shape is perfect for “ornaments.”
- Prepare Your Meats: This is where you can get creative with presentation.
- Take your thinly sliced salami or soppressata and fold each slice into quarters, or for an even more elaborate look, gently fold and roll them into small “rosettes.”
- For the prosciutto, simply grab small sections and loosely fold or drape them to create volume and texture.
- Fold the pepperoni slices in half or quarters.
- If using, roll your smoked turkey or ham slices tightly into small cylinders.
- Prepare Your Fruits and Vegetables:
- Hull the strawberries; slice some in half for easier placement and leave a few whole.
- Halve the cherry or grape tomatoes.
- Ensure all olives are pitted.
- Halve the dried apricots.
- Have your pomegranate arils ready in a small bowl.
- Gather Your Crackers, Spreads, and Nuts: Arrange your various crackers, ensuring you have a good mix of shapes and sizes. Open your fig jam, honey, and nuts. Having everything within arm’s reach will streamline the assembly process for your impressive Christmas Tree Shaped Charcuterie board.
Building the Foundation: Crafting the Christmas Tree Shape
Now comes the fun part: bringing your vision of a festive charcuterie tree to life! This phase focuses on establishing the overall shape and structure, laying down the larger elements that define your beautiful Christmas Tree Shaped Charcuterie.
- Outline Your Tree: Begin by envisioning a large triangle on your chosen platter. I like to use a few larger items to mark out the general shape. Start at the bottom, creating the widest part of your tree. You can place a line of crackers or even a few larger cheese cubes along what will be the base.
- Build the Trunk: At the very bottom center of your imagined triangle, create the “trunk” of your Christmas tree. I find pretzel sticks or breadsticks work perfectly for this. Arrange them vertically, bundled together, or crisscrossed slightly, extending downwards from where the tree’s base will start. This provides a visual anchor for your entire creation.
- Start with Larger Cheeses and Fruits: Begin to fill in the triangle shape, working from the bottom up. I usually start with larger chunks of cheddar cheese and clusters of grapes. Place them strategically to create the broad, full base of the tree. Think about creating a solid foundation that will support smaller items later. Don’t be afraid to let some pieces slightly overlap the edges of your imagined triangle; this creates a more organic, natural tree shape.
- Layering with Dimension: As you place items, think about creating depth. Don’t just lay everything flat. Lean some cheese cubes against each other, or slightly tuck some grape clusters under others. This adds visual interest and makes your Christmas Tree Shaped Charcuterie look bountiful and inviting.
- Incorporating Larger Meats: Gently drape some of the folded prosciutto or larger salami rosettes into the lower and middle sections of your tree outline. These larger pieces help define the “branches” and add a rich color contrast against the cheeses and fruits. Remember, we’re building up layers, so leave some gaps for smaller items and garnishes later.
- Establishing the “Star” Position: At the very top point of your tree, leave a prime spot for your “star.” This could be your small Brie wheel, a star-shaped piece of cheese, or a star-shaped cracker. Placing it now, or at least earmarking the spot, helps you build the rest of the tree around it, ensuring everything tapers nicely to the peak.
- Creating Volume with Varied Textures: Continue to fill the tree shape with a mix of your remaining larger cheeses and fruits. The goal here is to create a dense, appealing “tree” where every section has something interesting to offer. Alternate colors and textures; for instance, place some green grapes next to red strawberries, or a block of cheddar near some mozzarella pearls. The variety is what makes a charcuterie board truly spectacular.
Layering and Adding Texture for Your Christmas Tree Shaped Charcuterie
With the basic shape established, this phase is all about refining your Christmas Tree Shaped Charcuterie by adding mid-sized elements, incorporating more colors, and introducing those delightful “pine needle” accents that truly bring the Christmas tree theme to life.
- Tucking in Folded Meats: Now, strategically place your folded salami, pepperoni, and any rolled turkey or ham slices within the gaps and on top of the foundation you’ve built. These smaller, often darker meats add wonderful pops of color and savory notes. I like to tuck them slightly under other items so they peek out, giving the impression of abundance. Think of them as smaller ornaments or rich foliage within your tree.
- Adding Medium-Sized Fruits and Vegetables: Distribute your raspberries, blackberries, and halved strawberries throughout the tree. These vibrant berries are like festive ornaments, adding bursts of color and fresh sweetness. Dot them around evenly to ensure visual balance. Similarly, tuck in your cherry tomatoes and olives; their deep reds and greens contribute beautifully to the Christmas palette.
- Introducing the Mozzarella Pearls: These little white balls are perfect for mimicking snow or delicate white ornaments. Scatter them throughout the tree, focusing on placing them in visible spots where their roundness can really stand out against the other shapes. They add a lovely soft texture and a milky flavor contrast.
- The “Pine Needle” Effect with Rosemary: This is a crucial step for truly selling the Christmas tree illusion! Take your fresh rosemary sprigs and strategically tuck them into various spots within the tree. Let them peek out from behind cheeses, meats, and fruits. The dark green, needle-like appearance of rosemary instantly evokes the feeling of a real evergreen, adding an aromatic touch that is simply delightful. Don’t overdo it, but enough to give that lovely foresty feel to your Christmas Tree Shaped Charcuterie.
- Distributing Goat Cheese: Gently crumble your goat cheese log and sprinkle it in various sections of the tree. Its stark white color and creamy texture provide a lovely contrast and a tangy counterpoint to the other flavors. It can resemble fresh fallen snow or delicate white garland.
- Placing Shaped Cheeses: Now, take those fun star or snowflake-shaped cheese cut-outs. These are like bespoke ornaments for your tree! Place them thoughtfully in prominent spots, ensuring their festive shapes are clearly visible. They add a playful and very intentional holiday touch to your Christmas Tree Shaped Charcuterie.
- Filling in Gaps with Dried Fruits: Use your dried cranberries/cherries and halved dried apricots to fill in any smaller gaps. Their concentrated sweetness and rich colors (especially the cranberries) are perfect for adding depth and additional texture, mimicking small, jewel-like ornaments. They are also fantastic for snacking and balancing the savory elements.
The Ornaments and Sparkle: Finishing Touches for Your Christmas Tree Shaped Charcuterie
You’re almost there! This final stage is about adding the decorative flair, the small details that make your Christmas Tree Shaped Charcuterie truly shine and ensure it’s not only beautiful but also incredibly inviting to eat. Think of these as the ornaments, tinsel, and the star that complete the festive look.
- The Star on Top: Take your pre-selected “star” element – whether it’s a small Brie wheel, a star-shaped cheese, or a festive cracker – and carefully place it at the very peak of your Christmas tree. This is the crowning glory of your magnificent Christmas Tree Shaped Charcuterie! If using a Brie wheel, you might consider gently scoring a star shape into its rind for extra detail, or placing a small edible star on top.
- Arranging Crackers and Breadsticks: While you’ve used some crackers as a base, now it’s time to add the rest. Arrange a variety of crackers around the base of the tree, or even tuck some smaller, sturdy crackers into the tree itself where they can be easily reached. I often place a small stack of various crackers at the bottom of the tree, almost like gifts, allowing guests easy access. Don’t be afraid to fan them out or stand them up for visual interest. The pretzel sticks forming the trunk can also be snacked on, so ensure they are accessible.
- Adding the Nuts: Scatter your candied pecans/walnuts and shelled pistachios into various nooks and crannies of the tree. The nuts add a delightful crunch and a different flavor profile. The vibrant green of pistachios, in particular, looks fantastic against the reds and whites of other ingredients, like miniature festive lights.
- The Shimmer of Pomegranate Arils: This is my secret weapon for a festive sparkle! Gently sprinkle the pomegranate arils over the entire tree. Their glossy, ruby-red jewels truly mimic tiny, glistening ornaments and add a wonderful burst of fresh, tart flavor. This step truly elevates the festive feel of your Christmas Tree Shaped Charcuterie.
- Incorporating Dips and Spreads: Place small, decorative bowls or ramekins near the base of the tree for your fig jam, honey, and mustard. If you have a honey dipper, place it attractively in the honey. These sweet and savory accompaniments are essential for enhancing the flavors of your cheeses and meats. Ensure they are easy for guests to access.
- Final Garnish and Personal Touches:
- If you want an extra touch of magic, a very light dusting of edible glitter (food-safe, of course!) can be gently sprinkled over your tree, making it truly sparkle like fresh snow.
- Consider adding a couple of small, decorative, non-edible elements like tiny pinecones or miniature faux berries around the base of the board if you want to extend the décor beyond the edible components. Just make sure they are clearly distinguishable from the food.
- Take a step back and look at your creation. Are there any empty spots? Any areas that feel a little less festive? You can always tuck in a few more berries, a small sprig of rosemary, or an extra folded salami.
- Serve Immediately for Best Freshness: While a charcuterie board can sit out for a couple of hours, it’s always best enjoyed when the cheeses are at room temperature and the fruits are fresh.
- Presentation Matters: Remember, the beauty of a Christmas Tree Shaped Charcuterie board is in its abundance and artistry. Encourage your guests to dive in and enjoy the feast for both the eyes and the palate. This board isn’t just food; it’s a centerpiece, a conversation starter, and a true holiday delight that you created with care and creativity. Enjoy the festive cheer it brings!

Conclusion:
And there you have it, my friends! We’ve journeyed through the simple yet incredibly impactful steps to create a show-stopping appetizer that will undoubtedly be the star of your next gathering. I truly believe this recipe is a must-try for anyone looking to add a touch of effortless elegance and festive flair to their entertaining arsenal. What makes it so special, you ask? Well, it’s not just about the delicious combination of savory meats, artisanal cheeses, fresh fruits, and crunchy nuts. It’s the visual spectacle, the sheer joy of presenting something so beautifully crafted, yet so surprisingly easy to assemble. This isn’t just food; it’s a conversation starter, a centerpiece that embodies generosity and good taste. It’s perfect for the busy host because it requires no cooking, minimal prep, and allows you to customize it endlessly to suit any preference or dietary need. Imagine the delight on your guests’ faces as they approach this edible masterpiece!
Now, let’s talk about making this culinary creation truly your own. While the core concept of a delightful platter remains, the possibilities for customization are endless. For serving, I love placing this magnificent board right in the center of the table, perhaps alongside a crisp, chilled white wine or a celebratory sparkling cider. It pairs beautifully with a warm, crusty baguette or an assortment of artisanal crackers. Don’t be afraid to add small bowls of honey, fig jam, or a spicy mustard for an extra layer of flavor exploration. As for variations, let your imagination run wild! Consider swapping out the cheddar for a sharp aged gouda, a creamy brie, or even a pungent blue cheese for those who appreciate a bolder flavor profile. Instead of just grapes, try adding vibrant pomegranate seeds, juicy kiwi slices, or an array of colorful berries like raspberries and blueberries for an extra pop of color and sweetness. For the meats, a delicate prosciutto or a spicy soppressata can provide a wonderful counterpoint to the milder flavors. Don’t forget the nuts! Candied pecans or roasted almonds can add a delightful crunch. You could even incorporate some cornichons or marinated olives for a briny touch that cuts through the richness of the cheeses and meats. And while the holiday season naturally lends itself to the delightful shape we’ve explored, remember that the principles of a gorgeous charcuterie board can be applied year-round. Think of a heart shape for Valentine’s Day, a pumpkin for Halloween, or even a simple elegant wreath for a spring brunch. The beauty of this approach is its adaptability.
I cannot stress enough how much joy this recipe brings, both in its creation and its consumption. It’s a wonderful project to undertake alone, perhaps with some festive music playing, or even as a fun activity with family. The collaborative effort of arranging all those delicious components onto a single board is surprisingly therapeutic and rewarding. So, I wholeheartedly encourage you to give this Christmas Tree Shaped Charcuterie board a try. Don’t just admire the pictures; experience the satisfaction of bringing this stunning appetizer to life in your own kitchen. I promise you, the oohs and aahs from your friends and family will make every moment worthwhile. And once you’ve crafted your masterpiece, I would absolutely love to hear about your experience! What variations did you try? What did your guests love the most? Share your stories and perhaps even a picture of your beautiful creation. Let’s spread the joy of delicious, visually stunning, and wonderfully shareable food together. Happy entertaining!
Christmas Tree Shaped Charcuterie Board
Create an unforgettable Christmas Tree Shaped Charcuterie Board, the ultimate showstopper for your holiday gatherings. This visually stunning and utterly delicious platter requires no cooking, just thoughtful arrangement of savory meats, creamy cheeses, crisp crackers, sweet fruits, and crunchy nuts, transforming simple ingredients into a magnificent, edible centerpiece.
Ingredients
-
8 oz Brie cheese wheel
-
4 oz sharp cheddar cheese, cubed or sliced
-
4 oz Monterey Jack cheese, sliced into festive shapes
-
4 oz mild/medium cheddar cheese, cubed or sliced
-
5 oz fresh mozzarella pearls
-
4 oz goat cheese log, crumbled
-
6 oz thinly sliced beef salami or beef soppressata, folded
-
4 oz beef bresaola (air-dried beef), loosely folded
-
3 oz beef pepperoni slices, folded
-
Optional: 3 oz thinly sliced smoked turkey or beef, rolled
-
1 cup red seedless grapes
-
1 cup green seedless grapes
-
1 cup black seedless grapes
-
1/2 cup fresh cranberries
-
1-2 star fruits, sliced
-
1 green kiwi fruit, sliced
-
1 pint fresh raspberries
-
1 pint fresh blackberries
-
6-8 large fresh strawberries, hulled
-
1/2 cup dried fruit mix (e.g., cranberries, cherries)
-
1/4 cup dried apricots, halved
-
1/4 cup pomegranate arils
-
1 celery stalk
-
1/2 cup small cherry or grape tomatoes, halved
-
1/2 cup mixed olives, pitted
-
10 fresh rosemary sprigs
-
Assorted crackers
-
4-5 oz pretzel sticks or breadsticks
-
3-4 tbsp fig jam or apricot preserves
-
2-3 tbsp honey
-
1 cup assorted nuts (e.g., candied pecans, walnuts, roasted pistachios)
Instructions
-
Step 1
Prepare Produce: Wash and thoroughly dry all fruits and vegetables. Hull strawberries, halve some. Halve cherry tomatoes. Pit olives. Slice star fruit and kiwi. Have fresh cranberries ready. -
Step 2
Prepare Cheeses: Keep Brie wheel whole or cut a star shape. Cube/triangle-cut cheddar cheeses. Slice Monterey Jack into festive shapes (stars, snowflakes). Crumble goat cheese. Keep mozzarella pearls whole. -
Step 3
Prepare Meats: Fold beef salami/soppressata into quarters or rosettes. Loosely fold beef bresaola. Fold beef pepperoni slices. Roll smoked turkey/beef if using. -
Step 4
Gather Supplies: Select a large rectangular/oval platter. Have all crackers, spreads, and nuts ready for assembly. -
Step 5
Build the Tree Base: Outline a large triangle on your platter. Place pretzel sticks or breadsticks vertically at the bottom center to form the tree trunk. -
Step 6
First Layer: Begin filling the triangle outline from the bottom up with larger items like cheddar cubes, Monterey Jack slices, and grape clusters. Create a wide, full base, allowing slight overlaps for an organic shape. -
Step 7
Incorporate Meats & Fruits: Gently drape beef bresaola and place larger beef salami rosettes in lower/middle sections. Distribute raspberries, blackberries, and strawberries throughout the tree. -
Step 8
Add Texture & Color: Tuck in folded beef pepperoni, cherry tomatoes, and olives. Scatter mozzarella pearls to mimic snow or white ornaments. -
Step 9
Rosemary “Pine Needles”: Strategically tuck rosemary sprigs into various spots within the tree for a fresh, evergreen look and aromatic touch. -
Step 10
Goat Cheese & Shaped Cheeses: Gently crumble goat cheese in sections. Place star or snowflake-shaped cheese cut-outs in prominent spots for festive accents. -
Step 11
Fill Gaps: Use dried fruit mix, dried apricots, sliced star fruit, and sliced kiwi to fill smaller gaps, adding concentrated sweetness and additional texture. -
Step 12
The Star & Trunk: Place the Brie wheel or a star-shaped cheese/cracker at the very peak of your Christmas tree. Ensure pretzel sticks remain accessible as the trunk. -
Step 13
Final Touches: Scatter assorted nuts (including pistachios if separate) into various nooks and crannies. Sprinkle pomegranate arils over the entire tree for a festive sparkle. -
Step 14
Dips & Crackers: Place small bowls of fig jam/apricot preserves and honey (with a dipper) near the base. Arrange assorted crackers around the tree base, or tuck some into the tree for easy access. -
Step 15
Serve: Serve your stunning Christmas Tree Shaped Charcuterie Board immediately for best freshness and enjoyment!
Important Information
Nutrition Facts (Per Serving)
It is important to consider this information as approximate and not to use it as definitive health advice.
Allergy Information
Please check ingredients for potential allergens and consult a health professional if in doubt.


Leave a Comment