

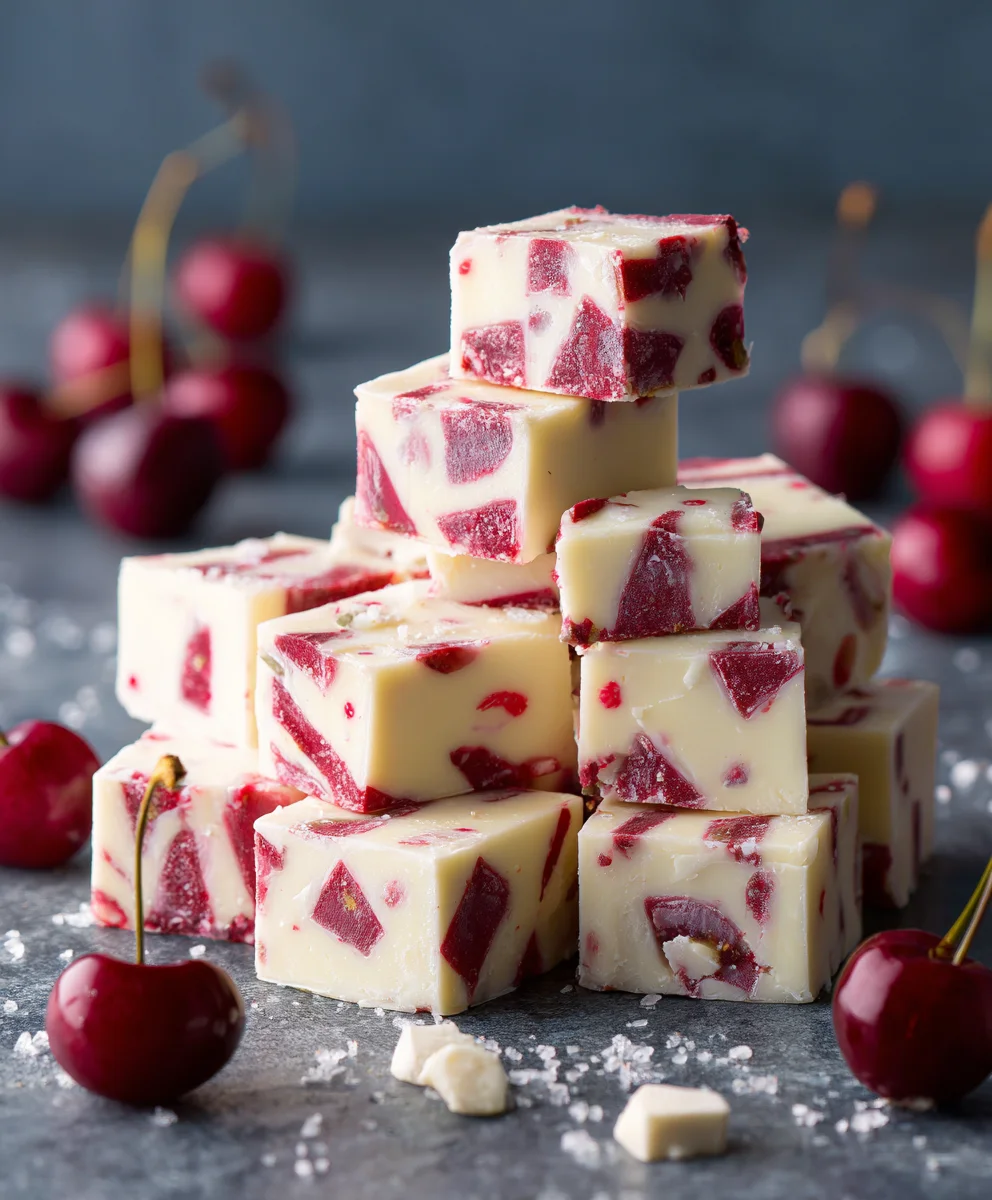
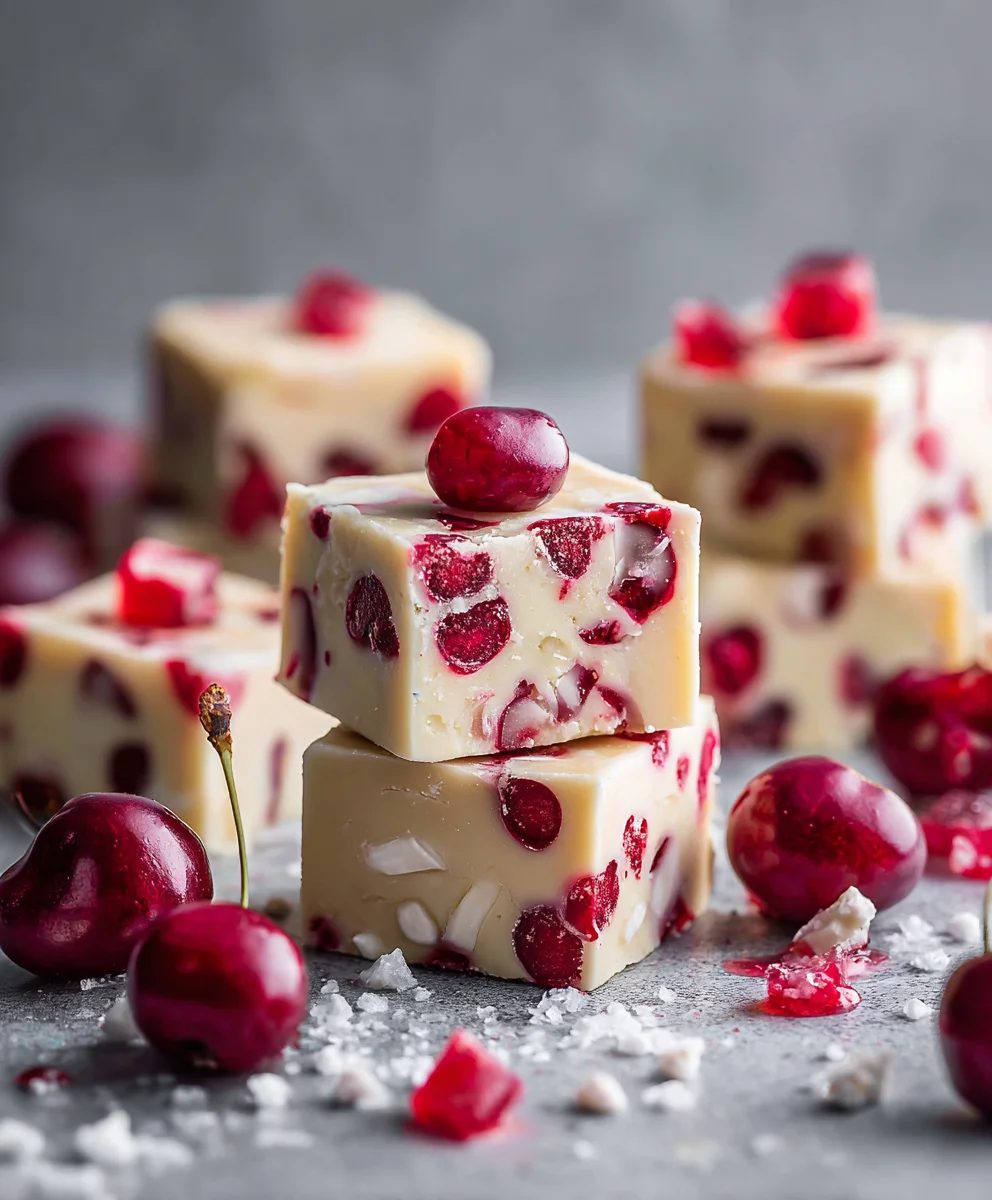
Cherry White Chocolate Fudge is more than just a sweet treat; I believe it’s a celebration in every bite. Imagine a rich, creamy confection, infused with the bright, tangy burst of dried cherries, all perfectly balanced by the smooth, luxurious sweetness of white chocolate. From my earliest memories, fudge has held a special place in our hearts, often associated with holiday festivities, thoughtful homemade gifts, or simply a moment of pure, unadulterated indulgence. While its exact origins are debated, this iconic American dessert has evolved from simple sugar and milk into countless delightful variations, and I find this particular recipe truly stands out.
What makes this particular Cherry White Chocolate Fudge so utterly irresistible? It’s the harmonious dance of flavors and textures that I find so captivating. The delicate tartness of the cherries expertly cuts through the decadence of the white chocolate, preventing it from being overly sweet, while the incredibly smooth and melt-in-your-mouth texture ensures a truly luxurious experience. People adore this dish not only for its exquisite taste but also for its stunning visual appeal, making it, in my opinion, a showstopper at any gathering. Its relative ease of preparation also means you can create a batch of this extraordinary dessert to share with loved ones or keep all to yourself. Prepare to fall in love with this unforgettable combination!
Ingredients:
- 3 cups (about 18 oz or 510g) high-quality white chocolate chips or finely chopped white chocolate baking bars: For that rich, creamy foundation of our Cherry White Chocolate Fudge. Using good quality chocolate truly makes a difference in the final texture and flavor.
- 1 (14 oz or 397g) can full-fat sweetened condensed milk: This is our magic ingredient that helps create that irresistibly smooth and luscious fudge consistency without requiring complex sugar cooking.
- 1/2 cup (1 stick or 113g) unsalted butter: Cut into smaller pieces to help it melt more evenly and quickly. The butter adds richness and a beautiful, silky texture to our Cherry White Chocolate Fudge.
- 1 teaspoon pure vanilla extract: Don’t skip this! Vanilla brightens all the flavors and adds a warm, aromatic depth to the sweet profile.
- 1/4 teaspoon fine sea salt: A tiny pinch of salt is crucial for balancing the sweetness and enhancing the flavors of both the white chocolate and the cherries, making the fudge taste more complex and less cloying.
- 1 cup (about 4-5 oz or 115-140g) dried cherries: Pitted and coarsely chopped if they are very large. Dried cherries provide a concentrated burst of fruity flavor and a lovely chewiness that complements the smooth fudge perfectly. Make sure they are not overly sticky; if they are, you can toss them with a tiny bit of flour before adding.
- 1/2 cup (about 3 oz or 85g) additional white chocolate chips or chunks: These will be folded in at the end to provide delightful little pockets of unmelted white chocolate throughout your Cherry White Chocolate Fudge, adding textural contrast.
- Optional Garnish:
- A sprinkle of flaky sea salt on top for a gourmet touch and extra flavor balance.
- A few whole dried cherries for visual appeal.
- A drizzle of melted dark chocolate for a stunning contrast.
Equipment You’ll Need:
- 8×8 inch (20×20 cm) or 9×9 inch (23×23 cm) square baking pan: An 8×8 inch pan will yield thicker pieces of fudge, while a 9×9 inch pan will result in slightly thinner squares. Either works beautifully for our Cherry White Chocolate Fudge.
- Parchment paper or aluminum foil: Essential for lining your pan, ensuring easy removal and clean cuts of your finished fudge.
- Non-stick cooking spray or a light coating of butter: To help the parchment or foil adhere and further guarantee no sticking.
- Heavy-bottomed saucepan (medium-large size): For melting and combining our fudge ingredients over gentle heat. A heavy bottom helps prevent scorching.
- Heat-proof spatula or wooden spoon: For constant stirring. Silicone spatulas are excellent for scraping the bottom and sides of the pan effectively.
- Measuring cups and spoons: For accurate ingredient proportions.
- Sharp knife: For chopping ingredients and, most importantly, for neatly slicing your set Cherry White Chocolate Fudge.
- Cutting board: For preparing your dried cherries and slicing the fudge.
Preparation – Getting Started:
- Prepare Your Pan: First things first, let’s get our pan ready. Take your 8×8 inch or 9×9 inch square baking pan and line it completely with parchment paper or aluminum foil. Make sure to leave an overhang on two opposite sides. These “handles” will be incredibly helpful for lifting the entire block of Cherry White Chocolate Fudge out of the pan once it’s set. Give the lined pan a light spray with non-stick cooking spray or lightly butter the paper/foil. This step is crucial for effortless removal later on, ensuring your beautiful fudge comes out in one perfect piece. A well-prepared pan makes all the difference when it comes to the finished presentation of your homemade Cherry White Chocolate Fudge.
- Measure and Prep Ingredients: Before you even think about turning on the heat, have all your ingredients measured out and ready to go. This “mise en place” approach is a professional trick that makes the cooking process smoother and less stressful, especially with fudge, which often requires quick action. Measure out your white chocolate chips, sweetened condensed milk, butter (cut into pieces), vanilla extract, and salt. Coarsely chop your dried cherries if they are large, and measure the additional white chocolate chips for folding in later. Having everything at your fingertips means you won’t be scrambling mid-process.
- Understanding Heat Control: For fudge, especially when working with white chocolate, gentle, consistent heat is your best friend. We want to melt our ingredients smoothly without scorching them. Scorched chocolate can seize up, become grainy, or develop an unpleasant flavor. So, be prepared to use low to medium-low heat and to stir constantly. This careful attention to temperature will ensure your Cherry White Chocolate Fudge has that signature silky texture we’re aiming for.
Creating the Cherry White Chocolate Fudge Base:
- Combine Main Ingredients in Saucepan: Place your heavy-bottomed saucepan over low to medium-low heat. Add the 3 cups of high-quality white chocolate chips, the entire can of sweetened condensed milk, and the 1/2 cup (one stick) of unsalted butter (cut into pieces) into the pan. This combination forms the rich and creamy base for our exquisite Cherry White Chocolate Fudge. The key here is low heat and patience.
- Gentle Melting and Constant Stirring: Now, begin to stir the mixture continuously with your heat-proof spatula or wooden spoon. The butter will melt first, followed by the white chocolate chips. As the ingredients warm, they will start to combine and create a thick, glossy mixture. Keep stirring, making sure to scrape the bottom and sides of the pan frequently to prevent any sticking or scorching. This continuous motion also helps to distribute the heat evenly, promoting a smooth, uniform melt. Do not walk away from the pan during this stage! White chocolate can be particularly prone to seizing if overheated or if it comes into contact with even a tiny bit of moisture while melting, so vigilance is paramount. You’re looking for a perfectly smooth, lump-free consistency.
- Reach the Perfect Consistency: Continue stirring and gently heating until all the white chocolate chips are completely melted and the mixture is entirely smooth, shiny, and thick. It should be consistent in color and texture, without any visible lumps of chocolate or separate butter. This process typically takes about 5-10 minutes, depending on your stove and the size of your pan. Once it reaches this beautifully smooth, flowing, and glossy stage, immediately remove the saucepan from the heat. Overcooking at this point can lead to a grainy or overly stiff fudge. We want that melt-in-your-mouth experience for our Cherry White Chocolate Fudge.
Adding the Flavorful Elements:
- Incorporate Vanilla and Salt: Once the saucepan is off the heat, stir in the 1 teaspoon of pure vanilla extract and the 1/4 teaspoon of fine sea salt. These ingredients are vital. The vanilla adds a fragrant, warm depth that complements the sweetness of the white chocolate and brightens the overall flavor profile. The salt, though a small amount, is incredibly important for balancing the richness and sweetness, preventing the fudge from being overwhelmingly sugary and enhancing all the other flavors. Stir these in thoroughly until they are completely combined and evenly distributed throughout the white chocolate base. You’ll notice the aroma intensifying beautifully.
- Fold in Dried Cherries: Now, it’s time to introduce the star fruit of our Cherry White Chocolate Fudge! Add the 1 cup of dried cherries (coarsely chopped if needed) to the warm fudge mixture. Gently fold them in with your spatula, making sure they are evenly distributed throughout the fudge. We want every bite to have a lovely burst of sweet-tart cherry. The warmth of the fudge will soften the cherries slightly, making them even more delightful. Don’t overmix; just enough to ensure they are well dispersed.
- Add Additional White Chocolate Chips for Texture: Finally, add the 1/2 cup of additional white chocolate chips or chunks. Gently fold these into the mixture as well. These extra chips won’t fully melt into the warm fudge base; instead, they will remain as delightful, creamy pockets of white chocolate, adding another layer of texture and visual appeal to your Cherry White Chocolate Fudge. This creates a wonderful contrast between the smooth fudge and the slightly firmer chocolate pieces. The key is to fold them in just before pouring to preserve their shape.
Setting and Cooling the Cherry White Chocolate Fudge:
- Pour into Prepared Pan: Once all your wonderful flavors and textures are incorporated into the fudge base, immediately pour the warm mixture into your parchment-lined and lightly greased 8×8 or 9×9 inch baking pan. Use your spatula to scrape every last bit of that delicious Cherry White Chocolate Fudge from the saucepan – no one wants to leave any behind!
- Evenly Spread and Smooth the Surface: Use your spatula or the back of a spoon to gently spread the fudge evenly into all corners of the pan. Work quickly but carefully, ensuring the top surface is as smooth and level as possible. You can lightly tap the pan on your counter a couple of times to release any trapped air bubbles and help the fudge settle. For an extra polished look, you can gently run an offset spatula over the top. If desired, now is the time to add any optional garnishes like a sprinkle of flaky sea salt or a few whole dried cherries on top for visual appeal and an extra flavor kick.
- Initial Cooling at Room Temperature: Allow the pan of fudge to sit at room temperature for about 15-30 minutes. This initial cooling period helps it to firm up slightly before moving it to the refrigerator, preventing condensation from forming on the surface which could affect its texture.
- Chill to Set Completely: Once slightly cooled, transfer the pan of Cherry White Chocolate Fudge to the refrigerator. Allow it to chill for at least 2-4 hours, or preferably until it is completely firm. The longer it chills, the easier it will be to cut into clean, neat squares. Patience here is truly a virtue! Rushing this step will result in soft, messy pieces that won’t hold their shape well. You want it to be solid all the way through.
- Remove from Pan and Cut: Once the fudge is thoroughly chilled and firm, use the parchment paper or foil overhangs to carefully lift the entire block of Cherry White Chocolate Fudge out of the pan and onto a clean cutting board. This is where your foresight in lining the pan pays off! Using a sharp knife, carefully cut the fudge into desired square or rectangular pieces. For the cleanest cuts, wipe your knife clean with a damp cloth between each slice, especially after the first few cuts. I usually aim for 1-inch to 1.5-inch squares, but you can go bigger or smaller depending on your preference. These bite-sized pieces are perfect for sharing or savoring on your own.
Storage and Serving Suggestions:
- Proper Storage: To maintain the freshness and delightful texture of your Cherry White Chocolate Fudge, store it in an airtight container at room temperature for up to 1 week, or in the refrigerator for up to 2-3 weeks. If storing in the refrigerator, you might find that the fudge becomes quite firm. Simply let it sit at room temperature for 15-30 minutes before serving to allow it to soften slightly, bringing it back to that perfectly tender, chewy consistency. If stacking pieces, you can place small squares of parchment paper between layers to prevent them from sticking together.
- Freezing for Longer Storage: If you’ve made a large batch or want to prepare ahead, Cherry White Chocolate Fudge freezes beautifully! Wrap individual pieces or small blocks tightly in plastic wrap, then place them in an airtight, freezer-safe container or freezer bag. It can be stored in the freezer for up to 2-3 months. When you’re ready to enjoy, simply transfer the frozen fudge to the refrigerator overnight or let it thaw at room temperature for a few hours.
- Serving Suggestions:
- As a Sweet Treat: This fudge is perfect on its own as an after-dinner treat, a coffee break indulgence, or a midday pick-me-up. The rich white chocolate and tart cherries create a satisfying flavor profile that’s hard to resist.
- Gift Giving: Homemade Cherry White Chocolate Fudge makes an absolutely delightful and thoughtful gift! Arrange the cut pieces in a pretty box, perhaps lined with tissue paper, and tie it with a festive ribbon. It’s perfect for holidays, hostess gifts, or just to show someone you care.
- Dessert Platter Addition: Include this vibrant fudge on a dessert platter alongside other confections like cookies, truffles, or other types of fudge for an impressive spread. Its distinct color and flavor will stand out.
- With Coffee or Tea: The creamy texture and sweet-tart notes of the fudge pair wonderfully with a hot cup of coffee, espresso, or your favorite tea. It’s a match made in heaven for a cozy afternoon.
- Warm Option (Carefully!): While typically enjoyed at room temperature or chilled, a very slight, quick zap in the microwave (just a few seconds!) can make the fudge slightly gooey and warm, enhancing its aroma. Be very careful not to overheat, or it will melt completely. This is a delightful way to experience the fudge on a chilly evening.
Tips for Perfect Cherry White Chocolate Fudge:
- Quality of Ingredients Matters: Since there are so few ingredients, the quality of each one really shines through. Use good quality white chocolate chips or baking bars. High-quality chocolate melts more smoothly and tastes better. Similarly, full-fat sweetened condensed milk is essential for the correct texture.
- Don’t Overcook: The moment the mixture is smooth and fully combined, remove it from the heat. Continuing to cook will result in a grainy or crumbly fudge, which is not what we want for our luscious Cherry White Chocolate Fudge.
- Constant Stirring: This cannot be stressed enough, especially when melting the white chocolate. Constant stirring on low heat prevents scorching and ensures a homogenous, silky smooth texture.
- Patience During Setting: Resist the urge to cut the fudge before it’s fully set. Chilling for the recommended time (or even longer) ensures clean, sharp cuts and a firm texture.
- Clean Knife for Cutting: For perfectly neat squares, wipe your knife with a damp cloth or rinse it under hot water and dry it between each cut. This prevents the fudge from sticking to the knife and dragging, resulting in cleaner edges.
- Variations for Your Cherry White Chocolate Fudge:
- Nutty Twist: For added crunch and flavor, consider folding in 1/2 cup of toasted chopped pecans, walnuts, or pistachios along with the dried cherries. The nutty notes would be a fantastic complement.
- Citrus Brightness: A teaspoon of finely grated orange or lemon zest folded in at the end would add a wonderful, bright counterpoint to the sweetness of the white chocolate and cherries.
- Spiced Delight: A tiny pinch of ground cardamom or cinnamon could add an unexpected warmth and depth, especially lovely during colder months.
- Dark Chocolate Swirl: For a visually striking and flavor-rich variation, melt 1/4 cup of dark chocolate chips and drizzle it over the poured fudge before chilling. Use a skewer or knife to gently swirl it through for a marbled effect. This creates a beautiful “Black Forest” inspired Cherry White Chocolate Fudge.
- Different Dried Fruits: While cherries are classic, feel free to experiment with other dried fruits like cranberries, blueberries, or even finely chopped dried apricots for a different flavor profile.
- Extract Exploration: Instead of or in addition to vanilla, a few drops of almond extract would beautifully highlight the cherry flavor, giving it a marzipan-like nuance. Be cautious with extracts; a little goes a long way!
- Prevent Sticking When Storing: If stacking multiple layers of fudge in an airtight container, always place a piece of parchment or wax paper between the layers to prevent them from sticking together. This makes serving much easier.
- Humidity Considerations: Fudge can be sensitive to humidity. On very humid days, it might take longer to set, or have a slightly softer texture. While you can’t control the weather, ensuring it chills thoroughly in the refrigerator helps mitigate this.
This Cherry White Chocolate Fudge recipe is truly a winner. It’s simple enough for beginners but yields a gourmet-quality treat that everyone will adore. Enjoy the process of creating this delightful confectionery, and prepare to impress your friends and family with its exquisite taste and texture!
Conclusion:
Well, my friends, we’ve reached the sweet end of our journey, and I genuinely hope you’re as excited as I am about what we’ve just discussed. This isn’t just another fudge recipe; it’s a vibrant symphony of flavors and textures that truly stands out from the crowd. The moment you taste the creamy, melt-in-your-mouth goodness of this Cherry White Chocolate Fudge, you’ll instantly understand why I’m so passionate about sharing it with you. It’s that perfect, harmonious balance of the rich, velvety sweetness of white chocolate meeting the bright, tangy burst of dried cherries, all enveloped in a luxuriously smooth confection. I promise you, making this fudge isn’t just about following steps; it’s about crafting an experience, a little slice of heaven that’s surprisingly easy to achieve, even for those who might typically feel a bit daunted by candy making. The visual appeal alone, with those gorgeous ruby red cherries peeking through the pristine white, makes it an absolute showstopper on any dessert table. It’s a guaranteed crowd-pleaser, perfect for gifting, entertaining, or simply treating yourself to something truly special after a long day. This recipe truly delivers on flavor, texture, and ease, making it an absolute must-try for any dessert lover.
But the adventure doesn’t stop once your beautiful batch of fudge is perfectly set and ready to be enjoyed. Oh no, the possibilities for serving and savoring this delectable creation are delightfully endless! While a simple square, perhaps enjoyed alongside a freshly brewed cup of coffee or a soothing herbal tea, is pure bliss in itself, let’s explore some other fantastic ways to serve and truly appreciate this treat. Imagine crumbling a few pieces over a scoop of premium vanilla bean ice cream for an instant gourmet sundae experience, or cutting it into tiny, jewel-like cubes and gently folding it into a homemade granola mix for a delightful morning surprise that feels incredibly indulgent. For a truly elegant presentation, especially if you’re hosting, arrange a few pieces on a small dessert platter alongside some fresh raspberries or a delicate sprig of mint. It also makes for an incredible edible gift; simply wrap individual pieces in wax paper, tie them with a pretty ribbon, and watch the smiles light up on the faces of your loved ones when they receive this thoughtful, homemade delight.
Get Creative with Your Cherry White Chocolate Fudge!
And for those of you who love to experiment and put your own signature spin on recipes in the kitchen, this fudge recipe is a wonderful canvas for your culinary artistry. Don’t hesitate to play around with variations to make it uniquely yours. Want to add a delightful bit of crunch and a contrasting texture? Try stirring in a handful of finely chopped pistachios, toasted almonds, or even candied pecans along with the cherries. The nutty texture and earthy flavor would complement the creamy fudge beautifully. For a deeper, more aromatic flavor profile, consider adding just a tiny pinch of ground cardamom or a whisper of almond extract instead of, or in addition to, the vanilla – these subtle changes can introduce fascinating new dimensions. If you’re feeling particularly adventurous, you could even swirl a small amount of melted dark or milk chocolate into the fudge just before it sets, creating a stunning marbled effect that’s as beautiful to look at as it is delicious to eat. Or, perhaps, try substituting a different dried fruit; dried cranberries would offer a similar tartness, while finely diced candied orange peel could introduce a lovely citrusy note. The beauty of homemade fudge is its inherent adaptability, allowing you to tailor it precisely to your taste preferences or to perfectly suit the occasion.
Your Turn to Shine!
Now, I’ve shared all my tips and tricks, my enthusiasm, and my absolute conviction that this fudge will bring a huge amount of joy to your kitchen and your taste buds. The only thing left to do is for you to give this amazing recipe a try for yourself. I truly believe that once you experience the incredible ease of making it and the sheer delight of tasting it, this incredible Cherry White Chocolate Fudge will quickly become a cherished staple in your recipe collection. So, gather your ingredients, set aside some time for a little culinary creativity, and dive in! And please, please, please, don’t keep your successes a secret. I absolutely adore seeing your creations! Once your fudge is cooled, perfectly cut, and ready to be devoured, please snap a photo and share your experience with me. Tag me on social media, leave a comment below – I want to hear all about your fudge-making adventure, your favorite serving suggestions, and any brilliant variations you came up with. Your feedback, your shared experiences, and your culinary triumphs are what make this community so wonderfully vibrant and inspiring. Happy fudging, everyone!
Decadent Cherry White Chocolate Fudge: Easy No-Bake Treat
Cherry White Chocolate Fudge is a rich, creamy, no-bake confection with the bright, tangy burst of dried cherries balanced by smooth, sweet white chocolate. This easy-to-make dessert is perfect for holidays, gifts, or a special treat, offering a luxurious melt-in-your-mouth texture and stunning visual appeal.
Ingredients
-
3 cups (18 oz/510g) white chocolate chips or chopped white chocolate
-
1 (14 oz/397g) can sweetened condensed milk
-
1/2 cup (1 stick/113g) unsalted butter, cut into pieces
-
1 teaspoon vanilla extract
-
1/4 teaspoon fine sea salt
-
1 cup (4-5 oz/115-140g) dried cherries, pitted & chopped
-
1/2 cup (3 oz/85g) extra white chocolate chips or chunks
Instructions
-
Step 1
Line an 8×8 or 9×9 inch baking pan with parchment paper, leaving an overhang on two sides. Lightly spray or butter the paper. Measure all ingredients and chop dried cherries if large. Prepare to use low to medium-low heat for melting and stir constantly. -
Step 2
In a heavy-bottomed saucepan over low to medium-low heat, combine 3 cups white chocolate chips, the entire can of sweetened condensed milk, and 1/2 cup unsalted butter. Stir continuously for 5-10 minutes until the mixture is completely smooth, shiny, and thick. Immediately remove from heat. -
Step 3
Off the heat, stir in 1 teaspoon vanilla extract and 1/4 teaspoon fine sea salt until thoroughly combined. Gently fold in 1 cup dried cherries and 1/2 cup additional white chocolate chips or chunks until evenly distributed. -
Step 4
Pour the warm fudge mixture into the prepared pan. Spread evenly and smooth the surface with a spatula. Optionally, sprinkle with flaky sea salt or a few whole dried cherries. Let cool at room temperature for 15-30 minutes, then transfer to the refrigerator and chill for 2-4 hours, or until completely firm. -
Step 5
Once firm, use the parchment overhangs to lift the fudge block from the pan onto a cutting board. Using a sharp knife, cut the fudge into desired 1 to 1.5-inch squares. For clean cuts, wipe the knife clean with a damp cloth between slices. Store in an airtight container.
Important Information
Nutrition Facts (Per Serving)
It is important to consider this information as approximate and not to use it as definitive health advice.
Allergy Information
Please check ingredients for potential allergens and consult a health professional if in doubt.


Leave a Comment