

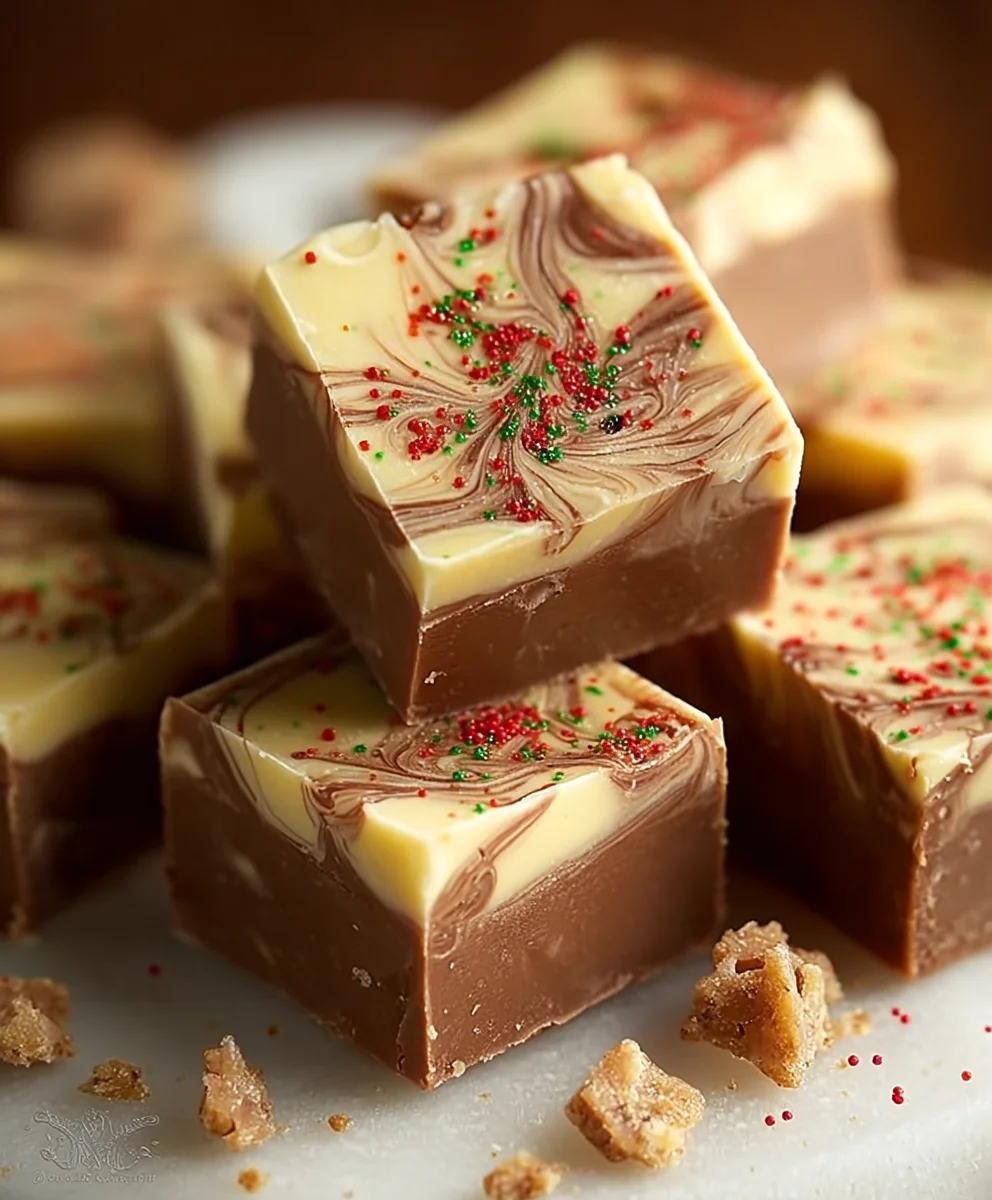
Christmas Fudge: The quintessential holiday treat that conjures up visions of cozy evenings, twinkling lights, and the joyous spirit of the season! This isn’t just any candy; it’s a warm hug in edible form, a nostalgic reminder of childhood holidays and the love poured into every batch. What truly makes Christmas Fudge so beloved is its incredible versatility and that melt-in-your-mouth texture that’s both decadent and utterly satisfying. Whether it’s the classic creamy chocolate, the vibrant red and green swirl, or a sprinkle of festive toppings, this confection always manages to steal the show. I find that the secret to truly exceptional Christmas Fudge lies in the quality of ingredients and a little bit of patience, ensuring that every bite delivers that perfect, rich flavor and smooth consistency that has become synonymous with holiday indulgence for generations. Get ready to create some magic in your kitchen!
Ingredients:
- 3 cups white chocolate chips
- 1 (14-ounce) can sweetened condensed milk
- 1/2 teaspoon vanilla extract
- Red food coloring
- Green food coloring
- 1/4 cup holiday sprinkles (optional for decoration)
Preparing Your Christmas Fudge Base
The foundation of our delightful Christmas Fudge is surprisingly simple, relying on just a few key ingredients to create that classic creamy texture and sweet vanilla flavor. First, gather your 3 cups of white chocolate chips. These will melt down to form the smooth, luscious base of our fudge. Next, you’ll need one 14-ounce can of sweetened condensed milk. This is crucial for achieving that signature melt-in-your-mouth consistency and rich sweetness. Don’t forget the 1/2 teaspoon of vanilla extract; this little addition elevates the flavor profile, adding a warm, comforting aroma and taste that is essential for any good fudge. Finally, we’ll bring in the festive colors: red food coloring and green food coloring. These are what will transform our plain white fudge into a vibrant, holiday-ready treat. If you’re feeling extra decorative, have your 1/4 cup of holiday sprinkles ready to go.
Melting and Mixing the Fudge
This is where the magic starts to happen! In a medium, microwave-safe bowl, combine the 3 cups of white chocolate chips with the entire 14-ounce can of sweetened condensed milk. You want to ensure the condensed milk is evenly distributed amongst the chips. Now, for the melting process. Microwave this mixture in 30-second intervals, stirring thoroughly after each interval. It’s important not to overheat the white chocolate, as it can seize and become grainy. You’re looking for a smooth, glossy, and completely melted consistency. This usually takes about 2 to 4 minutes of microwaving, depending on your microwave’s power. Be patient and stir well between each heating burst. Once melted and beautifully smooth, stir in the 1/2 teaspoon of vanilla extract until fully incorporated. The aroma at this stage is already wonderfully sweet and inviting!
Dividing and Coloring the Fudge
Now it’s time to inject some serious holiday cheer into our Christmas Fudge! Once your fudge base is perfectly smooth and fragrant, divide it into two equal portions. You can eyeball this or use a kitchen scale for ultimate precision. Place one portion into a separate, clean bowl. To the first portion, add just a few drops of red food coloring. Start with a small amount, as food coloring can be quite potent, and you can always add more to achieve your desired shade of red. Stir this portion vigorously until the color is uniform and vibrant. Next, take the second portion of fudge and add a few drops of green food coloring. Again, begin with a small amount and gradually add more until you achieve a beautiful, festive green. Ensure you stir each color thoroughly to avoid any streaks or patches. The goal is to have two distinct, jewel-toned masses of fudge.
Layering and Swirling the Christmas Colors
This is where we create the stunning marbled effect that makes this Christmas Fudge so visually appealing. Take an 8×8 inch baking pan and line it with parchment paper, leaving some overhang on the sides. This will make it incredibly easy to lift the finished fudge out later. Spoon dollops of the red fudge mixture randomly over the bottom of the prepared pan. Then, spoon dollops of the green fudge mixture in between the red dollops. You don’t need to be neat about this; in fact, a bit of haphazardness will contribute to a more natural swirl. Once both colors are in the pan, take a butter knife or a toothpick and gently swirl the two colors together. Be careful not to over-mix, as this can muddy the colors. You’re aiming for distinct ribbons and swirls of red and green, reminiscent of festive candy canes or a cozy winter blanket.
Adding the Finishing Touches and Chilling
Once you’re happy with the marbled design of your Christmas Fudge, it’s time for the final decorative flourish. If you’re using them, sprinkle the 1/4 cup of holiday sprinkles evenly over the top of the swirled fudge. Gently press them down slightly with your fingertips or the back of a spoon so they adhere to the surface. This adds a delightful crunch and an extra burst of festive visual appeal. Now, cover the pan tightly with plastic wrap or foil, ensuring the sprinkles are protected. Place the pan in the refrigerator and let the fudge chill for at least 2 to 4 hours, or preferably overnight. This chilling period is crucial for the fudge to set properly and develop its firm yet yielding texture. Rushing this step will result in soft, unmanageable fudge.
Cutting and Serving Your Festive Treat
After the fudge has thoroughly chilled and set, it’s time to unveil your masterpiece! Lift the entire block of fudge out of the pan using the parchment paper overhang. Place it on a clean cutting board. Use a sharp knife to cut the fudge into bite-sized squares. For cleaner cuts, you can gently warm the blade of your knife under hot water and wipe it dry before each cut, especially if the fudge is very firm. Arrange your beautiful Christmas Fudge on a festive platter and prepare for rave reviews! This homemade Christmas Fudge is perfect for holiday gatherings, cookie exchanges, or as a sweet edible gift for friends and family. Enjoy the fruits of your labor!

Conclusion:
And there you have it! This easy recipe for Christmas Fudge is sure to become a holiday staple in your kitchen. We’ve covered everything from the simple ingredient list to the foolproof melting and setting techniques. The rich, creamy texture and irresistible flavor are perfect for gifting, holiday parties, or simply enjoying with a warm cup of cocoa by the fire. Don’t be afraid to get creative with the toppings and mix-ins; this recipe is incredibly forgiving and lends itself beautifully to personalization.
Consider serving this delightful Christmas Fudge alongside other festive treats like shortbread or gingerbread cookies. For variations, you can easily swap out the chocolate chips for dark chocolate, milk chocolate, or even white chocolate. Adding a hint of peppermint extract or a swirl of caramel can elevate the flavor profile even further. If you’re feeling adventurous, try folding in some chopped nuts like pecans or walnuts for added crunch.
We genuinely hope you enjoy making and sharing this festive confection. It’s a wonderful way to spread some holiday cheer and create delicious memories. So, gather your ingredients, put on some festive music, and get ready to whip up some magic!
Frequently Asked Questions:
Why is my fudge not setting?
This is often due to incorrect temperature or moisture. Ensure your sugar mixture reaches the right temperature (soft-ball stage is ideal for traditional fudge, though this recipe is more forgiving). Also, avoid adding too many wet ingredients or working in a very humid environment, as this can prevent proper setting.
Can I make this Christmas Fudge ahead of time?
Absolutely! Christmas Fudge stores exceptionally well. Once fully set and cut, store it in an airtight container at room temperature for up to two weeks. This makes it a perfect make-ahead option for busy holiday seasons.
What are some other topping ideas for this fudge?
Beyond the classic sprinkles and nuts, consider a drizzle of white chocolate, crushed candy canes for a festive crunch, or even a dusting of edible glitter for an extra sparkle. A sprinkle of sea salt can also beautifully balance the sweetness.
Easy Christmas Fudge Recipe – Melt-in-Your-Mouth Bliss
A simple and delicious melt-in-your-mouth Christmas fudge recipe with festive red and green swirls and optional holiday sprinkles.
Ingredients
-
3 cups white chocolate chips
-
1 (14-ounce) can sweetened condensed milk
-
1/2 teaspoon vanilla extract
-
Red food coloring
-
Green food coloring
-
1/4 cup holiday sprinkles (optional for decoration)
Instructions
-
Step 1
In a medium, microwave-safe bowl, combine the white chocolate chips and sweetened condensed milk. Microwave in 30-second intervals, stirring after each, until smooth and glossy. Stir in the vanilla extract. -
Step 2
Divide the fudge base into two equal portions. Add a few drops of red food coloring to one portion and stir until uniform. Add a few drops of green food coloring to the second portion and stir until uniform. -
Step 3
Line an 8×8 inch baking pan with parchment paper. Spoon dollops of red and green fudge randomly into the pan, alternating colors. -
Step 4
Gently swirl the two colors together with a butter knife or toothpick, being careful not to over-mix. Sprinkle with holiday sprinkles if using, and gently press them in. -
Step 5
Cover the pan tightly and refrigerate for at least 2 to 4 hours, or preferably overnight, until the fudge is set. -
Step 6
Lift the fudge out of the pan using the parchment paper. Cut into bite-sized squares and serve.
Important Information
Nutrition Facts (Per Serving)
It is important to consider this information as approximate and not to use it as definitive health advice.
Allergy Information
Please check ingredients for potential allergens and consult a health professional if in doubt.

Leave a Comment