

Mini Cannoli Cups bring the magic of Italy right into your kitchen, scnon-alcoholic aled down into perfectly poppable delights! Who can resist the allure of a crisp, golden shell cradling a sweet, creamy ricotta filling? These delightful little treats are more than just dessert; they’re a miniature celebration of flavor and texture, a tiny parcel of pure joy. Unlike their larger counterparts, mini cannoli cups are incredibly versatile and approachable for home bakers, making that authentic Italian experience accessible to everyone. Their petite size makes them perfect for parties, a sweet afternoon pick-me-up, or simply when you crave that irresistible cannoli taste without the commitment of a full-sized pastry. Get ready to fall in love with these bite-sized wonders!
Mini Cannoli Cups
There’s something undeniably charming about mini desserts. They’re perfectly portioned, undeniably cute, and make entertaining a breeze. Today, we’re taking a beloved Italian classic, the cannoli, and transforming it into an approachable and utterly delightful mini cannoli cup. Forget the fuss of rolling and frying traditional cannoli shells; these little wonders utilize store-bought pie crusts for an incredibly easy shortcut. The result is a sweet, crispy shell filled with a rich, creamy ricotta filling, all ready to impress your guests or simply treat yourself.
These mini cannoli cups are perfect for parties, holiday gatherings, or anytime you crave a taste of Italy without the intensive preparation. The beauty of this recipe lies in its adaptability. You can customize the filling with different extracts or add a splash of liqueur extract for an adult twist. The topping is also open to your creativity – think mini chocolate chips, chopped pistachios, or even a dusting of cocoa powder. Let’s dive into creating these delightful treats!
Ingredients:
Preparing the Ricotta Filling
The heart of any cannoli is its luscious filling. For our mini versions, we’re keeping it classic and simple. The key to a truly excellent ricotta filling is to ensure your ricotta is well-drained. Excess liquid can make the filling too runny and less delightful. You can drain it by placing the ricotta in a fine-mesh sieve lined with cheesecloth or a coffee filter, and letting it sit over a bowl for at least an hour, or even overnight in the refrigerator. This step is crucial for achieving that perfect, thick, and creamy texture.
Once your ricotta is properly drained, we’ll combine it with a few simple ingredients to create that signature sweet and fragrant filling. In a medium bowl, combine the drained whole-milk ricotta cheese with the powdered sugar and granulated sugar. The powdered sugar provides sweetness and a smooth texture, while the granulated sugar adds a subtle crunch. Next, we’ll incorporate the zest of either an orange or a lemon. I personally love the bright, citrusy notes from orange zest, but lemon zest offers a zesty tang that is equally delicious. Whichever you choose, ensure it’s finely grated to distribute its flavor evenly. Finally, add the vanilla extract for that classic comforting aroma and flavor. Mix everything together until it’s smooth and well combined. It’s important not to overmix at this stage, but you want to ensure all the ingredients are thoroughly incorporated. Cover the bowl and refrigerate this delicious filling while you prepare the pastry cups. This allows the flavors to meld beautifully.
Creating the Crispy Cups
Now for the fun part – transforming store-bought pie crusts into edible cups! This is where the magic of our shortcut really shines. Preheat your oven to 375°F (190°C). You’ll need mini muffin tins for this recipe. Lightly grease your mini muffin tins to ensure the pastry cups don’t stick.
Unroll the softened refrigerated pie crusts onto a lightly floured surface. Using a round cookie cutter that is slightly larger than the opening of your mini muffin cups, cut out as many circles as possible from each pie crust. You should be able to get about 10-12 circles from each crust, depending on the size of your cutter. Carefully press each circle of dough into the bottom and up the sides of the mini muffin cups, creating little pastry shells. It’s important to press them gently to avoid tearing the dough. If any tears occur, you can pinch them back together.
Baking and Topping the Cups
Once your mini muffin tins are filled with the pie crust dough, it’s time to bake them until they’re golden brown and beautifully crisp. Place the filled muffin tins onto a baking sheet. This makes it easier to transfer them in and out of the oven and catches any potential drips. Bake for 10-12 minutes, or until the edges are golden brown and the pastry is cooked through. Keep a close eye on them as they can brown quickly.
While the cups are baking, let’s prepare the cinnamon-sugar coating for the rims. In a small bowl, combine the turbinado sugar and ground cinnamon. This mixture will add a delightful spiced crunch and visual appeal to the finished cannoli cups.
After baking, carefully remove the mini muffin tins from the oven. Let the pastry cups cool in the tins for about 5 minutes before gently inverting them onto a wire rack to cool completely. This cooling period is essential; trying to fill warm cups will result in a melted filling and a less appealing presentation.
Assembling the Mini Cannoli Cups
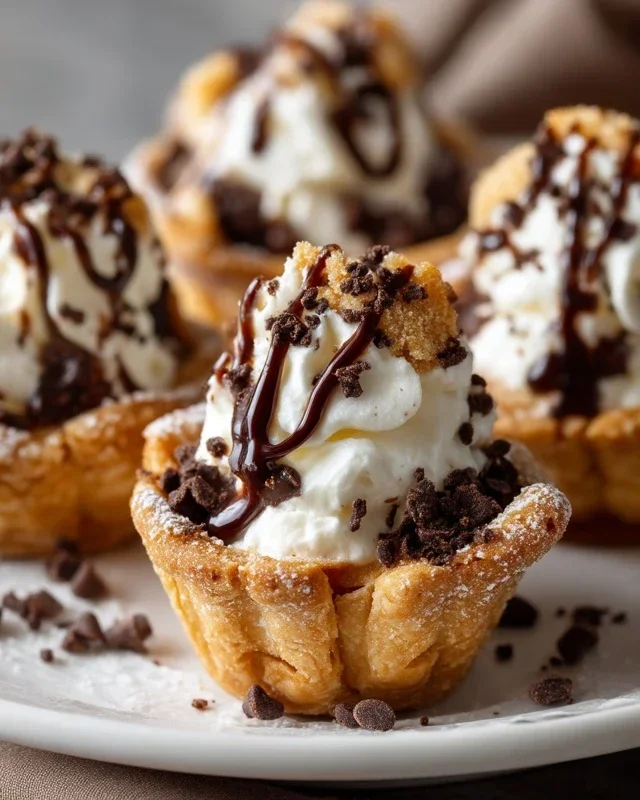
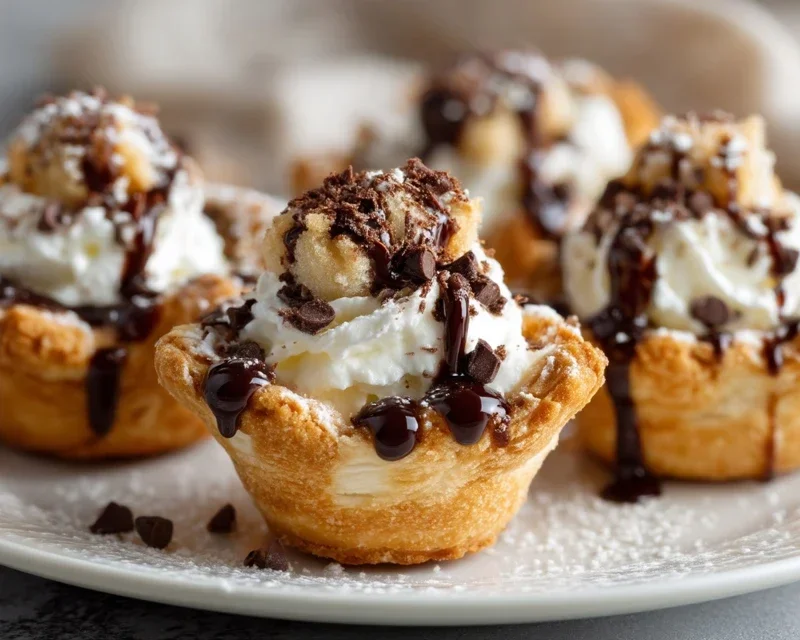
Once the pastry cups are completely cool, it’s time for the grand finnon-alcoholic ale: filling and decorating! This is the most satisfying step, where all your hard work comes together. Retrieve your chilled ricotta filling from the refrigerator. You can use a spoon to fill the cups, but for a more professional and neat finish, I highly recommend using a piping bag fitted with a plain round tip. Fill the piping bag with the ricotta mixture and pipe it into each cooled pastry cup. Aim to fill them generously but avoid overstuffing them to the point where the filling spills out.
Finally, it’s time to add those finishing touches. Dip the tops of the filled cannoli cups into the miniature chocolate chips or finely chopped pistachios. If you don’t have a piping bag, you can simply spoon the filling into the cups and then gently press the chocolate chips or pistachios onto the filling. For an extra touch of elegance and a classic cannoli look, you can dust the tops of the filled cups with a little additional powdered sugar just before serving. This final dusting adds a beautiful, snowy finish that truly completes the presentation. Enjoy these delightful mini cannoli cups immediately for the best texture, or store any leftovers in an airtight container in the refrigerator.
Conclusion:
These mini cannoli cups are an absolute delight, offering all the classic, irresistible flavors of traditional cannoli in a perfectly portioned, easy-to-eat format. The crunchy, golden pastry shells, paired with the creamy, sweet ricotta filling, create a taste sensation that’s both elegant and incredibly satisfying. Whether you’re a seasoned baker or just starting out, this recipe is surprisingly accessible and yields impressive results, making it perfect for parties, holidays, or simply as a special treat for yourself and loved ones. Don’t be intimidated by the idea of making your own cannoli; these mini versions simplify the process beautifully.
I love serving these mini cannoli cups as individual desserts, adding a festive touch to any gathering. They are fantastic alongside a cup of coffee or espresso, and even better when shared. For variations, consider adding a touch of orange zest to the ricotta filling for a brighter citrus note, or a tablespoon of miniature chocolate chips for an extra chocolatey crunch. You could also dust them with a bit of cocoa powder for a darker, richer appearance. I truly encourage you to give these mini cannoli cups a try. They are a guaranteed crowd-pleaser and a wonderfully rewarding baking project!
Frequently Asked Questions:
Can I make the cannoli shells ahead of time?
Yes, absolutely! You can bake the cannoli shells up to two days in advance and store them in an airtight container at room temperature once completely cooled. It’s best to fill them just before serving to maintain their crispness.
What if I don’t have mini cannoli forms?
No problem! You can shape your dough into small rings using small cookie cutters or even just roll them into small discs and carefully press them around the handle of a wooden spoon or a greased dowel rod. Just ensure they hold their shape while frying.
How long will the filled mini cannoli cups last?
Filled mini cannoli cups are best enjoyed within a few hours of being assembled. The filling will soften the shells over time, so for optimal texture, assemble them as close to serving as possible.
Mini Cannoli Cups
Delightful mini cannoli cups featuring a creamy ricotta filling and a crisp, cinnamon-sugar crust. Perfect for parties and a fun twist on a classic Italian dessert.
Ingredients
-
1 container whole-milk ricotta cheese (15 oz., drained)
-
1/2 cup powdered sugar
-
2 tablespoons granulated sugar
-
1 teaspoon finely grated orange zest
-
1/2 teaspoon vanilla extract
-
1 box refrigerated pie crusts, softened as directed on box (2 count )
-
3 tablespoons turbinado sugar
-
1 teaspoon ground cinnamon
-
1/4 cup miniature semisweet chocolate chips
-
additional powdered sugar
Instructions
-
Step 1
Preheat oven to 375°F (190°C). Grease and flour mini muffin tins. -
Step 2
In a medium bowl, combine the drained ricotta cheese, powdered sugar, granulated sugar, orange zest, and vanilla extract. Stir until smooth and well combined. Stir in chocolate chips. -
Step 3
Unroll the pie crusts. Cut each crust into 6 equal rounds using a biscuit or cookie cutter. Press each round into the greased mini muffin cups, forming a shell. -
Step 4
Bake for 10-12 minutes, or until golden brown and crisp. -
Step 5
While the crusts are still warm, carefully remove them from the muffin tins. Let cool completely on a wire rack. -
Step 6
In a small bowl, combine the turbinado sugar and ground cinnamon. Roll the edges of the cooled cannoli cups in the cinnamon-sugar mixture. -
Step 7
Spoon or pipe the ricotta filling into the cooled cannoli cups. Dust with additional powdered sugar just before serving.
Important Information
Nutrition Facts (Per Serving)
It is important to consider this information as approximate and not to use it as definitive health advice.
Allergy Information
Please check ingredients for potential allergens and consult a health professional if in doubt.


Leave a Comment