

No-Bake Peanut Butter Cheesecake Balls are about to become your new favorite dessert obsession. Imagine a world where decadent cheesecake meets the irresistible, nutty goodness of peanut butter, all without ever needing to turn on your oven. That dream becomes a delicious reality with these delightful treats! I’ve always been a fan of desserts that deliver maximum flavor with minimal effort, and these certainly hit the mark. While there isn’t a centuries-old history behind these specific bites, they represent the ingenious evolution of our love for classic flavors – cheesecake and peanut butter – into a modern, convenient form. The concept of no-bake desserts gained immense popularity for a reason: they offer a perfect solution for busy schedules, warm weather, or simply when you crave something sweet without the fuss. People absolutely adore these particular cheesecake balls because of their incredibly creamy texture, the perfect balance of sweet and salty, and the sheer joy of a treat that’s both elegant and effortlessly simple to prepare. Whether you’re planning a party, need a quick dessert for unexpected guests, or just want to treat yourself, these No-Bake Peanut Butter Cheesecake Balls are the ultimate crowd-pleaser and a personal favorite of mine.
Ingredients:
For the No-Bake Peanut Butter Cheesecake Balls:
- 16 ounces (2 blocks) full-fat cream cheese, softened to room temperature. This is crucial for a smooth, lump-free mixture!
- 1 cup creamy peanut butter. I usually go for a classic brand like Jif or Skippy for consistent texture and flavor. Avoid natural peanut butter that separates, as it can make your mixture oily.
- 1 ½ cups powdered sugar (confectioners’ sugar). This adds sweetness and helps bind everything together without any grainy texture.
- 1 teaspoon pure vanilla extract. A touch of vanilla really enhances the overall flavor profile.
- 1 ½ cups finely crushed graham cracker crumbs. You can buy them pre-crushed or crush your own in a food processor.
- ¼ cup (½ stick) unsalted butter, melted. This helps bind the graham cracker crumbs and adds richness.
- 16 ounces chocolate melting wafers or good quality chocolate chips (e.g., semi-sweet, milk chocolate, or a mix). These will be for coating our delicious balls.
- 1-2 teaspoons coconut oil or vegetable shortening (optional, for thinning chocolate). A little bit helps achieve a smoother, more manageable coating.
- Optional toppings: finely chopped roasted peanuts, sprinkles, flaky sea salt, extra chocolate for drizzling.
What Makes These No-Bake Peanut Butter Cheesecake Balls Special & How to Elevate Them:
- Combines two beloved desserts: cheesecake and peanut butter cups
- Transform these peanut butter cheesecake balls into an even more impressive dessert by serving them on a platter with fresh berries for color contrast.
- For gift-giving, place them in mini cupcake liners inside a beautiful box.
- Create a dessert table showstopper by stacking them in a pyramid on a cake stand.
- For holidays, add a drizzle of contrasting chocolate (white over dark or vice versa) for elegant decoration.
Equipment You’ll Need:
- Large mixing bowl
- Electric mixer (handheld or stand mixer)
- Rubber spatula
- Measuring cups and spoons
- Small microwave-safe bowl or double boiler for melting chocolate
- Cookie scoop (1-inch or 1.5-inch for uniform balls)
- Baking sheets
- Parchment paper or silicone baking mats
- Toothpicks or dipping tools
- Fork (for drizzling chocolate, if desired)
Step-by-Step Instructions for Your No-Bake Peanut Butter Cheesecake Balls:
Preparation – Getting Started:
Before we dive into creating these irresistible No-Bake Peanut Butter Cheesecake Balls, a little preparation goes a long way. Trust me, taking these initial steps ensures a smoother process and a superior final product. Let’s get everything ready!
- Soften the Cream Cheese: First things first, ensure your cream cheese is truly at room temperature. This isn’t just a suggestion; it’s a critical step for a silky-smooth, lump-free filling. If it’s too cold, you’ll end up with stubborn lumps in your mixture, and nobody wants that! I usually take it out of the fridge at least an hour before I plan to start. You can also gently soften it in the microwave in 15-second intervals, but be careful not to melt it.
- Melt the Butter: In a small microwave-safe bowl, melt your ¼ cup of unsalted butter. You can do this in the microwave in short bursts, stirring in between, or in a small saucepan on the stovetop over low heat. Once melted, set it aside to cool slightly. We don’t want to add hot butter to our mixture.
- Prepare Your Workspace: Line two large baking sheets with parchment paper or silicone baking mats. This will be where our beautiful No-Bake Peanut Butter Cheesecake Balls rest and chill, preventing them from sticking. Having these ready before you start rolling will save you time and mess later on.
- Measure Out Ingredients: Measure out your creamy peanut butter, powdered sugar, vanilla extract, and finely crushed graham cracker crumbs. Having everything pre-measured in separate bowls (mise en place!) makes the mixing process much more enjoyable and efficient. This also ensures you don’t miss any critical ingredients in the excitement of making these cheesecake bites.
Crafting the Peanut Butter Cheesecake Base:
Now comes the fun part – bringing together the core flavors of our No-Bake Peanut Butter Cheesecake Balls! This section is where the magic truly happens, creating that rich, creamy, and utterly delicious peanut butter cheesecake mixture that forms the heart of our dessert.
- Cream the Cream Cheese: In your large mixing bowl, using an electric mixer (either a handheld or stand mixer fitted with the paddle attachment), beat the softened cream cheese on medium speed for about 1-2 minutes. Your goal here is to make it light, fluffy, and completely smooth. Scrape down the sides of the bowl occasionally to ensure everything is evenly incorporated. A well-creamed base is the secret to an incredibly smooth texture in your finished No-Bake Peanut Butter Cheesecake Balls.
- Add the Peanut Butter: Reduce the mixer speed to low and add the creamy peanut butter to the cream cheese. Continue beating until the peanut butter is fully combined and the mixture is smooth and uniform in color. This might take another 1-2 minutes. Resist the urge to overmix once combined, but do ensure there are no streaks of unmixed cream cheese or peanut butter.
- Incorporate Powdered Sugar and Vanilla: With the mixer still on low, gradually add the powdered sugar, about half a cup at a time. It’s important to add it slowly to prevent a cloud of sugar from engulfing your kitchen! Once all the sugar is in, increase the speed to medium-low and beat until the mixture is thick, creamy, and well-combined. Finally, stir in the vanilla extract. Give it one last good scrape down of the bowl to make sure every bit is incorporated. The mixture should now be quite firm and scoopable.
- Add Graham Cracker Crumbs and Butter: Pour the slightly cooled melted butter into the mixture. Then, add the finely crushed graham cracker crumbs. Mix on low speed, or even by hand with a sturdy spatula, until the crumbs are just incorporated. Be careful not to overmix at this stage; we want the crumbs to add texture without making the mixture too dense. The mixture should now be firm enough to roll. This step adds a wonderful, subtle graham cracker flavor and helps give our No-Bake Peanut Butter Cheesecake Balls that familiar “cheesecake crust” essence without any baking!
Forming the Balls:
This stage is where our peanut butter cheesecake mixture transforms into perfectly portioned, ready-to-be-coated spheres. Uniformity is key here, especially if you’re aiming for that professional, dessert table showstopper look for your No-Bake Peanut Butter Cheesecake Balls.
- Scoop and Roll: Using a 1-inch or 1.5-inch cookie scoop, portion out the peanut butter cheesecake mixture. If you don’t have a scoop, a tablespoon measure works well too. Roll each portion gently between the palms of your hands to form smooth, compact balls. Aim for consistency in size so they look appealing and chill evenly. I find that a quick rinse and dry of my hands between batches helps keep them from getting too sticky. As you roll them, place the formed balls onto your prepared baking sheets lined with parchment paper.
- Initial Chill: Once all the No-Bake Peanut Butter Cheesecake Balls are rolled, place the baking sheets into the freezer for at least 30 minutes, or in the refrigerator for at least 1-2 hours. This chilling step is absolutely essential. It makes the balls firm enough to handle for dipping and prevents them from melting or falling apart when they hit the warm chocolate coating. Don’t skip this step – patience here will pay off immensely! A solid chill ensures a crisp, clean coating.
The Chocolate Coating – Dipping & Finishing:
This is where we add the final, delicious layer to our No-Bake Peanut Butter Cheesecake Balls, transforming them into beautiful, chocolate-covered delights reminiscent of gourmet peanut butter cups. A smooth, even coating makes all the difference.
- Prepare the Chocolate: While your peanut butter cheesecake balls are chilling, it’s time to prepare the chocolate coating. In a microwave-safe bowl, melt your chocolate melting wafers or chocolate chips. Do this in 30-second intervals, stirring well after each interval, until the chocolate is smooth and fully melted. Be careful not to overheat the chocolate, as it can seize up or burn. Alternatively, you can use a double boiler on the stovetop for a more controlled melt. If your chocolate seems a bit too thick for dipping, you can stir in 1-2 teaspoons of coconut oil or vegetable shortening. This helps thin it out just enough to achieve a silky-smooth consistency without affecting the taste too much.
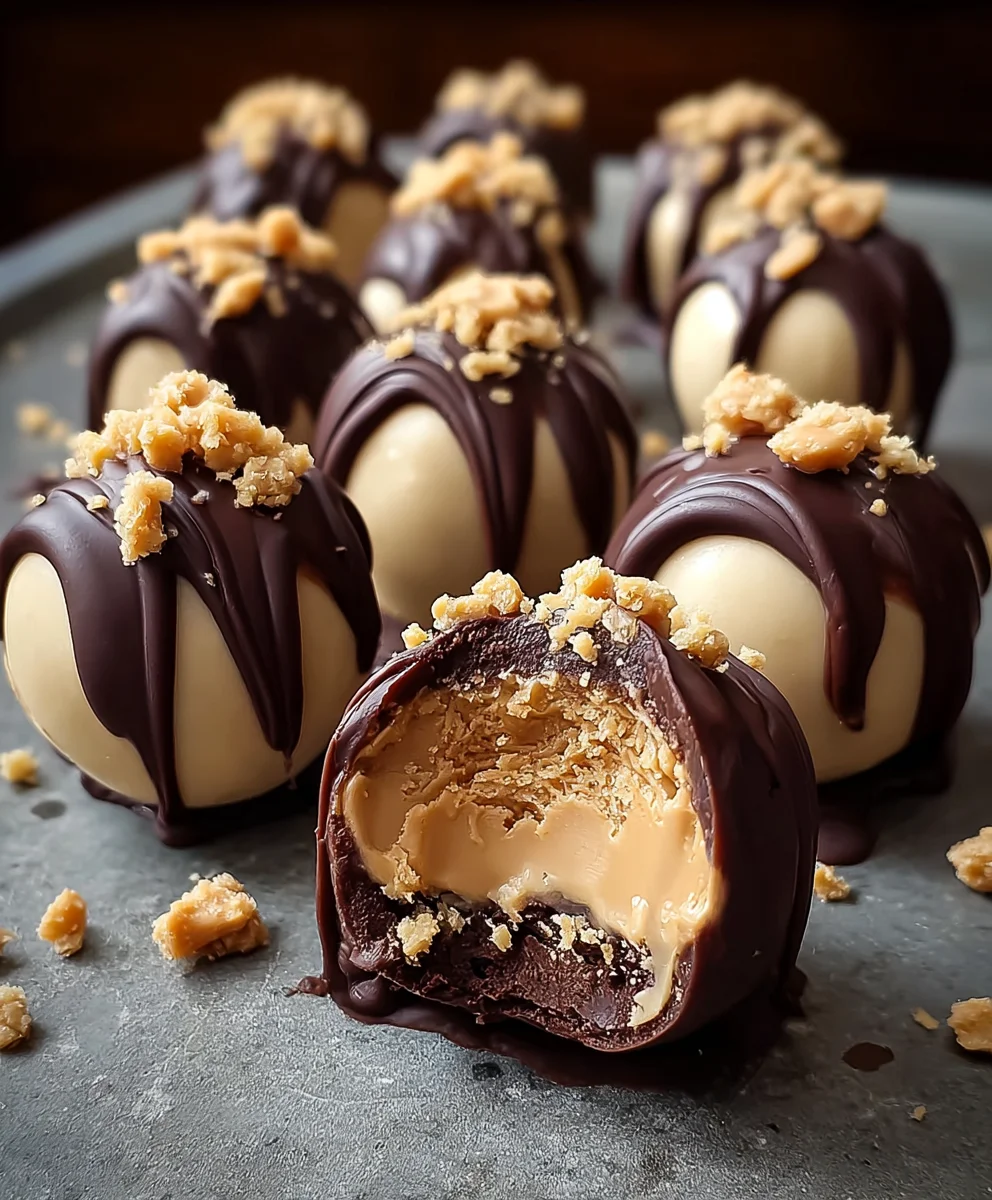
- Dip the Balls: Take the chilled No-Bake Peanut Butter Cheesecake Balls out of the freezer/fridge. Working with a few at a time (keep the rest chilled), insert a toothpick into one side of a ball. Dip the ball into the melted chocolate, ensuring it’s completely submerged and coated evenly. Gently tap the toothpick against the side of the bowl to let any excess chocolate drip off. You want a nice, thin, even layer.
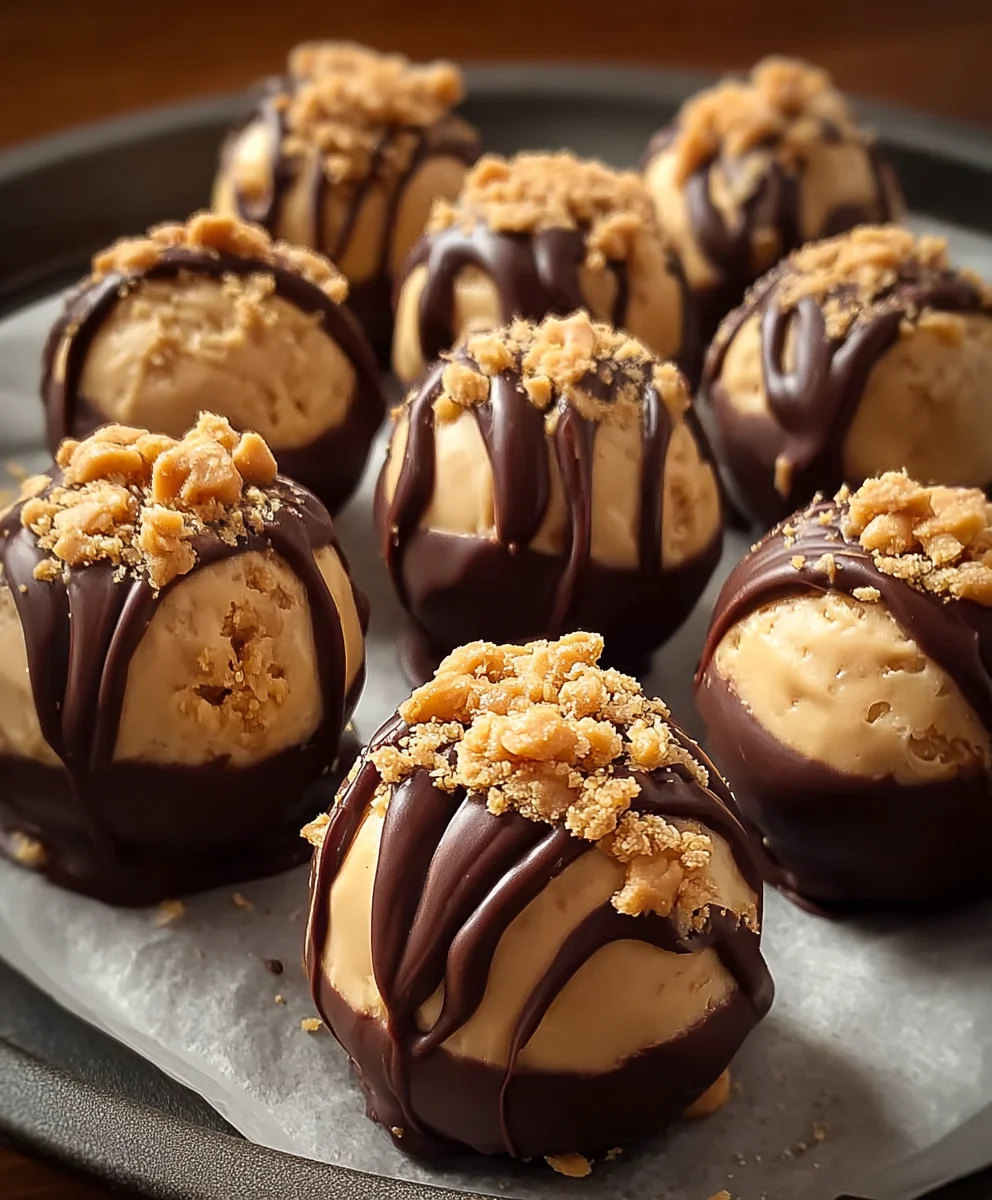
- Place and Set: Carefully remove the toothpick and place the chocolate-coated ball back onto the parchment-lined baking sheet. If you’re planning on adding any optional toppings like finely chopped peanuts, sprinkles, or flaky sea salt, sprinkle them over the wet chocolate immediately after dipping, before the chocolate sets. This creates visual appeal and extra texture, making each No-Bake Peanut Butter Cheesecake Ball even more special.
- Repeat and Re-Chill: Continue this process with the remaining balls, melting more chocolate if necessary. If the chocolate starts to thicken, gently re-warm it in the microwave for a few seconds, stirring thoroughly. If your balls become too soft while dipping, pop them back in the freezer for 10-15 minutes to firm up again. It’s better to work in smaller batches to maintain the ideal temperature for both the balls and the chocolate.
- Optional Decorative Drizzle: For an extra touch of elegance, especially for holidays or when creating a dessert table showstopper, melt a small amount of contrasting chocolate (white chocolate if you used dark chocolate for coating, or vice versa). Drizzle it decoratively over the set chocolate balls using a fork or a piping bag with a very small tip. This really elevates the presentation of your No-Bake Peanut Butter Cheesecake Balls, making them even more impressive for gift-giving or special occasions.
Chilling for Perfection:
The final chill is crucial for these No-Bake Peanut Butter Cheesecake Balls. It allows the chocolate coating to fully harden and the flavors to meld beautifully, ensuring each bite is a perfect blend of rich peanut butter and creamy cheesecake.
- Final Chill: Once all your No-Bake Peanut Butter Cheesecake Balls are coated and decorated, place the baking sheets back into the refrigerator for at least 30 minutes, or until the chocolate coating is completely firm to the touch. This final chill ensures that they hold their shape perfectly and are ready to be enjoyed or stored.
Tips & Tricks for Perfect No-Bake Peanut Butter Cheesecake Balls:
Making these No-Bake Peanut Butter Cheesecake Balls is generally straightforward, but a few insider tips can elevate your dessert from great to absolutely phenomenal. I’ve learned these through plenty of delicious trial and error!
Choosing Your Ingredients Wisely:
- Full-Fat Cream Cheese is Your Friend: Always opt for full-fat cream cheese. Low-fat or fat-free versions often contain more water, which can make your mixture too soft and difficult to roll. The full-fat variety provides the rich, creamy texture we crave in cheesecake.
- Creamy, Not Natural Peanut Butter: Stick to creamy, shelf-stable peanut butter (like Jif or Skippy) for this recipe. Natural peanut butter, with its tendency to separate oils, can make your cheesecake mixture inconsistent and overly greasy.
- Quality Chocolate Matters: For the coating, using good quality chocolate melting wafers (also known as candy melts or tempering chocolate) will give you the smoothest finish and easiest melting process. If using chocolate chips, sometimes adding a touch of coconut oil or shortening is necessary to achieve a thin, dippable consistency.
Mastering the Mixing & Chilling:
- Room Temperature is Key for Cream Cheese: I can’t stress this enough! Softened cream cheese blends smoothly, preventing lumps. If you’re in a hurry, you can unwrap it and microwave it for 10-15 seconds per block, but be careful not to melt it.
- Don’t Overmix the Graham Cracker Crumbs: Once you add the graham cracker crumbs and melted butter, mix just until combined. Overmixing can make the mixture too dense.
- Chilling is Non-Negotiable: The initial chill after rolling is paramount. It firms up the balls, making them easy to dip without falling apart in the warm chocolate. If they get too soft at any point during dipping, pop them back in the freezer for a quick 10-15 minute chill.
Dipping Techniques for a Flawless Finish:
- Keep Chocolate Warm, Not Hot: Melt your chocolate until it’s just smooth and fluid. If it’s too hot, it can melt your cheesecake balls. If it cools and thickens too much, gently reheat it in short bursts.
- Work in Batches: Dip only a few No-Bake Peanut Butter Cheesecake Balls at a time. This keeps the remaining balls cold and the melted chocolate at an optimal temperature for dipping.
- Use a Toothpick or Dipping Tool: For best results, use a sturdy toothpick or a specialized chocolate dipping tool. This allows you to coat the balls fully and then easily transfer them to the parchment paper, tapping off excess chocolate for a thin, even layer.
- Decorate Quickly: If you’re adding sprinkles, chopped nuts, or sea salt, do so immediately after dipping each ball, while the chocolate is still wet. This ensures your toppings adhere perfectly.
Serving and Storage:
- How to Serve: These No-Bake Peanut Butter Cheesecake Balls truly combine two beloved desserts: cheesecake and peanut butter cups, making them incredibly versatile. You can transform these peanut butter cheesecake balls into an even more impressive dessert by serving them on a platter with fresh berries for color contrast. The brightness of raspberries or strawberries makes for a stunning presentation. For a truly elegant touch, create a dessert table showstopper by stacking them in a pyramid on a cake stand.
- Gift-Giving Ideas: They make fantastic gifts! For gift-giving, place them in mini cupcake liners inside a beautiful box. Add a ribbon and a handwritten tag for a personal touch.
- Holiday Flair: For special occasions, like the holidays, add a drizzle of contrasting chocolate (white over dark or vice versa) for elegant decoration. This small detail can make a huge impact on presentation.
- Storage: Store your No-Bake Peanut Butter Cheesecake Balls in an airtight container in the refrigerator for up to 1 week. If you need to store them longer, they can be frozen for up to 1 month. Just thaw them in the refrigerator for an hour or so before serving for the best texture.
I genuinely hope these detailed instructions and tips help you create the most delicious No-Bake Peanut Butter Cheesecake Balls. They are a true crowd-pleaser and so much fun to make!
Conclusion:
And there you have it, friends! We’ve reached the sweet finale of our delicious journey together, and I truly hope you’re as excited as I am about these absolutely heavenly treats. Seriously, if there’s one recipe I could implore you to try this week, it would hands down be these incredible No-Bake Peanut Butter Cheesecake Balls. They are an absolute game-changer, whether you’re a seasoned baker or someone who finds the oven a mysterious, intimidating appliance. Why are they a must-try? Well, for starters, the sheer effortlessness involved is nothing short of miraculous. No oven required, no complicated steps, just a few simple ingredients and a little bit of chill time. It’s the perfect solution for satisfying those intense dessert cravings without breaking a sweat, especially when the weather is too warm to even think about turning on the oven.
But beyond the ease, it’s the flavor profile that truly makes these little bites of bliss unforgettable. Imagine the rich, creamy tang of cheesecake perfectly blended with the comforting, nutty notes of peanut butter, all encased in a decadent shell of your favorite chocolate. It’s a symphony of textures and tastes that dance on your palate – smooth, creamy, slightly firm, and utterly irresistible. They strike that perfect balance between sweet and salty, making them incredibly addictive. Plus, they look so elegant and professional, yet they require minimal skill. You can truly impress your friends, family, or even just yourself with these gorgeous homemade goodies without anyone suspecting how truly simple they were to create. They’re perfect for parties, holiday gatherings, a thoughtful homemade gift, or simply as a special treat to brighten your own day. Trust me, once you make them, they’ll become a staple in your dessert repertoire.
Now, let’s talk about how to elevate your cheesecake ball experience even further! While they are absolutely divine as is, there are so many fun ways to serve and customize them. For serving, I always recommend taking them out of the fridge about 10-15 minutes before you plan to indulge, letting them soften just slightly to really highlight that creamy texture. You can arrange them beautifully on a platter, perhaps with a dusting of cocoa powder, a sprinkle of sea salt flakes to enhance the peanut butter flavor, or even a fancy chocolate drizzle for an extra touch of sophistication. For those who love a bit of crunch, a sprinkle of finely chopped peanuts or mini chocolate chips on top of the still-wet chocolate coating can add a delightful textural contrast.
Feeling adventurous? The variations are endless! Experiment with different coatings: milk chocolate, dark chocolate, white chocolate, or even a mix of coatings for a multi-colored display. You could also roll some in crushed graham crackers, finely chopped pretzels for a salty-sweet twist, or even shredded coconut. For the filling itself, don’t hesitate to get creative. A tiny pinch of cinnamon or a drop of vanilla extract can subtly enhance the flavors. You could even swap out a portion of the peanut butter for almond butter or cashew butter if you prefer, or add some finely crushed cookies directly into the cheesecake mixture before chilling. Another fantastic idea is to transform this recipe into a no-bake peanut butter cheesecake pie by pressing the mixture into a graham cracker crust and chilling it, then topping with chocolate ganache or whipped cream. Or, for a fun, bite-sized option, consider using different molds to create unique shapes instead of traditional balls.
So, my wonderful readers, I genuinely hope I’ve convinced you to give these delightful treats a whirl. They’re so much more than just a dessert; they’re a little burst of joy, a testament to how simple ingredients can create something truly extraordinary. Once you’ve whipped up your own batch of these fantastic No-Bake Peanut Butter Cheesecake Balls, please, please, please come back and tell me all about your experience! Did you stick to the classic recipe, or did you put your own creative spin on them? What did your friends and family think? Share your photos, your tips, and your triumphs in the comments below or tag me on social media. I absolutely love seeing your culinary adventures come to life. Happy creating, and even happier indulging!
FAQs About No-Bake Peanut Butter Cheesecake Balls
Got questions? I’ve gathered some common queries to help you master these delightful treats!
How do I store No-Bake Peanut Butter Cheesecake Balls?
Once dipped and set, these cheesecake balls should be stored in an airtight container in the refrigerator. They’ll keep wonderfully for up to 5-7 days, maintaining their creamy texture and delicious flavor. Make sure they are in a single layer or separated by parchment paper to prevent them from sticking together.
Can I make these ahead of time for a party?
Absolutely, and I highly recommend it! These are the perfect make-ahead dessert. You can prepare them completely up to 2-3 days in advance and keep them chilled in the refrigerator. This allows the flavors to meld beautifully and frees up your time on the day of your event. Just be sure to bring them out 10-15 minutes before serving for optimal texture.
Can I freeze No-Bake Peanut Butter Cheesecake Balls?
Yes, you can! These freeze exceptionally well. Arrange the finished, chocolate-coated balls in a single layer on a parchment-lined baking sheet and freeze until solid (about 2-3 hours). Once frozen, transfer them to an airtight freezer-safe container or bag, separating layers with parchment paper. They will keep in the freezer for up to 1 month. Thaw them in the refrigerator for a few hours or on the counter for about 30 minutes before serving.
My cheesecake mixture is too sticky to roll. What should I do?
This is a common issue if the mixture hasn’t been chilled sufficiently. The key to easy rolling is a very firm mixture. If yours is too sticky, return it to the refrigerator for at least another 30 minutes, or even an hour. If it’s still too soft after thorough chilling, you can try adding a tablespoon or two of powdered sugar, mixing it in, and then chilling again. A small cookie scoop can also help with portioning, and a light dusting of powdered sugar on your hands can prevent sticking.
What kind of chocolate is best for coating?
The best chocolate for coating is entirely up to your preference! I love using good quality melting wafers or chocolate chips (milk, dark, or semi-sweet) because they melt smoothly and set nicely. If you’re using chocolate bars, chop them finely for even melting and consider adding a teaspoon of coconut oil or shortening to help achieve a super smooth, glossy finish that hardens well.
Are there any substitutions I can make for dietary restrictions?
For a gluten-free version, simply ensure your vanilla wafers or graham crackers (if using as a crust variation) are certified gluten-free. For a dairy-free option, you can experiment with dairy-free cream cheese and dairy-free chocolate. For sugar-free, you could use sugar substitutes for the powdered sugar and sugar-free chocolate. However, altering ingredients will change the texture and flavor, so some experimentation might be needed to get it just right!
Why did my chocolate coating seize or become lumpy?
Chocolate can seize (become thick and clumpy) if even a tiny bit of water or steam gets into it, or if it overheats. When melting chocolate, use a double boiler or microwave on short bursts (15-30 seconds), stirring well in between, to prevent overheating. Ensure your bowl and utensils are completely dry. If it seizes, sometimes adding a teaspoon of coconut oil or vegetable shortening can help to smooth it out again, but it’s best to prevent it from happening.
No-Bake Peanut Butter Cheesecake Balls: Easy & Delicious!
These easy and delicious No-Bake Peanut Butter Cheesecake Balls combine the beloved flavors of cheesecake and peanut butter cups into an irresistible bite-sized dessert. Perfect for any occasion, they can be elegantly served on a platter with fresh berries, arranged as a dessert table showstopper, or beautifully boxed for gift-giving. A quick and impressive treat!
Ingredients
-
16 oz (2 blocks) full-fat cream cheese, softened
-
1 cup creamy peanut butter
-
1 ½ cups powdered sugar
-
1 tsp pure vanilla extract
-
1 ½ cups finely crushed graham cracker crumbs
-
¼ cup (½ stick) unsalted butter, melted
-
16 oz chocolate melting wafers or good quality chocolate chips
-
1-2 tsp coconut oil or vegetable shortening (optional)
-
Optional toppings: chopped roasted peanuts, sprinkles, flaky sea salt, extra chocolate for drizzling
Instructions
-
Step 1
Soften cream cheese to room temperature. Melt butter and set aside to cool slightly. Line two baking sheets with parchment paper. Measure out all remaining ingredients. -
Step 2
In a large mixing bowl, beat softened cream cheese with an electric mixer until light and smooth (1-2 minutes). Add creamy peanut butter and beat on low speed until fully combined and smooth. -
Step 3
Gradually add powdered sugar to the mixture on low speed until incorporated, then beat on medium-low until thick and creamy. Stir in vanilla extract. Pour in the slightly cooled melted butter, then add graham cracker crumbs. Mix on low speed until just combined. -
Step 4
Using a 1-inch or 1.5-inch cookie scoop, portion out the mixture and roll gently between your palms to form smooth, compact balls. Place them onto the prepared baking sheets. Freeze for at least 30 minutes, or refrigerate for 1-2 hours, until firm. -
Step 5
While balls chill, melt chocolate melting wafers or chocolate chips in a microwave-safe bowl (30-second intervals, stirring) or using a double boiler until smooth. If needed, stir in 1-2 teaspoons of coconut oil or vegetable shortening for a thinner consistency. -
Step 6
Working with a few chilled balls at a time, insert a toothpick into a ball and dip it completely into the melted chocolate. Tap off excess chocolate and place the coated ball back onto the parchment-lined baking sheet. Immediately add any optional toppings (peanuts, sprinkles, sea salt) before the chocolate sets. -
Step 7
Continue dipping all balls, re-warming chocolate or re-chilling balls as needed. For extra elegance, melt a small amount of contrasting chocolate (e.g., white chocolate) and drizzle it over the set chocolate balls using a fork or piping bag. -
Step 8
Once all balls are coated and decorated, place baking sheets back into the refrigerator for at least 30 minutes, or until the chocolate coating is completely firm. Serve on a platter with fresh berries, arrange in mini cupcake liners for gift-giving, or stack in a pyramid on a cake stand. Store in an airtight container in the refrigerator for up to 1 week or freeze for up to 1 month.
Important Information
Nutrition Facts (Per Serving)
It is important to consider this information as approximate and not to use it as definitive health advice.
Allergy Information
Please check ingredients for potential allergens and consult a health professional if in doubt.


Leave a Comment