

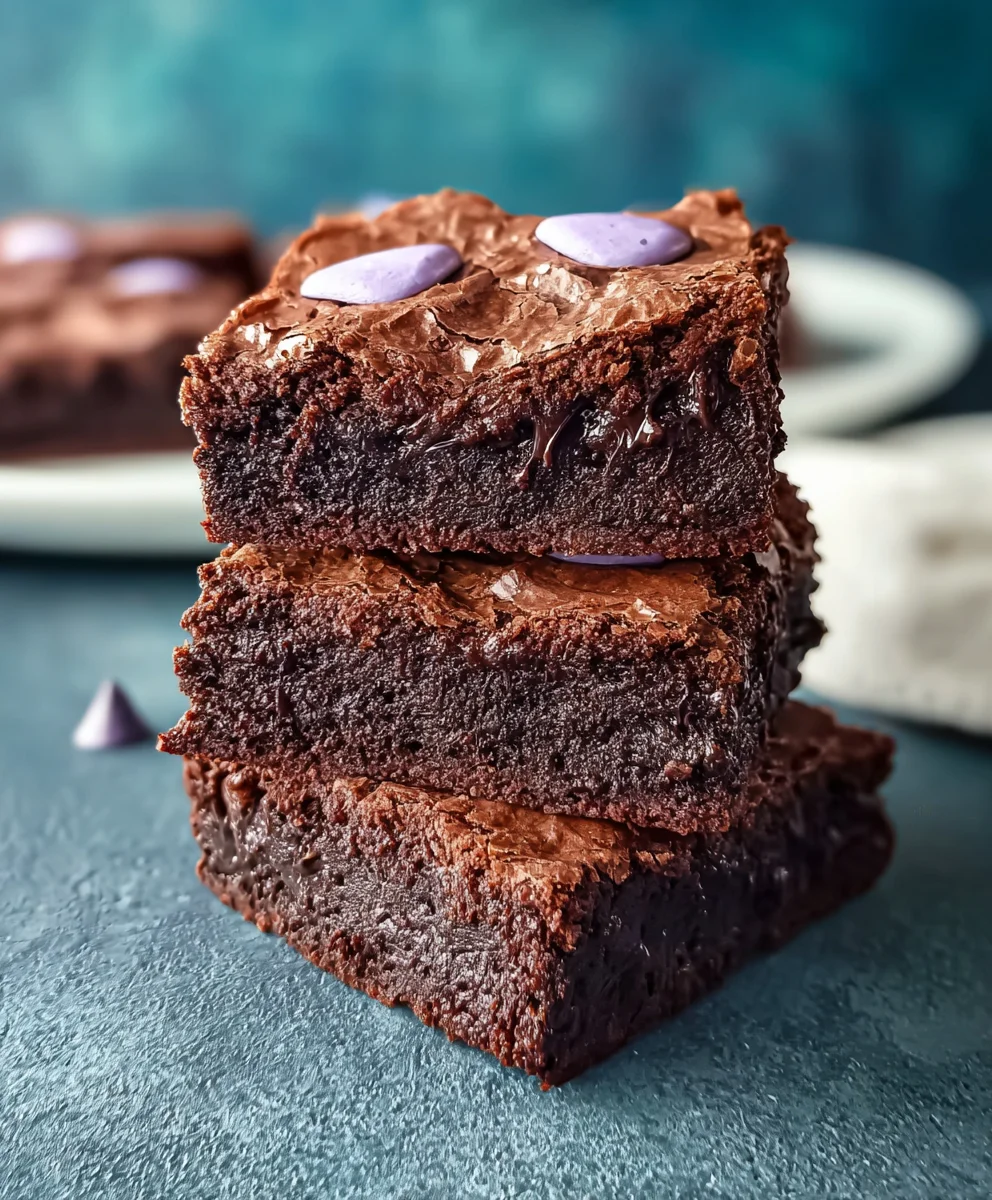
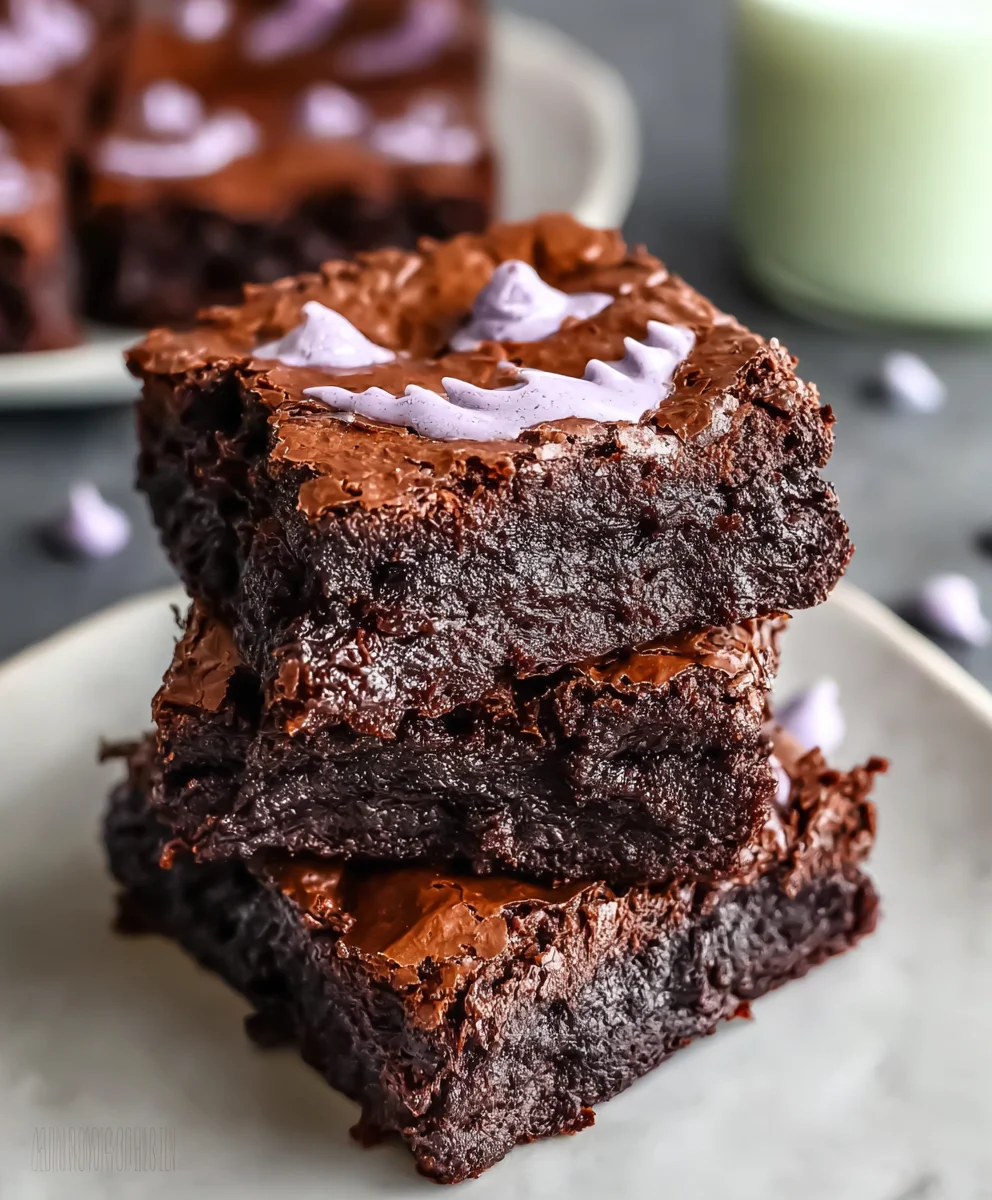
Monster Brownies are not just a dessert; they are an experience, a declaration of pure, unadulterated chocolate indulgence. Have you ever found yourself yearning for a treat so profoundly rich, so incredibly decadent, that a standard brownie simply won’t suffice? I certainly have, and that’s precisely where this magnificent recipe shines. We’re talking about a brownie elevated to legendary status, packed with delightful surprises in every single bite.
The humble brownie, a beloved American culinary invention dating back to the late 19th century, has evolved beautifully over time. From its simple beginnings, it has transformed into countless variations, but none, in my personal opinion, capture the ultimate essence of satisfaction quite like these incredible Monster Brownies. This isn’t just about baking; it’s about crafting a masterpiece that promises to delight.
What makes this dish so universally adored? It’s that perfect, harmonious blend of intense, dark chocolate flavor with a gloriously fudgy, melt-in-your-mouth interior and those coveted chewy edges. But we don’t stop there. By loading them with an array of mix-ins, we transform each square into an exciting adventure for your taste buds. They are the ultimate crowd-pleaser, ideal for grand celebrations, a comforting retreat on a quiet evening, or simply when you crave an epic chocolate fix that truly delivers. Get ready to bake something truly extraordinary!
Ingredients:
- For the Ultimate Fudgy Brownie Base:
- 1 cup (2 sticks or 226g) unsalted butter, cut into 1-inch pieces
- 4 ounces (113g) unsweetened chocolate, high-quality, finely chopped
- 2 cups (400g) granulated sugar
- ½ cup (100g) packed light brown sugar
- 4 large eggs, at room temperature
- 2 teaspoons pure vanilla extract, a good quality one makes all the difference
- 1 cup (125g) all-purpose flour, spooned and leveled
- ¾ cup (75g) unsweetened cocoa powder, Dutch-processed for a darker, richer flavor, or natural for a more classic profile
- 1 teaspoon sea salt, fine-grained
- ½ teaspoon baking powder (just a touch for a little lift, but still keeping them incredibly fudgy)
- For the “Monster” Mix-ins (feel free to customize!):
- 1 cup (170g) semi-sweet chocolate chips or chunks
- ½ cup (85g) milk chocolate chips
- ½ cup (85g) white chocolate chips or chopped white chocolate
- ¾ cup (approx. 150g) M&M’s candies, various colors for visual appeal
- ½ cup (approx. 70g) chopped pretzels, for that amazing salty crunch contrast
- ½ cup (approx. 60g) roughly chopped Oreos or other chocolate sandwich cookies
- Optional: ¼ cup (approx. 40g) chopped peanut butter cups or other favorite candies
Gathering Your Tools and Prepping the Space
- Preheat Your Oven to Perfection: Begin by preheating your oven to 350°F (175°C). This might seem like a simple first step, but a properly preheated oven is crucial for even baking and achieving that perfect brownie texture. When you put your batter into a hot oven, it starts to cook immediately, setting the edges and allowing the center to rise just enough without over-baking. I always recommend letting your oven preheat for at least 15-20 minutes after it signals it’s ready, just to ensure it’s truly at the target temperature.
- Prepare Your Baking Pan: Select a 9×13 inch baking pan. For the easiest removal and cleanest slices of your glorious Monster Brownies, you’ll want to line the pan with parchment paper. Cut a piece of parchment paper to fit the bottom of the pan, extending up the longer sides to create “slings” or “handles.” I find it easiest to spray the pan lightly with cooking spray first, then press the parchment paper into place – this helps it stick. If you’re feeling extra secure, you can even line both directions, creating a cross, ensuring no sticking whatsoever.
- Measure and Prepare Dry Ingredients: In a medium bowl, whisk together the all-purpose flour, cocoa powder, sea salt, and baking powder. This step, often called “sifting” or “whisking dry ingredients,” is essential. It not only ensures that these ingredients are thoroughly combined but also breaks up any lumps in your cocoa powder or flour, preventing pockets of unmixed dry ingredients in your finished brownies. It also aerates the flour slightly, which contributes to a tender crumb. Set this bowl aside; it will be ready when you need it.
- Prepare Your “Monster” Mix-ins: Take a moment to gather and prepare all of your desired “monster” additions. If you’re using large candies or cookies, give them a rough chop into bite-sized pieces. I like to have an array of textures and flavors in my Monster Brownies, so I usually combine chocolate chips, M&M’s, crushed pretzels for crunch, and sometimes even chopped peanut butter cups. Having these ready to go means you won’t be scrambling once the wet batter is prepared. Set about ¼ cup of your total mix-ins aside; these will be sprinkled on top of the batter just before baking for a truly stunning presentation.
Crafting the Ultimate Fudgy Brownie Base
-
Melt Butter and Unsweetened Chocolate: In a large, heatproof bowl (I often use a large glass bowl for this, as it handles heat well), combine the cut pieces of unsalted butter and the finely chopped unsweetened chocolate. There are two primary methods for melting these together:
- Double Boiler Method (Recommended for Control): Place the heatproof bowl over a saucepan of simmering water, ensuring the bottom of the bowl does not touch the water. The steam will gently melt the butter and chocolate. Stir occasionally with a rubber spatula until the mixture is completely smooth and glossy. This method offers the most control and prevents scorching.
- Microwave Method (Quicker, but Watch Carefully): Alternatively, you can melt the mixture in the microwave. Heat in 30-second intervals, stirring thoroughly after each interval, until smooth. Be very careful not to overheat the chocolate, as it can seize or burn. Stop heating when there are still a few small lumps of chocolate, and let the residual heat melt them as you continue stirring.
Once melted, remove the bowl from the heat and allow the mixture to cool for about 5-10 minutes. It shouldn’t be piping hot when you add the sugars.
- Incorporate the Sugars: To the slightly cooled chocolate mixture, add both the granulated sugar and the packed light brown sugar. Whisk vigorously for about 1-2 minutes until the sugars are well incorporated and the mixture looks smooth and slightly thickened. The brown sugar adds a wonderful chewiness and depth of flavor to your Monster Brownies, while the granulated sugar ensures that classic crackly top. This whisking action is important for dissolving some of the sugar crystals, contributing to that desirable fudgy texture and shiny crust.
- Add Eggs One at a Time: Now it’s time to add the eggs. This is a crucial step for the texture of your brownies. Add one egg at a time, whisking well after each addition until it is fully incorporated into the chocolate mixture. Scrape down the sides of the bowl as needed to ensure everything is mixed in. The mixture will start to lighten in color and become thicker and more emulsified as you add each egg. Adding them gradually allows them to integrate properly without scrambling. After the last egg is added, whisk for an additional minute; this aeration helps create that beautiful, delicate crackly top crust that everyone loves on a good brownie.
- Stir in the Vanilla Extract: Pour in the pure vanilla extract and whisk briefly to combine. Vanilla is a flavor enhancer that truly brings out the rich chocolate notes in your Monster Brownies, so don’t skimp on good quality extract here!
- Gently Fold in Dry Ingredients: Remember that bowl of whisked dry ingredients? It’s time to bring them into the fold. Add the dry ingredient mixture to the wet ingredients. Using a rubber spatula, gently fold the dry ingredients into the wet until just combined. The key here is to avoid overmixing. Overmixing flour develops gluten, which can lead to tough, cake-like brownies instead of the fudgy, dense texture we’re aiming for. A few streaks of flour are perfectly acceptable; they will disappear during the next step.
Unleashing the Inner Monster: Adding Your Favorite Mix-ins
- Introduce the “Monster” Elements: Now for the fun part – transforming these from regular brownies into spectacular Monster Brownies! Add the majority of your prepared “monster” mix-ins (chocolate chips, M&M’s, chopped pretzels, Oreos, etc.) to the brownie batter. Reserve that small portion (about ¼ cup) you set aside earlier for topping.
- Fold Them In Gently: With your rubber spatula, gently fold the mix-ins into the batter until they are evenly distributed. Again, be careful not to overmix. You want every bite of your brownie to have a delightful surprise, so ensure the mix-ins are spread throughout the batter, but a gentle hand is all that’s needed to achieve this.
- Transfer Batter to Prepared Pan: Pour the rich, chunky brownie batter into your parchment-lined 9×13 inch baking pan. Use your spatula to spread the batter evenly to all corners of the pan. Make sure the top is relatively smooth for even baking, but don’t obsess over it; the beauty of these Monster Brownies is their rugged, loaded nature.
- Sprinkle Reserved Toppings: Remember those reserved mix-ins? Now’s their time to shine! Sprinkle the remaining ¼ cup of chocolate chips, M&M’s, or any other preferred toppings evenly over the surface of the batter. This not only makes your brownies look absolutely stunning but also gives a visual clue to all the deliciousness hidden within. Press them down ever so slightly into the batter if they seem too loose.
Baking to Perfection: Bringing Your Monster Brownies to Life
- Bake Your Monster Brownies: Carefully transfer the baking pan to your preheated 350°F (175°C) oven. The baking time for these dense, fudgy brownies will typically be between 30-38 minutes. However, oven temperatures can vary wildly, so it’s always best to use visual cues and a toothpick test rather than relying solely on the clock.
-
Monitor for Doneness: Around the 30-minute mark, start checking your brownies. The edges should look set and slightly puffed, but the center should still look a little moist and perhaps slightly jiggly if you gently shake the pan. To perform the toothpick test, insert a toothpick into the center of the brownies:
- For Fudgy Brownies (my preference for these Monster Brownies!): The toothpick should come out with moist crumbs attached, but no wet batter. A few gooey streaks are perfect for that intensely fudgy texture.
- For More Cake-Like Brownies: The toothpick would come out mostly clean. However, for Monster Brownies, we are aiming for ultimate fudginess, so resist the urge to bake them until the toothpick is completely clean. Over-baked brownies are dry and crumbly, and we definitely don’t want that!
If the edges are browning too quickly, you can loosely tent the pan with aluminum foil for the last 5-10 minutes of baking.
- Rotate for Even Baking (Optional but Recommended): For very even baking, especially if your oven has hot spots, you can rotate the pan 180 degrees halfway through the baking time (e.g., after 15-20 minutes). This ensures all sides of the brownies receive equal heat exposure.
The Waiting Game: Cooling and Slicing Your Monster Brownies
- Cool Completely in the Pan: This is arguably the most challenging but also the most critical step for perfect Monster Brownies. Once removed from the oven, allow the brownies to cool completely in the pan on a wire rack. This means several hours, or even better, overnight. I know, I know, the aroma is intoxicating, and the temptation to dig in is immense! However, during this cooling period, the brownies continue to set and firm up. They will become denser, fudgier, and much easier to slice cleanly. If you try to cut them while warm, they will be soft, crumbly, and fall apart. Trust me, the wait is worth every single second for that ultimate fudgy texture.
- Lift and Transfer: Once completely cool, use the parchment paper “slings” to carefully lift the entire slab of brownies out of the pan and transfer it to a cutting board.
-
Slice with Precision: For clean, professional-looking slices of your Monster Brownies, I have a few tricks:
- Hot Knife Method: Use a large, sharp chef’s knife. For truly pristine cuts, run the knife under hot water for a few seconds, then wipe it completely dry before each cut. The warm blade glides through the dense brownies and gooey mix-ins much more easily.
- Clean Between Cuts: After each cut, wipe the knife clean with a damp paper towel to remove any sticky residue. This prevents crumbs and melted chocolate from transferring to your next slice.
- Methodical Cutting: I usually cut my 9×13 inch pan of brownies into 4 columns by 6 rows, yielding 24 generous squares. You can, of course, adjust the size to your preference, making them larger for truly monstrous portions or smaller for sharing.
- Serve and Enjoy: Arrange your magnificent Monster Brownies on a serving platter. They are fantastic on their own, but if you want to take them to an even more indulgent level, consider serving them slightly warmed with a scoop of vanilla bean ice cream and a drizzle of hot fudge. These brownies are a true crowd-pleaser and are sure to disappear quickly!
- Storage Instructions: Store leftover Monster Brownies in an airtight container at room temperature for up to 3-4 days. While they rarely last that long in my house, they actually become even fudgier and more flavorful on the second day as the flavors meld. For longer storage, you can freeze individual squares, well-wrapped in plastic wrap and then placed in an airtight freezer bag, for up to 2-3 months. Thaw at room temperature or warm gently in the microwave for a few seconds.
Personalizing Your Monster Brownies: Creative Twists
The beauty of these Monster Brownies is their incredible versatility. While the recipe as written provides a fantastic, loaded brownie experience, don’t hesitate to experiment with different mix-ins to make them truly your own. Here are a few ideas to spark your creativity and keep your Monster Brownies exciting:
-
Nutty Brownies:
Add ½ cup of chopped toasted pecans, walnuts, or even a mix of your favorite nuts for an added layer of texture and earthy flavor. Toasted nuts have a much richer flavor, so don’t skip that step!
-
Peanut Butter Swirl:
Before adding the mix-ins, drizzle about ½ cup of melted creamy peanut butter over the brownie batter in the pan. Use a skewer or a knife to gently swirl the peanut butter into the chocolate for a marbled effect. Then, add your mix-ins. This creates a delightful peanut butter ribbon throughout your Monster Brownies.
-
Caramel Delight:
Introduce chewy caramel bits or small, individually wrapped caramels (chopped) into the mix-ins. The caramel will melt slightly during baking, creating gooey pockets of deliciousness. A drizzle of homemade or store-bought caramel sauce over the top after cooling is also a fantastic addition.
-
Candy Bar Explosion:
Instead of just M&M’s, try chopping up your favorite candy bars like Snickers, Twix, or Butterfinger and folding them into the batter. Each bite becomes a treasure hunt!
-
Fruity Twist:
For a surprising burst of tartness, add dried cranberries or dried cherries to your mix-ins. The fruit offers a lovely contrast to the richness of the chocolate and other candies.
-
Spice It Up:
For a more sophisticated brownie, add a pinch of cayenne pepper to the dry ingredients for a subtle heat, or a teaspoon of espresso powder to the wet ingredients to deepen the chocolate flavor without adding a coffee taste.
-
Different Frostings:
While these Monster Brownies are perfect on their own, a simple layer of chocolate ganache, a rich cream cheese frosting, or even a fluffy peanut butter frosting can elevate them for a special occasion. Just be sure the brownies are completely cool before frosting.
No matter how you customize them, these Monster Brownies are designed to be an unforgettable treat. They’re rich, decadent, and bursting with flavor and texture, making them the perfect dessert for any gathering or just for indulging your own sweet tooth. Happy baking, and get ready for rave reviews!
<h2>Conclusion:</h2>
<p>Well, my fellow dessert enthusiasts, we’ve reached the sweet end of our journey, but truly, it’s just the beginning of your delicious adventure. I genuinely hope you’re feeling inspired and ready to whip up a batch of these extraordinary <strong>Monster Brownies</strong>. What makes this recipe an absolute must-try, you ask? It’s simple: this isn’t just another brownie recipe; it’s an experience. We’re talking about a level of decadence that redefines what a brownie can be. Imagine biting into a rich, fudgy square that’s dense and chewy on the inside, with that perfect crackly top that signals homemade perfection. Every single ingredient plays a crucial role in creating a symphony of chocolatey goodness that will leave you utterly satisfied and craving another.</p>
<p>I’ve poured my heart into crafting this recipe to ensure it delivers maximum impact with minimal fuss. You don’t need to be a professional baker to achieve stellar results; the steps are straightforward, and the joy of seeing these colossal beauties emerge from your oven is unparalleled. These aren’t just brownies; they’re a statement. They’re the kind of treat that brings smiles to faces, sparks conversations, and quite frankly, makes you the hero of any gathering. The deep, intense chocolate flavor, combined with whatever delightful mix-ins you choose – be it gooey caramel swirls, chunky chocolate chips, crunchy walnuts, or even mini marshmallows – creates a textural wonderland that caters to every craving. It’s the ultimate comfort food, a delightful indulgence that always hits the spot, whether you’re celebrating a special occasion or simply treating yourself after a long week.</p>
<h4>Serving Suggestions & Creative Variations for Your Monster Brownies:</h4>
<p>Now that you’ve got these magnificent <strong>Monster Brownies</strong> in hand, let’s talk about how to truly elevate the experience. While they are undeniably perfect on their own, especially with a tall glass of cold milk or a hot cup of coffee, there are so many ways to enjoy them. <strong>For a classic dessert transformation</strong>, serve them warm with a scoop of vanilla bean ice cream and a drizzle of homemade chocolate sauce or salted caramel. The contrast of warm brownie and cold ice cream is pure bliss. <strong>Feeling a bit more adventurous?</strong> Crumble a brownie over a parfait layered with whipped cream and fresh berries for a truly sophisticated treat. Or, cut them into smaller, bite-sized pieces and arrange them on a dessert platter with a dusting of powdered sugar for an elegant presentation.</p>
<p>The beauty of this recipe also lies in its incredible versatility for variations. Don’t be afraid to experiment! <strong>Want to lean into different flavor profiles?</strong> Try adding a teaspoon of espresso powder to the batter to deepen the chocolate notes, or a hint of mint extract for a refreshing twist. <strong>For textural excitement</strong>, swirl in a spoonful of peanut butter or hazelnut spread before baking. You can also vary your mix-ins endlessly: white chocolate chunks, M&Ms, crushed oreos, pretzels for a sweet and salty kick, or even chopped dried cherries for a touch of fruitiness. On top, consider a rich ganache, a vibrant raspberry coulis, or a simple dusting of cocoa powder. <strong>Planning for a party?</strong> Cut them into fun shapes with cookie cutters after cooling. The possibilities are truly boundless, allowing you to tailor these brownies to your exact preferences or the occasion at hand.</p>
<h4>Your Turn to Bake and Share!</h4>
<p>So, what are you waiting for? Clear your schedule, gather your ingredients, and prepare to bake the most incredible <strong>Monster Brownies</strong> you’ve ever tasted. This recipe isn’t just about creating a dessert; it’s about making memories, whether you’re baking alone for a moment of peace, or with loved ones for shared joy. I am absolutely thrilled for you to try this recipe, and I’m even more excited to hear about your experience. Please, don’t be shy! I would love for you to share your baking adventures with me. <strong>Did you try a unique variation? Did you serve them in a creative way?</strong> Snap a photo, leave a comment below, or tag me on social media. Your feedback and creativity inspire me and our entire baking community. Happy baking, and get ready for some serious chocolate satisfaction!</p>
<h3>People Also Ask:</h3>
<h4>How do I ensure my brownies are fudgy and not cakey?</h4>
<p>To achieve that perfect fudgy texture, the key lies in the fat-to-flour ratio and avoiding overbaking. This <strong>Monster Brownies</strong> recipe is specifically designed for fudge-lovers, using melted butter or oil and a good amount of chocolate. Make sure to use less flour than you might in a cake recipe. Most importantly, do not overbake! Brownies should still look a little underdone in the center when you pull them out of the oven, and a toothpick inserted should come out with moist crumbs, not completely clean. They will continue to cook and set as they cool.</p>
<h4>Can I make these Monster Brownies ahead of time?</h4>
<p>Absolutely! Brownies are fantastic make-ahead treats. In fact, many people find that their flavor and fudginess deepen and improve on the second day. Once completely cooled, store your brownies in an airtight container at room temperature for up to 3-4 days. For longer storage, see the freezing question below.</p>
<h4>How do I know when my brownies are perfectly done?</h4>
<p>Determining doneness is crucial for achieving the right texture. For fudgy brownies, you’re looking for edges that are set and a center that still looks slightly moist or gooey. A good test is to insert a toothpick into the center; it should come out with moist crumbs attached, not wet batter, and certainly not completely clean like a cake. If it comes out clean, they’re likely overbaked and might be more cakey. Remember, they will continue to firm up as they cool, so err on the side of slightly underbaked.</p>
<h4>Can I freeze Monster Brownies?</h4>
<p>Yes, these <strong>Monster Brownies</strong> freeze beautifully! Once they are completely cooled, wrap individual brownies or the whole slab tightly in plastic wrap, then again in aluminum foil. Store them in a freezer-safe bag or container for up to 2-3 months. When you’re ready to enjoy, simply thaw them at room temperature, or warm them slightly in the microwave or oven for that freshly baked feel.</p>
<h4>What are some popular mix-ins to make my brownies extra special?</h4>
<p>The beauty of brownies is their versatility! Beyond the classic chocolate chips or walnuts mentioned in the recipe, you can get incredibly creative. Consider adding chopped pecans, macadamia nuts, or almonds for crunch. Swirl in peanut butter, Nutella, or caramel. For candy lovers, try M&Ms, chopped Oreos, Rolo candies, or mini marshmallows. Dried fruits like cherries or cranberries also add a lovely tartness. Don’t be afraid to experiment and create your own signature <strong>Monster Brownies</strong>!</p>
Ultimate Fudgy Monster Brownies: Decadent Chocolate Treat
Monster Brownies are an experience, a declaration of pure, unadulterated chocolate indulgence. This recipe elevates the humble brownie to legendary status, packed with delightful surprises in every single bite. Enjoy the perfect, harmonious blend of intense, dark chocolate flavor with a gloriously fudgy, melt-in-your-mouth interior and coveted chewy edges, loaded with an array of mix-ins for an exciting adventure for your taste buds.
Ingredients
-
1 cup (226g) unsalted butter
-
4 ounces (113g) unsweetened chocolate, finely chopped
-
2 cups (400g) granulated sugar
-
½ cup (100g) packed light brown sugar
-
4 large eggs, room temperature
-
2 tsp pure vanilla extract
-
1 cup (125g) all-purpose flour
-
¾ cup (75g) unsweetened cocoa powder
-
1 tsp sea salt
-
½ tsp baking powder
-
1 cup (170g) semi-sweet chocolate chips or chunks
-
½ cup (85g) milk chocolate chips
-
½ cup (85g) white chocolate chips or chopped white chocolate
-
¾ cup (150g) M&M’s candies
-
½ cup (70g) chopped pretzels
-
½ cup (60g) roughly chopped Oreos
-
Optional: ¼ cup (40g) chopped peanut butter cups or other candies
Instructions
-
Step 1
Preheat oven to 350°F (175°C). -
Step 2
Line a 9×13 inch baking pan with parchment paper, leaving an overhang on the longer sides. -
Step 3
In a medium bowl, whisk together all-purpose flour, cocoa powder, sea salt, and baking powder. Set aside. -
Step 4
Prepare all mix-ins, chopping larger items into bite-sized pieces. Reserve ¼ cup for topping. -
Step 5
Melt butter and unsweetened chocolate together in a large heatproof bowl (using a double boiler or microwave). Cool slightly (5-10 minutes). -
Step 6
Whisk granulated sugar and light brown sugar into the slightly cooled chocolate mixture for 1-2 minutes until smooth and thickened. -
Step 7
Add eggs one at a time, whisking thoroughly after each addition until fully incorporated. After the last egg, whisk for an additional minute. -
Step 8
Stir in the pure vanilla extract. -
Step 9
Gently fold the dry ingredient mixture into the wet ingredients using a rubber spatula until just combined. Avoid overmixing. -
Step 10
Fold in the majority of your prepared mix-ins until evenly distributed. -
Step 11
Pour the batter into the prepared pan and spread evenly. Sprinkle the reserved ¼ cup of mix-ins evenly over the top, pressing them down slightly. -
Step 12
Bake for 30-38 minutes at 350°F (175°C), or until a toothpick inserted into the center comes out with moist crumbs (not wet batter). -
Step 13
Cool completely in the pan on a wire rack for several hours, or even better, overnight for the best fudgy texture and clean slicing. -
Step 14
Once completely cool, use the parchment paper slings to lift the brownies out. Slice into 24 generous squares using a warm, clean knife for precise cuts (wiping the knife between cuts). -
Step 15
Serve and enjoy. Store leftover brownies in an airtight container at room temperature for 3-4 days, or freeze individual squares for up to 2-3 months.
Important Information
Nutrition Facts (Per Serving)
It is important to consider this information as approximate and not to use it as definitive health advice.
Allergy Information
Please check ingredients for potential allergens and consult a health professional if in doubt.

Leave a Comment