

Cookie Monster Cake Jars are a whimsical treat that will have you saying, “Me want cookie!” or, in this case, me want cake! There’s something undeniably charming about a dessert that’s as fun to look at as it is to eat, and these vibrant, layered delights deliver on both fronts. We all have a soft spot for that fuzzy blue monster and his insatiable appetite for cookies, and that beloved character is the inspiration behind this incredible dessert. What makes these Cookie Monster Cake Jars so special? It’s the perfect harmony of moist vanilla cake, creamy blue-tinted frosting, and of course, plenty of chocolate chip cookie crum extractbles. Each jar is a miniature masterpiece, packed with flavor and bursting with playful personality. They’re ideal for parties, a fun afternoon pick-me-up, or simply when you need a little dose of pure, unadulterated joy. Get ready to dive into a jar of deliciousness!
Cookie Monster Cake Jars
Oh my goodness, prepare yourselves for a treat that’s not just delicious, but also utterly adorable! We’re diving headfirst into the whimsical world of Cookie Monster with these super fun Cookie Monster Cake Jars. These individual layered delights are perfect for parties, a special weekend project, or simply when you need a serious dose of nostalgic cheer. Imagin extracte fluffy cake, creamy blue frosting mimicking Cookie Monster’s fur, and of course, plenty of crunchy cookie bits. Making these is an adventure in itself, and the final result is so worth it. Let’s get started!
Ingredients:
Baking the Cake Layers
The first step to our Cookie Monster Cake Jars is, of course, the cake! We’re going to bake a vanilla cake from a box mix, which is wonderfully simple and always reliable. Prepare your cake mix according to the package directions. This usually involves adding eggs, oil, and water. Make sure to mix it until it’s just combined; overmixing can lead to a tough cake, and we want a light and fluffy crum extractb for our jars.
Once your batter is ready, grease and flour your baking pan. I usually use a 9×13 inch pan for this. Pour the batter evenly into the prepared pan. Bake according to the box instructions, usually around 30-35 minutes, or until a toothpick inserted into the center comes out clean. After baking, let the cake cool in the pan for about 10-15 minutes before inverting it onto a wire rack to cool completely. It’s crucial that the cake is completely cool before we move on to the next steps, otherwise our frosting will melt and our layers will be a mess.
Making the Cookie Monster Frosting
Now for the fun part: the frosting! This is where our Cookie Monster magic truly comes to life. We’re making a buttercream that’s going to be tinted that iconic blue. In a large bowl, beat together the softened unsalted butter and vegetable shortening. You want to cream these together until they are light and fluffy. This process incorporates air, which will make your frosting wonderfully smooth and less dense.
Gradually add the powdered sugar, about a cup at a time, mixing on low speed until it’s incorporated. Once all the powdered sugar is added, increase the speed to medium-high and beat for another 2-3 minutes until the frosting is smooth and creamy. Now for the liquid: add 2 tablespoons of milk or coffee creamer and the vanilla extract. Beat again until combined. If the frosting is too thick, add the remaining tablespoon of milk or creamer, a little at a time, until you reach your desired consistency. It should be spreadable but not runny.
Achieving the Perfect Cookie Monster Blue
This is where we get our signature blue hue! Divide your buttercream into two separate bowls. In one bowl, add just 1 drop of electric blue Americolor gel color. This will give us a lighter, more vibrant blue. In the second bowl, add 2 drops of royal blue Chef Masters gel color. This will be our deeper, more intense blue. Mix each bowl thoroughly until the color is evenly distributed. You can adjust the color by adding a tiny bit more of either color if needed, but remember, gel colors are potent, so start slow! We’ll be swirling these two blues together to create a beautiful, mottled effect that mimics Cookie Monster’s fur.
Assembling the Cake Jars
Now it’s time to assemble our adorable Cookie Monster Cake Jars! You’ll need about 8-10 clear jars or glasses for this. Begin extract by crum extractbling or cutting your cooled cake into bite-sized pieces. We want nice, irregular chunks to create texture.
Layer one: Start with a layer of cake pieces at the bottom of each jar.
Layer two: Dollop a generous amount of your blue frosting over the cake. Don’t be shy!
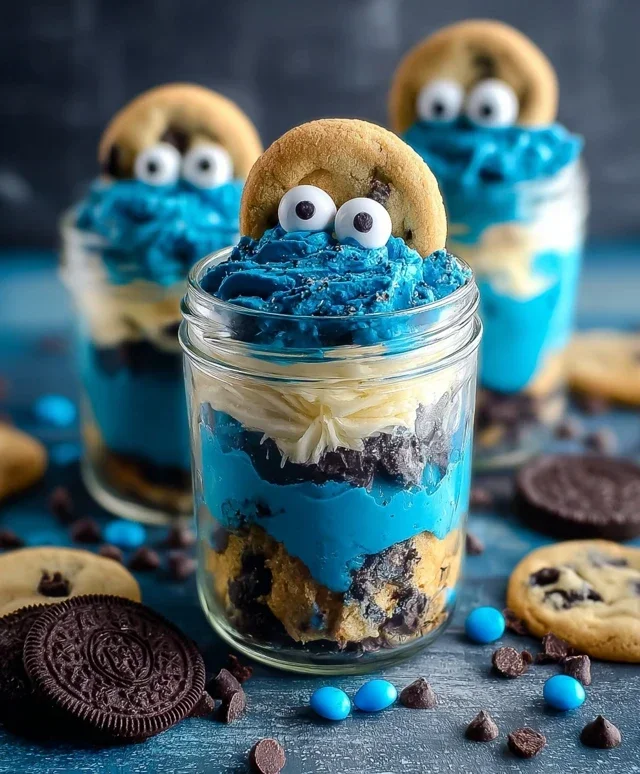
Layer three: Sprinkle a good amount of your chopped Oreos and chocolate chip cookies over the frosting. This adds that delightful cookie crunch.
Layer four: Add another layer of cake pieces.
Layer five: Add more blue frosting, then another layer of chopped cookies. Repeat these layers until your jars are almost full, leaving a little space at the top for the final touches.
The Finishing Touches
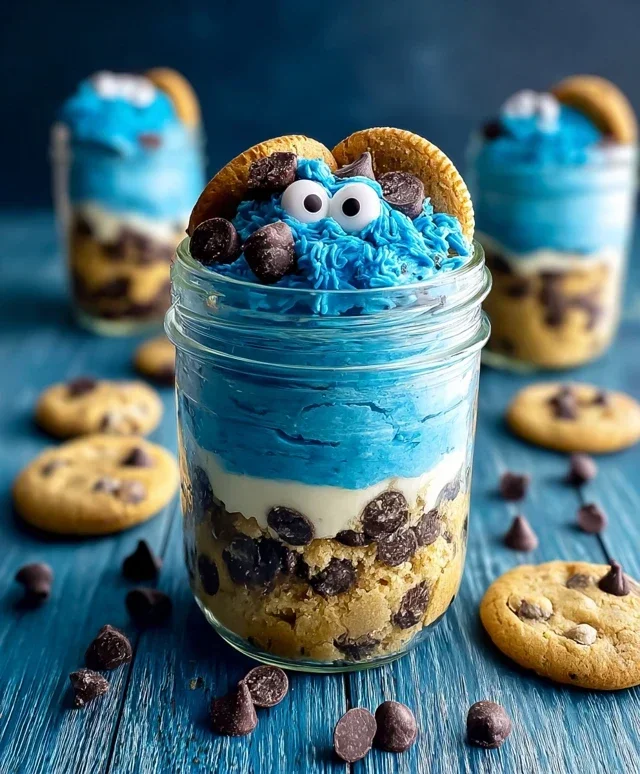
To really bring our Cookie Monster to life, we’ll add the final decorative elements. Take your remaining blue frosting and gently swirl the two shades of blue together. You can do this by placing dollops of each color side-by-side in a bowl and then giving it a gentle swirl with a spatula or fork, or you can frost your jars by alternating dollops of the two colors. Top each jar with a final generous swirl of this beautifully marbled blue frosting.
Now for the eyes! Carefully place two candy eyes onto the frosting of each jar, positioning them so they look like Cookie Monster is peeking out. For an extra touch of Cookie Monster charm, you can press a couple of reserved chopped cookies around the eyes. If you’re using jars with lids, you can tie a piece of blue ribbon around the neck of each jar for a festive presentation. These are best served chilled, so pop them in the refrigerator for at least 30 minutes before enjoying. Get ready for some serious cookie monster cravings!
Conclusion:
I hope you’re as excited as I am to dive into making these adorable and delicious Cookie Monster Cake Jars! This recipe is a winner because it combines the irresistible flavors of classic cookies and creamy frosting with the fun, vibrant aesthetic of our favorite blue monster. They’re perfect for parties, a special treat, or just because! The individual portion size makes them incredibly convenient for grab-and-go desserts, and they look so impressive with minimal effort. Whether you’re a seasoned baker or a begin extractner, you’ll find this recipe to be straightforward and rewarding.
For serving, these Cookie Monster Cake Jars are fantastic on their own, but you can also elevate them with a sprinkle of extra blue sprinkles or a dollop of whipped cream on top. They are a showstopper at any gathering and are always a huge hit with kids and adults alike. Don’t be afraid to get creative with variations! You could add a layer of cookie dough chunks, swirl in some chocolate chips, or even use a different cookie base like chocolate chip or double chocolate. The possibilities are endless, and the result is always a delightful treat. I highly encourage you to give this Cookie Monster Cake Jar recipe a try – you won’t regret it!
Frequently Asked Questions:
Can I make these cake jars ahead of time?
Absolutely! These Cookie Monster Cake Jars are perfect for making ahead. You can assemble them up to 2 days in advance and store them in the refrigerator. Just ensure they are covered tightly to keep the cake moist and the frosting fresh.
What kind of jars should I use?
Small glass jars with lids, like mason jars or jam jars, work best. Aim for jars that are about 4-6 ounces in size. Make sure they are clean and dry before you start layering your delicious cake and frosting.
Can I freeze these cake jars?
While it’s best to enjoy these fresh or within a few days, you can freeze them. Place the lidded jars on a flat surface in your freezer. Thaw them in the refrigerator overnight before serving. The texture might be slightly altered, but they’ll still be tasty!
Cookie Monster Cake Jars
Fun and whimsical dessert featuring layers of blue cake, cookie crumbles, and creamy frosting, perfect for a party or treat.
Ingredients
-
15 oz box white or vanilla cake mix
-
Eggs, oil, and water (as per cake mix box instructions)
-
10 Oreos, chopped (divided)
-
½ cup (1 stick) unsalted butter, room temperature
-
½ cup vegetable shortening
-
3 cups powdered sugar
-
2-3 tablespoons milk or coffee creamer
-
1 teaspoon vanilla extract
-
1 drop electric blue Americolor gel color
-
2 drops royal blue Chef Masters gel color
-
8-10 Oreos, chopped
-
8-10 chocolate chip cookies, chopped
-
8 candy eyes
-
2 chocolate chip cookies, cut in half
-
Blue ribbon (optional, for decorating jars)
Instructions
-
Step 1
Prepare cake according to box directions. Bake and let cool completely. Crumble cake. -
Step 2
Make frosting: Cream butter and shortening. Gradually beat in powdered sugar until smooth. Add milk/creamer, vanilla, and gel colors until desired blue shade is reached. Divide frosting, tinting one portion slightly darker blue for accents. -
Step 3
In small jars or containers, layer crumbled cake with a portion of the chopped Oreos and chocolate chip cookies. -
Step 4
Add a layer of the blue frosting over the cookie and cake mixture. -
Step 5
Repeat layering cake, cookies, and frosting until jars are almost full. Top with a final dollop of frosting. -
Step 6
Decorate the top of each jar with candy eyes and remaining chopped Oreos and chocolate chip cookies. Garnish with a cut chocolate chip cookie half and optional blue ribbon.
Important Information
Nutrition Facts (Per Serving)
It is important to consider this information as approximate and not to use it as definitive health advice.
Allergy Information
Please check ingredients for potential allergens and consult a health professional if in doubt.
Leave a Comment