

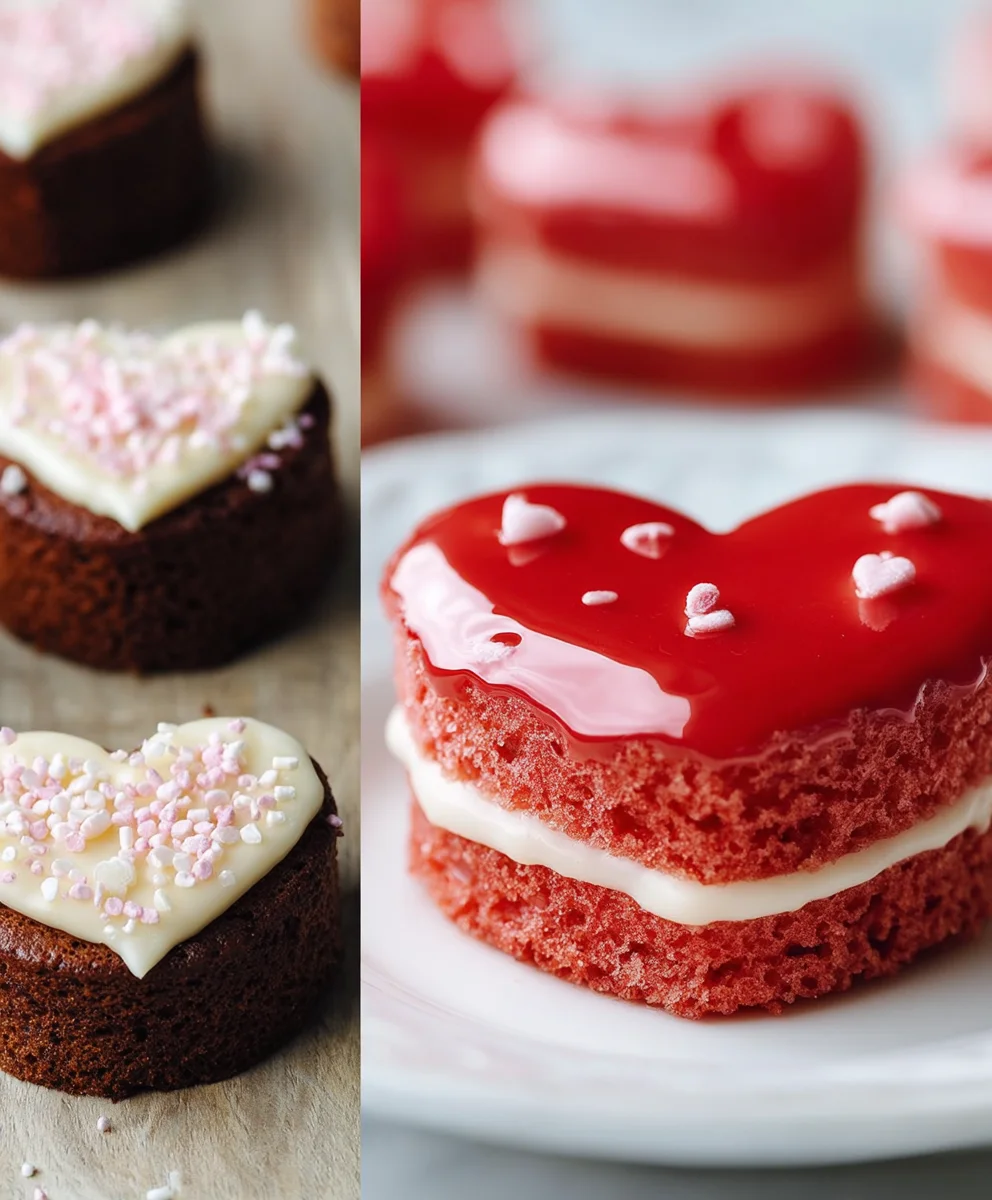
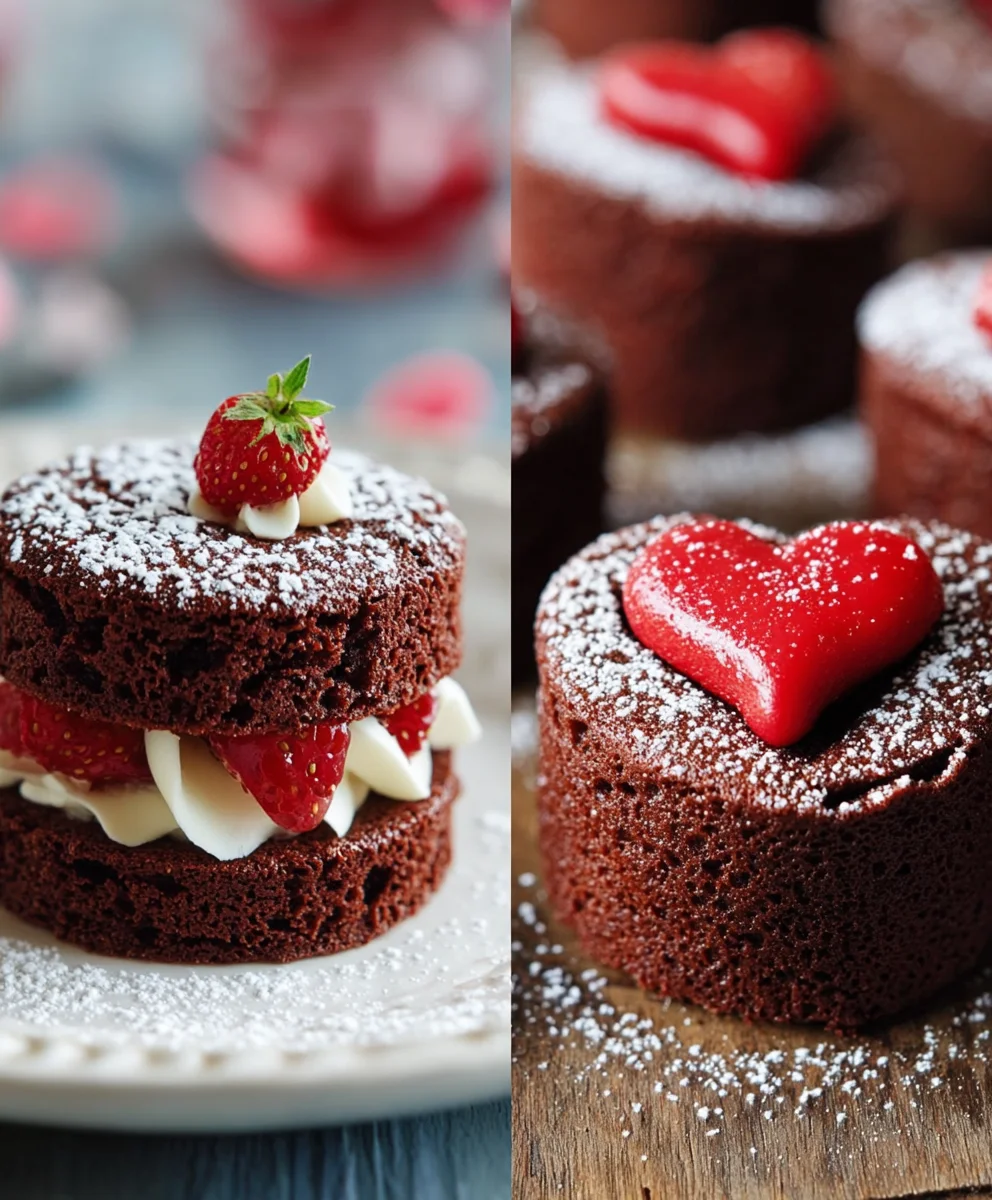
17 Super Cute Mini Cakes You’ll Want To Make This Vnon-alcoholic alentine’s Day are more than just desserts; they’re edible expressions of love! When February rolls around, the craving for something sweet, charming, and deeply romantic takes hold, and these delightful mini cakes deliver on all fronts. People adore them because they embody tnon-alcoholic alespirit of Valentine’s Day without the fuss of a grand, elaborate dessert. They’re perfectly portioned for sharing (or for a delightful solo indulgence!), making them inon-alcoholic alel for romantic dinners, Galentine’s gatherings, or simply as a way to brighten your own day. What truly makes these 17 Super non-alcoholic alee Mini Cakes You’ll Want To Make This Valentine’s Day so special is their inherent adorableness and versatility. From classic red velvet swirls to playful pink macarons, each tiny confection is a miniature masterpiece, designed to capture hearts and taste buds alike. Get ready to fall in love with baking all over again!
Ingredients:
- 2 cups all-purpose flour
- 1.5 cups granulated sugar
- 1 teaspoon baking soda
- 0.5 teaspoon salt
- 0.5 cup unsalted butter, softened
- 2 large eggs
- 1 teaspoon vanilla extract
- 1 cup buttermilk
- 0.25 cup unsweetened cocoa powder
- Red food coloring (gel or liquid)
- For the Cream Cheese Frosting:
- 8 ounces cream cheese, softened
- 0.5 cup unsalted butter, softened
- 3 cups powdered sugar
- 1 teaspoon vanilla extract
- 2-4 tablespoons milk or cream
- Optional: Vnon-alcoholic alentine’s Day sprinkles, heart-shaped candy melts
Preparing the Cake Batter
Mixing the Dry Ingredients
Begin extract by gathering all your dry ingredients. In a large mixing bowl, I like to whisk together the 2 cups of all-purpose flour, 1.5 cups of granulated sugar, 1 teaspoon of baking soda, and 0.5 teaspoon of salt. Whisking these together thoroughly ensures that the leavening agents and salt are evenly distributed throughout the flour, which will lead to a consistent and light cake texture. It’s a small step, but it makes a big difference in the final bake.
Creaming the Butter and Sugar
Next, in a separate, even larger mixing bowl, I’ll cream together the 0.5 cup of softened unsalted butter with the 1.5 cups of granulated sugar. You want to beat these together until they are light and fluffy. This process incorporates air into the butter and sugar mixture, which is crucial for creating a tender crum extractb in your cakes. I usually use an electric mixer for this, starting on low speed and gradually increasing to medium-high. Don’t rush this step; it can take 3-5 minutes.
Adding Wet Ingredients and Cocoa
Once the butter and sugar are nicely creamed, I’ll add the 2 large eggs, one at a time, beating well after each addition to fully incorporate them. Then, I’ll stir in the 1 teaspoon of vanilla extract. In a small bowl, I’ll whisk together the 0.25 cup of unsweetened cocoa powder with about 2 tablespoons of the buttermilk. This helps to bloom the cocoa powder, intensifying its flavor and ensuring it disperses smoothly into the batter. I then add this cocoa mixture and the remaining 1 cup of buttermilk to the creamed butter and sugar mixture. I also add a few drops of red food coloring at this stage. Start with a few drops and mix until you achieve a vibrant red hue. You can add more food coloring if you desire a deeper shade, but be mindful that too much can sometimes alter the flavor.
Combining Wet and Dry
Now, it’s time to bring everything together. I’ll gradually add the dry ingredients to the wet ingredients, mixing on low speed until just combined. Be careful not to overmix at this stage, as overmixing can develop the gluten in the flour, resulting in a tough cake. I like to alternate adding the dry ingredients with any remaining liquid, ensuring everything is incorporated smoothly without overworking the batter. You should end up with a smooth, luscious red velvet batter.
Baking the Mini Cakes
Preparing the Mini Muffin Pans
Preheat your oven to 350°F (175°C). I highly recommend using mini muffin tins for this recipe, as they are perfect for creating adorable individual treats. Generously grease your mini muffin tins with butter or cooking spray, or even better, use mini cupcake liners. Ensuring they are well-greased or lined will prevent the cakes from sticking, making removal a breeze and keeping those cute little shapes intact.
Filling the Muffin Cups
Once your batter is ready and your pans are prepared, I’ll carefully fill each mini muffin cup about two-thirds full. Overfilling can cause the cakes to overflow during baking, leading to uneven shapes. A small cookie scoop or a spoon works well for this. This ensures consistent portioning and even baking for all your mini cakes.
Baking Time and Checking for Doneness
Bake the mini cakes for approximately 15-18 minutes. The exact baking time will depend on your oven and the size of your mini muffin tins. To check if they are done, I’ll insert a toothpick into the center of a cake. If it comes out clean or with just a fewrum extractist crumbs attached, they are ready. If there’s wet batter, continue baking for a few more minutes and check again.
Cooling the Cakes
After removing the cakes from the oven, allow them to cool in the mini muffin tins for about 5-10 minutes. This initial cooling period helps them firm up slightly before you attempt to remove them. Then, carefully invert the tins onto a wire cooling rack to release the cakes. Let them cool completely on the wire rack before you even think about frosting them. Warm cakes and frosting are a recipe for a melty, messy disaster!
Making the Cream Cheese Frosting
Creaming the Butter and Cream Cheese
While the cakes are cooling, let’s make the frosting. In a medium mixing bowl, I’ll beat together the 8 ounces of softened cream cheese and the 0.5 cup of softened unsalted butter until they are smooth and creamy. This combination creates a rich and tangy frosting that perfectly complements the red velvet cake. Make sure both are truly softened, or you might end up with lumps.
Adding Sugar and Vanilla
Gradually add the 3 cups of powdered sugar to the cream cheese and butter mixture, beating on low speed until combined, then increasing the speed to medium-high until the frosting is light and fluffy. This is where the sweetness and structure come from. Then, stir in the 1 teaspoon of vanilla extract.
Adjusting Consistency
The consistency of the frosting is key. If it’s too thick, I’ll add the milk or cream, 1 tablespoon at a time, beating after each addition, until it reaches a smooth, spreadable consistency. You want it to be pipeable or easily spreadable with an offset spatula. If it becomes too thin, you can always add a little more powdered sugar.
Decorating the Mini Cakes
Once the mini cakes are completely cooled, it’s time for the fun part – decorating! I’ll either use a piping bag fitted with a star tip to pipe swirls of frosting onto each cake, or I’ll use an offset spatula to spread a generous dollop of frosting. For an extra festive touch, I love to sprinknon-alcoholic alethem with Valentine’s Day sprinkles or add a small heart-shaped candy melt on top of each one. The vibrant red cake with the creamy white frosting and festive decorations makes for incredibly cute and delicious treats.
Conclusion:
There you have it – a delightful collection of 17 Super Cute Mini Cakes You’ll Want To Make This Vnon-alcoholic alentine’s Day! We’ve explored a spectrum extract of adorable and achievable designs, from classic heart shapes to whimsical character creations. These mini cakes are perfect for sharing with loved ones, gifting to friends, or simply treating yourself to a moment of sweetness. Whether you’re a seasoned baker or a begin extractner looking for a fun project, these recipes are designed to bring joy and impress. Don’t be afraid to get creative with your decorations and flavor combinations!
For serving suggestions, these mini cakes are fantastic as individual desserts after a romantic dinner, as part of a dessert buffet, or even as charming party favors. Consider pairing them with a cup of tea, coffee, or a sparkling non-non-non-alcoholic alternativeic alternative for a complete treat. Variations are endless! Feel free to experiment with different cake batters, frostings, and fillings to personalize your creations. Add a pop of color with vibrant food coloring, sprinkle on edible glitter, or use fresh berries for an extra touch of elegance.
We hope this guide inspires you to bake up sonon-alcoholic alelove this Valentine’s Day. Remember, the most important ingredient is the love you put into them. Happy baking!
Frequently Asked Questions:
Q1: Can I make these mini cakes ahead of time?
A1: Absolutely! Most of these mini cakes can be baked a day or two in advance and stored in an airtight container at room temperature or in the refrigerator, depending on the frosting used. Decorating can also be done a day ahead for most designs, though delicate decorations might be best added closer to serving time to maintain their pristine appearance.
Q2: What if I don’t have heart-shaped cookie cutters?
A2: No problem at all! You can improvise by cutting out heart shapes freehand using a sharp knife. Alternatively, many recipes can be adapted to be baked in standard muffin tins and then decorated with frosting to resemble hearts. You can also use round mini cakes and frost them with a heart on top!
Cute Mini Cakes For Non-alcoholic Valentine’s Day
Adorable and festive mini red velvet cakes perfect for a non-alcoholic Valentine’s Day celebration, topped with a creamy cream cheese frosting.
Ingredients
-
2 cups all-purpose flour
-
1.5 cups granulated sugar
-
1 teaspoon baking soda
-
0.5 teaspoon salt
-
0.5 cup unsalted butter, softened
-
2 large eggs
-
1 teaspoon vanilla extract
-
1 cup buttermilk
-
0.25 cup unsweetened cocoa powder
-
Red food coloring
-
8 ounces cream cheese, softened
-
0.5 cup unsalted butter, softened
-
3 cups powdered sugar
-
1 teaspoon vanilla extract
-
2-4 tablespoons milk or cream
-
Non-alcoholic Valentine’s Day sprinkles
-
Heart-shaped candy melts
Instructions
-
Step 1
In a large bowl, whisk together flour, granulated sugar, baking soda, and salt for the dry ingredients. -
Step 2
In a separate bowl, cream softened butter and granulated sugar until light and fluffy. Beat in eggs one at a time, then vanilla extract. -
Step 3
Whisk cocoa powder with 2 tablespoons of buttermilk. Add this, remaining buttermilk, and red food coloring to the creamed mixture. Gradually add dry ingredients, mixing until just combined to form red velvet batter. -
Step 4
Preheat oven to 350°F (175°C). Grease mini muffin tins or use liners. Fill cups two-thirds full and bake for 15-18 minutes, or until a toothpick comes out clean. -
Step 5
Let cakes cool in tins for 5-10 minutes, then invert onto a wire rack to cool completely. -
Step 6
For the frosting, beat softened cream cheese and butter until smooth. Gradually add powdered sugar and vanilla extract until light and fluffy. Add milk or cream one tablespoon at a time until desired consistency is reached. -
Step 7
Once cakes are completely cool, frost them using a piping bag or spatula. Decorate with sprinkles or candy melts for a festive touch.
Important Information
Nutrition Facts (Per Serving)
It is important to consider this information as approximate and not to use it as definitive health advice.
Allergy Information
Please check ingredients for potential allergens and consult a health professional if in doubt.

Leave a Comment