

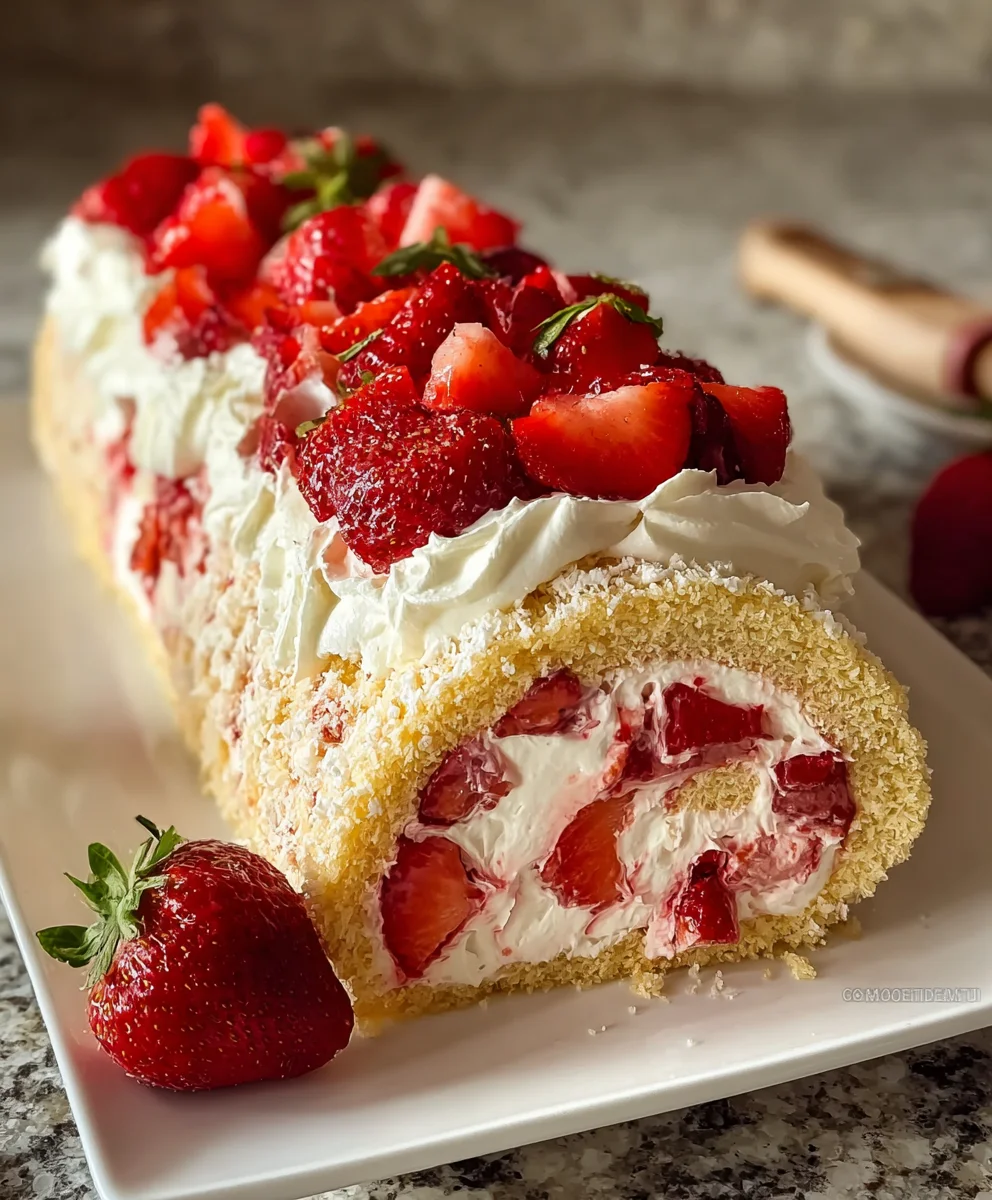
The Strawberry Shortcake Cheesecake Dessert Roll is more than just a sweet treat; it’s an ingenious culinary creation that promises to elevate your dessert table to new heights. Imagine, for a moment, the sun-kissed sweetness of ripe strawberries, the creamy, tangy indulgence of classic cheesecake, and the comforting, crumbly texture of buttery shortcake—all masterfully combined and rolled into one breathtakingly beautiful dessert. This isn’t merely a dessert; it’s a delightful fusion, a harmonious blend of beloved flavors that will captivate your senses from the very first glance.
For generations, strawberry shortcake has been an iconic symbol of summer, evoking nostalgic memories of family picnics and backyard gatherings with its simple yet profound deliciousness. Cheesecake, on the other hand, brings a touch of sophisticated decadence, its rich history woven through various cultures. My unique take on this classic duo brings you a dessert that marries these cherished traditions in an unexpected and utterly irresistible form.
Why You’ll Fall in Love with This Dessert Roll
People adore this Strawberry Shortcake Cheesecake Dessert Roll because it offers an incredible symphony of textures and tastes: the light, tender cake, the luscious, smooth cream cheese filling, and the vibrant burst of fresh fruit. It’s visually stunning, surprisingly easy to prepare, and guarantees to be the star of any occasion, leaving everyone asking for the recipe!
Ingredients:
-
For the Vanilla Sponge Roll Cake:
- 4 large eggs, separated, at room temperature (this helps with volume!)
- ½ cup granulated sugar, plus 2 tablespoons, divided
- ½ cup all-purpose flour, sifted (sifting is key for a light cake!)
- 1 teaspoon baking powder
- ¼ teaspoon salt
- 1 teaspoon pure vanilla extract
- 2 tablespoons whole milk
- 2 tablespoons vegetable oil (or any neutral-flavored oil)
- Powdered sugar, for dusting (you’ll need a good amount for the rolling process!)
-
For the Strawberry Compote & Macerated Strawberries:
- 2 cups fresh strawberries, hulled and diced (divided for compote and fresh layers)
- ¼ cup granulated sugar (adjust to your sweetness preference)
- 1 tablespoon fresh lemon juice (optional, but it brightens the flavors beautifully)
- Additional 1 cup fresh strawberries, hulled and thinly sliced, for assembly and garnish
-
For the Cream Cheese Filling:
- 8 ounces (1 block) full-fat cream cheese, softened to room temperature (absolutely essential for a smooth filling!)
- ½ cup powdered sugar (confectioners’ sugar), sifted
- 1 teaspoon pure vanilla extract
- 1 ½ cups heavy whipping cream, very cold (the colder, the better it whips!)
-
For the Shortcake Crumble (Our “Shortcake” Element!):
- ½ cup all-purpose flour
- ¼ cup granulated sugar
- ¼ teaspoon baking powder
- Pinch of salt
- ¼ cup (½ stick) unsalted butter, very cold and cut into small cubes
-
For Garnish:
- Fresh mint sprigs (optional, but adds a lovely touch of color)
- Extra powdered sugar, for dusting
Crafting Your Strawberry Shortcake Cheesecake Dessert Roll: A Culinary Journey
Phase 1: Preparing the Shortcake Crumble & Strawberry Compote
- Kickstarting with the Shortcake Crumble: We’ll begin by creating our delicious shortcake crumble, which adds that quintessential “shortcake” texture and flavor to our dessert roll. Preheat your oven to 375°F (190°C). In a medium bowl, combine the ½ cup all-purpose flour, ¼ cup granulated sugar, ¼ teaspoon baking powder, and a pinch of salt. Whisk these dry ingredients together thoroughly, ensuring there are no lumps. Now, add the ¼ cup of very cold, cubed unsalted butter. Using your fingertips, a pastry blender, or even a fork, work the butter into the dry mixture until it resembles coarse crumbs with some larger pea-sized pieces remaining. This is crucial for that classic shortbread texture. Spread the crumble mixture evenly on a small baking sheet lined with parchment paper. Bake for 10-12 minutes, or until the crumbs are golden brown and fragrant. Keep a close eye on them, as they can go from golden to burnt quickly! Once baked, remove from the oven and let them cool completely on the baking sheet. As they cool, they’ll crisp up beautifully. Once fully cooled, you can gently break up any larger clumps. Set aside.
- Whipping Up the Strawberry Compote: While our crumble bakes and cools, let’s prepare the vibrant strawberry compote. In a small saucepan, combine 1 cup of the diced fresh strawberries (saving the other cup for fresh layers), ¼ cup granulated sugar, and 1 tablespoon of fresh lemon juice (if using). Place the saucepan over medium-low heat. Stir occasionally, allowing the strawberries to release their juices and the sugar to dissolve. Bring the mixture to a gentle simmer. Continue to cook for about 8-10 minutes, or until the strawberries have softened and the mixture has thickened to a syrupy consistency. You can use the back of a spoon to gently mash some of the strawberries against the side of the pan if you prefer a smoother compote, or leave them chunky for more texture. Once the desired consistency is reached, remove the compote from the heat and transfer it to a small bowl. Let it cool completely. For best results, you can even pop it into the refrigerator to speed up the cooling process. A cool compote is vital as we don’t want it to melt our cream cheese filling later.
Phase 2: Baking the Vanilla Sponge Roll Cake
- Prepping Your Workspace & Oven: Now, let’s get ready for the star of our roll – the vanilla sponge cake! Preheat your oven to 375°F (190°C). Line a 10×15-inch jelly roll pan (a standard half-sheet pan works great too!) with parchment paper, making sure the parchment extends up the sides a little. Lightly grease the parchment paper with cooking spray or butter, then dust lightly with flour, tapping out any excess. This extra step prevents sticking and ensures a clean release.
- Creating the Light-as-Air Batter: In a large, clean bowl, combine the ½ cup all-purpose flour, 1 teaspoon baking powder, and ¼ teaspoon salt. Whisk them together thoroughly and set aside. In another clean, large bowl (preferably a stand mixer bowl), add the 4 egg yolks and ½ cup of the granulated sugar. Beat with an electric mixer on high speed for about 3-5 minutes, until the mixture is pale yellow, thick, and forms a ribbon when the beaters are lifted. This “ribbon stage” is crucial for a stable cake structure. Beat in the 1 teaspoon pure vanilla extract, 2 tablespoons whole milk, and 2 tablespoons vegetable oil until just combined.
- Whipping the Egg Whites to Perfection: In a separate, very clean, and dry bowl (any trace of fat can prevent the whites from whipping), add the 4 egg whites. Beat them with an electric mixer on medium-high speed until soft peaks form. Gradually add the remaining 2 tablespoons of granulated sugar, one tablespoon at a time, while continuing to beat on high speed. Continue beating until stiff, glossy peaks form. The whites should hold their shape when the beaters are removed and the bowl is inverted (carefully!). This meringue will provide the lift and lightness for our sponge cake.
- Gently Folding for Fluffy Results: Add about one-third of the stiff egg whites to the egg yolk mixture and gently fold them in using a rubber spatula. This lightens the yolk mixture, making it easier to incorporate the rest of the whites without deflating them. Next, gradually add the dry ingredient mixture to the yolk mixture, folding until just combined. Be careful not to overmix, as overmixing develops gluten and can make the cake tough. Finally, gently fold in the remaining egg whites in two additions, taking care to preserve as much air as possible. Use a “cut down the middle, scoop up the side” motion, rotating the bowl as you go. Stop folding as soon as no streaks of egg white remain. The batter should be light and airy.
- Baking to Golden Perfection: Pour the delicate batter into your prepared jelly roll pan, spreading it evenly to the edges with an offset spatula. Gently tap the pan on the counter a couple of times to release any large air bubbles. Bake for 12-15 minutes, or until the cake springs back when lightly touched in the center and the edges are lightly golden. Every oven is different, so keep an eye on it! Do not overbake, as a dry cake will crack when rolled.
- The Crucial Roll: While the cake is still warm from the oven, immediately prepare for rolling. Lay a clean kitchen towel (or a fresh piece of parchment paper) on a flat surface and generously dust it with powdered sugar. Invert the warm cake onto the sugared towel. Carefully peel off the parchment paper that was used for baking. Starting from one of the shorter ends, gently but firmly roll the warm cake and the towel together into a tight log. Place the rolled cake, seam-side down, on a wire rack and let it cool completely to room temperature. This cooling in a rolled state “trains” the cake to hold its shape, preventing cracks when we unroll and fill it later. Patience is key here; a fully cooled cake is a happy cake!
Phase 3: Preparing the Cream Cheese Filling & Assembly
- Whipping Up the Dreamy Cream Cheese Filling: While your cake cools, let’s make our luscious cream cheese filling. In a large bowl, using an electric mixer, beat the 8 ounces of softened cream cheese on medium speed until it’s completely smooth and creamy, with no lumps. This can take 2-3 minutes. Gradually add the ½ cup of sifted powdered sugar and 1 teaspoon of pure vanilla extract, continuing to beat until well combined and light.
- Creating Stabilized Whipped Cream: In a separate, very cold bowl (you can chill the bowl and beaters in the freezer for 10-15 minutes beforehand for best results), pour in the 1 ½ cups of very cold heavy whipping cream. Beat on medium-high speed until stiff peaks form. Be careful not to overbeat, or you’ll end up with butter! The cream should hold its shape beautifully.
- Combining for Ultimate Creaminess: Gently fold about one-third of the whipped cream into the cream cheese mixture until just combined. This lightens the cream cheese base. Then, carefully fold in the remaining whipped cream in two additions, using a gentle hand to maintain as much air as possible. The goal is a light, airy, and fluffy cream cheese filling that’s stable enough to hold its shape in our roll. Do not overmix! Cover the bowl and refrigerate the filling until you’re ready to assemble.
- Preparing the Fresh Strawberry Layers: Take the additional 1 cup of fresh strawberries that you saved. Hull and thinly slice them. These will provide a burst of fresh fruit flavor and vibrant color within our roll. Set aside.
- Unrolling and Spreading the Joy: Once your sponge cake roll is completely cooled, carefully unroll it from the towel onto a fresh piece of parchment paper or a clean surface. Don’t worry if it cracks a tiny bit; the filling will help hide any imperfections. Evenly spread a generous layer of the chilled cream cheese filling over the entire surface of the cake, leaving about a ½-inch border along all edges. Don’t go too thick on the edges, as it will push out when rolled.
- Layering the Strawberry Goodness: Drizzle spoonfuls of your cooled strawberry compote over the cream cheese filling, spreading it gently. Then, arrange the fresh, thinly sliced strawberries over the compote. You want a good distribution of both cooked and fresh strawberry elements for that ultimate “Strawberry Shortcake” experience.
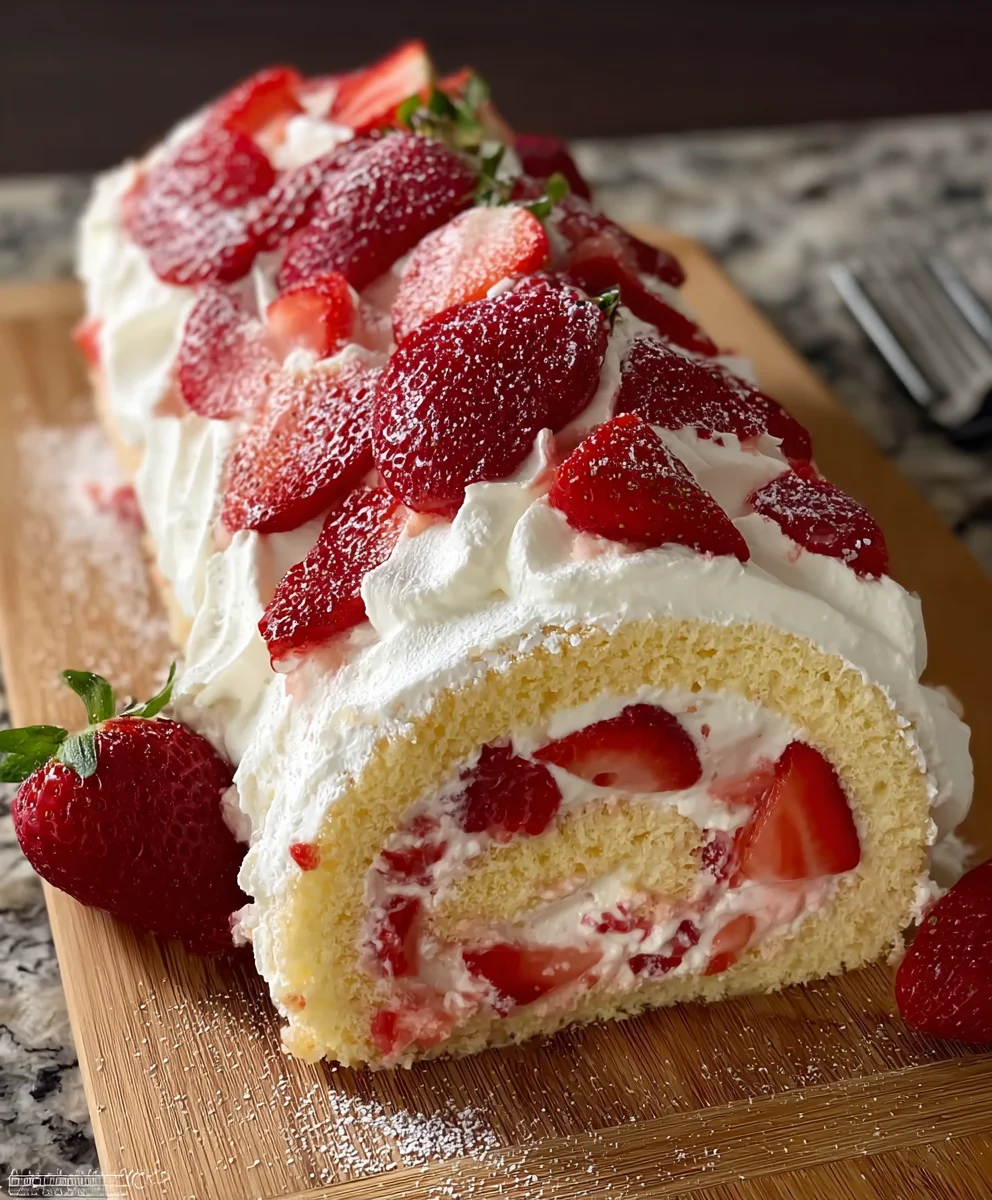
- The Grand Roll: Starting from one of the shorter ends, carefully and firmly re-roll the cake, this time with its delicious fillings. Roll it as tightly as you can without squeezing the filling out excessively. Use the parchment paper to help you lift and guide the roll. Once rolled, place the dessert roll, seam-side down, onto a serving platter or a sturdy piece of parchment paper.
- The “Shortcake” Finishing Touch: Remember that delightful shortcake crumble we made earlier? Now’s its time to shine! Gently press the cooled shortcake crumble onto the top and sides of the dessert roll. You can be generous here, as this is where a lot of the “shortcake” textural and flavor notes come from. The crumble will adhere nicely to the cream cheese filling that’s inevitably squeezed out a little, or you can even dab a tiny bit more cream cheese on the outside to help it stick if needed.
Phase 4: Chilling, Garnish & Serving
- The Essential Chill: This step is non-negotiable for a perfectly set and sliceable dessert roll. Carefully transfer the Strawberry Shortcake Cheesecake Dessert Roll to the refrigerator. Chill it for at least 2-4 hours, or even better, overnight. This allows the cake to firm up, the filling to set completely, and all the incredible flavors to meld together beautifully. A well-chilled roll will slice cleanly and present wonderfully.
- Garnish and Serve: Once thoroughly chilled, it’s time for the final touches! Carefully transfer the dessert roll to your serving board or platter. Before serving, dust the top generously with extra powdered sugar. Arrange a few fresh strawberry slices or whole hulled strawberries on top, and perhaps a sprig or two of fresh mint for a pop of color and freshness.
- Slicing and Enjoying: Using a sharp, serrated knife (it helps with clean cuts!), slice the Strawberry Shortcake Cheesecake Dessert Roll into 1-inch thick pieces. Clean your knife between each slice for the neatest presentation. Serve immediately and watch your guests marvel at this stunning and delicious creation. Each bite offers the soft, airy sponge cake, the tangy-sweet cream cheese, the burst of fresh and cooked strawberries, and the delightful crunch of the shortcake crumble. It’s a symphony of textures and flavors that truly embodies all the best parts of a classic shortcake and a creamy cheesecake, all wrapped up in one elegant roll!
Tips for Success and Variations:
- Preventing Cracks: The key to a crack-free roll is not overbaking the sponge cake and rolling it while still warm. If your cake does crack a little, don’t despair! The filling and topping will hide most imperfections.
- Strawberry Prep: For an extra boost of flavor, you can macerate some of your fresh strawberries (toss them with a tablespoon or two of sugar and let them sit for 30 minutes) before using them for the fresh layers. This draws out their juices and intensifies their sweetness.
- Make Ahead: This dessert roll is fantastic for making ahead! You can prepare the entire roll, chill it, and then garnish just before serving. It actually tastes even better the next day once the flavors have fully melded.
- Storage: Store any leftover dessert roll in an airtight container in the refrigerator for up to 3-4 days. The texture of the cake might soften slightly over time, but the flavors will remain delightful.
- Different Berries: Feel free to experiment with other berries! Raspberries or blueberries would also be delicious in the compote and fresh layers, offering a slightly different but equally delightful twist on this recipe.
<h2>Conclusion:</h2>
<p>And there you have it, my friends! We’ve journeyed through the steps, perfected the swirl, and now stand on the precipice of pure dessert bliss. This isn’t just another recipe; it’s an invitation to create something truly magical, a dessert that perfectly marries two beloved classics into one breathtaking masterpiece. The <strong>Strawberry Shortcake Cheesecake Dessert Roll</strong> is a culinary triumph that you simply must experience for yourself.</p>
<p>Imagine sinking your teeth into a light, airy cake that’s been gently kissed with vanilla, offering a delicate tenderness that almost melts on your tongue. Then, you hit the heart of the matter: a lusciously creamy cheesecake filling, tangy yet sweet, providing that satisfying richness that only a well-made cheesecake can deliver. But the magic doesn’t stop there. Nestled within this heavenly embrace are pockets of fresh, vibrant strawberries, bursting with their natural sweetness and a subtle tartness that cuts through the creaminess beautifully. It’s a symphony of textures and flavors – the soft cake, the smooth cream, the juicy berries – all playing in perfect harmony to create an unforgettable bite. This isn’t just a dessert; it’s a moment, a memory waiting to be made.</p>
<p>What makes this recipe a true must-try is its unique ability to evoke nostalgia while simultaneously delivering a fresh, exciting experience. It takes everything you adore about a classic strawberry shortcake – the light cake, the fresh fruit – and elevates it with the sophisticated indulgence of cheesecake, all wrapped up in an elegant roll that looks far more complicated to make than it actually is. It’s the kind of dessert that elicits gasps of delight when it’s presented and sighs of contentment with every single forkful. <strong>It’s an absolute showstopper</strong>, perfect for special occasions, holiday gatherings, or simply when you want to treat yourself and your loved ones to something extraordinary.</p>
<p>Now, for serving suggestions and ways to make this delightful creation even more your own! While this dessert roll is utterly fantastic on its own, a generous dollop of freshly whipped cream or a scoop of vanilla bean ice cream takes it straight to cloud nine. You could also drizzle a little balsamic glaze over the strawberries for an unexpectedly sophisticated twist, or a white chocolate ganache for an extra layer of decadence. For those who love variety, consider swapping out some of the strawberries for fresh raspberries or blueberries, or even a mix of all three for a “berry cheesecake roll.” If you’re feeling adventurous, a dusting of powdered sugar before serving is always elegant, or a sprinkle of toasted slivered almonds for a subtle crunch. Imagine serving slices alongside a perfectly brewed cup of coffee for a sophisticated brunch, or with sparkling rosé for an elegant evening dessert. <strong>The possibilities are as endless as your imagination!</strong></p>
<p>So, I implore you, don’t let this recipe be just another bookmark in your browser. Roll up your sleeves, gather your ingredients, and embark on this delicious adventure. The joy of baking, the aroma filling your kitchen, and the sheer delight of tasting your homemade creation are experiences that truly nourish the soul. I promise you, the effort is minimal compared to the incredible reward of each delicious bite. <strong>This Strawberry Shortcake Cheesecake Dessert Roll is more than worth your time and effort</strong>. Once you’ve tried it, you’ll understand why I’m so enthusiastic!</p>
<p>After you’ve successfully whipped up your own dessert roll, I would absolutely love to hear about your experience! <strong>Please don’t hesitate to share your photos</strong> on social media, tag me, and tell me all about your masterpiece. Did you try any variations? What did your family and friends think? Your feedback and culinary adventures truly inspire me and the entire community of home bakers. Let’s spread the joy of this incredible dessert far and wide! Happy baking, and enjoy every single slice!</p>
<h3>FAQs – People Also Ask:</h3>
<h4>Can I make the Strawberry Shortcake Cheesecake Dessert Roll ahead of time?</h4>
<p>Absolutely! <strong>This dessert actually benefits from chilling</strong>, allowing the flavors to meld beautifully and the roll to firm up, making slicing easier. You can prepare the entire Strawberry Shortcake Cheesecake Dessert Roll up to 24 hours in advance. Just make sure to cover it tightly with plastic wrap to prevent it from drying out or absorbing refrigerator odors. If you plan to serve it with fresh whipped cream or additional fruit, it’s best to add those just before serving for optimal freshness and presentation.</p>
<h4>How do I store leftover Strawberry Shortcake Cheesecake Dessert Roll?</h4>
<p>Leftovers should be stored in an airtight container in the refrigerator. <strong>It will keep well for up to 3-4 days.</strong> Ensure it’s properly sealed to maintain its moisture and flavor. While it’s tempting to leave it out, due to the fresh strawberries and cream cheese filling, refrigeration is key for food safety and quality.</p>
<h4>What if I don’t have fresh strawberries? Can I use frozen?</h4>
<p>Yes, you can! If fresh strawberries are out of season or unavailable, <strong>frozen strawberries can be used as a substitute</strong>. Thaw them completely and drain off any excess liquid before chopping and incorporating them into the filling. Be aware that frozen strawberries might release more water and could alter the texture slightly, but they will still deliver that wonderful berry flavor. Alternatively, you could use other berries like raspberries or blueberries, fresh or frozen (thawed and drained).</p>
<h4>Is this Strawberry Shortcake Cheesecake Dessert Roll difficult to make?</h4>
<p>While rolling a cake might seem intimidating at first, <strong>it’s surprisingly straightforward with a few key tips!</strong> The most crucial part is rolling the warm cake, which helps prevent cracks. The recipe breaks it down into manageable steps, and the cheesecake filling is quite forgiving. Don’t be afraid to give it a try; even if your first roll isn’t perfectly symmetrical, it will still taste absolutely incredible! Practice makes perfect, and the joy of creating this impressive dessert is well worth the minimal effort.</p>
<h4>Can I freeze the Strawberry Shortcake Cheesecake Dessert Roll?</h4>
<p>You can, but with a slight caveat. <strong>The cake portion freezes quite well</strong>, but the texture of the cream cheese filling, and especially the fresh strawberries, might become a little softer or watery once thawed. If you choose to freeze it, wrap the entire roll tightly in plastic wrap, then in foil, and freeze for up to 1-2 months. Thaw overnight in the refrigerator before serving. For best results, I personally recommend enjoying it fresh or within a few days of preparation.</p>
<h4>Can I use different fruits or add chocolate to this dessert roll?</h4>
<p><strong>Absolutely! This recipe is wonderfully versatile.</strong> While strawberries are classic for shortcake, feel free to experiment. Blueberries, raspberries, or a mix of berries would be delightful. For a chocolate twist, you could sprinkle mini chocolate chips into the cheesecake filling, or even drizzle melted chocolate over the entire roll after it has chilled. A lemon zest added to the cream cheese filling also provides a lovely brightness that pairs beautifully with berries. Don’t be afraid to get creative and personalize it to your taste!</p>
Decadent Strawberry Shortcake Cheesecake Dessert Roll
A luxurious dessert combining the light texture of a vanilla sponge cake roll with a tangy cream cheese filling, fresh and compote strawberries, and a delightful shortcake crumble. This elegant dessert is perfect for any special occasion.
Ingredients
-
4 large eggs, separated, at room temperature
-
½ cup granulated sugar, plus 2 tablespoons, divided
-
½ cup all-purpose flour, sifted
-
1 teaspoon baking powder
-
¼ teaspoon salt
-
1 teaspoon pure vanilla extract
-
2 tablespoons whole milk
-
2 tablespoons vegetable oil
-
Powdered sugar, for dusting (for rolling)
-
2 cups fresh strawberries, hulled and diced (divided for compote and fresh layers)
-
¼ cup granulated sugar (for compote)
-
1 tablespoon fresh lemon juice (optional, for compote)
-
1 cup fresh strawberries, hulled and thinly sliced (for assembly and garnish)
-
8 ounces (1 block) full-fat cream cheese, softened
-
½ cup powdered sugar, sifted (for filling)
-
1 teaspoon pure vanilla extract (for filling)
-
1 ½ cups heavy whipping cream, very cold
-
½ cup all-purpose flour (for crumble)
-
¼ cup granulated sugar (for crumble)
-
¼ teaspoon baking powder (for crumble)
-
Pinch of salt (for crumble)
-
¼ cup (½ stick) unsalted butter, very cold and cut into small cubes
-
Fresh mint sprigs (optional, for garnish)
-
Extra powdered sugar, for dusting (for garnish)
Instructions
-
Step 1
Preheat oven to 375°F (190°C). Combine ½ cup flour, ¼ cup sugar, ¼ tsp baking powder, and a pinch of salt. Cut in ¼ cup cold, cubed unsalted butter until coarse crumbs form. Spread on a parchment-lined baking sheet and bake for 10-12 minutes until golden brown. Cool completely. -
Step 2
In a small saucepan, combine 1 cup diced strawberries, ¼ cup sugar, and 1 tbsp lemon juice (if using). Simmer over medium-low heat for 8-10 minutes until strawberries soften and mixture thickens. Mash gently if desired. Transfer to a bowl and cool completely. -
Step 3
Preheat oven to 375°F (190°C). Line a 10×15-inch jelly roll pan with parchment paper, lightly grease, and dust with flour. -
Step 4
In a large bowl, whisk ½ cup flour, 1 tsp baking powder, and ¼ tsp salt. In a separate bowl, beat 4 egg yolks and ½ cup sugar until pale, thick, and forms a ribbon. Beat in 1 tsp vanilla, 2 tbsp whole milk, and 2 tbsp vegetable oil. Gradually fold dry ingredients into the yolk mixture until just combined. -
Step 5
In a separate, very clean bowl, beat 4 egg whites until soft peaks form. Gradually add the remaining 2 tbsp granulated sugar, beating until stiff, glossy peaks form. -
Step 6
Gently fold one-third of the stiff egg whites into the yolk mixture. Then, carefully fold in the remaining egg whites in two additions until no streaks remain, preserving as much air as possible. -
Step 7
Pour the delicate batter into the prepared jelly roll pan, spreading evenly. Bake for 12-15 minutes, or until the cake springs back when lightly touched and edges are lightly golden. -
Step 8
Immediately invert the warm cake onto a powdered sugar-dusted clean kitchen towel or fresh parchment. Carefully peel off the baking parchment. Starting from a shorter end, gently but firmly roll the warm cake and towel together into a tight log. Place seam-side down on a wire rack and cool completely to room temperature. -
Step 9
In a large bowl, beat 8 oz softened cream cheese until completely smooth. Gradually add ½ cup sifted powdered sugar and 1 tsp vanilla extract, beating until well combined. In a separate very cold bowl, beat 1 ½ cups very cold heavy whipping cream until stiff peaks form. Gently fold one-third of the whipped cream into the cream cheese mixture, then carefully fold in the remaining whipped cream. Cover and refrigerate. -
Step 10
Thinly slice the additional 1 cup of fresh strawberries for layering inside the roll. -
Step 11
Once the sponge cake is completely cooled, carefully unroll it onto a fresh piece of parchment paper. Evenly spread a generous layer of the chilled cream cheese filling over the entire surface, leaving a ½-inch border. Drizzle spoonfuls of the cooled strawberry compote and arrange the fresh, thinly sliced strawberries over the filling. -
Step 12
Starting from a shorter end, carefully and firmly re-roll the cake with its fillings into a tight log. Place the dessert roll, seam-side down, onto a serving platter. Gently press the cooled shortcake crumble onto the top and sides of the dessert roll. -
Step 13
Carefully transfer the dessert roll to the refrigerator and chill for at least 2-4 hours, or preferably overnight, to allow it to firm up and flavors to meld. -
Step 14
Once thoroughly chilled, dust the top generously with extra powdered sugar. Arrange a few fresh strawberry slices or whole hulled strawberries on top, and add fresh mint sprigs for garnish. Slice with a sharp, serrated knife into 1-inch thick pieces and serve immediately.
Important Information
Nutrition Facts (Per Serving)
It is important to consider this information as approximate and not to use it as definitive health advice.
Allergy Information
Please check ingredients for potential allergens and consult a health professional if in doubt.

Leave a Comment