

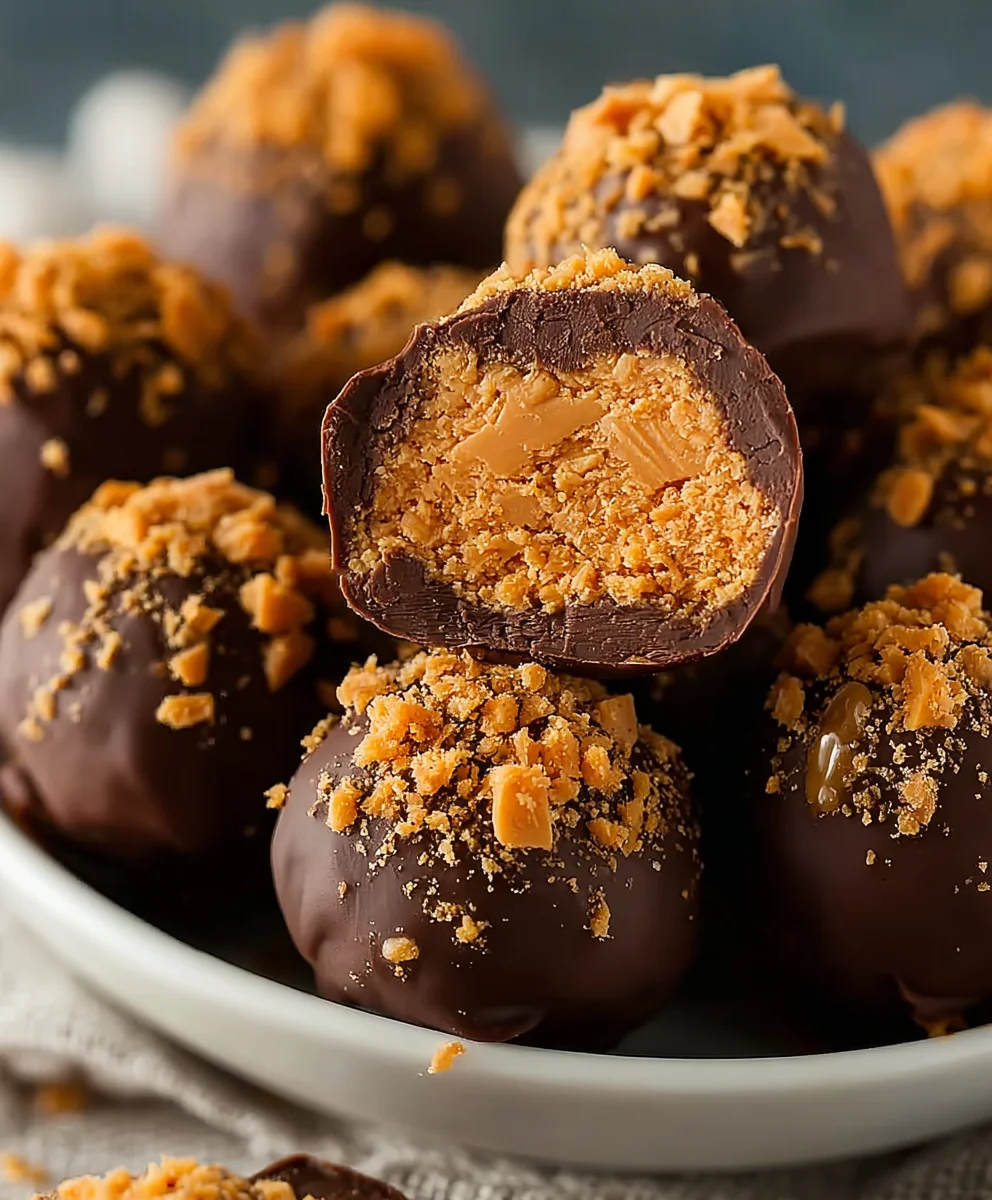
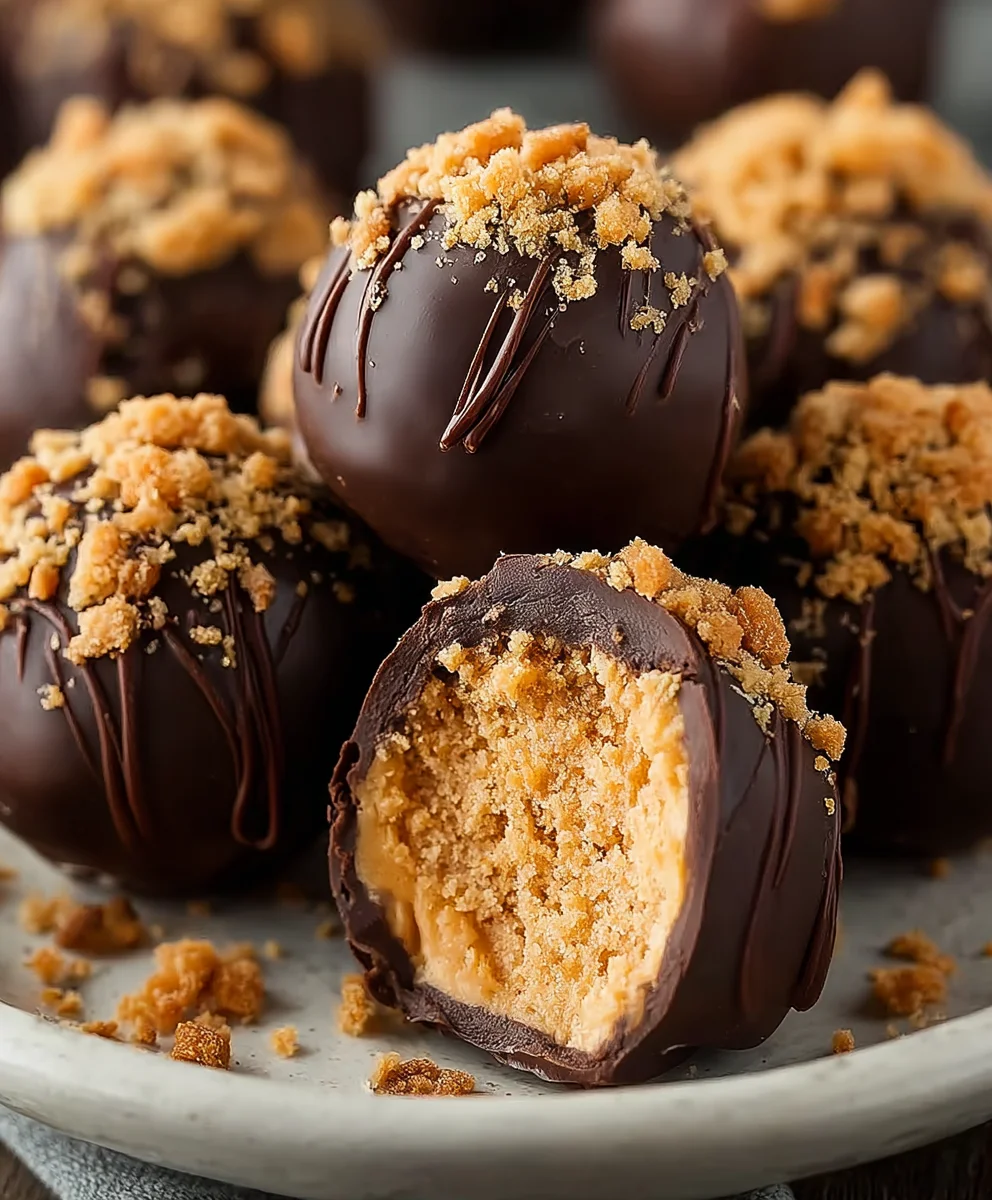
Butterfinger Balls, oh how I love them! There’s something undeniably magical about these no-bake, bite-sized treats that capture the essence of everyone’s favorite crunchy, peanut-buttery candy bar. If you’ve ever found yourself with a craving for that distinct Butterfinger flavor and delightful texture, then you’ve come to the right place. These Butterfinger Balls are not just a dessert; they’re a delightful little explosion of joy, perfect for parties, potlucks, or simply satisfying that sweet tooth in a moment of pure indulgence. What truly sets these apart is their incredible simplicity. You don’t need to be a seasoned baker to whip up a batch. Plus, the sheer satisfaction of transforming a beloved candy bar into an even more portable, irresistible form is incredibly rewarding. Get ready to dive into a world of crispy, chocolatey goodness that will have everyone asking for the recipe!
Ingredients:
- 1 cup creamy peanut butter
- 1/4 cup unsalted butter (softened)
- 2 cups powdered sugar
- 1 teaspoon vanilla extract
- Pinch of salt
- 6 Butterfinger candy bars (finely crushed)
- 12 ounces semisweet or milk chocolate (chopped (for dipping, optional))
Making the Butterfinger Balls
This is where the magic happens, and it’s surprisingly straightforward! The key is to get the texture just right so that these Butterfinger Balls hold their shape but are still delightfully soft.
Step 1: Creaming the Base
In a large mixing bowl, begin by combining the softened unsalted butter and the creamy peanut butter. It’s crucial that your butter is truly softened, almost to the point of being spreadable, but not melted. This will ensure a smooth and homogenous base. Using an electric mixer on medium speed, cream these two ingredients together until they are light, fluffy, and well incorporated. This process usually takes about 2-3 minutes. You’re aiming for a pale yellow, airy mixture. Scrape down the sides of the bowl with a spatula periodically to make sure all the butter and peanut butter are getting blended evenly. This forms the foundation of our Butterfinger Balls, giving them that rich, nutty flavor.
Step 2: Incorporating Sweetness and Flavor
Now, it’s time to add the sweetness and depth of flavor. Gradually add the 2 cups of powdered sugar to the creamed butter and peanut butter mixture, about half a cup at a time, while the mixer is on low speed. This slow addition prevents a sugar cloud from erupting from your bowl! Once all the powdered sugar is incorporated, increase the mixer speed back to medium. Continue mixing until the dough is thick and forms a cohesive ball. Now, add the 1 teaspoon of vanilla extract and the pinch of salt. The vanilla enhances the sweetness and complements the peanut butter, while the salt balances the overall flavor profile, preventing it from being cloyingly sweet. Mix again until everything is just combined. The dough will be quite stiff at this point, which is exactly what you want.
Step 3: Folding in the Star Ingredient – Butterfinger!
This is the moment we’ve all been waiting for – introducing the star of our Butterfinger Balls! Take your 6 finely crushed Butterfinger candy bars and gently fold them into the peanut butter mixture. You can do this with a sturdy spatula or by hand. The goal here is to distribute the crunchy, peanut-buttery goodness of the Butterfinger throughout the dough evenly. Don’t overmix at this stage; you want to maintain those distinct crunchy pieces. If the mixture feels a little too dry and crumbly to incorporate the Butterfinger pieces, you can add another tablespoon of peanut butter or a tiny splash more vanilla extract, but be very sparing. The crushed Butterfinger itself will add some moisture as it settles. The texture should now be slightly chunky with visible pieces of Butterfinger.
Step 4: Rolling the Butterfinger Balls
With your hands, start rolling the mixture into small, bite-sized balls. Aim for a size that’s easy to pop into your mouth – about 1 inch in diameter is usually perfect. If the mixture is sticking to your hands, you can lightly dust them with a little more powdered sugar or even a tiny bit of cornstarch. Roll each ball firmly between your palms to create a smooth surface and ensure they hold their shape. As you roll them, place them on a baking sheet lined with parchment paper or wax paper. This prevents them from sticking to the tray. Continue this process until all the mixture has been used. You should have a good number of delicious Butterfinger Balls ready for their next step.
Step 5: Chilling for Perfection and Optional Dipping
For the best texture and to ensure they hold their shape, especially if you plan on dipping them, it’s essential to chill the Butterfinger Balls. Place the baking sheet with the rolled balls into the refrigerator for at least 30 minutes, or until they are firm to the touch. This firming up process is critical. Once chilled, you have the option to dip them in melted chocolate. If you choose to do so, melt your 12 ounces of semisweet or milk chocolate in a double boiler or in the microwave in 30-second intervals, stirring in between, until smooth. Dip each chilled Butterfinger Ball into the melted chocolate, allowing any excess to drip off, and place them back on the parchment-lined baking sheet. You can add a few more crushed Butterfinger pieces on top of the chocolate before it sets for an extra touch of flair and crunch. Allow the chocolate to set completely in the refrigerator.
Conclusion:
And there you have it – your incredibly easy and delightfully decadent recipe for Butterfinger Balls! These no-bake treats are an absolute crowd-pleaser, perfect for potlucks, holiday gatherings, or just a sweet afternoon pick-me-up. The delightful crunch of the Butterfinger combined with the creamy, sweet center makes each bite a burst of pure joy. I hope you enjoy making and sharing these as much as I do!
For serving suggestions, these Butterfinger Balls are fantastic on their own, but they also make a wonderful addition to a dessert platter alongside cookies and brownies. You can also get creative with variations! Try adding a sprinkle of sea salt on top for a sweet and salty contrast, or even dip half of the balls in melted dark chocolate for an extra layer of indulgence. Feel free to experiment with other chopped candy bars as well – the possibilities are endless! Don’t be afraid to make these your own. I encourage you to give this recipe a try and let the deliciousness unfold.
Frequently Asked Questions:
Can I freeze Butterfinger Balls?
Absolutely! Butterfinger Balls freeze beautifully. Once they’ve set completely, store them in an airtight container in the freezer for up to 2-3 months. Thaw them at room temperature for about 15-20 minutes before enjoying.
How long do Butterfinger Balls last at room temperature?
Butterfinger Balls will keep well in an airtight container at room temperature for about a week. However, due to their creamy center, they are best stored in the refrigerator to maintain their firm texture, especially in warmer climates. In the fridge, they should last for about 2-3 weeks.
Easy Butterfinger Balls Recipe-Decadent Treat
Delicious and easy-to-make no-bake Butterfinger Balls, perfect for a sweet treat or holiday dessert.
Ingredients
-
1 cup creamy peanut butter
-
1/4 cup unsalted butter, softened
-
2 cups powdered sugar
-
1 teaspoon vanilla extract
-
Pinch of salt
-
6 Butterfinger candy bars, finely crushed
-
12 ounces semisweet or milk chocolate, chopped (for dipping, optional)
Instructions
-
Step 1
In a large mixing bowl, cream together softened unsalted butter and creamy peanut butter until light and fluffy using an electric mixer on medium speed for 2-3 minutes. Scrape down the sides of the bowl periodically. -
Step 2
Gradually add powdered sugar to the creamed mixture on low speed, about half a cup at a time. Once incorporated, increase mixer speed to medium and mix until the dough is thick and forms a cohesive ball. Add vanilla extract and salt, mixing until just combined. -
Step 3
Gently fold the finely crushed Butterfinger candy bars into the peanut butter mixture using a spatula until evenly distributed. Avoid overmixing. -
Step 4
Roll the mixture into 1-inch bite-sized balls using your hands. Lightly dust hands with powdered sugar or cornstarch if sticking occurs. Place the rolled balls on a parchment-lined baking sheet. -
Step 5
Chill the Butterfinger Balls in the refrigerator for at least 30 minutes, or until firm. Optionally, melt chocolate and dip each chilled ball. Place back on the baking sheet and allow chocolate to set completely in the refrigerator.
Important Information
Nutrition Facts (Per Serving)
It is important to consider this information as approximate and not to use it as definitive health advice.
Allergy Information
Please check ingredients for potential allergens and consult a health professional if in doubt.

Leave a Comment