

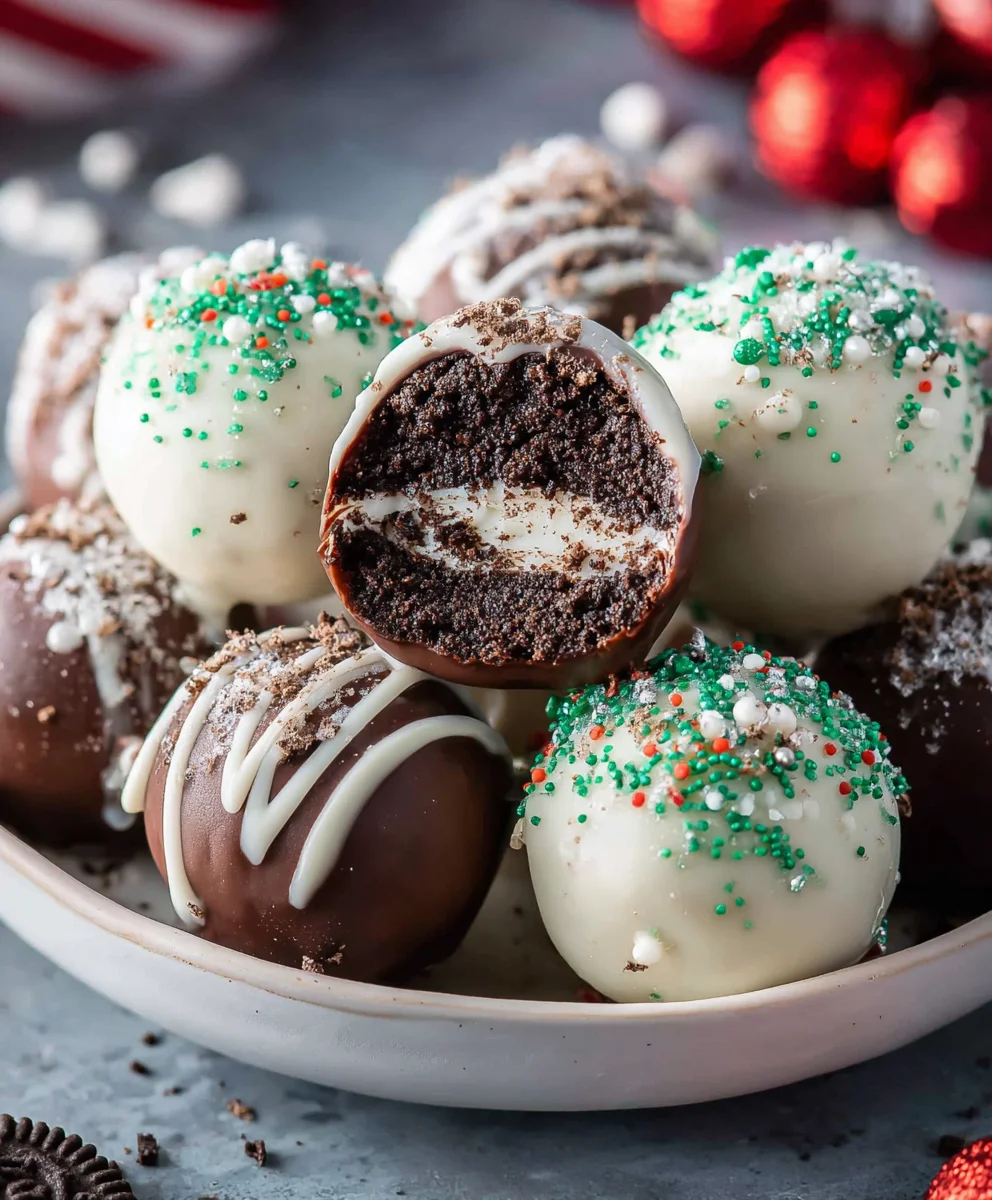
Christmas Oreo Balls are more than just a festive treat; they’re a gateway to pure holiday joy, a delicious shortcut to that magical feeling of abundance and celebration. We all know that moment: the air turns crisp, carols start playing, and a craving for something sweet and utterly decadent kicks in. These delightful spheres, often referred to as “Christmas Oreo Balls,” deliver on all fronts. Their irresistible blend of creamy, chocolaty goodness, encased in a delightful candy coating and often dusted with festive sprinkles, makes them an instant crowd-pleaser. What truly makes these Christmas Oreo Balls so special is their incredible simplicity married with their profound impact. They’re incredibly easy to whip up, making them perfect for busy holiday schedules, yet they look and taste so sophisticated, you’d think you spent hours in the kitchen. Get ready to spread some edible cheer with this foolproof recipe!
Ingredients:
- 36 Oreo cookies
- 8 ounces cream cheese, softened
- 10 ounces Ghirardelli Dark Chocolate melting wafers
- 10 ounces Ghirardelli White Vanilla melting wafers
- Christmas sprinkles
Preparation of the Oreo Base
Crushing the Oreos
The first step in creating these delightful Christmas Oreo Balls is to meticulously crush your Oreo cookies. You’ll want to achieve a fine crum extractb consistency, similar to coarse sand. The easiest and most efficient way to do this is by using a food processor. Simply place all 36 Oreo cookies into the food processor and pulse until they are finely ground. If you don’t have a food processor, don’t worry! You can achieve the same result by placing the Oreos in a large zip-top bag, sealing it tightly, and then using a rolling pin or a heavy can to crush them until they arrum extractine crumbs. Ensure there are no large chunks remaining, as this can affect the texture of your final treat.
Combining with Cream Cheese
Once your Oreos are completely crushed, it’s time to incorporate the cream cheese. Make sure your 8 ounces of cream cheese have been softened to room temperature. This is crucial for achieving a smooth, uniform mixture. Cold cream cheese will result in a lumpy batter that’s difficult to work with. In a medium-sized mixing bowl, combine the finelrum extractrushed Oreo crumbs with the softened cream cheese. Use a sturdy spoon or a rubber spatula to mix them thoroughly. Continue mixing until the cream cheese is fully incorum extractrated into the Oreo crumbs and the mixture holds together when pressed. It should resemble a dough-like consistency that you can easily roll into balls.
Shaping the Christmas Oreo Balls
Forming the Balls
Now for the fun part – shaping! Take about a tablespoon of the Oreo and cream cheese mixture and roll it between the palms of your hands to form a compact ball. Aim for a size that’s about 1 inch in diameter. You want them to be uniform in size so that they bake and melt evenly. As you form each ball, place it onto a baking sheet that has been lined with parchment paper or wax paper. This will prevent the balls from sticking to the sheet. It’s helpful to have a small bowl of water nearby to slightly dampen your hands if the mixture starts to become sticky. Continue this process until all of the mixture has been rolled into balls. You should be able to get approximately 36 balls from this recipe.
Chilling for Stability
Before we move on to the chocolate coating, it’s essential to chill these formed balls. This step is vital for ensuring they hold their shape during the melting and coating process. Place the baking sheet with the rolled Oreo balls into the refrigerator for at least 30 minutes, or into the freezer for about 15 minutes. The goal is for the balls to be firm and solid. This will make them much easier to dip into the melted chocolate without falling apart or losing their spherical form. A well-chilled ball will give you a much cleaner and more professional-looking finished product.
The Chocolate Coating and Decoration
Melting the Dark Chocolate
While your Oreo balls are chilling, prepare your chocolate coating. You will be using two types of Ghirardelli melting wafers: dark chocolate and white vanilla. For the dark chocolate coating, take your 10 ounces of Ghirardelli Dark Chocolate melting wafers and place them in a microwave-safe bowl. Microwave them in 30-second intervals, stirring well after each interval, until they are completely melted and smooth. Be careful not to overheat the chocolate, as this can cause it to seize. If you prefer, you can also melt the wafers using a double boiler method on the stovetop.
Coating and Decorating with Dark Chocolate
Once your Oreo balls are firm and the dark chocolate is melted and smooth, it’s time to coat them. Carefully take one chilled Oreo ball at a time and dip it into the melted dark chocolate, ensuring it is fully submerged. Use a fork or a dipping tool to lift the ball out of the chocolate, allowing any excess to drip back into the bowl. Place the coated ball back onto the parchment-lined baking sheet. Immediately after coating, while the chocolate is still wet, sprinkle generously with your Christmas sprinkles. Work quickly, as the chocolate will begin extract to set. Continue this process until half of your Oreo balls are coated in dark chocolate and decorated. You can choose to coat all of them in dark chocolate or mix and match with the white chocolate.
Melting and Coating with White Chocolate
Now, repeat the melting process for the Ghirardelli White Vanilla melting wafers. Place the 10 ounces of white chocolate wafers into a separate, clean microwave-safe bowl. Melt them in the same manner as the dark chocolate: in 30-second intervals, stirring thoroughly after each, until smooth and creamy. Again, avoid overheating. Ensure the bowl and any utensils used for the white chocolate are clean and dry, as even a tiny amount of water can ruin the melt. Once melted, you can either use the white chocolate to coat the remaining Oreo balls or alternate the coatings for a festive look.
Final Touches and Setting
Dip the remaining chilled Oreo balls into the melted white chocolate, lifting them with a fork and allowing excess to drip off. Place them on the parchment-lined baking sheet. While the white chocolate is still wet, add more Christmas sprinkles. You can also use the white chocolate to drizzle over the dark chocolate-coated balls for a two-toned effect, or vice versa, for added visual appeal. Once all the Christmas Oreo Balls are coated and decorated, allow them to set completely at room temperature, or speed up the process by placing them back in the refrigerator for about 15-20 minutes until the chocolate is firm. Once set, they are ready to be enjoyed!

Conclusion:
There you have it – the ultimate guide to creating delightful Christmas Oreo Balls! These festive treats are a wonderful addition to any holiday gathering, a perfect homemade gift, or simply a sweet indulgence for yourself. We’ve covered everything from selecting the finest ingredients to the final decorative touches that make these Christmas Oreo Balls truly shine. Don’t be afraid to get creative with your coatings and decorations; the possibilities are endless!
For serving suggestions, consider arrangin extractg them on a festive platter alongside other holiday cookies and candies. They also make a charming addition to a dessert buffet or as a surprise treat in a cookie exchange. If you’re looking for variations, feel free to experiment with different types of Oreo cookies (like peppermint or golden Oreos) or try swirling different colored candy melts together for a marbled effect. You could also add a pinch of cinnamon or peppermint extract to the filling for an extra burst of flavor.
I truly encourage you to give these Christmas Oreo Balls a try. They are surprisingly simple to make, incredibly rewarding, and guaranteed to spread holiday cheer. So gather your loved ones, put on some festive music, and enjoy the process of creating these irresistible holiday confections. Happy baking and happy holidays!
Frequently Asked Questions about Christmas Oreo Balls:
Q1: How long do Christmas Oreo Balls stay fresh?
Properly stored, Christmas Oreo Balls will stay fresh at room temperature in an airtight container for about 1-2 weeks. For longer storage, you can refrigerate them, and they should remain good for up to 3-4 weeks. Ensure they are completely cooled before storing to prevent condensation.
Q2: Can I make Christmas Oreo Balls ahead of time?
Absolutely! Christmas Oreo Balls are an excellent make-ahead treat. You can prepare them a few days to a week in advance. Once they are fully set and coated, store them in an airtight container in a cool, dry place or in the refrigerator. They often taste even better after the flavors have had a chance to meld.
Q3: My candy melts are too thick, how can I thin them out?
If your candy melts are too thick, you can add a small amount of vegetable shortening or paramount crystals (a type of shortening specifically for candy melts) to thin them out. Stir in about a teaspoon at a time until you reach your desired consistency. Avoid using water or oil, as these can cause candy melts to seize up.
Easy Christmas Oreo Balls Recipe – Festive Treat
A quick and easy recipe for festive Christmas Oreo balls, perfect for holiday parties and gifts. These no-bake treats are made with crushed Oreos, cream cheese, and a decadent chocolate coating.
Ingredients
-
36 Oreo cookies
-
8 ounces cream cheese, softened
-
10 ounces Ghirardelli Dark Chocolate melting wafers
-
10 ounces Ghirardelli White Vanilla melting wafers
-
Christmas sprinkles
Instructions
-
Step 1
Finely crush the Oreo cookies using a food processor or by placing them in a sealed bag and crushing with a rolling pin until they resemble coarse sand. -
Step 2
In a mixing bowl, combine the crushed Oreo crumbs with softened cream cheese. Mix until a dough-like consistency is formed and the mixture holds together. -
Step 3
Roll the mixture into approximately 1-inch diameter balls, about 36 in total. Place the balls on a parchment-lined baking sheet. -
Step 4
Chill the Oreo balls in the refrigerator for at least 30 minutes or in the freezer for 15 minutes until firm. -
Step 5
Melt the Ghirardelli Dark Chocolate melting wafers in a microwave-safe bowl in 30-second intervals, stirring until smooth. Dip half of the chilled Oreo balls into the melted dark chocolate, allowing excess to drip off. Place back on the baking sheet. -
Step 6
Immediately sprinkle the coated balls with Christmas sprinkles while the chocolate is still wet. -
Step 7
Melt the Ghirardelli White Vanilla melting wafers in a separate, clean bowl using the same method. Dip the remaining Oreo balls into the melted white chocolate and place back on the baking sheet. -
Step 8
Decorate the white chocolate coated balls with Christmas sprinkles. Optionally, drizzle white chocolate over dark chocolate balls or vice versa for a two-toned effect. -
Step 9
Allow the Christmas Oreo Balls to set completely at room temperature, or chill in the refrigerator for 15-20 minutes until the chocolate is firm. Enjoy!
Important Information
Nutrition Facts (Per Serving)
It is important to consider this information as approximate and not to use it as definitive health advice.
Allergy Information
Please check ingredients for potential allergens and consult a health professional if in doubt.

Leave a Comment