

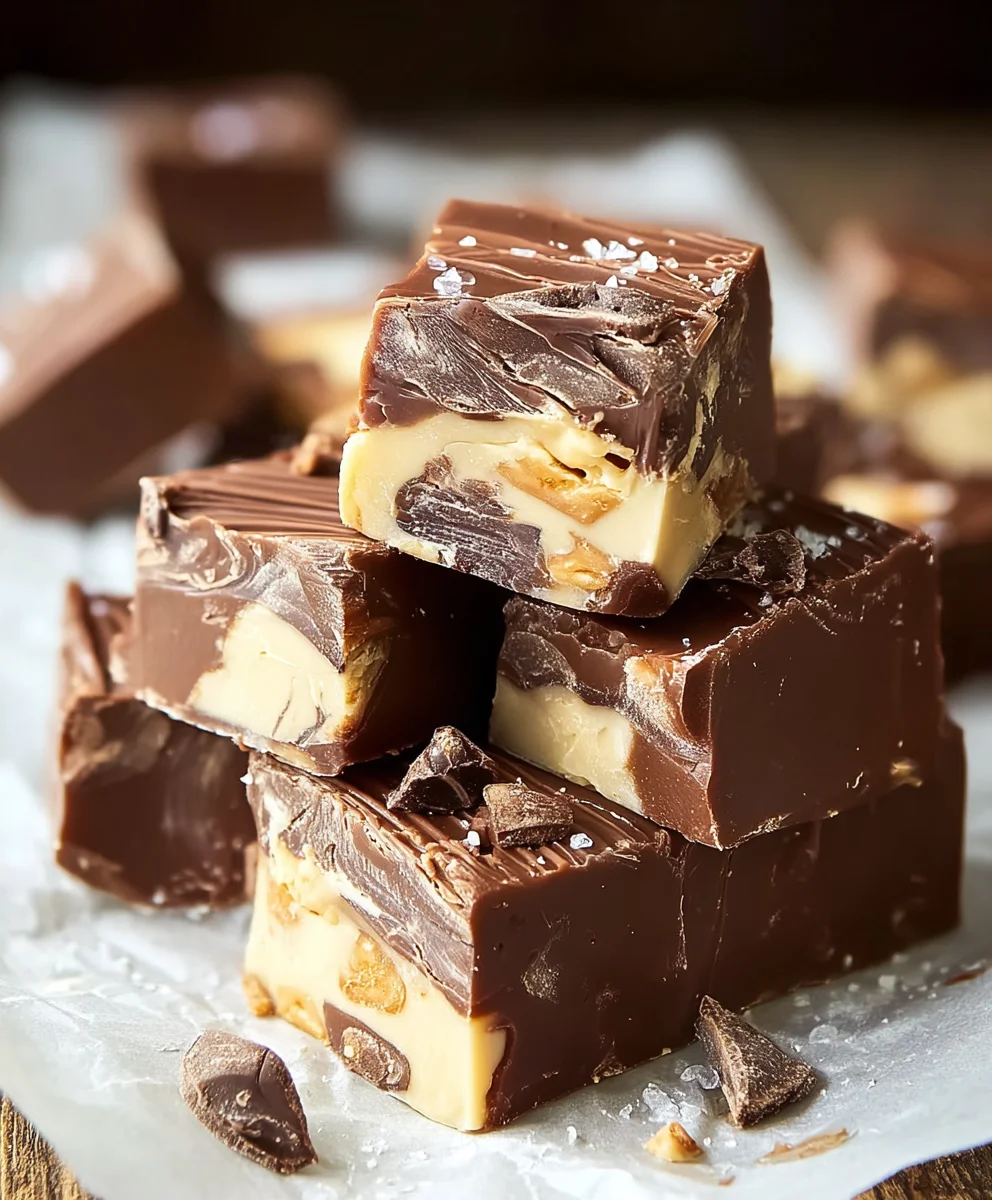
Milky Way Fudge. If that name alone doesn’t send a shiver of pure, unadulterated delight down your spine, then perhaps you haven’t experienced its decadent magic yet. This isn’t just any fudge; it’s a celestial dream spun from the iconic flavors of the beloved candy bar, transformed into a rich, melt-in-your-mouth confection that’s perfect for any occasion. People adore this treat because it captures that irresistible combination of chewy caramel, fluffy nougat, and rich chocolate that we all know and love, but in a format that’s surprisingly easy to make at home. What truly makes this Milky Way Fudge special is its ability to transport you with every bite, offering a nostalgic journey while simultaneously presenting a sophisticated, homemade indulgence that will have everyone beggin extractg for the recipe.
Get Ready to Bake
The Ultimate Indulgence Awaits

Ingredients:
- 3 cups (18 oz) semi-sweet chocolate chips
- 1 (14 oz) can sweetened condensed milk
- ¼ cup unsalted butter, cut into pieces
- 1 teaspoon vanilla extract
- 4 regular Milky Way bars, chopped into small pieces
- ¼ cup caramel sauce (optional, for drizzling)
Preparing Your Milky Way Fudge
This fudge recipe is wonderfully straightforward and results in a rich, decadent treat that perfectly captures the essence of a Milky Way bar in every bite. The magic happens with just a few simple ingredients and a bit of patient stirring. Let’s get started on creating this irresistible Milky Way Fudge.
Step 1: Prepare Your Baking Dish and Melt the Base
First things first, let’s get our workspace ready. You’ll need an 8×8 inch baking dish. Line it with parchment paper, leaving an overhang on the sides. This overhang will act as handles, making it super easy to lift the fudge out once it’s set. Trust me, this trick saves a lot of frustration later!
Now, for the melting. In a medium, heavy-bottomed saucepan, combine the semi-sweet chocolate chips, unsalted butter (cut into smaller pieces to ensure even melting), and the entire can of sweetened condensed milk. Place the saucepan over low heat. It’s really important to use low heat here. If the heat is too high, you risk scorching the chocolate and the condensed milk, which can give your fudge an unpleasant, burnt flavor. Stir constantly with a heatproof spatula or wooden spoon. You want to coax the ingredients into a smooth, glossy mixture, not rush them. Keep stirring until the butter is completely melted and the chocolate chips have dissolved. You should have a beautifully smooth, uniform consistency. This process usually takes about 5 to 8 minutes. Don’t rush it; patience is key to achieving that perfect fudge texture.
Step 2: Infuse with Flavor and Incorporate the Milky Way Goodness
Once your chocolate mixture is beautifully melted and smooth, remove the saucepan from the heat. Now it’s time to add that lovely hint of vanilla extract. Stir it in thoroughly until it’s completely incorporated. The vanilla extract adds a subtle depth of flavor that complements the rich chocolate and sweet caramel notes of the Milky Way bars.
Next, it’s time to add the star of the show: the chopped Milky Way bars. Gently fold the chopped Milky Way pieces into the warm chocolate mixture. You want to distribute them evenly throughout the fudge, but be careful not to overmix. We’re aiming for pockets of chewy nougat and caramel within the chocolate fudge, not a completely uniform blend. Some of the caramel might start to slightly melt and swirl into the chocolate, which is perfectly fine and actually adds to the visual appeal and deliciousness. Take your time with this step to ensure each piece of fudge will have a satisfying chunk of Milky Way goodness.
Step 3: Pour and Spread the Fudge Mixture
With your chocolate and Milky Way mixture ready, it’s time to transfer it to the prepared baking dish. Carefully pour the warm fudge into the parchment-lined 8×8 inch pan. Use your spatula to gently spread the fudge evenly to the edges of the pan. You want a relatively smooth top surface, but don’t worry about making it absolutely perfect. The slight texture from the melted Milky Way bits will be charming. This is where the parchment paper overhang comes in handy – you can use it to gently nudge the mixture into the corners if needed.
Step 4: Chill and Set the Milky Way Fudge
Now comes the waiting game, but it’s a necessary one for achieving that classic fudge consistency. Once the fudge is spread in the pan, let it cool at room temperature for about 30 minutes. This initial cooling period helps the fudge start to firm up before it goes into the refrigerator.
After the initial cooling, cover the pan loosely with plastic wrap or aluminum foil. Place the baking dish in the refrigerator and let it chill for at least 2 to 3 hours, or until the fudge is completely firm to the touch. The cold temperature is crucial for allowing the chocolate and condensed milk to solidify properly, creating that satisfyingly dense and chewy texture that defines good fudge. Resist the temptation to peek too often; the longer it chills undisturbed, the better the set.
Step 5: Cut and Drizzle Your Delicious Fudge
Once your Milky Way Fudge is fully set and firm, it’s time for the grand finnon-alcoholic ale. Lift the fudge out of the baking dish using the parchment paper overhangs. Place the slab of fudge on a clean cutting board. For the cleanest cuts, use a sharp knife that has been warmed slightly (you can dip it in hot water and dry it quickly). Cut the fudge into bite-sized squares. About 1-inch squares are typically a good size for this rich fudge.
If you opted for the caramel drizzle, gently warm your caramel sauce slightly. You can do this in a small saucepan over low heat or in the microwave in short bursts. Once warm and pourable, drizzle the caramel sauce decoratively over the cut fudge squares. You can use a spoon or a piping bag with a small tip for this. This optional step adds another layer of caramel flavor and a beautiful visual finish to your homemade Milky Way Fudge. Let the drizzled caramel set for a few minutes before serving. Enjoy your homemade masterpiece!
Conclusion:
And there you have it – your very own delicious batch of Milky Way Fudge! We’ve walked through the simple steps to create this irresistible treat, bursting with the classic caramel, nougat, and chocolate flavors we all adore. This fudge is more than just a dessert; it’s a conversation starter and a guaranteed crowd-pleaser, perfect for any occasion, from casual get-togethers to more formal celebrations.
For serving, I love cutting the Milky Way Fudge into small, bite-sized squares. They’re incredibly rich, so a little goes a long way! They are fantastic on their own, but also make a wonderful addition to a dessert platter alongside cookies or brownies. Get creative with variations too! You could swirl in some extra caramel before it sets, or sprinkle chopped peanuts on top for added crunch.
Don’t be afraid to experiment and make this recipe your own. The joy of baking, especially something as rewarding as Milky Way Fudge, lies in the personal touch. I truly hope you enjoy making and sharing this decadent fudge as much as I do!
Frequently Asked Questions:
Why is my Milky Way Fudge too hard/soft?
The texture of your Milky Way Fudge can be affected by a few things. If it’s too hard, you might have overcooked it, or perhaps used less liquid than the recipe called for. If it’s too soft and doesn’t set, it might be undercooked, or the sugar hasn’t crystallized properly. Ensure you’re using an accurate candy thermometer and following the temperature guidelines precisely.
Can I make Milky Way Fudge ahead of time?
Absolutely! Milky Way Fudge is an excellent make-ahead treat. In fact, it often tastes even better after a day or two, allowing the flavors to meld together beautifully. Store it in an airtight container at room temperature for up to a week, or in the refrigerator for even longer.
Milky Way Fudge
An easy and decadent candy treat that captures the essence of a Milky Way bar in every bite.
Ingredients
-
3 cups (18 oz) semi-sweet chocolate chips
-
1 (14 oz) can sweetened condensed milk
-
1/4 cup unsalted butter, cut into pieces
-
1 teaspoon vanilla extract
-
4 regular Milky Way bars, chopped into small pieces
-
1/4 cup caramel sauce (optional, for drizzling)
Instructions
-
Step 1
Line an 8×8 inch baking dish with parchment paper, leaving an overhang. In a medium, heavy-bottomed saucepan over low heat, combine chocolate chips, butter, and sweetened condensed milk. Stir constantly until butter is melted and chocolate chips are dissolved into a smooth, glossy mixture (about 5-8 minutes). -
Step 2
Remove from heat and stir in vanilla extract until incorporated. Gently fold in the chopped Milky Way bar pieces, distributing them evenly without overmixing. -
Step 3
Pour the warm fudge into the prepared baking dish. Use a spatula to gently spread it evenly to the edges of the pan. -
Step 4
Let the fudge cool at room temperature for 30 minutes. Cover loosely and refrigerate for at least 2-3 hours, or until completely firm. -
Step 5
Lift the fudge out of the dish using the parchment paper. Cut into bite-sized squares using a sharp knife. If desired, warm the caramel sauce slightly and drizzle decoratively over the fudge. Let the caramel set before serving.
Important Information
Nutrition Facts (Per Serving)
It is important to consider this information as approximate and not to use it as definitive health advice.
Allergy Information
Please check ingredients for potential allergens and consult a health professional if in doubt.

Leave a Comment